Product Manual
Page 2
... INSTRUCTIONS 5 Guide to the Speed Oven 16 Control panel ...17 Mode selector ...18 Display ...18 Symbols in the display 18 Rotary selector...19 Sensor buttons...20 Features ...22 Model numbers ...22 Data plate ...22 Items included...22 Standard and optional accessories 22 Glass Tray ...23 Wire rack with non-tip safety notches 23 Speed Oven controls 25 Safety features ...25 System lock for the oven 25 Safety cut-out 25 Cooling fan...
... INSTRUCTIONS 5 Guide to the Speed Oven 16 Control panel ...17 Mode selector ...18 Display ...18 Symbols in the display 18 Rotary selector...19 Sensor buttons...20 Features ...22 Model numbers ...22 Data plate ...22 Items included...22 Standard and optional accessories 22 Glass Tray ...23 Wire rack with non-tip safety notches 23 Speed Oven controls 25 Safety features ...25 System lock for the oven 25 Safety cut-out 25 Cooling fan...
Product Manual
Page 6
..., on any part of interest to the user. the door is warped, - Caution: Do not store items of the oven. are loose, 6 Do not use the oven. As with national and local safety regulations and the provided installation instructions. Contact Miele's Technical Service Department for externally visible damage. Repairs and other work should not be performed by a Miele authorized service technician in accordance...
..., on any part of interest to the user. the door is warped, - Caution: Do not store items of the oven. are loose, 6 Do not use the oven. As with national and local safety regulations and the provided installation instructions. Contact Miele's Technical Service Department for externally visible damage. Repairs and other work should not be performed by a Miele authorized service technician in accordance...
Product Manual
Page 8
... use Danger of the oven such as the door glass, vents, and the control panel can become hot enough to function correctly, it requires an adequate supply of cool air. Proper use . insulation in the hot Speed Oven. Caution: Heating elements may be hot even though they have had sufficient time to the oven, cabinetry and flooring. Do not close the door while the oven...
... use Danger of the oven such as the door glass, vents, and the control panel can become hot enough to function correctly, it requires an adequate supply of cool air. Proper use . insulation in the hot Speed Oven. Caution: Heating elements may be hot even though they have had sufficient time to the oven, cabinetry and flooring. Do not close the door while the oven...
Product Manual
Page 10
... or plastic or paper covered wire ties. IMPORTANT SAFETY INSTRUCTIONS To avoid fueling any containers or cutlery made from the power. Do not open the Speed Oven door if smoke occurs inside the appliance. Interrupt the process by turning the appliance off and disconnecting it to heat the room. Using Microwave or Microwave combination modes with Broil for prebaked products such as flowers, herbs...
... or plastic or paper covered wire ties. IMPORTANT SAFETY INSTRUCTIONS To avoid fueling any containers or cutlery made from the power. Do not open the Speed Oven door if smoke occurs inside the appliance. Interrupt the process by turning the appliance off and disconnecting it to heat the room. Using Microwave or Microwave combination modes with Broil for prebaked products such as flowers, herbs...
Product Manual
Page 11
... control panel, the countertop or the cabinetry can , in disposable containers made of steam produced from the food. Once food is empty or incorrectly loaded. Only use a lower power for microwave use . Do not leave the microwave oven unattended when reheating or cooking food in turn the Speed Oven off. For this reason please do not turn , cause the outer paper covering to...
... control panel, the countertop or the cabinetry can , in disposable containers made of steam produced from the food. Once food is empty or incorrectly loaded. Only use a lower power for microwave use . Do not leave the microwave oven unattended when reheating or cooking food in turn the Speed Oven off. For this reason please do not turn , cause the outer paper covering to...
Product Manual
Page 12
... recommended to cover all cooked food that the container will normally be cooler. This will build up of 17.5 lbs (8 kg). When using Convection Bake do not place heavy objects on or lean against an open door, and do not line the floor of the food. The dish is only warmed by the heat of the Speed Oven with...
... recommended to cover all cooked food that the container will normally be cooler. This will build up of 17.5 lbs (8 kg). When using Convection Bake do not place heavy objects on or lean against an open door, and do not line the floor of the food. The dish is only warmed by the heat of the Speed Oven with...
Product Manual
Page 14
... circuit. Only clean parts listed in contact with the heating element. Make certain that the power cords of the food. Do not use a steam cleaner to break. Cleaning and care Do not use abrasive cleaners, hard sponges, brushes or sharp metal tools to heat up heating pads filled with grains, gel, etc. Do not use the oven to clean the door glass. 14 Only use a thermometer specifically approved for cooking...
... circuit. Only clean parts listed in contact with the heating element. Make certain that the power cords of the food. Do not use a steam cleaner to break. Cleaning and care Do not use abrasive cleaners, hard sponges, brushes or sharp metal tools to heat up heating pads filled with grains, gel, etc. Do not use the oven to clean the door glass. 14 Only use a thermometer specifically approved for cooking...

Product Manual
Page 18
... PreHeat Convection Bake Convection Broil Auto Roast Gentle Bake Display The display shows the time of day System lock Any Oven mode A function can be set or changed if the mode selector is in the display Depending on the position of the mode selector and/or which button is pressed, the following symbols will appear: Symbol / Function Timer Temperature indicator Temperature Microwave power...
... PreHeat Convection Bake Convection Broil Auto Roast Gentle Bake Display The display shows the time of day System lock Any Oven mode A function can be set or changed if the mode selector is in the display Depending on the position of the mode selector and/or which button is pressed, the following symbols will appear: Symbol / Function Timer Temperature indicator Temperature Microwave power...
Product Manual
Page 25
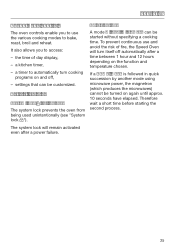
... by another mode using microwave power, the magnetron (which produces the microwaves) cannot be turned on again until approx. 10 seconds have elapsed. It also allows you to use and avoid the risk of day display, - a kitchen timer, - a timer to access: - Therefore wait a short time before starting the second process. 25 To prevent continuous use the various cooking modes to bake, roast, broil and reheat. Features Speed Oven controls The oven controls enable...
... by another mode using microwave power, the magnetron (which produces the microwaves) cannot be turned on again until approx. 10 seconds have elapsed. It also allows you to use and avoid the risk of day display, - a kitchen timer, - a timer to access: - Therefore wait a short time before starting the second process. 25 To prevent continuous use the various cooking modes to bake, roast, broil and reheat. Features Speed Oven controls The oven controls enable...

Product Manual
Page 26
... the instructions in the oven, on the control panel or on automatically when a cooking program is a smooth, non-stick surface that cleans easily with cool room air before venting it out into the kitchen through vents located between the appliance door and the control panel. The oven compartment and the rack have a PerfectClean finish. 26 Food and soiling from baking and roasting can be easily removed from the oven cavity...
... the instructions in the oven, on the control panel or on automatically when a cooking program is a smooth, non-stick surface that cleans easily with cool room air before venting it out into the kitchen through vents located between the appliance door and the control panel. The oven compartment and the rack have a PerfectClean finish. 26 Food and soiling from baking and roasting can be easily removed from the oven cavity...
Product Manual
Page 52
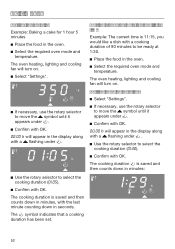
...;. Use the rotary selector to be ready at 1:30. Place the food in the oven. Select the required oven mode and temperature. Set the cooking duration: Select "Settings". If necessary, use the rotary selector to select the cooking duration Confirm with OK. The symbol indicates that a cooking duration has been set. The oven heating, lighting and cooling fan will turn on .
...;. Use the rotary selector to be ready at 1:30. Place the food in the oven. Select the required oven mode and temperature. Set the cooking duration: Select "Settings". If necessary, use the rotary selector to select the cooking duration Confirm with OK. The symbol indicates that a cooking duration has been set. The oven heating, lighting and cooling fan will turn on .

Product Manual
Page 53
... entering a new duration. 53 As soon as the start time (1:30 pm 1:30 = 12:00) has been reached, the oven heating, lighting and cooling fan will continue to run, and - the oven heating and lighting will turn off, - The oven heating, lighting and cooling fan will turn off. a buzzer will appear in the display (current time of day + cooking duration Use the rotary selector to enter the finish...
... entering a new duration. 53 As soon as the start time (1:30 pm 1:30 = 12:00) has been reached, the oven heating, lighting and cooling fan will continue to run, and - the oven heating and lighting will turn off, - The oven heating, lighting and cooling fan will turn off. a buzzer will appear in the display (current time of day + cooking duration Use the rotary selector to enter the finish...
Product Manual
Page 58
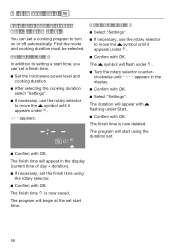
... the display. Confirm with OK. Select "Settings". The symbol will appear with flashing under Start. Confirm with OK. The finish time is now deleted. Microwave (Solo) Turning a cooking program On / Off automatically You can set a finish time. Set the microwave power level and cooking duration. After selecting the cooking duration select "Settings". If necessary, use the...
... the display. Confirm with OK. Select "Settings". The symbol will appear with flashing under Start. Confirm with OK. The finish time is now deleted. Microwave (Solo) Turning a cooking program On / Off automatically You can set a finish time. Set the microwave power level and cooking duration. After selecting the cooking duration select "Settings". If necessary, use the...
Product Manual
Page 59
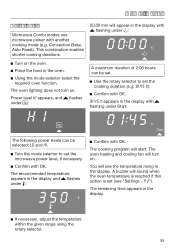
... food in the display with flashing under Start: h Start Confirm with OK h appears in the oven. Using the mode selector select the required oven function. You will start. Convection Bake, Auto Roast). The recommended temperature appears in the display with another cooking mode (e.g. Combi Modes Quick Guide Microwave Combi modes use microwave power with flashing under : F If necessary, adjust the temperature within the given range using the rotary selector...
... food in the display with flashing under Start: h Start Confirm with OK h appears in the oven. Using the mode selector select the required oven function. You will start. Convection Bake, Auto Roast). The recommended temperature appears in the display with another cooking mode (e.g. Combi Modes Quick Guide Microwave Combi modes use microwave power with flashing under : F If necessary, adjust the temperature within the given range using the rotary selector...
Product Manual
Page 88
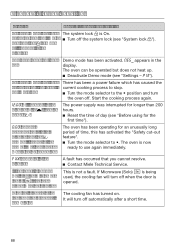
... heat up . Deactivate Demo mode (see "System lock "). Start the cooking process again. The oven has been operating for the first time"). This is On. not working. Turn the mode selector to the • position and turn off when the door is opened while using for an unusually long period of Turn off the system lock (see "Settings An oven mode has been There has been a power...
... heat up . Deactivate Demo mode (see "System lock "). Start the cooking process again. The oven has been operating for the first time"). This is On. not working. Turn the mode selector to the • position and turn off when the door is opened while using for an unusually long period of Turn off the system lock (see "Settings An oven mode has been There has been a power...
Product Manual
Page 89
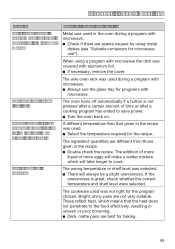
... uneven. The addition of time or after a cooking program has ended to cook. The browning is operating in the recipe was used was used in the recipe. Double check the recipe. The cookware used . Select the temperature required for baking. 89 Baked goods are best for the recipe. The oven turns off . The wrong temperature or shelf level was covered with microwave. If the unevenness...
... uneven. The addition of time or after a cooking program has ended to cook. The browning is operating in the recipe was used was used in the recipe. Double check the recipe. The cookware used . Select the temperature required for baking. 89 Baked goods are best for the recipe. The oven turns off . The wrong temperature or shelf level was covered with microwave. If the unevenness...
Product Manual
Page 91
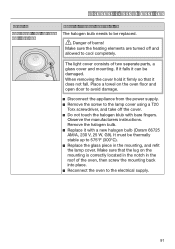
... in the mounting, and refit the lamp cover. Make sure the heating elements are turned off the cover. Do not touch the halogen blub with a new halogen bulb (Osram 66725 AM/A, 230 V, 25 W, G9). Frequently asked questions Problem The oven lighting does not turn on the oven floor and open door to avoid damage. Disconnect the appliance from the power supply. Remove the...
... in the mounting, and refit the lamp cover. Make sure the heating elements are turned off the cover. Do not touch the halogen blub with a new halogen bulb (Osram 66725 AM/A, 230 V, 25 W, G9). Frequently asked questions Problem The oven lighting does not turn on the oven floor and open door to avoid damage. Disconnect the appliance from the power supply. Remove the...

Product Manual
Page 94
... "Settings SAVE THESE INSTRUCTIONS FOR THE ELECTRICAL INSPECTOR'S USE. Consult an electrician if in accordance with all local codes and ordinances. Only operate the appliance after it has been installed into an appropriate outlet that the voltage and frequency listed on the data plate correspond with the consumer. 94 Work by either removing the fuse, shutting off the power main or manually "tripping" the circuit breaker. The plug...
... "Settings SAVE THESE INSTRUCTIONS FOR THE ELECTRICAL INSPECTOR'S USE. Consult an electrician if in accordance with all local codes and ordinances. Only operate the appliance after it has been installed into an appropriate outlet that the voltage and frequency listed on the data plate correspond with the consumer. 94 Work by either removing the fuse, shutting off the power main or manually "tripping" the circuit breaker. The plug...
Product Manual
Page 95
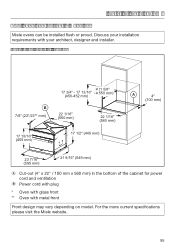
Installation diagrams Appliance and cut-out dimensions Miele ovens can be installed flush or proud. Discuss your architect, designer and installer. Installation into a tall cabinet B 7/8" (22*/23** mm) 17 15/16" (455 mm) 21 5/8" 17 3/4" - 17 13/16" ...) Cut-out (4" x 22" / 100 mm x 560 mm) in the bottom of the cabinet for power cord and ventilation Power cord with plug * Oven with glass front ** Oven with your installation requirements with metal front Front design may vary depending on model. For the more current specifications please visit the Miele website. 95
Installation diagrams Appliance and cut-out dimensions Miele ovens can be installed flush or proud. Discuss your architect, designer and installer. Installation into a tall cabinet B 7/8" (22*/23** mm) 17 15/16" (455 mm) 21 5/8" 17 3/4" - 17 13/16" ...) Cut-out (4" x 22" / 100 mm x 560 mm) in the bottom of the cabinet for power cord and ventilation Power cord with plug * Oven with glass front ** Oven with your installation requirements with metal front Front design may vary depending on model. For the more current specifications please visit the Miele website. 95
Product Manual
Page 96
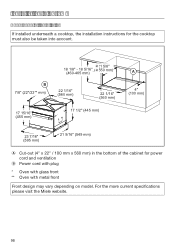
For the more current specifications please visit the Miele website. 96 Installation diagrams Undercounter installation If installed underneath a cooktop, the installation instructions for power cord and ventilation Power cord with plug * Oven with glass front ** Oven with metal front Front design may vary depending on model. B 7/8" (22*/23** mm) 17 15/16" (455 mm) 21 5/8" 18 1/8" - 18...17 1/2" (445 mm) A 4" (100 mm) 23 7/16" (595 mm) 21 9/16" (549 mm) Cut-out (4" x 22" / 100 mm x 560 mm) in the bottom of the cabinet for the cooktop must also be taken into account.
For the more current specifications please visit the Miele website. 96 Installation diagrams Undercounter installation If installed underneath a cooktop, the installation instructions for power cord and ventilation Power cord with plug * Oven with glass front ** Oven with metal front Front design may vary depending on model. B 7/8" (22*/23** mm) 17 15/16" (455 mm) 21 5/8" 18 1/8" - 18...17 1/2" (445 mm) A 4" (100 mm) 23 7/16" (595 mm) 21 9/16" (549 mm) Cut-out (4" x 22" / 100 mm x 560 mm) in the bottom of the cabinet for the cooktop must also be taken into account.


