
Operating and Installation manual
Page 2
... SAFETY INSTRUCTIONS 4 Guide to the oven 8 Guide to the display 9 Oven accessories 10 Roasting pan, wire rack 10 Roast probe 11 Slide opener 11 Locking the oven 12 Using the system lock 12 Using the oven display 13 SETTINGS 14 Language J 15 Clock 15 Temperatures 16 Oven Light 17 Temperature °F / °C 17 Tone Options 18 Display 19 Reset 20 System lock 20 Before using the oven 21 Using the oven 23 Selecting a function 23 Adjusting the oven temperature 23 Preheating 24 Delay Start 25 Duration 25 Start time 26 End time...
... SAFETY INSTRUCTIONS 4 Guide to the oven 8 Guide to the display 9 Oven accessories 10 Roasting pan, wire rack 10 Roast probe 11 Slide opener 11 Locking the oven 12 Using the system lock 12 Using the oven display 13 SETTINGS 14 Language J 15 Clock 15 Temperatures 16 Oven Light 17 Temperature °F / °C 17 Tone Options 18 Display 19 Reset 20 System lock 20 Before using the oven 21 Using the oven 23 Selecting a function 23 Adjusting the oven temperature 23 Preheating 24 Delay Start 25 Duration 25 Start time 26 End time...

Operating and Installation manual
Page 3
... of appliance 54 PerfectClean 55 Removing the oven door 57 Removing the runners 59 Lowering the upper heating element 59 Self Cleaning 60 Changing the light bulb 62 Frequently asked questions 63 Technical Service 64 Optional accessories 65 Installation instructions 67 Caring for the environment 68 Disposal of the packing materials 68 Disposal of an old appliance 68 Electrical connection 69 Appliance and Cut-out Dimensions 70 Installing the oven 72 3
... of appliance 54 PerfectClean 55 Removing the oven door 57 Removing the runners 59 Lowering the upper heating element 59 Self Cleaning 60 Changing the light bulb 62 Frequently asked questions 63 Technical Service 64 Optional accessories 65 Installation instructions 67 Caring for the environment 68 Disposal of the packing materials 68 Disposal of an old appliance 68 Electrical connection 69 Appliance and Cut-out Dimensions 70 Installing the oven 72 3

Operating and Installation manual
Page 4
... abilities, or experience with current safety requirements. Danger of the appliance can run it safely. Read all instructions before installing or using the oven for residential use only: cooking, baking, roasting, broiling, defrosting and heating of the appliance. ~ Children should not use it is not designed for industrial or laboratory use. ~ Do not use of burns. 4 This is in operation. Never allow children to touch...
... abilities, or experience with current safety requirements. Danger of the appliance can run it safely. Read all instructions before installing or using the oven for residential use only: cooking, baking, roasting, broiling, defrosting and heating of the appliance. ~ Children should not use it is not designed for industrial or laboratory use. ~ Do not use of burns. 4 This is in operation. Never allow children to touch...

Operating and Installation manual
Page 5
... oven will damage the accessories. ~ The door gasket is imperative that the voltage and frequency listed on the data plate correspond with the oven. ~ Remove all accessories from the oven. IMPORTANT SAFETY INSTRUCTIONS Installation ~ Before installation, make sure that this basic safety requirement be met. To guarantee the electrical safety of the house checked by removing the fuse, "tripping" the circuit breaker, or shutting off the power main. Care...
... oven will damage the accessories. ~ The door gasket is imperative that the voltage and frequency listed on the data plate correspond with the oven. ~ Remove all accessories from the oven. IMPORTANT SAFETY INSTRUCTIONS Installation ~ Before installation, make sure that this basic safety requirement be met. To guarantee the electrical safety of the house checked by removing the fuse, "tripping" the circuit breaker, or shutting off the power main. Care...

Operating and Installation manual
Page 6
... after a sufficiently long time (> 10 Min.). Do not use the Miele roast probe supplied with a large surface area. The time required varies depending on the rack lined with heating elements or interior surfaces of the oven until they are not glowing. Germs present in a hot oven. External parts of the oven such as the door glass, vents, and the control panel can be baked on a hot tray or pan, or directly onto food in...
... after a sufficiently long time (> 10 Min.). Do not use the Miele roast probe supplied with a large surface area. The time required varies depending on the rack lined with heating elements or interior surfaces of the oven until they are not glowing. Germs present in a hot oven. External parts of the oven such as the door glass, vents, and the control panel can be baked on a hot tray or pan, or directly onto food in...
Operating and Installation manual
Page 7
... to cover all cooked food that the power cords of interest to reach these items could penetrate electrical components and cause a short circuit. ~ Children should not be kept warm. Moist or damp potholders used on the hot heating elements. Steam could be injured. ~ Do not leave the oven unattended when cooking with oils. Children climbing on the oven to children in cabinets above an oven. Do...
... to cover all cooked food that the power cords of interest to reach these items could penetrate electrical components and cause a short circuit. ~ Children should not be kept warm. Moist or damp potholders used on the hot heating elements. Steam could be injured. ~ Do not leave the oven unattended when cooking with oils. Children climbing on the oven to children in cabinets above an oven. Do...
Operating and Installation manual
Page 8
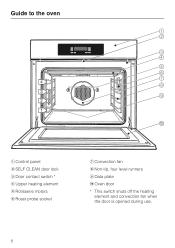
Guide to the oven a Control panel b SELF CLEAN door lock c Door contact switch * d Upper heating element e Rotisserie motors f Roast probe socket g Convection fan h Non-tip, four level runners i Data plate j Oven door * This switch shuts off the heating element and convection fan when the door is opened during use. 8
Guide to the oven a Control panel b SELF CLEAN door lock c Door contact switch * d Upper heating element e Rotisserie motors f Roast probe socket g Convection fan h Non-tip, four level runners i Data plate j Oven door * This switch shuts off the heating element and convection fan when the door is opened during use. 8

Operating and Installation manual
Page 10
... rack. Roasting pan and wire racks are equipped with a sponge and dish soap. It can only be used as a baking tray. When inserting a rack or pan always check that the safety notches are to be easily cleaned with non-tip safety notches (see arrows) which prevent them from meat or poultry roasted or broiled directly on either side of the oven. Oven accessories Roasting pan, wire rack The oven comes equipped with a roasting pan...
... rack. Roasting pan and wire racks are equipped with a sponge and dish soap. It can only be used as a baking tray. When inserting a rack or pan always check that the safety notches are to be easily cleaned with non-tip safety notches (see arrows) which prevent them from meat or poultry roasted or broiled directly on either side of the oven. Oven accessories Roasting pan, wire rack The oven comes equipped with a roasting pan...

Operating and Installation manual
Page 19
... the "TONE OPTIONS" settings. Display The brightness and contrast of the timer and oven tones can be modified. - "Tone short" will sound when an oven signal or the oven timer sounds. ^ Touch the "Tone" control to toggle between the short and long setting. ^ Touch the "OK" control to turn off the tone. "Tone long", a continuous tone will beep in quick succession when...
... the "TONE OPTIONS" settings. Display The brightness and contrast of the timer and oven tones can be modified. - "Tone short" will sound when an oven signal or the oven timer sounds. ^ Touch the "Tone" control to toggle between the short and long setting. ^ Touch the "OK" control to turn off the tone. "Tone long", a continuous tone will beep in quick succession when...
Operating and Installation manual
Page 20
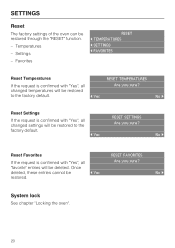
... "RESET" function. - No ) System lock See chapter "Locking the oven". 20 No ) Reset Settings If the request is confirmed with "Yes", all changed settings will be restored to the factory default. ( Yes RESET TEMPERATURES Are you sure? Temperatures - Favorites RESET ( TEMPERATURES ( SETTINGS ( FAVORITES Reset Temperatures If the request is confirmed with "Yes", all changed temperatures will be restored to the factory default. ( Yes RESET SETTINGS Are you sure? SETTINGS Reset The factory settings...
... "RESET" function. - No ) System lock See chapter "Locking the oven". 20 No ) Reset Settings If the request is confirmed with "Yes", all changed settings will be restored to the factory default. ( Yes RESET TEMPERATURES Are you sure? Temperatures - Favorites RESET ( TEMPERATURES ( SETTINGS ( FAVORITES Reset Temperatures If the request is confirmed with "Yes", all changed temperatures will be restored to the factory default. ( Yes RESET SETTINGS Are you sure? SETTINGS Reset The factory settings...

Operating and Installation manual
Page 21
... baking tray, roasting pan or interior floor. - CONVECTION BAKE 325°F 12:23 Preheating 60°F Temperature ) ( Delay Start Add to favorites ) 21 Before heating the oven for 2 hours. any cork spacers from the ceiling of the interior. - foil from the appliance front. BAKE FUNCTIONS ( BAKE BROWNING ) ( CONVECTION BAKE INTENSIVE ) ( SURROUND ^ Select "Temperature". Heat the oven New ovens may have a slight odor during this process. ^ Remove all accessories from the oven. ^ Touch the "On" control...
... baking tray, roasting pan or interior floor. - CONVECTION BAKE 325°F 12:23 Preheating 60°F Temperature ) ( Delay Start Add to favorites ) 21 Before heating the oven for 2 hours. any cork spacers from the ceiling of the interior. - foil from the appliance front. BAKE FUNCTIONS ( BAKE BROWNING ) ( CONVECTION BAKE INTENSIVE ) ( SURROUND ^ Select "Temperature". Heat the oven New ovens may have a slight odor during this process. ^ Remove all accessories from the oven. ^ Touch the "On" control...

Operating and Installation manual
Page 22
... using the oven ^ Set the temperature to 500 °F (260 °C) using the keypad. ^ Touch the "OK" control. Delay Start: Please select ( Start time hh:mm ( Duration hh:mm ( End time hh:mm 12:23 OK ) The oven will appear in the display. CONVECTION BAKE 500°F 12:23 ( Delay Start Temperature ) Add to favorites ) 22 CONVECTION BAKE 325°F 12:23 Range: 125°F - 500°F Temperature ) ( Delay Start Add to favorites ) ^ Set the timer...
... using the oven ^ Set the temperature to 500 °F (260 °C) using the keypad. ^ Touch the "OK" control. Delay Start: Please select ( Start time hh:mm ( Duration hh:mm ( End time hh:mm 12:23 OK ) The oven will appear in the display. CONVECTION BAKE 500°F 12:23 ( Delay Start Temperature ) Add to favorites ) 22 CONVECTION BAKE 325°F 12:23 Range: 125°F - 500°F Temperature ) ( Delay Start Add to favorites ) ^ Set the timer...

Operating and Installation manual
Page 27
... timer was set in the display under the function name, and - a tone will appear in addition to favorites ) 27 "Ready" will sound, - CONVECTION BAKE 325°F 12:23 Ready Temperature ) ( Delay Start Add to a cooking process time, touching "Clear" will be canceled. Canceling a process ^ Touch the "Clear" control. ^ Select the option you wish to cancel. Using the oven Turning off the oven ^ Touch the "Off" control...
... timer was set in the display under the function name, and - a tone will appear in addition to favorites ) 27 "Ready" will sound, - CONVECTION BAKE 325°F 12:23 Ready Temperature ) ( Delay Start Add to a cooking process time, touching "Clear" will be canceled. Canceling a process ^ Touch the "Clear" control. ^ Select the option you wish to cancel. Using the oven Turning off the oven ^ Touch the "Off" control...

Operating and Installation manual
Page 49
... the function, temperature and cooking times of the alpha-numeric list. Your "favorite" must be named before it can be recalled from the "FAVORITES" list. Confirm each character entry by touching the controls left and right of the recipe. CONVECTION BAKE 325°F 12:23 Preheating 60°F Temperature ) ( Delay Start Add to favorites ) Add to favorites" control. The oven will automatically use the saved settings. ^ Touch...
... the function, temperature and cooking times of the alpha-numeric list. Your "favorite" must be named before it can be recalled from the "FAVORITES" list. Confirm each character entry by touching the controls left and right of the recipe. CONVECTION BAKE 325°F 12:23 Preheating 60°F Temperature ) ( Delay Start Add to favorites ) Add to favorites" control. The oven will automatically use the saved settings. ^ Touch...
Operating and Installation manual
Page 50
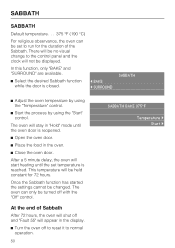
... the control panel and the clock will not be held constant for the duration of Sabbath After 72 hours, the oven will shut off and "Fault 55" will be displayed. This temperature will appear in the display. ^ Turn the oven off to reset it to run for 72 hours. The oven will start heating until the oven door is closed. ( BAKE ( SURROUND SABBATH ^ Adjust the oven temperature by using the "Temperature" control. ^ Start the process by using the "Start" control...
... the control panel and the clock will not be held constant for the duration of Sabbath After 72 hours, the oven will shut off and "Fault 55" will be displayed. This temperature will appear in the display. ^ Turn the oven off to reset it to run for 72 hours. The oven will start heating until the oven door is closed. ( BAKE ( SURROUND SABBATH ^ Adjust the oven temperature by using the "Temperature" control. ^ Start the process by using the "Start" control...

Operating and Installation manual
Page 60
... the oven has cooled, remove the ash with a damp sponge. Remove large pieces of debris and any puddles of the door. "Start" will begin the function at high temperatures. - "Delayed Start" will begin the function once the entered delay time has elapsed. Avoid cleaning the gasket which seals the glass pane of grease from glass fiber and will damage the accessories. ^ Touch the "SELF CLEAN" control...
... the oven has cooled, remove the ash with a damp sponge. Remove large pieces of debris and any puddles of the door. "Start" will begin the function at high temperatures. - "Delayed Start" will begin the function once the entered delay time has elapsed. Avoid cleaning the gasket which seals the glass pane of grease from glass fiber and will damage the accessories. ^ Touch the "SELF CLEAN" control...

Operating and Installation manual
Page 62
... by shutting off the power main or tripping the circuit breaker. Reassemble in the reverse order, making sure that all the parts are in case the light cover falls. ^ Remove the lamp cover. Do not touch the new light bulb with your fingers; Changing the light bulb ^ Remove the runners. ^ Spread a dishtowel on the oven floor to pry the lamp out of the oven and reinsert the cover. Use...
... by shutting off the power main or tripping the circuit breaker. Reassemble in the reverse order, making sure that all the parts are in case the light cover falls. ^ Remove the lamp cover. Do not touch the new light bulb with your fingers; Changing the light bulb ^ Remove the runners. ^ Spread a dishtowel on the oven floor to pry the lamp out of the oven and reinsert the cover. Use...
Operating and Installation manual
Page 63
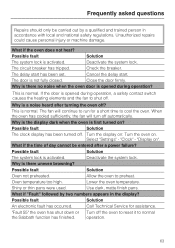
... operation, a safety contact switch causes the heating elements and the fan to shut off . Select "Settings" - "Clock" - Oven temperature too high. Shiny or thin pans were used. What if "Fault" followed by a qualified and trained person in the display? Deactivate the system lock. The door is normal. If the door is first turned on . This is not fully closed. Possible fault Solution The clock display has been turned off . Possible fault Solution Oven not preheated...
... operation, a safety contact switch causes the heating elements and the fan to shut off . Select "Settings" - "Clock" - Oven temperature too high. Shiny or thin pans were used. What if "Fault" followed by a qualified and trained person in the display? Deactivate the system lock. The door is normal. If the door is first turned on . This is not fully closed. Possible fault Solution The clock display has been turned off . Possible fault Solution Oven not preheated...

Operating and Installation manual
Page 64
... your oven. Only genuine Miele parts installed by Miele. This information is covered by a Miele Authorized Service Provider using genuine Miele parts. MieleCare (USA only) MieleCare, our Extended Service Contract program, gives you cannot easily fix yourself, please contact the Miele Technical Service Department: U 1-800-999-1360 [email protected] V 1-800-565-6435 service@miele.ca When contacting Technical Service please quote the serial number and model of your Miele appliance...
... your oven. Only genuine Miele parts installed by Miele. This information is covered by a Miele Authorized Service Provider using genuine Miele parts. MieleCare (USA only) MieleCare, our Extended Service Contract program, gives you cannot easily fix yourself, please contact the Miele Technical Service Department: U 1-800-999-1360 [email protected] V 1-800-565-6435 service@miele.ca When contacting Technical Service please quote the serial number and model of your Miele appliance...

Operating and Installation manual
Page 69
... oven comes equipped with a 7.2 ft. (2.2 m) power cord with the consumer. 69 WARNING: THIS APPLIANCE MUST BE GROUNDED Installer: Please leave these instructions with a NEMA 14-30 P molded plug ready for connection to prevent machine damage. The silver data plate is installed and grounded in accordance with the household electrical supply. Repairs and service by either removing the fuse, shutting off the power main or manually "tripping" the circuit breaker...
... oven comes equipped with a 7.2 ft. (2.2 m) power cord with the consumer. 69 WARNING: THIS APPLIANCE MUST BE GROUNDED Installer: Please leave these instructions with a NEMA 14-30 P molded plug ready for connection to prevent machine damage. The silver data plate is installed and grounded in accordance with the household electrical supply. Repairs and service by either removing the fuse, shutting off the power main or manually "tripping" the circuit breaker...


