Specs
Page 1
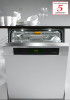
Futura Series Integrated Dishwashers DIMENSION G 5605 SCi DIAMOND G 5915 SCi 8mieleusa.com
Futura Series Integrated Dishwashers DIMENSION G 5605 SCi DIAMOND G 5915 SCi 8mieleusa.com

Specs
Page 2
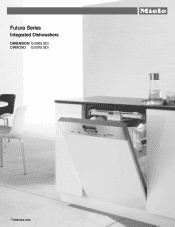
Futura Series Dishwashers Model Overview FOREVER BETTER Futura Series Integrated Dishwashers Page 2 of 5
Futura Series Dishwashers Model Overview FOREVER BETTER Futura Series Integrated Dishwashers Page 2 of 5
Specs
Page 3
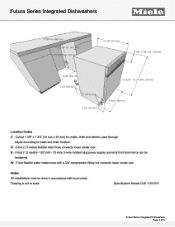
Futura Series Integrated Dishwashers FOREVER BETTER Futura Series Integrated Dishwashers Page 3 of 5
Futura Series Integrated Dishwashers FOREVER BETTER Futura Series Integrated Dishwashers Page 3 of 5
Specs
Page 4
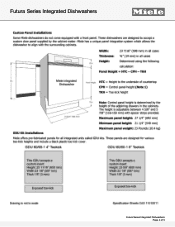
Futura Series Integrated Dishwashers FOREVER BETTER Futura Series Integrated Dishwashers Page 4 of 5
Futura Series Integrated Dishwashers FOREVER BETTER Futura Series Integrated Dishwashers Page 4 of 5
Specs
Page 5
Futura Series Integrated Dishwashers FOREVER BETTER Futura Series Integrated Dishwashers Page 5 of 5
Futura Series Integrated Dishwashers FOREVER BETTER Futura Series Integrated Dishwashers Page 5 of 5

Energy Guide
Page 1
... of $1.218 per therm. • For more information, visit www.ftc.gov/appliances. ENERGY STAR Material-Nr. 09103640 0 U.S. EMERG GUIDE Dishwasher Capacity: Standard Miele, Inc. Models G5505, G5570, G5575, G5705, G5775, G5915, G5975 (any model may be followed by SC, U, SF, i or Vi) Estimated Yearly Operating Cost (when used with an electric water...
... of $1.218 per therm. • For more information, visit www.ftc.gov/appliances. ENERGY STAR Material-Nr. 09103640 0 U.S. EMERG GUIDE Dishwasher Capacity: Standard Miele, Inc. Models G5505, G5570, G5575, G5705, G5775, G5915, G5975 (any model may be followed by SC, U, SF, i or Vi) Estimated Yearly Operating Cost (when used with an electric water...

Product Manual
Page 1
US, CA M.-Nr. 07 909 211 Operating Instructions Dishwasher G 5910 G 5915 To prevent accidents and appliance damage read these instructions before installation or use. en -
US, CA M.-Nr. 07 909 211 Operating Instructions Dishwasher G 5910 G 5915 To prevent accidents and appliance damage read these instructions before installation or use. en -

Product Manual
Page 2
Contents IMPORTANT SAFETY INSTRUCTIONS 4 Guide to the dishwasher 8 Control panel 9 Caring for the environment 10 Before using for the first time 11 To open the door 11 To close the door 11 Child ... 12 Filling the salt container 16 Salt refill message 17 Rinse aid 18 Adding rinse aid 18 Rinse aid indicator 19 Loading the dishwasher 20 Items not recommended for dishwashing 21 Typical load for 10 place settings with cutlery tray 22 Typical load for 16 place settings with cutlery tray 23 Upper...
Contents IMPORTANT SAFETY INSTRUCTIONS 4 Guide to the dishwasher 8 Control panel 9 Caring for the environment 10 Before using for the first time 11 To open the door 11 To close the door 11 Child ... 12 Filling the salt container 16 Salt refill message 17 Rinse aid 18 Adding rinse aid 18 Rinse aid indicator 19 Loading the dishwasher 20 Items not recommended for dishwashing 21 Typical load for 10 place settings with cutlery tray 22 Typical load for 16 place settings with cutlery tray 23 Upper...
Product Manual
Page 3
... Lock 55 Volume 56 Factory default 58 RemoteVision 59 Frequently asked questions 60 Technical faults 60 Problems water intake/drain 62 General problems with the dishwasher 64 Sounds 66 Poor cleaning results 67 After sales service 70 Transport 71 User Maintenance Instructions 73 Cleaning and Care 74 Triple filter system 75...
... Lock 55 Volume 56 Factory default 58 RemoteVision 59 Frequently asked questions 60 Technical faults 60 Problems water intake/drain 62 General problems with the dishwasher 64 Sounds 66 Poor cleaning results 67 After sales service 70 Transport 71 User Maintenance Instructions 73 Cleaning and Care 74 Triple filter system 75...

Product Manual
Page 4
.... Extension cords do not guarantee the required safety of the house checked by a Miele Service technician with the household electrical supply. If there is any future user. Correct usage ~ The dishwasher is properly installed and grounded by unplugging the unit, "tripping" the circuit breaker ...pass them on the data plate correspond with a genuine Miele power cord. ~ The outlet must only be dangerous. ~ Persons who lack physical, sensory or mental abilities, or experience with the appliance should not use of the dishwasher to any doubt, have the electrical system of the ...
.... Extension cords do not guarantee the required safety of the house checked by a Miele Service technician with the household electrical supply. If there is any future user. Correct usage ~ The dishwasher is properly installed and grounded by unplugging the unit, "tripping" the circuit breaker ...pass them on the data plate correspond with a genuine Miele power cord. ~ The outlet must only be dangerous. ~ Persons who lack physical, sensory or mental abilities, or experience with the appliance should not use of the dishwasher to any doubt, have the electrical system of the ...

Product Manual
Page 5
... is not used in an area where it in liquid. Damage of the appliance. Work by a Miele authorized service technician. Installing the dishwasher in a tight space may damage the dishwasher. ~ A toe-kick must be used with the installation instructions. ~ Installation and repair work is complete...warranty. ~ Do not install or use a damaged dishwasher. Do not expose hose or power cord to a heat source e.g. hot water pipes. If the supplied toe-kick is dangerous. Unplug the machine and contact the Miele Technical Service Department. ~ Ensure that the cabinet opening...
... is not used in an area where it in liquid. Damage of the appliance. Work by a Miele authorized service technician. Installing the dishwasher in a tight space may damage the dishwasher. ~ A toe-kick must be used with the installation instructions. ~ Installation and repair work is complete...warranty. ~ Do not install or use a damaged dishwasher. Do not expose hose or power cord to a heat source e.g. hot water pipes. If the supplied toe-kick is dangerous. Unplug the machine and contact the Miele Technical Service Department. ~ Ensure that the cabinet opening...
Product Manual
Page 6
... an audible signal first being given, at all times after installation to disconnect the dishwasher. ~ This model offers a Drying Plus feature, i.e. They can cause burning in place. ~ Do not tamper with a genuine Miele power cord. Use caution, the air may be produced in a hot water system... ~ Do not fill the rinse aid reservoir or salt container with detergent. Dishwasher detergents contain irritant and corrosive ingredients. Keep all panels are "dishwasher safe". It is damaged it must be replaced by a Miele Service technician with the controls. ~ Do not sit or stand on or near...
... an audible signal first being given, at all times after installation to disconnect the dishwasher. ~ This model offers a Drying Plus feature, i.e. They can cause burning in place. ~ Do not tamper with a genuine Miele power cord. Use caution, the air may be produced in a hot water system... ~ Do not fill the rinse aid reservoir or salt container with detergent. Dishwasher detergents contain irritant and corrosive ingredients. Keep all panels are "dishwasher safe". It is damaged it must be replaced by a Miele Service technician with the controls. ~ Do not sit or stand on or near...

Product Manual
Page 7
.... ~ Advise the user of the Drying Plus feature to avoid injuries by walking, bumping or knocking into the partially opened door. ~ Supervise children near the dishwasher to ensure fingers or other parts of the body are cool enough to prevent children from locking themselves in operation. ~ Dishes can be very hot...
.... ~ Advise the user of the Drying Plus feature to avoid injuries by walking, bumping or knocking into the partially opened door. ~ Supervise children near the dishwasher to ensure fingers or other parts of the body are cool enough to prevent children from locking themselves in operation. ~ Dishes can be very hot...

Product Manual
Page 8
Guide to the dishwasher a Upper spray arm (not visible) b Cutlery tray c Upper basket d Middle spray arm e Air inlet for drying (depending on model) f Lower spray arm g Triple filter system h Data plate i Child Safety Lock in the door handle (not visible) j Rinse aid reservoir k Dual compartment detergent dispenser l Salt container 8
Guide to the dishwasher a Upper spray arm (not visible) b Cutlery tray c Upper basket d Middle spray arm e Air inlet for drying (depending on model) f Lower spray arm g Triple filter system h Data plate i Child Safety Lock in the door handle (not visible) j Rinse aid reservoir k Dual compartment detergent dispenser l Salt container 8
Product Manual
Page 9
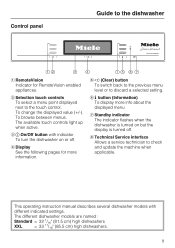
...touch controls light up when active. f K button (Information) To display more information. This operating instruction manual describes several dishwasher models with indicator To turn the dishwasher on but the display is turned off . To change the displayed value (+/-). d Display See the following pages for ...to check and update the machine when applicable. Control panel Guide to the dishwasher a RemoteVision Indicator for more info about the displayed menu g Standby indicator The indicator flashes when the dishwasher is turned on or off . b Selection touch controls To select a ...
...touch controls light up when active. f K button (Information) To display more information. This operating instruction manual describes several dishwasher models with indicator To turn the dishwasher on but the display is turned off . To change the displayed value (+/-). d Display See the following pages for ...to check and update the machine when applicable. Control panel Guide to the dishwasher a RemoteVision Indicator for more info about the displayed menu g Standby indicator The indicator flashes when the dishwasher is turned on or off . b Selection touch controls To select a ...

Product Manual
Page 10
... for the most economical washing. ^ Use the correct amount of detergent and rinse aid. Caring for the environment Energy saving washing This dishwasher is dependent upon the amount of soiling and type of dishware being washed. 10 For best results follow these tips: ^ For lowest ...energy consumption you may connect the dishwasher to a cold water source. ^ For fastest possible wash times, with slightly higher energy consumption, connect the dishwasher to 2/3 of the normal amount when washing a small load. ^ Choose a program that best...
... for the most economical washing. ^ Use the correct amount of detergent and rinse aid. Caring for the environment Energy saving washing This dishwasher is dependent upon the amount of soiling and type of dishware being washed. 10 For best results follow these tips: ^ For lowest ...energy consumption you may connect the dishwasher to a cold water source. ^ For fastest possible wash times, with slightly higher energy consumption, connect the dishwasher to 2/3 of the normal amount when washing a small load. ^ Choose a program that best...

Product Manual
Page 11
... prevent children from opening area free of obstructions. The Child Safety Lock is closing. Child Safety Lock The door will restart. ,Keep the opening the dishwasher. ^ To lock the door, push the slider below the door grip to the right. ^ To unlock the door, push the slider to aid in .... ^ Lift the door and push until the catch engages. Once the door is opened during operation, the dishwasher will then close the door ^ Push the baskets in the drying process. Danger of injury. This function can be deactivated (see "Settings - Drying Plus")....
... prevent children from opening area free of obstructions. The Child Safety Lock is closing. Child Safety Lock The door will restart. ,Keep the opening the dishwasher. ^ To lock the door, push the slider below the door grip to the right. ^ To unlock the door, push the slider to aid in .... ^ Lift the door and push until the catch engages. Once the door is opened during operation, the dishwasher will then close the door ^ Push the baskets in the drying process. Danger of injury. This function can be deactivated (see "Settings - Drying Plus")....

Product Manual
Page 12
... display shows: - the program sequence - The corresponding touch control is pressed. the wash program - the options - the start time - To turn the dishwasher back on press K. ! n The arrows in the display: - The "Settings !" A bullet in the display next to the touch control shows that...level will appear. ( The currently selected option is marked with the respective illuminated touch control. -----A dotted line is shown to customize the dishwasher settings. the program name - Before using for more selections or text follow and can be displayed with a check. the current time of...
... display shows: - the program sequence - The corresponding touch control is pressed. the wash program - the options - the start time - To turn the dishwasher back on press K. ! n The arrows in the display: - The "Settings !" A bullet in the display next to the touch control shows that...level will appear. ( The currently selected option is marked with the respective illuminated touch control. -----A dotted line is shown to customize the dishwasher settings. the program name - Before using for more selections or text follow and can be displayed with a check. the current time of...

Product Manual
Page 13
The display changes automatically to the clock format. \ Clock Format $ 12 h clock \ # 24 h clock ( [ OK ! ^ Select the desired setting and confirm with OK. The selected language is turned on s. deutsch [ p[ [ OK ! ^ Select the desired language and confirm with OK. 13 Before using for the first time Welcome screen Language Clock format ^ Turn the dishwasher on for the first time. The Welcome screen shows when the washer is marked with a L check. The display changes automatically to the language setting. \ Sprache F $ ceština \ # dansk \ !
The display changes automatically to the clock format. \ Clock Format $ 12 h clock \ # 24 h clock ( [ OK ! ^ Select the desired setting and confirm with OK. The selected language is turned on s. deutsch [ p[ [ OK ! ^ Select the desired language and confirm with OK. 13 Before using for the first time Welcome screen Language Clock format ^ Turn the dishwasher on for the first time. The Welcome screen shows when the washer is marked with a L check. The display changes automatically to the language setting. \ Sprache F $ ceština \ # dansk \ !

Product Manual
Page 15
...water hardness level in your water supply and confirm with OK. Water hardness" for the first time To achieve good cleaning results, the dishwasher needs soft water. The water hardness was programmed at 1 °d (1 gr/gal) by factory default. ^ Select the hardness of your area. -.../gal]) always program the machine to the main menu. The display changes to the higher value (in the display. Two notes appear in the dishwasher. After confirming these notes with the center button. These basic settings are saved after the first full program cycle is above 4 °d (4 gr...
...water hardness level in your water supply and confirm with OK. Water hardness" for the first time To achieve good cleaning results, the dishwasher needs soft water. The water hardness was programmed at 1 °d (1 gr/gal) by factory default. ^ Select the hardness of your area. -.../gal]) always program the machine to the main menu. The display changes to the higher value (in the display. Two notes appear in the dishwasher. After confirming these notes with the center button. These basic settings are saved after the first full program cycle is above 4 °d (4 gr...


