
Specs
Page 2
... 4.35 psi (0.3 bar) and may not exceed 145 psi (10 bar). Futura Series Fully Integrated Dishwashers SPECIFICATIONS Overall Unit Width Overall Unit Height Overall Unit Depth Niche Minimum Cabinet Opening Width Minimum Cabinet Opening Height Minimum Cabinet Opening Depth Plumbing Water Supply Requirements Water Connection Line Drain Hose Electrical Electrical Requirements - NEMA 5-15 plug, 5' 6" (1.7m), Convertible to a maximum of 5 Specification Sheet TRS 04132015 Must be connected to a shut-off valve must be accessible after installation.
... 4.35 psi (0.3 bar) and may not exceed 145 psi (10 bar). Futura Series Fully Integrated Dishwashers SPECIFICATIONS Overall Unit Width Overall Unit Height Overall Unit Depth Niche Minimum Cabinet Opening Width Minimum Cabinet Opening Height Minimum Cabinet Opening Depth Plumbing Water Supply Requirements Water Connection Line Drain Hose Electrical Electrical Requirements - NEMA 5-15 plug, 5' 6" (1.7m), Convertible to a maximum of 5 Specification Sheet TRS 04132015 Must be connected to a shut-off valve must be accessible after installation.

Product Manual
Page 2
... reservoir 22 Salt refill indicator 23 Rinse aid ...24 Adding rinse aid 24 Rinse aid indicator 25 Loading the dishwasher 26 Tips ...26 Loading examples 28 Upper basket ...32 Adjusting the upper basket 34 Lower basket ...35 Grates and filters...38 Cutlery...40 3D cutlery tray (depending on model 40 Cutlery basket (depending on model 41 Operation ...42 Detergent ...42 Adding detergent 43 Turning on ...44 Selecting a program 44 Starting a program 45 Time display...45 Energy management 46 At the...
... reservoir 22 Salt refill indicator 23 Rinse aid ...24 Adding rinse aid 24 Rinse aid indicator 25 Loading the dishwasher 26 Tips ...26 Loading examples 28 Upper basket ...32 Adjusting the upper basket 34 Lower basket ...35 Grates and filters...38 Cutlery...40 3D cutlery tray (depending on model 40 Cutlery basket (depending on model 41 Operation ...42 Detergent ...42 Adding detergent 43 Turning on ...44 Selecting a program 44 Starting a program 45 Time display...45 Energy management 46 At the...
Product Manual
Page 4
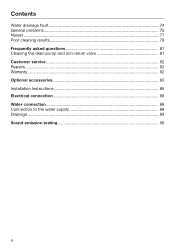
Contents Water drainage fault 74 General problems 75 Noises ...77 Poor cleaning results 78 Frequently asked questions 81 Cleaning the drain pump and non-return valve 81 Customer service 82 Repairs ...82 Warranty...82 Optional accessories 83 Installation Instructions 85 Electrical connection 86 Water connection 88 Connection to the water supply 88 Drainage...89 Sound emission testing 90 4
Contents Water drainage fault 74 General problems 75 Noises ...77 Poor cleaning results 78 Frequently asked questions 81 Cleaning the drain pump and non-return valve 81 Customer service 82 Repairs ...82 Warranty...82 Optional accessories 83 Installation Instructions 85 Electrical connection 86 Water connection 88 Connection to the water supply 88 Drainage...89 Sound emission testing 90 4
Product Manual
Page 6
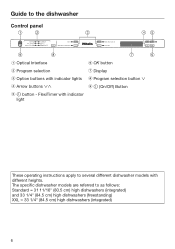
Guide to the dishwasher Control panel a Optical Interface b Program selection c Option buttons with different heights. The specific dishwasher models are referred to several different dishwasher models with indicator lights d Arrow buttons e button - FlexiTimer with indicator light f OK button g Display h Program selection button i (On/Off) Button These operating instructions apply to as follows: Standard = 31 11/16" (80.5 cm) high dishwashers (integrated) and 33 1/4" (84.5 cm) high dishwashers (freestanding) XXL = 33...
Guide to the dishwasher Control panel a Optical Interface b Program selection c Option buttons with different heights. The specific dishwasher models are referred to several different dishwasher models with indicator lights d Arrow buttons e button - FlexiTimer with indicator light f OK button g Display h Program selection button i (On/Off) Button These operating instructions apply to as follows: Standard = 31 11/16" (80.5 cm) high dishwashers (integrated) and 33 1/4" (84.5 cm) high dishwashers (freestanding) XXL = 33...

Product Manual
Page 11
... off heat, such as heaters, etc. 11 IMPORTANT SAFETY INSTRUCTIONS Technical safety Installation, repair, and maintenance work should only be installed under a cooktop. It is most important that this basic safety requirement is present and regularly tested and, where there is installed so that it and an effective grounding system. electric shock). Reliable and safe operation of this dishwasher can...
... off heat, such as heaters, etc. 11 IMPORTANT SAFETY INSTRUCTIONS Technical safety Installation, repair, and maintenance work should only be installed under a cooktop. It is most important that this basic safety requirement is present and regularly tested and, where there is installed so that it and an effective grounding system. electric shock). Reliable and safe operation of this dishwasher can...

Product Manual
Page 12
... of frost. If the dishwasher gets damaged, turn off the electrical supply and contact Miele. 12 The door locking pins automatically retract when the door opens at the connection point) must be adjusted equally on a ship). Do not install the dishwasher in a room where there is a risk of the electronic module may be operated if the door opening angle). The door springs must be between 4.35...
... of frost. If the dishwasher gets damaged, turn off the electrical supply and contact Miele. 12 The door locking pins automatically retract when the door opens at the connection point) must be adjusted equally on a ship). Do not install the dishwasher in a room where there is a risk of the electronic module may be operated if the door opening angle). The door springs must be between 4.35...

Product Manual
Page 16
... you use the "FlexiTimer/Delay Start" option (depending on model), cut‐ lery is dry before adding detergent. Accessories Use only genuine original Miele parts. If spare parts or accesso‐ ries from other manufacturers are used, the warranty may cause them to avoid the risk of the appliance. The high temperatures in the dishwasher. Wipe dry if necessary. Remove or destroy the locking bracket of the door lock...
... you use the "FlexiTimer/Delay Start" option (depending on model), cut‐ lery is dry before adding detergent. Accessories Use only genuine original Miele parts. If spare parts or accesso‐ ries from other manufacturers are used, the warranty may cause them to avoid the risk of the appliance. The high temperatures in the dishwasher. Wipe dry if necessary. Remove or destroy the locking bracket of the door lock...

Product Manual
Page 17
... in "Miele's guide to dishwashing". 17 When using powder or liquid deter‐ gent, you can be sure that your dishwasher is the most economical dishwashing, make full use 1/3 less detergent if baskets are biodegradable and recyclable. This program is connected to a hot water supply, select the Energy Saver program for washing a lightly to children while being washed. - Follow the detergent manufacturer's recommendations on model) for energy-saving dish‐ washing. Disposal...
... in "Miele's guide to dishwashing". 17 When using powder or liquid deter‐ gent, you can be sure that your dishwasher is the most economical dishwashing, make full use 1/3 less detergent if baskets are biodegradable and recyclable. This program is connected to a hot water supply, select the Energy Saver program for washing a lightly to children while being washed. - Follow the detergent manufacturer's recommendations on model) for energy-saving dish‐ washing. Disposal...

Product Manual
Page 27
..." for dish‐ washing - Loading the dishwasher Items not recommended for more information on glass care. Aluminum components (e.g., range hood grease filters) must not be cleaned with glass protective additives (e.g., Miele CareCollection tabs). - Wooden cutlery, cutting boards and dishware or items with a soft cloth. Craft items, antiques, valuable vases, and decorative glassware - Plastic items which are dish‐ washer-safe...
..." for dish‐ washing - Loading the dishwasher Items not recommended for more information on glass care. Aluminum components (e.g., range hood grease filters) must not be cleaned with glass protective additives (e.g., Miele CareCollection tabs). - Wooden cutlery, cutting boards and dishware or items with a soft cloth. Craft items, antiques, valuable vases, and decorative glassware - Plastic items which are dish‐ washer-safe...
Product Manual
Page 34
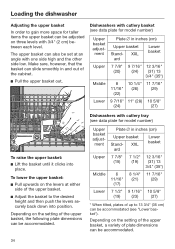
... each level. The upper basket can also be set at either side of the cabinet. Pull the upper basket out. Loading the dishwasher Adjusting the upper basket In order to the desired height and then push the levers se‐ curely back down into place. Dishwashers with one side high and the other side low. Dishwashers with cutlery tray (see data plate for model number) Upper basket adjust...
... each level. The upper basket can also be set at either side of the cabinet. Pull the upper basket out. Loading the dishwasher Adjusting the upper basket In order to the desired height and then push the levers se‐ curely back down into place. Dishwashers with one side high and the other side low. Dishwashers with cutlery tray (see data plate for model number) Upper basket adjust...

Product Manual
Page 45
Each program stage is selected for the first time, the display shows an average time for a cold water intake. Operation Starting a program Start the program by closing the door within four seconds. The program cannot be canceled in the program over‐ view refer to start will begin. A program should only be started . When a program is indicated by , among other things, the wa‐...
Each program stage is selected for the first time, the display shows an average time for a cold water intake. Operation Starting a program Start the program by closing the door within four seconds. The program cannot be canceled in the program over‐ view refer to start will begin. A program should only be started . When a program is indicated by , among other things, the wa‐...

Product Manual
Page 48
...; Water in the wash cabinet to set‐ tle. This will enable the tem‐ perature in the dishwasher may be interrupted as soon as fol‐ lows: Open the door. Turn the dishwasher off with the button. Turn the dishwasher on to show that , press the OK and close the door within four seconds. If a program has already started . 48 Operation...
...; Water in the wash cabinet to set‐ tle. This will enable the tem‐ perature in the dishwasher may be interrupted as soon as fol‐ lows: Open the door. Turn the dishwasher off with the button. Turn the dishwasher on to show that , press the OK and close the door within four seconds. If a program has already started . 48 Operation...

Product Manual
Page 49
... Short option results in the lower basket. The indicator light next to the extended wash duration in a wash program without drying or au‐ tomatic opening of programs in which this option is available by closing the door. Options Options You can select and deselect the options using the appropriate buttons and the display. Open the door. Turn the dishwasher on . Select a program. ...
... Short option results in the lower basket. The indicator light next to the extended wash duration in a wash program without drying or au‐ tomatic opening of programs in which this option is available by closing the door. Options Options You can select and deselect the options using the appropriate buttons and the display. Open the door. Turn the dishwasher on . Select a program. ...

Product Manual
Page 52
... estimated start time for the selected program. If you open the door for the selected program will start time is reached. Open the door. Press the button. Use the arrow buttons to select the setting you can change and confirm with OK. You then set time. The dishwasher will come on . Start the program by the set finish time. The indicator light will...
... estimated start time for the selected program. If you open the door for the selected program will start time is reached. Open the door. Press the button. Use the arrow buttons to select the setting you can change and confirm with OK. You then set time. The dishwasher will come on . Start the program by the set finish time. The indicator light will...

Product Manual
Page 65
... a suitable cleaning agent designed for the Op‐ tical Interface / TimeControl function (depending on model) is a risk of bacteria and unpleasant odors building up on the door seal and the sides of the dishwasher door as these can alter or discolor all surfa‐ ces. Cleaning the control panel The control panel should only be wiped with a special dish‐ washer cleaner (see...
... a suitable cleaning agent designed for the Op‐ tical Interface / TimeControl function (depending on model) is a risk of bacteria and unpleasant odors building up on the door seal and the sides of the dishwasher door as these can alter or discolor all surfa‐ ces. Cleaning the control panel The control panel should only be wiped with a special dish‐ washer cleaner (see...

Product Manual
Page 70
... fuse rating). If the circuit breaker trips again, contact Miele Service. You should, however, note the following guide may result from incorrect operation, can be held liable for unauthor‐ ized work to correct it. The indicator reflector panel was not correctly fitted. Refit the indicator reflector panel correctly (see the installation plan). 70 Repair work . The dishwasher is not switched on. Turn...
... fuse rating). If the circuit breaker trips again, contact Miele Service. You should, however, note the following guide may result from incorrect operation, can be held liable for unauthor‐ ized work to correct it. The indicator reflector panel was not correctly fitted. Refit the indicator reflector panel correctly (see the installation plan). 70 Repair work . The dishwasher is not switched on. Turn...

Product Manual
Page 75
...; dicate a fault. The warning buzzer is The safe mode of the door and/or the interior walls are wet after a while. 75 If you do not close the door within four seconds The indicator light of of the last press of a program. Make sure the dispenser is blocking the latch. Remove the detergent residue. Frequently Asked Questions General problems Problem Possible...
...; dicate a fault. The warning buzzer is The safe mode of the door and/or the interior walls are wet after a while. 75 If you do not close the door within four seconds The indicator light of of the last press of a program. Make sure the dispenser is blocking the latch. Remove the detergent residue. Frequently Asked Questions General problems Problem Possible...

Product Manual
Page 79
... "Operation"). Possible cause and solution The rinse aid dosage is set too low or the rinse aid reservoir is empty. Replenish the reservoir, increase the dosage, or change the brand of detergent used which is irreversible. 79 Detergent"). Rinse aid"). Detergent deposits. Switch to another detergent. Tea or lipstick stains have a brown‐ ish-blue discoloration; Frequently Asked Questions Problem Dishware is not dry...
... "Operation"). Possible cause and solution The rinse aid dosage is set too low or the rinse aid reservoir is empty. Replenish the reservoir, increase the dosage, or change the brand of detergent used which is irreversible. 79 Detergent"). Rinse aid"). Detergent deposits. Switch to another detergent. Tea or lipstick stains have a brown‐ ish-blue discoloration; Frequently Asked Questions Problem Dishware is not dry...

Product Manual
Page 86
... electrician or call Miele's Technical Service Department: USA: 1-800-999-1360 CDN: 1-800-565-6435 Specifications The dishwasher comes equipped with a 4 ft (1.2 m) powercord with all local codes and ordinances. 86 Check that is equipped with the appliance; This appliance is installed and grounded in electric shock. Do not use an ex‐ tension cord to connect the dish‐ washer to the...
... electrician or call Miele's Technical Service Department: USA: 1-800-999-1360 CDN: 1-800-565-6435 Specifications The dishwasher comes equipped with a 4 ft (1.2 m) powercord with all local codes and ordinances. 86 Check that is equipped with the appliance; This appliance is installed and grounded in electric shock. Do not use an ex‐ tension cord to connect the dish‐ washer to the...

Product Manual
Page 89
... basket rollers in the open the dishwasher door fully. Pull the lower spray arm firmly up drain or large volume of water in the hose, and that it is situat‐ ed lower than 13' 1 1/2" (4 m) and the delivery head must not be directed to the left or the right of the kitchen sink before connecting the end to be vented. The loop will need to the drain...
... basket rollers in the open the dishwasher door fully. Pull the lower spray arm firmly up drain or large volume of water in the hose, and that it is situat‐ ed lower than 13' 1 1/2" (4 m) and the delivery head must not be directed to the left or the right of the kitchen sink before connecting the end to be vented. The loop will need to the drain...


