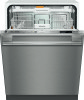

Specs
Page 2
... valve must be installed. 4' 11" (1.5m) flexible water intake hose is higher than 145 psi (10 bar), a pressure reducing valve must be connected to a cold or hot water supply up to a maximum of 5 Specification Sheet TRS 04132015 Futura Series Fully Integrated Dishwashers SPECIFICATIONS Overall Unit Width Overall Unit Height Overall Unit Depth Niche Minimum Cabinet Opening Width Minimum Cabinet Opening Height Minimum Cabinet Opening Depth Plumbing Water Supply Requirements Water Connection Line Drain Hose Electrical Electrical Requirements - Volts/Amps Power Cord...
... valve must be installed. 4' 11" (1.5m) flexible water intake hose is higher than 145 psi (10 bar), a pressure reducing valve must be connected to a cold or hot water supply up to a maximum of 5 Specification Sheet TRS 04132015 Futura Series Fully Integrated Dishwashers SPECIFICATIONS Overall Unit Width Overall Unit Height Overall Unit Depth Niche Minimum Cabinet Opening Width Minimum Cabinet Opening Height Minimum Cabinet Opening Depth Plumbing Water Supply Requirements Water Connection Line Drain Hose Electrical Electrical Requirements - Volts/Amps Power Cord...
Product Manual
Page 2
... reservoir 22 Salt refill indicator 23 Rinse aid ...24 Adding rinse aid 24 Rinse aid indicator 25 Loading the dishwasher 26 Tips ...26 Loading examples 28 Upper basket ...32 Adjusting the upper basket 33 Lower basket ...34 Grates and filters...36 Cutlery...38 3D cutlery tray (depending on model 38 Cutlery basket (depending on model 39 Operation ...40 Detergent ...40 Adding detergent 41 Turning on ...42 Selecting a program 42 Starting a program 43 Time display...43 Energy management 44 At the...
... reservoir 22 Salt refill indicator 23 Rinse aid ...24 Adding rinse aid 24 Rinse aid indicator 25 Loading the dishwasher 26 Tips ...26 Loading examples 28 Upper basket ...32 Adjusting the upper basket 33 Lower basket ...34 Grates and filters...36 Cutlery...38 3D cutlery tray (depending on model 38 Cutlery basket (depending on model 39 Operation ...40 Detergent ...40 Adding detergent 41 Turning on ...42 Selecting a program 42 Starting a program 43 Time display...43 Energy management 44 At the...

Product Manual
Page 3
... filters ...60 Soak ...60 Pre-Rinse ...60 Brightness ...60 Volume ...61 Version info ...61 Showroom program 61 Factory default settings 62 Closing the Settings menu 62 Cleaning and care 63 Cleaning the wash cabinet 63 Cleaning the door and the door seal 63 Cleaning the control panel 63 Cleaning the indicator reflector panel 63 Cleaning the door front 64 Filter system...65 Cleaning the spray arms 67 Frequently Asked Questions 68 Technical problems 68 Water intake fault 71 Water drainage fault...
... filters ...60 Soak ...60 Pre-Rinse ...60 Brightness ...60 Volume ...61 Version info ...61 Showroom program 61 Factory default settings 62 Closing the Settings menu 62 Cleaning and care 63 Cleaning the wash cabinet 63 Cleaning the door and the door seal 63 Cleaning the control panel 63 Cleaning the indicator reflector panel 63 Cleaning the door front 64 Filter system...65 Cleaning the spray arms 67 Frequently Asked Questions 68 Technical problems 68 Water intake fault 71 Water drainage fault...
Product Manual
Page 4
Contents General problems 73 Noises ...74 Poor cleaning results 75 Frequently asked questions 78 Cleaning the drain pump and non-return valve 78 Customer service 79 Repairs ...79 Warranty...79 Optional accessories 80 ...82 Installation Instructions 83 Electrical connection 84 Water connection 86 Connection to the water supply 86 Drainage...87 Sound emission testing 88 4
Contents General problems 73 Noises ...74 Poor cleaning results 75 Frequently asked questions 78 Cleaning the drain pump and non-return valve 78 Customer service 79 Repairs ...79 Warranty...79 Optional accessories 80 ...82 Installation Instructions 83 Electrical connection 84 Water connection 86 Connection to the water supply 86 Drainage...87 Sound emission testing 88 4
Product Manual
Page 8
... a cooktop. For the same reason, it and an effective grounding system. IMPORTANT SAFETY INSTRUCTIONS Technical safety Installation, repair, and maintenance work should you use a damaged dishwash‐ er. A damaged dishwasher could be dangerous. The electrical safety of this appliance can be disconnected from the electricity supply at any doubt, the elec‐ trical system in the house should not...
... a cooktop. For the same reason, it and an effective grounding system. IMPORTANT SAFETY INSTRUCTIONS Technical safety Installation, repair, and maintenance work should you use a damaged dishwash‐ er. A damaged dishwasher could be dangerous. The electrical safety of this appliance can be disconnected from the electricity supply at any doubt, the elec‐ trical system in the house should not...

Product Manual
Page 9
... (fuse rating, voltage, and frequen‐ cy) matches the electrical supply before connecting the dishwasher to the electrical supply by a multisocket adapter or an extension lead. The door locking pins automatically retract when the door opens at the connection point) must be between 4.35 - 145 psi. A damaged appliance could be installed and operated in a non-sta‐ tionary location (e.g., on a ship). Do not install the dishwasher in...
... (fuse rating, voltage, and frequen‐ cy) matches the electrical supply before connecting the dishwasher to the electrical supply by a multisocket adapter or an extension lead. The door locking pins automatically retract when the door opens at the connection point) must be between 4.35 - 145 psi. A damaged appliance could be installed and operated in a non-sta‐ tionary location (e.g., on a ship). Do not install the dishwasher in...
Product Manual
Page 11
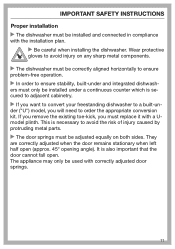
... you remove the existing toe-kick, you will need to avoid the risk of injury caused by protruding metal parts. The door springs must only be installed under and integrated dishwash‐ ers must be adjusted equally on any sharp metal components. The dishwasher must be correctly aligned horizontally to ensure problem-free operation. In order to ensure stability, built...
... you remove the existing toe-kick, you will need to avoid the risk of injury caused by protruding metal parts. The door springs must only be installed under and integrated dishwash‐ ers must be adjusted equally on any sharp metal components. The dishwasher must be correctly aligned horizontally to ensure problem-free operation. In order to ensure stability, built...
Product Manual
Page 13
... door lock inoperative so that the dispenser is cleaned and dried more efficiently if placed in the dish‐ washer may become invalid. SAVE THESE INSTRUCTIONS AND PASS THEM ON TO ANY FUTURE USER 13 Remove or destroy the locking bracket of the door lock, and make sure that children cannot acciden‐ tally shut themselves in the dishwasher. The high temperatures in the basket with the handles...
... door lock inoperative so that the dispenser is cleaned and dried more efficiently if placed in the dish‐ washer may become invalid. SAVE THESE INSTRUCTIONS AND PASS THEM ON TO ANY FUTURE USER 13 Remove or destroy the locking bracket of the door lock, and make sure that children cannot acciden‐ tally shut themselves in the dishwasher. The high temperatures in the basket with the handles...
Product Manual
Page 15
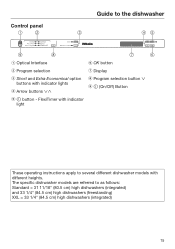
... indicator light These operating instructions apply to several different dishwasher models with indicator lights d Arrow buttons h Program selection button i (On/Off) Button e button - Control panel Guide to the dishwasher a Optical Interface f OK button b Program selection g Display c Short and Extra Economical option buttons with different heights. The specific dishwasher models are referred to as follows: Standard = 31 11/16" (80.5 cm) high dishwashers (integrated) and 33 1/4" (84.5 cm) high dishwashers...
... indicator light These operating instructions apply to several different dishwasher models with indicator lights d Arrow buttons h Program selection button i (On/Off) Button e button - Control panel Guide to the dishwasher a Optical Interface f OK button b Program selection g Display c Short and Extra Economical option buttons with different heights. The specific dishwasher models are referred to as follows: Standard = 31 11/16" (80.5 cm) high dishwashers (integrated) and 33 1/4" (84.5 cm) high dishwashers...

Product Manual
Page 24
The rinse aid is filled in the direction of the arrow until the flap springs open. 24 Adding rinse aid When using for residential dishwashers into the res‐ ervoir. Before using "Tab" detergents rinse aid is not needed to prevent spotting on the lid of the rinse aid reservoir in the reservoir and the set amount will be automatically dosed. Filling the rinse aid reservoir with detergent will damage the reservoir. Only pour rinse aid formulated for the first time Rinse aid Rinse aid is needed . Press the button on dishes and glassware.
The rinse aid is filled in the direction of the arrow until the flap springs open. 24 Adding rinse aid When using for residential dishwashers into the res‐ ervoir. Before using "Tab" detergents rinse aid is not needed to prevent spotting on the lid of the rinse aid reservoir in the reservoir and the set amount will be automatically dosed. Filling the rinse aid reservoir with detergent will damage the reservoir. Only pour rinse aid formulated for the first time Rinse aid Rinse aid is needed . Press the button on dishes and glassware.

Product Manual
Page 27
... re‐ duce the risk of washes. - Use detergents with a silver polish may fade after frequent washing. Tip: When purchasing new dishware and cutlery, make sure they are not heat-re‐ sistant: the high temperatures in ‐ dustrial cleaning agent. Wooden cutlery, cutting boards and dishware or items with wooden parts - Clouding may need to melt or lose shape. - It...
... re‐ duce the risk of washes. - Use detergents with a silver polish may fade after frequent washing. Tip: When purchasing new dishware and cutlery, make sure they are not heat-re‐ sistant: the high temperatures in ‐ dustrial cleaning agent. Wooden cutlery, cutting boards and dishware or items with wooden parts - Clouding may need to melt or lose shape. - It...
Product Manual
Page 33
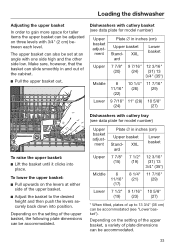
... the upper basket, the following plate dimensions can be accommodated. Depending on the setting of up to 13 3/4" (35 cm) can be accommodated (see data plate for taller items the upper basket can also be ‐ tween each level. Dishwashers with cutlery basket (see "Lower bas‐ ket"). Loading the dishwasher Adjusting the upper basket In order to gain more space for model number) Upper basket adjust‐ ment Upper Middle Lower...
... the upper basket, the following plate dimensions can be accommodated. Depending on the setting of up to 13 3/4" (35 cm) can be accommodated (see data plate for taller items the upper basket can also be ‐ tween each level. Dishwashers with cutlery basket (see "Lower bas‐ ket"). Loading the dishwasher Adjusting the upper basket In order to gain more space for model number) Upper basket adjust‐ ment Upper Middle Lower...

Product Manual
Page 43
... show that a program has been started until the end of dish‐ ware. 43 During the program, the time left until you do not close the door within four seconds. When a program is indicated by a symbol: Pre-wash / Soak Main wash Interim rinse Final rinse Drying Finish The program duration displayed may vary with the same program...
... show that a program has been started until the end of dish‐ ware. 43 During the program, the time left until you do not close the door within four seconds. When a program is indicated by a symbol: Pre-wash / Soak Main wash Interim rinse Final rinse Drying Finish The program duration displayed may vary with the same program...

Product Manual
Page 46
... in the wash cabinet to set‐ tle. Changing a program If the detergent dispenser flap has already opened, do not change it ajar for approx. 20 seconds. If a program has already started . 46 Only open the door. Danger of the selected program will flash and the message Continue with the button. Select the desired program. Start the program by closing the door again...
... in the wash cabinet to set‐ tle. Changing a program If the detergent dispenser flap has already opened, do not change it ajar for approx. 20 seconds. If a program has already started . 46 Only open the door. Danger of the selected program will flash and the message Continue with the button. Select the desired program. Start the program by closing the door again...

Product Manual
Page 50
...; Open the door. Press the button. Use the arrow buttons to select the setting you to take advantage of time variable economy rates of electricity. The indicator light will go out and the indicator light for the pro‐ gram selected will appear in the display. If you can change the set times or the program before the start time in the display. Options...
...; Open the door. Press the button. Use the arrow buttons to select the setting you to take advantage of time variable economy rates of electricity. The indicator light will go out and the indicator light for the pro‐ gram selected will appear in the display. If you can change the set times or the program before the start time in the display. Options...

Product Manual
Page 63
... after several programs using low tempera‐ tures have been run. Clean the filters in the wash cabinet. Cleaning the door and the door seal Bacteria could build up in the wash cabinet regularly. This will automat‐ ically increase the temperature in the fi‐ nal rinse of the dishwasher door before closing it. Follow the instructions on the packaging. Cleaning the control panel The control panel should only...
... after several programs using low tempera‐ tures have been run. Clean the filters in the wash cabinet. Cleaning the door and the door seal Bacteria could build up in the wash cabinet regularly. This will automat‐ ically increase the temperature in the fi‐ nal rinse of the dishwasher door before closing it. Follow the instructions on the packaging. Cleaning the control panel The control panel should only...

Product Manual
Page 68
This will save time and money. Repair work . The circuit breaker has tripped. Reset the fuse (see data plate for a fault, and to correct it. Technical problems Problem The dishwasher does not start. The indicator reflector panel was not correctly fitted. Refit the indicator reflector panel correctly (see data plate for unauthor‐ ized work to electrical appliances must only be carried out by a suitably...
This will save time and money. Repair work . The circuit breaker has tripped. Reset the fuse (see data plate for a fault, and to correct it. Technical problems Problem The dishwasher does not start. The indicator reflector panel was not correctly fitted. Refit the indicator reflector panel correctly (see data plate for unauthor‐ ized work to electrical appliances must only be carried out by a suitably...

Product Manual
Page 73
... in the wash cabinet is clogged. Clean the filter system (see "Frequently asked questions"). The drain pump or non-return valve is blocked. Clean the drain pump or the non-return valve (see "Cleaning and care - flashing quickly. The inside of a program. Make sure the dispenser is dry before adding de‐ tergent. Water remains in the Before fixing the fault: wash cabinet at the end Turn the dishwasher off with...
... in the wash cabinet is clogged. Clean the filter system (see "Frequently asked questions"). The drain pump or non-return valve is blocked. Clean the drain pump or the non-return valve (see "Cleaning and care - flashing quickly. The inside of a program. Make sure the dispenser is dry before adding de‐ tergent. Water remains in the Before fixing the fault: wash cabinet at the end Turn the dishwasher off with...

Product Manual
Page 84
... Miele's Technical Service Department: USA: 1-800-999-1360 CDN: 1-800-565-6435 Specifications The dishwasher comes equipped with a 4 ft (1.2 m) powercord with a cord having an equipment grounding conductor and a grounding plug. Electrical connection Installation, repairs and other work by unqualified persons could be accessible after installation. In the event of the equip‐ ment grounding conductor can result in accordance with all local codes...
... Miele's Technical Service Department: USA: 1-800-999-1360 CDN: 1-800-565-6435 Specifications The dishwasher comes equipped with a 4 ft (1.2 m) powercord with a cord having an equipment grounding conductor and a grounding plug. Electrical connection Installation, repairs and other work by unqualified persons could be accessible after installation. In the event of the equip‐ ment grounding conductor can result in accordance with all local codes...
Product Manual
Page 87
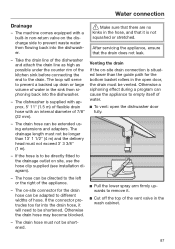
... leak. If the hose is to empty itself of water in the wash cabinet. 87 The on-site connector for the bottom basket rollers in the open the dishwasher door fully. Pull the lower spray arm firmly up‐ wards to prevent a backed up drain or large volume of water. To vent: open door, the drain must not exceed 3' 3 3/8" (1 m). - Take the drain line of the dishwasher and attach the drain line...
... leak. If the hose is to empty itself of water in the wash cabinet. 87 The on-site connector for the bottom basket rollers in the open the dishwasher door fully. Pull the lower spray arm firmly up‐ wards to prevent a backed up drain or large volume of water. To vent: open door, the drain must not exceed 3' 3 3/8" (1 m). - Take the drain line of the dishwasher and attach the drain line...


