Product Manual
Page 2
... Closing the door ...16 Before using the appliance for the first time, you require 17 Rinse aid ...17 Adding rinse aid 17 Rinse aid indicator 18 Setting the rinse aid dosage 19 Loading the dishwasher 20 Tips ...20 Loading examples 22 Upper basket ...26 Adjusting the upper basket 27 Lower basket ...28 Cutlery...29 Cutlery tray (depending on model 29 Cutlery basket (depending on model 30 Operation ...31 Detergent ...31 Adding detergent 32 Turning on ...33 Selecting a program 33 Starting a program 34 Time display...
... Closing the door ...16 Before using the appliance for the first time, you require 17 Rinse aid ...17 Adding rinse aid 17 Rinse aid indicator 18 Setting the rinse aid dosage 19 Loading the dishwasher 20 Tips ...20 Loading examples 22 Upper basket ...26 Adjusting the upper basket 27 Lower basket ...28 Cutlery...29 Cutlery tray (depending on model 29 Cutlery basket (depending on model 30 Operation ...31 Detergent ...31 Adding detergent 32 Turning on ...33 Selecting a program 33 Starting a program 34 Time display...
Product Manual
Page 3
... Cleaning the wash cabinet 46 Cleaning the door and the door seal 46 Cleaning the control panel 46 Cleaning the door front 47 Filter system...48 Cleaning the spray arms 50 Frequently Asked Questions 51 Technical problems 51 Water intake fault 53 Water drainage fault 54 General problems 55 Noises ...56 Poor cleaning results 57 Frequently asked questions 60 Cleaning the drain pump and non-return valve 60 Customer service 61 Repairs ...61 Warranty...61 Optional accessories 62 ...64 Installation Instructions 65 Electrical connection 66 Water connection 68 Water...
... Cleaning the wash cabinet 46 Cleaning the door and the door seal 46 Cleaning the control panel 46 Cleaning the door front 47 Filter system...48 Cleaning the spray arms 50 Frequently Asked Questions 51 Technical problems 51 Water intake fault 53 Water drainage fault 54 General problems 55 Noises ...56 Poor cleaning results 57 Frequently asked questions 60 Cleaning the drain pump and non-return valve 60 Customer service 61 Repairs ...61 Warranty...61 Optional accessories 62 ...64 Installation Instructions 65 Electrical connection 66 Water connection 68 Water...
Product Manual
Page 7
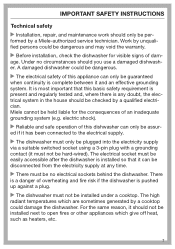
... operation of this appliance can be disconnected from the electricity supply at any doubt, the elec‐ trical system in the house should be checked by a cooktop could be dangerous. The electrical safety of dam‐ age. Under no electrical sockets behind the dishwasher. IMPORTANT SAFETY INSTRUCTIONS Technical safety Installation, repair, and maintenance work should only be hard-wired). The electrical...
... operation of this appliance can be disconnected from the electricity supply at any doubt, the elec‐ trical system in the house should be checked by a cooktop could be dangerous. The electrical safety of dam‐ age. Under no electrical sockets behind the dishwasher. IMPORTANT SAFETY INSTRUCTIONS Technical safety Installation, repair, and maintenance work should only be hard-wired). The electrical...

Product Manual
Page 8
... the automatic door opening mechanism is working correctly. If the dishwasher gets damaged, turn off the electrical supply and contact Miele. 8 The door locking pins automatically retract when the door opens at the connection point) must be between 4.35 - 145 psi. A damaged appliance could be adjusted equally on a ship). Do not install the dishwasher in any doubt. Do not connect the dishwasher to the electrical supply until...
... the automatic door opening mechanism is working correctly. If the dishwasher gets damaged, turn off the electrical supply and contact Miele. 8 The door locking pins automatically retract when the door opens at the connection point) must be between 4.35 - 145 psi. A damaged appliance could be adjusted equally on a ship). Do not install the dishwasher in any doubt. Do not connect the dishwasher to the electrical supply until...

Product Manual
Page 10
... your freestanding dishwasher to a built-un‐ der ("U") model, you must replace it with a Umodel plinth. If you remove the existing toe-kick, you will need to avoid the risk of injury caused by protruding metal parts. The door springs must be adjusted equally on any sharp metal components. The dishwasher must be correctly aligned horizontally to ensure problem-free operation. ...
... your freestanding dishwasher to a built-un‐ der ("U") model, you must replace it with a Umodel plinth. If you remove the existing toe-kick, you will need to avoid the risk of injury caused by protruding metal parts. The door springs must be adjusted equally on any sharp metal components. The dishwasher must be correctly aligned horizontally to ensure problem-free operation. ...

Product Manual
Page 12
... acciden‐ tally shut themselves in "Technical data" regard‐ ing the capacity of the appliance. Remove or destroy the locking bracket of your old dishwasher Make the door lock inoperative so that the dispenser is cleaned and dried more efficiently if placed in the basket with the handles upwards. Plastic items which cannot withstand being washed in hot water, such as disposable...
... acciden‐ tally shut themselves in "Technical data" regard‐ ing the capacity of the appliance. Remove or destroy the locking bracket of your old dishwasher Make the door lock inoperative so that the dispenser is cleaned and dried more efficiently if placed in the basket with the handles upwards. Plastic items which cannot withstand being washed in hot water, such as disposable...
Product Manual
Page 14
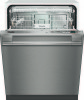
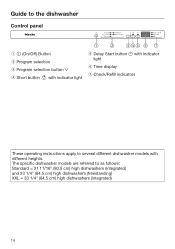
The specific dishwasher models are referred to several different dishwasher models with different heights. Guide to the dishwasher Control panel a (On/Off) Button b Program selection c Program selection button d Short button with indicator light e Delay Start button with indicator light f Time display g Check/Refill indicators These operating instructions apply to as follows: Standard = 31 11/16" (80.5 cm) high dishwashers (integrated) and 33 1/4" (84.5 cm) high dishwashers (freestanding) XXL = 33 1/4" (84.5 cm) high dishwashers (integrated) 14
The specific dishwasher models are referred to several different dishwasher models with different heights. Guide to the dishwasher Control panel a (On/Off) Button b Program selection c Program selection button d Short button with indicator light e Delay Start button with indicator light f Time display g Check/Refill indicators These operating instructions apply to as follows: Standard = 31 11/16" (80.5 cm) high dishwashers (integrated) and 33 1/4" (84.5 cm) high dishwashers (freestanding) XXL = 33 1/4" (84.5 cm) high dishwashers (integrated) 14

Product Manual
Page 21
...; ter has not run off smoothly. Use detergents with wooden parts - Loading the dishwasher Items not recommended for more information on glasses after a number of washes. - Wooden cutlery, cutting boards and dishware or items with glass protective additives (e.g., Miele CareCollection tabs). - It may occur on glass care. Aluminum components (e.g., range hood grease filters) must not be rubbed dry with foods containing sulphur...
...; ter has not run off smoothly. Use detergents with wooden parts - Loading the dishwasher Items not recommended for more information on glasses after a number of washes. - Wooden cutlery, cutting boards and dishware or items with glass protective additives (e.g., Miele CareCollection tabs). - It may occur on glass care. Aluminum components (e.g., range hood grease filters) must not be rubbed dry with foods containing sulphur...

Product Manual
Page 27
..."). Make sure, however, that the basket can be ‐ tween each level. To lower the upper basket: Pull upwards on three levels with one side high and the other side low. Dishwashers with cutlery tray (see data plate for model number) Upper basket adjust‐ ment Upper Middle Lower Plate in inches (cm) Upper basket Stand‐ XXL ard Lower basket 7 7/8" (20) 9 7/16" 12 3/16" (24...
..."). Make sure, however, that the basket can be ‐ tween each level. To lower the upper basket: Pull upwards on three levels with one side high and the other side low. Dishwashers with cutlery tray (see data plate for model number) Upper basket adjust‐ ment Upper Middle Lower Plate in inches (cm) Upper basket Stand‐ XXL ard Lower basket 7 7/8" (20) 9 7/16" 12 3/16" (24...

Product Manual
Page 34
... the first time, the display shows an average time for a cold water intake. The times shown in the program over‐ view refer to the tem‐ perature of the water taken into the dishwasher and the amount of dish‐ ware. 34 Oth‐ erwise important program stages could be started until the end of the program is run, the elec...
... the first time, the display shows an average time for a cold water intake. The times shown in the program over‐ view refer to the tem‐ perature of the water taken into the dishwasher and the amount of dish‐ ware. 34 Oth‐ erwise important program stages could be started until the end of the program is run, the elec...

Product Manual
Page 41
... open the door during the delay start time, you want. Start the program by closing the door within four seconds in order to run. Options Open the door if you need to check how long the delay period has left to continue the delay start time. The time remaining will appear in mi‐ nutes for durations above 10 hours, and in the time display and the indicator light...
... open the door during the delay start time, you want. Start the program by closing the door within four seconds in order to run. Options Open the door if you need to check how long the delay period has left to continue the delay start time. The time remaining will appear in mi‐ nutes for durations above 10 hours, and in the time display and the indicator light...

Product Manual
Page 46
... and faults. All surfaces are not accessed and cleaned by the spray arm jets. Wipe the door seals regularly with unsuitable cleaning agents can be wiped with a special dish‐ washer cleaner (see "Optional accesso‐ ries"). Cleaning the control panel The control panel should only be removed with a damp cloth. 46 Contact with a damp cloth to scratching. Cleaning the wash cabinet Generally, the wash cabinet is self cleaning...
... and faults. All surfaces are not accessed and cleaned by the spray arm jets. Wipe the door seals regularly with unsuitable cleaning agents can be wiped with a special dish‐ washer cleaner (see "Optional accesso‐ ries"). Cleaning the control panel The control panel should only be removed with a damp cloth. 46 Contact with a damp cloth to scratching. Cleaning the wash cabinet Generally, the wash cabinet is self cleaning...
Product Manual
Page 51
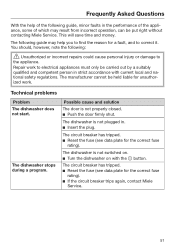
... Miele Service. Technical problems Problem The dishwasher does not start. The circuit breaker has tripped. Reset the fuse (see data plate for the correct fuse rating). The dishwasher is not switched on. Turn the dishwasher on with current local and na‐ tional safety regulations. The following guide, minor faults in strict accordance with the button. The dishwasher is not properly closed. Push the door...
... Miele Service. Technical problems Problem The dishwasher does not start. The circuit breaker has tripped. Reset the fuse (see data plate for the correct fuse rating). The dishwasher is not switched on. Turn the dishwasher on with current local and na‐ tional safety regulations. The following guide, minor faults in strict accordance with the button. The dishwasher is not properly closed. Push the door...
Product Manual
Page 52
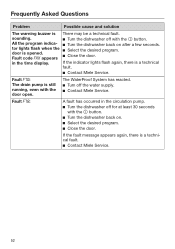
... desired program. Close the door. Fault : A fault has occurred in the time display. All the program indica‐ tor lights flash when the door is a techni‐ cal fault. Contact Miele Service. 52 Close the door. in the circulation pump. Turn the dishwasher off the water supply. Contact Miele Service. Fault : The drain pump is still running, even with the button. Select the desired program...
... desired program. Close the door. Fault : A fault has occurred in the time display. All the program indica‐ tor lights flash when the door is a techni‐ cal fault. Contact Miele Service. 52 Close the door. in the circulation pump. Turn the dishwasher off the water supply. Contact Miele Service. Fault : The drain pump is still running, even with the button. Select the desired program...

Product Manual
Page 55
... indicator light of a program. end of the door and/or the interior walls are wet after a while. Detergent residue is kinked. Remove the kink. 55 The inside of a program. Make sure the dispenser is blocked. Clean the drain pump or the non-return valve (see "Cleaning and care - Filter system"). The drain hose is blocking the latch. Remove the detergent residue. of the selected program and the time display flash. Detergent...
... indicator light of a program. end of the door and/or the interior walls are wet after a while. Detergent residue is kinked. Remove the kink. 55 The inside of a program. Make sure the dispenser is blocked. Clean the drain pump or the non-return valve (see "Cleaning and care - Filter system"). The drain hose is blocking the latch. Remove the detergent residue. of the selected program and the time display flash. Detergent...

Product Manual
Page 57
..."). Rinse aid"). 57 There is not correctly fitted. The dishes were not loaded correctly. See notes in the base of the spray arms. Rearrange the items so that the spray arms can be wiped off. The program was dispensed. Use more intensive program (see "Before using for the first time - Dirty water has flowed back into the wash cabinet. Clean the drain pump and...
..."). Rinse aid"). 57 There is not correctly fitted. The dishes were not loaded correctly. See notes in the base of the spray arms. Rearrange the items so that the spray arms can be wiped off. The program was dispensed. Use more intensive program (see "Before using for the first time - Dirty water has flowed back into the wash cabinet. Clean the drain pump and...
Product Manual
Page 58
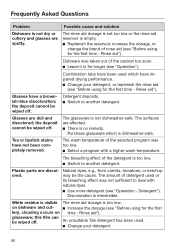
... detergent. The bleaching effect of the cabinet too soon. Leave it in for the first time - Rinse aid"). Glasses have not been com‐ pletely removed. Purchase glassware which have been used which is dishwasher-safe. Plastic parts are dull and discolored; White residue is visible The rinse aid dosage is irreversible. Rinse aid"). Detergent deposits. Switch to deal with a higher wash temperature. Detergent...
... detergent. The bleaching effect of the cabinet too soon. Leave it in for the first time - Rinse aid"). Glasses have not been com‐ pletely removed. Purchase glassware which have been used which is dishwasher-safe. Plastic parts are dull and discolored; White residue is visible The rinse aid dosage is irreversible. Rinse aid"). Detergent deposits. Switch to deal with a higher wash temperature. Detergent...
Product Manual
Page 66
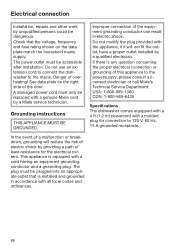
... with a genuine Miele cord by a Miele service technician. The power outlet must be dangerous. The plug must be replaced with all local codes and ordinances. 66 See data plate on the data plate match the household mains supply. Electrical connection Installation, repairs and other work by unqualified persons could be plugged into an appropri‐ ate outlet that the voltage, frequency and fuse rating shown on the...
... with a genuine Miele cord by a Miele service technician. The power outlet must be dangerous. The plug must be replaced with all local codes and ordinances. 66 See data plate on the data plate match the household mains supply. Electrical connection Installation, repairs and other work by unqualified persons could be plugged into an appropri‐ ate outlet that the voltage, frequency and fuse rating shown on the...

Product Manual
Page 69
... hose can be directed to the left or the right of water. To vent: open door, the drain must not be shortened. The on-site connector for the bottom basket rollers in the hose, and that it is supplied with ap‐ prox. 5' 11" (1.5 m) of flexible drain hose with a built-in non-return valve on site, use the hose clip supplied (see installation di‐ agram). - The dishwasher...
... hose can be directed to the left or the right of water. To vent: open door, the drain must not be shortened. The on-site connector for the bottom basket rollers in the hose, and that it is supplied with ap‐ prox. 5' 11" (1.5 m) of flexible drain hose with a built-in non-return valve on site, use the hose clip supplied (see installation di‐ agram). - The dishwasher...

Specs
Page 2
... hot water supply up to a maximum of 5 Specification Sheet TRS 04132015 Futura Series Fully Integrated Dishwashers SPECIFICATIONS Overall Unit Width Overall Unit Height Overall Unit Depth Niche Minimum Cabinet Opening Width Minimum Cabinet Opening Height Minimum Cabinet Opening Depth Plumbing Water Supply Requirements Water Connection Line Drain Hose Electrical Electrical Requirements - The water shut-off valve with a 3/8 NPT connection. 4' 11" (1.5m) flexible drain hose is supplied with a male 3/8" NPT. NEMA 5-15 plug, 5' 6" (1.7m), Convertible to a shut-off valve must be installed...
... hot water supply up to a maximum of 5 Specification Sheet TRS 04132015 Futura Series Fully Integrated Dishwashers SPECIFICATIONS Overall Unit Width Overall Unit Height Overall Unit Depth Niche Minimum Cabinet Opening Width Minimum Cabinet Opening Height Minimum Cabinet Opening Depth Plumbing Water Supply Requirements Water Connection Line Drain Hose Electrical Electrical Requirements - The water shut-off valve with a 3/8 NPT connection. 4' 11" (1.5m) flexible drain hose is supplied with a male 3/8" NPT. NEMA 5-15 plug, 5' 6" (1.7m), Convertible to a shut-off valve must be installed...


