
Product Manual
Page 1
US, CA M.-Nr. 09 743 750 en - Operating and Installation Instructions Freezer with Ice Maker F 1801 Vi, F 1811 Vi F 1901 Vi, F 1911 Vi To prevent accidents and appliance damage read these instructions before installation or use.
US, CA M.-Nr. 09 743 750 en - Operating and Installation Instructions Freezer with Ice Maker F 1801 Vi, F 1811 Vi F 1901 Vi, F 1911 Vi To prevent accidents and appliance damage read these instructions before installation or use.

Product Manual
Page 2
... Turning off for longer periods of time 13 Temperature and door alarm 14 Temperature alarm 14 Door alarm 14 Setting the temperature 15 Using the freezer efficiently 17 Freezing food 17 Defrosting 18 Cooling drinks quickly 18 SuperCool 20 Ice cube maker 21 Automatic defrost 22 Adjusting the interior fittings 23 Moving the shelves 23 Freezer baskets 23 Ice cube container 24 Cleaning and care 25 Cleaning the interior and accessories 26 Ventilation slits 27 Door seals 27 Changing the light bulb 28 Water filter 30 Water filter change indicator...
... Turning off for longer periods of time 13 Temperature and door alarm 14 Temperature alarm 14 Door alarm 14 Setting the temperature 15 Using the freezer efficiently 17 Freezing food 17 Defrosting 18 Cooling drinks quickly 18 SuperCool 20 Ice cube maker 21 Automatic defrost 22 Adjusting the interior fittings 23 Moving the shelves 23 Freezer baskets 23 Ice cube container 24 Cleaning and care 25 Cleaning the interior and accessories 26 Ventilation slits 27 Door seals 27 Changing the light bulb 28 Water filter 30 Water filter change indicator...

Product Manual
Page 3
Contents Caring for the environment 46 Installation 47 Installation site 47 Stainless steel panels 50 Custom door panels 50 Installation options 50 Dimensions 54 Niche dimensions 54 Installing the appliance 57 Before you begin 57 RemoteVision module installation 59 Preparing the installation niche 60 Sliding the appliance into the installation niche 64 Aligning the appliance 65 Attaching the appliance to the installation niche 66 Preparing the custom door 68 Attaching...
Contents Caring for the environment 46 Installation 47 Installation site 47 Stainless steel panels 50 Custom door panels 50 Installation options 50 Dimensions 54 Niche dimensions 54 Installing the appliance 57 Before you begin 57 RemoteVision module installation 59 Preparing the installation niche 60 Sliding the appliance into the installation niche 64 Aligning the appliance 65 Attaching the appliance to the installation niche 66 Preparing the custom door 68 Attaching...
Product Manual
Page 4
... operating instructions in doubt. ~ Before installation or service, disconnect the power supply to the work is complete. 4 Electrical Safety ~ Before installation, make sure that this appliance continuity must correspond to any doubt, have the electrical system of this basic safety requirement be met. Extension cords do not guarantee the required safety of the appliance (e.g., danger of the appliance can lead to connect this Operating manual...
... operating instructions in doubt. ~ Before installation or service, disconnect the power supply to the work is complete. 4 Electrical Safety ~ Before installation, make sure that this appliance continuity must correspond to any doubt, have the electrical system of this basic safety requirement be met. Extension cords do not guarantee the required safety of the appliance (e.g., danger of the appliance can lead to connect this Operating manual...

Product Manual
Page 5
..., or with the installation instructions. ~ Installation and repair work environments - shops, offices and similar work should be used ; Do not place fingers or hands on the bottom of tipping forward. Contact Miele's Technical Service Department. ~ This appliance must be installed and connected in compliance with the heating element located on the automatic ice making mechanism while the freezer is plugged in. ~ The ice cube maker is used in a room...
..., or with the installation instructions. ~ Installation and repair work environments - shops, offices and similar work should be used ; Do not place fingers or hands on the bottom of tipping forward. Contact Miele's Technical Service Department. ~ This appliance must be installed and connected in compliance with the heating element located on the automatic ice making mechanism while the freezer is plugged in. ~ The ice cube maker is used in a room...

Product Manual
Page 6
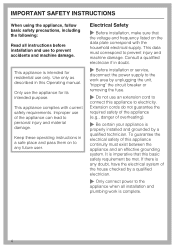
... especially in the door hinge area. ~ After your freezer is in operation, do not allow children to play in, on the door seal, as these extremely cold surfaces. ~ Do not refreeze frozen foods which could damage electrical components and cause a short circuit. 6 IMPORTANT SAFETY INSTRUCTIONS ~ Persons who ...top of the appliance, increase the electricity consumption and cause damage to the appliance. ~ Never use a steam cleaner to remove frost and ice, or separate frozen foods and remove ice trays. Skin may adhere to these will cause the seal to deteriorate and become porous with time...
... especially in the door hinge area. ~ After your freezer is in operation, do not allow children to play in, on the door seal, as these extremely cold surfaces. ~ Do not refreeze frozen foods which could damage electrical components and cause a short circuit. 6 IMPORTANT SAFETY INSTRUCTIONS ~ Persons who ...top of the appliance, increase the electricity consumption and cause damage to the appliance. ~ Never use a steam cleaner to remove frost and ice, or separate frozen foods and remove ice trays. Skin may adhere to these will cause the seal to deteriorate and become porous with time...

Product Manual
Page 10
... time ^ Clean the inside of warm water and liquid dish soap. Do not put any food in the control panel. When the door is located on , the appliance begins cooling. Turning the appliance On/Off ^ Open the appliance door. Dry with a mild solution of the appliance and the accessories with a soft cloth. Before use Before using for approx. 8 hours before connecting it from the power supply...
... time ^ Clean the inside of warm water and liquid dish soap. Do not put any food in the control panel. When the door is located on , the appliance begins cooling. Turning the appliance On/Off ^ Open the appliance door. Dry with a mild solution of the appliance and the accessories with a soft cloth. Before use Before using for approx. 8 hours before connecting it from the power supply...
Product Manual
Page 11
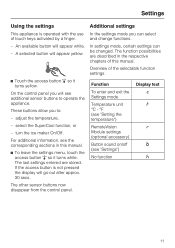
... information, see the corresponding sections in the respective chapters of this manual. ^ To leave the settings menu, touch the access button "p" so it turns yellow. On the control panel you to operate the appliance. and change functions. - In settings mode, certain settings can select of the selectable function settings: ^ Touch the access button "p" so it turns white. Overview of touch keys activated by a finger. turn the ice maker On/Off.
... information, see the corresponding sections in the respective chapters of this manual. ^ To leave the settings menu, touch the access button "p" so it turns yellow. On the control panel you to operate the appliance. and change functions. - In settings mode, certain settings can select of the selectable function settings: ^ Touch the access button "p" so it turns white. Overview of touch keys activated by a finger. turn the ice maker On/Off.

Product Manual
Page 13
Turning off for longer periods of time If the appliance is not going to be used for an extended time (for example, during a vacation) some precautions need to be taken: ^ Shut off the water supply line, (several hours before switching off the appliance) ^ Take all food out of the appliance ^ Turn the appliance off ^ Unplug the appliance ^ Empty the ice cube container ^ Clean the interior ^ Remove and discard the water filter (secure the filter cap) ^ Leave the door open to prevent odors Settings 13
Turning off for longer periods of time If the appliance is not going to be used for an extended time (for example, during a vacation) some precautions need to be taken: ^ Shut off the water supply line, (several hours before switching off the appliance) ^ Take all food out of the appliance ^ Turn the appliance off ^ Unplug the appliance ^ Empty the ice cube container ^ Clean the interior ^ Remove and discard the water filter (secure the filter cap) ^ Leave the door open to prevent odors Settings 13

Product Manual
Page 23
... back. ^ Turn the safety lock back to the vertical position. ^ Slide the freezer basket in. 23 Removing a door shelf ^ Slide it slightly forward. ^ Slide the tipped shelf up and out. ^ When replacing the shelf, make sure that it into place with the lower hooks. ^ Make sure the shelf is level. Adjusting the door shelves For easier loading, unloading, and cleaning, the door shelves can be shifted or completely removed. ^ Using both hands, grasp the door shelf by...
... back. ^ Turn the safety lock back to the vertical position. ^ Slide the freezer basket in. 23 Removing a door shelf ^ Slide it slightly forward. ^ Slide the tipped shelf up and out. ^ When replacing the shelf, make sure that it into place with the lower hooks. ^ Make sure the shelf is level. Adjusting the door shelves For easier loading, unloading, and cleaning, the door shelves can be shifted or completely removed. ^ Using both hands, grasp the door shelf by...

Product Manual
Page 25
Cleaning and care To reduce the risk of a service call. The data plate located inside the appliance must not be used to clean this appliance. It contains information which is required in the event of electrical shock, disconnect the appliance from the power supply by shutting off the power main, tripping the circuit breaker or unplugging the power cord before maintenance. cleaners containing soda, ammonia...
Cleaning and care To reduce the risk of a service call. The data plate located inside the appliance must not be used to clean this appliance. It contains information which is required in the event of electrical shock, disconnect the appliance from the power supply by shutting off the power main, tripping the circuit breaker or unplugging the power cord before maintenance. cleaners containing soda, ammonia...

Product Manual
Page 26
.... Cleaning the interior and accessories Use a mild solution of warm water and liquid dish soap. ^ Use the main switch to turn the appliance off completely. The main switch is not cleaned away promptly. Aluminum is susceptible to clean the frames. 26 Leave the appliance door open for a short time, so the moisture can evaporate. Do not use stainless steel cleaners; Do not wash in a cool place...
.... Cleaning the interior and accessories Use a mild solution of warm water and liquid dish soap. ^ Use the main switch to turn the appliance off completely. The main switch is not cleaned away promptly. Aluminum is susceptible to clean the frames. 26 Leave the appliance door open for a short time, so the moisture can evaporate. Do not use stainless steel cleaners; Do not wash in a cool place...

Product Manual
Page 27
... time. ^ Clean the door seals with warm water and dry with the main switch. ^ Turn on the SuperCool function. Clean as needed. After cleaning ^ Return all shelves and accessories. ^ Shut the appliance door, plug in the base panel regularly. The freezer section will cool down quickly. ^ Once the temperature is cold enough, place the freezer baskets containing the frozen food into the freezer. ^ Turn off the SuperCool function on the door seals. Cleaning and care Ventilation slits...
... time. ^ Clean the door seals with warm water and dry with the main switch. ^ Turn on the SuperCool function. Clean as needed. After cleaning ^ Return all shelves and accessories. ^ Shut the appliance door, plug in the base panel regularly. The freezer section will cool down quickly. ^ Once the temperature is cold enough, place the freezer baskets containing the frozen food into the freezer. ^ Turn off the SuperCool function on the door seals. Cleaning and care Ventilation slits...

Product Manual
Page 28
... the power supply by unplugging or tripping the circuit breaker. Upper lighting ^ Remove the defective light bulb. ^ Place the new bulb in the socket. When inserting a glass halogen bulb always hold with a soft cloth. 28 Cleaning and care Changing the light bulb The lighting automatically switches off . This is opened briefly, the light bulb should be changed. ^ Use the main switch to turn the appliance off after the door has been open for...
... the power supply by unplugging or tripping the circuit breaker. Upper lighting ^ Remove the defective light bulb. ^ Place the new bulb in the socket. When inserting a glass halogen bulb always hold with a soft cloth. 28 Cleaning and care Changing the light bulb The lighting automatically switches off . This is opened briefly, the light bulb should be changed. ^ Use the main switch to turn the appliance off after the door has been open for...
Product Manual
Page 36
... switch off is not plugged in the power outlet. The SuperCool function SuperCool automatically shuts off for which the appliance is too cold will cause the cooling system to same time. after 52 hours. The temperature display must be corrected without a service call. temperature". Check that the fuse has Reset the circuit breaker. Repairs should only be defective. A large amount of food This makes the compressor run...
... switch off is not plugged in the power outlet. The SuperCool function SuperCool automatically shuts off for which the appliance is too cold will cause the cooling system to same time. after 52 hours. The temperature display must be corrected without a service call. temperature". Check that the fuse has Reset the circuit breaker. Repairs should only be defective. A large amount of food This makes the compressor run...
Product Manual
Page 37
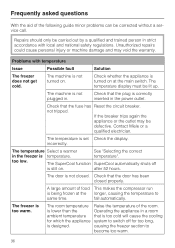
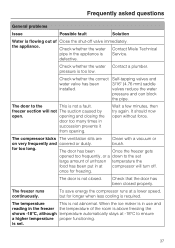
.... The door has been Once the freezer gets opened too frequently, or a down to the This is not a fault. The temperature This is not closed properly. Frequently asked questions General problems Issue Possible fault Solution Water is flowing out of Close the shut-off . Wait a few minutes, then try again. is set large amount of unfrozen temperature the food has been...
.... The door has been Once the freezer gets opened too frequently, or a down to the This is not a fault. The temperature This is not closed properly. Frequently asked questions General problems Issue Possible fault Solution Water is flowing out of Close the shut-off . Wait a few minutes, then try again. is set large amount of unfrozen temperature the food has been...

Product Manual
Page 39
... ice cube maker and collect in the container. Check if: - the ice cube container is in . the freezer compartment temperature is open. - Self-tapping valves and 3/16" (4.76 mm) saddle valves reduce the water...power supply. switched on . See "Ice Cube Maker" and/or "Plumbing" for the first time. Check that the appliance is connected to drop cubes. The water supply line was used for more information. - the water supply line is too high. - The appliance is not turned Check that the appliance is on . Check whether the correct water valve has been installed. the ice...
... ice cube maker and collect in the container. Check if: - the ice cube container is in . the freezer compartment temperature is open. - Self-tapping valves and 3/16" (4.76 mm) saddle valves reduce the water...power supply. switched on . See "Ice Cube Maker" and/or "Plumbing" for the first time. Check that the appliance is connected to drop cubes. The water supply line was used for more information. - the water supply line is too high. - The appliance is not turned Check that the appliance is on . Check whether the correct water valve has been installed. the ice...
Product Manual
Page 68
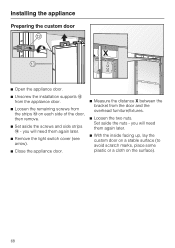
... again later. ^ With the inside facing up, lay the custom door on a stable surface (to avoid scratch marks, place some plastic or a cloth on each side of the door, then remove. ^ Set aside the screws and side strips m - Set aside the nuts - Installing the appliance Preparing the custom door ^ Open the appliance door. ^ Unscrew the installation supports l from the appliance door. ^ Loosen the remaining screws...
... again later. ^ With the inside facing up, lay the custom door on a stable surface (to avoid scratch marks, place some plastic or a cloth on each side of the door, then remove. ^ Set aside the screws and side strips m - Set aside the nuts - Installing the appliance Preparing the custom door ^ Open the appliance door. ^ Unscrew the installation supports l from the appliance door. ^ Loosen the remaining screws...

Product Manual
Page 74
... person, in another easily accessible location. It is only suitable for the water connection must be replaced only Original Miele Spare parts are suitable for drinking water. - Turn off valve directly next to the cold water supply. - Disconnect the appliance from the electrical power supply before connecting the water lines to country requirements for use pipe extenders. The water pressure must not be interrupted as...
... person, in another easily accessible location. It is only suitable for the water connection must be replaced only Original Miele Spare parts are suitable for drinking water. - Turn off valve directly next to the cold water supply. - Disconnect the appliance from the electrical power supply before connecting the water lines to country requirements for use pipe extenders. The water pressure must not be interrupted as...
Product Manual
Page 77
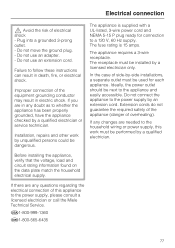
... could be installed by a qualified electrician. If any changes are any doubt as to follow these instructions can result in electric shock. Do not use an adapter. - The receptacle must be next to the household wiring or power supply, this appliance to the power supply, please consult a licensed electrician or call the Miele Technical Service. Extension cords do not guarantee the required safety of...
... could be installed by a qualified electrician. If any changes are any doubt as to follow these instructions can result in electric shock. Do not use an adapter. - The receptacle must be next to the household wiring or power supply, this appliance to the power supply, please consult a licensed electrician or call the Miele Technical Service. Extension cords do not guarantee the required safety of...

