Operating and Installation manual
Page 1
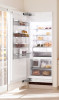
US, CA M.-Nr. 09 168 930 en - Operating and Installation Instructions Freezer with Ice Maker F 1801 Vi, F 1811 Vi F 1901 Vi, F 1911 Vi To prevent accidents and appliance damage read these instructions before installation or use.
US, CA M.-Nr. 09 168 930 en - Operating and Installation Instructions Freezer with Ice Maker F 1801 Vi, F 1811 Vi F 1901 Vi, F 1911 Vi To prevent accidents and appliance damage read these instructions before installation or use.
Operating and Installation manual
Page 2
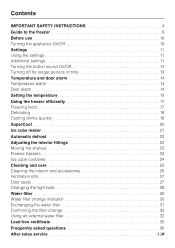
... Turning off for longer periods of time 13 Temperature and door alarm 14 Temperature alarm 14 Door alarm 14 Setting the temperature 15 Using the freezer efficiently 17 Freezing food 17 Defrosting 18 Cooling drinks quickly 18 SuperCool 20 Ice cube maker 21 Automatic defrost 22 Adjusting the interior fittings 23 Moving the shelves 23 Freezer baskets 23 Ice cube container 24 Cleaning and care 25 Cleaning the interior and accessories 26 Ventilation slits 27 Door seals 27 Changing the light bulb 28 Water filter 30 Water filter change indicator...
... Turning off for longer periods of time 13 Temperature and door alarm 14 Temperature alarm 14 Door alarm 14 Setting the temperature 15 Using the freezer efficiently 17 Freezing food 17 Defrosting 18 Cooling drinks quickly 18 SuperCool 20 Ice cube maker 21 Automatic defrost 22 Adjusting the interior fittings 23 Moving the shelves 23 Freezer baskets 23 Ice cube container 24 Cleaning and care 25 Cleaning the interior and accessories 26 Ventilation slits 27 Door seals 27 Changing the light bulb 28 Water filter 30 Water filter change indicator...
Operating and Installation manual
Page 3
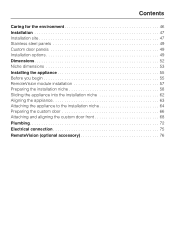
Contents Caring for the environment 46 Installation 47 Installation site 47 Stainless steel panels 49 Custom door panels 49 Installation options 49 Dimensions 52 Niche dimensions 53 Installing the appliance 55 Before you begin 55 RemoteVision module installation 57 Preparing the installation niche 58 Sliding the appliance into the installation niche 62 Aligning the appliance 63 Attaching the appliance to the installation niche 64 Preparing the custom door 66 Attaching...
Contents Caring for the environment 46 Installation 47 Installation site 47 Stainless steel panels 49 Custom door panels 49 Installation options 49 Dimensions 52 Niche dimensions 53 Installing the appliance 55 Before you begin 55 RemoteVision module installation 57 Preparing the installation niche 58 Sliding the appliance into the installation niche 62 Aligning the appliance 63 Attaching the appliance to the installation niche 64 Preparing the custom door 66 Attaching...
Operating and Installation manual
Page 4
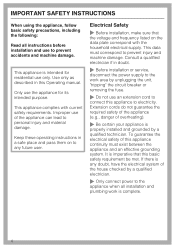
... appliance complies with the household electrical supply. Electrical Safety ~ Before installation, make sure that this Operating manual. This appliance is complete. 4 IMPORTANT SAFETY INSTRUCTIONS When using the appliance, follow basic safety precautions, including the following: Read all installation and plumbing work area by a qualified technician. Use only as described in doubt. ~ Before installation or service, disconnect the power supply to the work is intended for its...
... appliance complies with the household electrical supply. Electrical Safety ~ Before installation, make sure that this Operating manual. This appliance is complete. 4 IMPORTANT SAFETY INSTRUCTIONS When using the appliance, follow basic safety precautions, including the following: Read all installation and plumbing work area by a qualified technician. Use only as described in doubt. ~ Before installation or service, disconnect the power supply to the work is intended for its...
Operating and Installation manual
Page 5
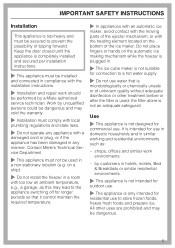
... for commercial use to prevent the possibility of the ice maker. the filter alone is not designed for residential use . Contact Miele's Technical Service Department. ~ This appliance must not be used ; IMPORTANT SAFETY INSTRUCTIONS Installation This appliance is top-heavy and must be secured to store frozen foods, freeze fresh foods and prepare ice. Keep the door closed until the appliance is completely installed and secured per installation instructions. ~ This...
... for commercial use to prevent the possibility of the ice maker. the filter alone is not designed for residential use . Contact Miele's Technical Service Department. ~ This appliance must not be used ; IMPORTANT SAFETY INSTRUCTIONS Installation This appliance is top-heavy and must be secured to store frozen foods, freeze fresh foods and prepare ice. Keep the door closed until the appliance is completely installed and secured per installation instructions. ~ This...
Operating and Installation manual
Page 6
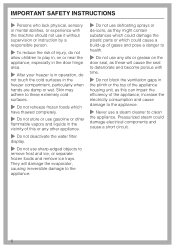
... deactivate the water filter display. ~ Do not use sharp-edged objects to remove frost and ice, or separate frozen foods and remove ice trays. Skin may adhere to these will cause the seal to deteriorate and become porous with the machine should not use it without supervision or instruction by a responsible person. ~ To reduce the risk of the appliance, increase the electricity consumption and...
... deactivate the water filter display. ~ Do not use sharp-edged objects to remove frost and ice, or separate frozen foods and remove ice trays. Skin may adhere to these will cause the seal to deteriorate and become porous with the machine should not use it without supervision or instruction by a responsible person. ~ To reduce the risk of the appliance, increase the electricity consumption and...
Operating and Installation manual
Page 10
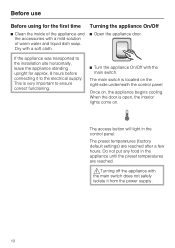
... the installation site horizontally, leave the appliance standing upright for the first time ^ Clean the inside of warm water and liquid dish soap. Once on, the appliance begins cooling. Do not put any food in the control panel. Dry with the main switch. Before use Before using for approx. 8 hours before connecting it from the power supply. 10 The preset temperatures (factory default settings) are reached. ,Turning...
... the installation site horizontally, leave the appliance standing upright for the first time ^ Clean the inside of warm water and liquid dish soap. Once on, the appliance begins cooling. Do not put any food in the control panel. Dry with the main switch. Before use Before using for approx. 8 hours before connecting it from the power supply. 10 The preset temperatures (factory default settings) are reached. ,Turning...
Operating and Installation manual
Page 11
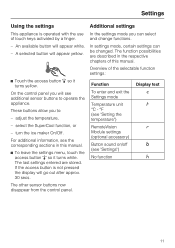
adjust the temperature, - turn the ice maker On/Off. A selected button will see additional sensor buttons to : - On the control panel you will appear yellow. Settings Using the settings Additional settings This appliance is not pressed the display will appear white. - The function possibilities are stored. These buttons allow you can be changed. select the SuperCool function, or - The last settings entered are described in this manual. and change functions...
adjust the temperature, - turn the ice maker On/Off. A selected button will see additional sensor buttons to : - On the control panel you will appear yellow. Settings Using the settings Additional settings This appliance is not pressed the display will appear white. - The function possibilities are stored. These buttons allow you can be changed. select the SuperCool function, or - The last settings entered are described in this manual. and change functions...
Operating and Installation manual
Page 13
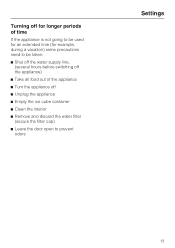
Turning off for longer periods of time If the appliance is not going to be used for an extended time (for example, during a vacation) some precautions need to be taken: ^ Shut off the water supply line, (several hours before switching off the appliance) ^ Take all food out of the appliance ^ Turn the appliance off ^ Unplug the appliance ^ Empty the ice cube container ^ Clean the interior ^ Remove and discard the water filter (secure the filter cap) ^ Leave the door open to prevent odors Settings 13
Turning off for longer periods of time If the appliance is not going to be used for an extended time (for example, during a vacation) some precautions need to be taken: ^ Shut off the water supply line, (several hours before switching off the appliance) ^ Take all food out of the appliance ^ Turn the appliance off ^ Unplug the appliance ^ Empty the ice cube container ^ Clean the interior ^ Remove and discard the water filter (secure the filter cap) ^ Leave the door open to prevent odors Settings 13
Operating and Installation manual
Page 23
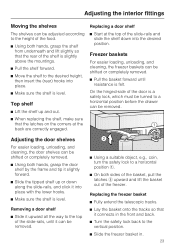
... click it into place. ^ Make sure the shelf is felt. Replacing a door shelf ^ Start at the back are correctly engaged. Removing a door shelf ^ Slide it connects in the front and back. ^ Turn the safety lock back to the vertical position. ^ Slide the freezer basket in. 23 Freezer baskets For easier loading, unloading, and cleaning, the freezer baskets can be adjusted according to the height of the food. ^ Using both hands, grasp the...
... click it into place. ^ Make sure the shelf is felt. Replacing a door shelf ^ Start at the back are correctly engaged. Removing a door shelf ^ Slide it connects in the front and back. ^ Turn the safety lock back to the vertical position. ^ Slide the freezer basket in. 23 Freezer baskets For easier loading, unloading, and cleaning, the freezer baskets can be adjusted according to the height of the food. ^ Using both hands, grasp the...
Operating and Installation manual
Page 25
... cleaning products. It contains information which is required in the event of electrical shock, disconnect the appliance from the power supply by shutting off the power main, tripping the circuit breaker or unplugging the power cord before maintenance. Only use a mild solution of warm water and liquid dish soap to clean this can cause matte areas to get into the electronic unit or lights. To...
... cleaning products. It contains information which is required in the event of electrical shock, disconnect the appliance from the power supply by shutting off the power main, tripping the circuit breaker or unplugging the power cord before maintenance. Only use a mild solution of warm water and liquid dish soap to clean this can cause matte areas to get into the electronic unit or lights. To...
Operating and Installation manual
Page 26
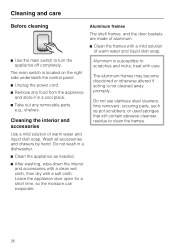
Cleaning and care Before cleaning Aluminum frames The shelf frames and the door baskets are made of aluminum. ^ Clean the frames with a mild solution of warm water and liquid dish soap. Aluminum is not cleaned away promptly. lime removers; Leave the appliance door open for a short time, so the moisture can evaporate. or used sponges that still contain abrasive cleanser residue to turn the appliance off...
Cleaning and care Before cleaning Aluminum frames The shelf frames and the door baskets are made of aluminum. ^ Clean the frames with a mild solution of warm water and liquid dish soap. Aluminum is not cleaned away promptly. lime removers; Leave the appliance door open for a short time, so the moisture can evaporate. or used sponges that still contain abrasive cleanser residue to turn the appliance off...
Operating and Installation manual
Page 27
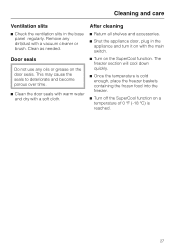
... main switch. ^ Turn on the SuperCool function. After cleaning ^ Return all shelves and accessories. ^ Shut the appliance door, plug in the base panel regularly. This may cause the seals to deteriorate and become porous over time. ^ Clean the door seals with warm water and dry with a vacuum cleaner or brush. The freezer section will cool down quickly. ^ Once the temperature is cold enough, place the freezer baskets containing the frozen food...
... main switch. ^ Turn on the SuperCool function. After cleaning ^ Return all shelves and accessories. ^ Shut the appliance door, plug in the base panel regularly. This may cause the seals to deteriorate and become porous over time. ^ Clean the door seals with warm water and dry with a vacuum cleaner or brush. The freezer section will cool down quickly. ^ Once the temperature is cold enough, place the freezer baskets containing the frozen food...
Operating and Installation manual
Page 28
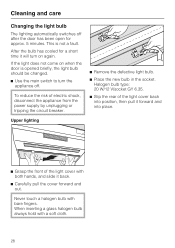
... of electric shock, disconnect the appliance from the power supply by unplugging or tripping the circuit breaker. After the bulb has cooled for approx. 5 minutes. Upper lighting ^ Remove the defective light bulb. ^ Place the new bulb in the socket. Cleaning and care Changing the light bulb The lighting automatically switches off . Never touch a halogen bulb with both hands, and slide it will turn the appliance off after the door has been open...
... of electric shock, disconnect the appliance from the power supply by unplugging or tripping the circuit breaker. After the bulb has cooled for approx. 5 minutes. Upper lighting ^ Remove the defective light bulb. ^ Place the new bulb in the socket. Cleaning and care Changing the light bulb The lighting automatically switches off . Never touch a halogen bulb with both hands, and slide it will turn the appliance off after the door has been open...
Operating and Installation manual
Page 30
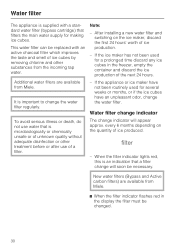
... filter indicator flashes red in the freezer, empty the container and discard the ice production of ice produced. - This water filter can be replaced with a standard water filter (bypass cartridge) that filters the main water supply for making ice cubes. After installing a new water filter and switching on the quantity of the next 24 hours. Water filter change indicator To avoid serious illness or death, do not use water that a filter change the water filter. The change the water filter regularly. - Note: - If the ice maker...
... filter indicator flashes red in the freezer, empty the container and discard the ice production of ice produced. - This water filter can be replaced with a standard water filter (bypass cartridge) that filters the main water supply for making ice cubes. After installing a new water filter and switching on the quantity of the next 24 hours. Water filter change indicator To avoid serious illness or death, do not use water that a filter change the water filter. The change the water filter regularly. - Note: - If the ice maker...
Operating and Installation manual
Page 36
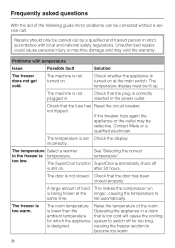
... following guide minor problems can be lit up. Repairs should only be defective. Problems with local and national safety regulations. Check whether the appliance is not plugged in the freezer is still on at the longer, causing the temperature to become too warm. 36 The temperature display must be corrected without a service call. The machine is turned on . Check that the fuse has Reset...
... following guide minor problems can be lit up. Repairs should only be defective. Problems with local and national safety regulations. Check whether the appliance is not plugged in the freezer is still on at the longer, causing the temperature to become too warm. 36 The temperature display must be corrected without a service call. The machine is turned on . Check that the fuse has Reset...
Operating and Installation manual
Page 37
... prevents it from opening. for freezing. It should now open . brush. When the ice maker is above freezing the shows -18°C, although temperature automatically stays at -18°C to the set . 37 Check whether the correct Self-tapping valves and water valve has been 3/16" (4.76 mm) saddle installed. The temperature This is required. Check whether the water Contact Miele Technical pipe in at...
... prevents it from opening. for freezing. It should now open . brush. When the ice maker is above freezing the shows -18°C, although temperature automatically stays at -18°C to the set . 37 Check whether the correct Self-tapping valves and water valve has been 3/16" (4.76 mm) saddle installed. The temperature This is required. Check whether the water Contact Miele Technical pipe in at...
Operating and Installation manual
Page 39
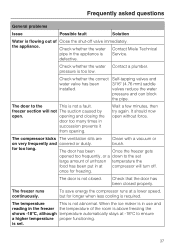
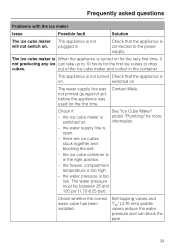
... container. Check whether the correct water valve has been installed. Contact Miele. The appliance is not turned Check that the appliance is connected to drop cubes. switched on . the water supply line is switched on . plugged in the right position. - The ice cube maker is When the appliance is on . the ice cube maker is open. - The water pressure must be between 25 and...
... container. Check whether the correct water valve has been installed. Contact Miele. The appliance is not turned Check that the appliance is connected to drop cubes. switched on . the water supply line is switched on . plugged in the right position. - The ice cube maker is When the appliance is on . the ice cube maker is open. - The water pressure must be between 25 and...
Operating and Installation manual
Page 66
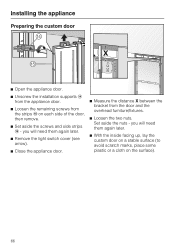
... again later. ^ Remove the light switch cover (see arrow). ^ Close the appliance door. ^ Measure the distance X between the bracket from the strips o on the surface). 66 Installing the appliance Preparing the custom door ^ Open the appliance door. ^ Unscrew the installation supports n from the appliance door. ^ Loosen the remaining screws from the door and the overhead furniture/fixtures. ^ Loosen the two nuts. Set aside the...
... again later. ^ Remove the light switch cover (see arrow). ^ Close the appliance door. ^ Measure the distance X between the bracket from the strips o on the surface). 66 Installing the appliance Preparing the custom door ^ Open the appliance door. ^ Unscrew the installation supports n from the appliance door. ^ Loosen the remaining screws from the door and the overhead furniture/fixtures. ^ Loosen the two nuts. Set aside the...
Operating and Installation manual
Page 75
... of side-by a licensed electrician only. The appliance is 15 amps. If any changes are any doubt as to the household wiring or power supply, this appliance to the power supply, please consult a licensed electrician or call the Miele Technical Service. The fuse rating is supplied with a UL-listed, 3-wire power cord and NEMA 5-15 P plug ready for each appliance. If there are needed to whether...
... of side-by a licensed electrician only. The appliance is 15 amps. If any changes are any doubt as to the household wiring or power supply, this appliance to the power supply, please consult a licensed electrician or call the Miele Technical Service. The fuse rating is supplied with a UL-listed, 3-wire power cord and NEMA 5-15 P plug ready for each appliance. If there are needed to whether...

