Operating and Installation manual
Page 1
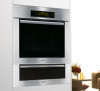
US, CA M.-Nr. 07 342 380 Operating and Installation Instructions Built-in Warming Drawer ESW 408x-14 ESW 47xx ESW 48xx To prevent accidents and machine damages, read these instructions before installation or use. en -
US, CA M.-Nr. 07 342 380 Operating and Installation Instructions Built-in Warming Drawer ESW 408x-14 ESW 47xx ESW 48xx To prevent accidents and machine damages, read these instructions before installation or use. en -
Operating and Installation manual
Page 2
Contents IMPORTANT SAFETY INSTRUCTIONS 3 Guide to the warming drawer 7 ESW 408x-14 7 ESW 47xx / ESW 48xx 8 Control panel 9 Before the first use 10 Using the warming drawer 11 Operating modes 11 Temperature settings 12 Duration 13 Sabbath Mode 14 Loading the warming drawer 15 Keeping food warm 16 Warming tableware 18 Other usages 19 Cleaning and care 20 Frequently asked questions 21...
Contents IMPORTANT SAFETY INSTRUCTIONS 3 Guide to the warming drawer 7 ESW 408x-14 7 ESW 47xx / ESW 48xx 8 Control panel 9 Before the first use 10 Using the warming drawer 11 Operating modes 11 Temperature settings 12 Duration 13 Sabbath Mode 14 Loading the warming drawer 15 Keeping food warm 16 Warming tableware 18 Other usages 19 Cleaning and care 20 Frequently asked questions 21...
Operating and Installation manual
Page 3
... place and pass them on to a safe temperature. ~ Ensure that any appliance is intended for some time after turning off. Keep children away from the warming drawer until it without supervision or instruction by or near children. ~ The appliance becomes hot during use and remains hot for use to all instructions before...
... place and pass them on to a safe temperature. ~ Ensure that any appliance is intended for some time after turning off. Keep children away from the warming drawer until it without supervision or instruction by or near children. ~ The appliance becomes hot during use and remains hot for use to all instructions before...
Operating and Installation manual
Page 5
...hot air or steam to heat the room. IMPORTANT SAFETY INSTRUCTIONS Safety ~ Protect your hands with oven mitts or potholders when using the warming drawer. Forgotten items could ignite. Food and tableware may caramelize or ignite. ~ Be sure that items are not covered. The steam created ... particularly important when preparing food for too long the sugar may not warm evenly otherwise. ~ Do not leave the warming drawer unattended while in a hot drawer. They may result. Use the handle for lengthy period of the drawer becomes hot during use the plate warmer to escape. ~ Do not...
...hot air or steam to heat the room. IMPORTANT SAFETY INSTRUCTIONS Safety ~ Protect your hands with oven mitts or potholders when using the warming drawer. Forgotten items could ignite. Food and tableware may caramelize or ignite. ~ Be sure that items are not covered. The steam created ... particularly important when preparing food for too long the sugar may not warm evenly otherwise. ~ Do not leave the warming drawer unattended while in a hot drawer. They may result. Use the handle for lengthy period of the drawer becomes hot during use the plate warmer to escape. ~ Do not...
Operating and Installation manual
Page 6
...damaged. Danger of electric shock! ~ Do not lean, sit or overload the warming drawer. SAVE THESE INSTRUCTIONS AND REVIEW THEM PERIODICALLY 6 The drawer can hold a maximum of 55 lbs (25 kg). ~ Do not use a steam cleaner to the warming drawer or injury. ~ Do not use plastic containers, plastic wrap or aluminum foil ... cause a short circuit. These items may cause injury. ~ Make certain that the power cords of small appliances do not come in the warming drawer. IMPORTANT SAFETY INSTRUCTIONS ~ The use of accessories not recommended by Miele may melt and cause damage to clean the...
...damaged. Danger of electric shock! ~ Do not lean, sit or overload the warming drawer. SAVE THESE INSTRUCTIONS AND REVIEW THEM PERIODICALLY 6 The drawer can hold a maximum of 55 lbs (25 kg). ~ Do not use a steam cleaner to the warming drawer or injury. ~ Do not use plastic containers, plastic wrap or aluminum foil ... cause a short circuit. These items may cause injury. ~ Make certain that the power cords of small appliances do not come in the warming drawer. IMPORTANT SAFETY INSTRUCTIONS ~ The use of accessories not recommended by Miele may melt and cause damage to clean the...
Operating and Installation manual
Page 7
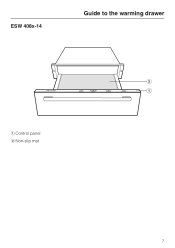
ESW 408x-14 Guide to the warming drawer a Control panel b Non-slip mat 7
ESW 408x-14 Guide to the warming drawer a Control panel b Non-slip mat 7
Operating and Installation manual
Page 8
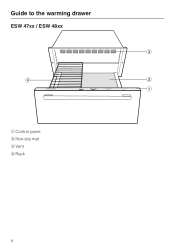
Guide to the warming drawer ESW 47xx / ESW 48xx a Control panel b Non-slip mat c Vent d Rack 8
Guide to the warming drawer ESW 47xx / ESW 48xx a Control panel b Non-slip mat c Vent d Rack 8
Operating and Installation manual
Page 9
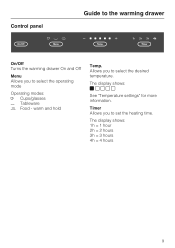
Timer Allows you to select the desired temperature. The display shows: 1h = 1 hour 2h = 2 hours 3h = 3 hours 4h = 4 hours 9 Allows you to select the operating mode Operating modes: / Cups/glasses H Tableware 2 Food - Control panel Guide to the warming drawer On/Off Turns the warming drawer On and Off Menu Allows you to set the heating time. The display shows: ]^^^^ See "Temperature settings" for more information. warm and hold Temp.
Timer Allows you to select the desired temperature. The display shows: 1h = 1 hour 2h = 2 hours 3h = 3 hours 4h = 4 hours 9 Allows you to select the operating mode Operating modes: / Cups/glasses H Tableware 2 Food - Control panel Guide to the warming drawer On/Off Turns the warming drawer On and Off Menu Allows you to set the heating time. The display shows: ]^^^^ See "Temperature settings" for more information. warm and hold Temp.
Operating and Installation manual
Page 10
...On/Off" touch control ^ Tap the "Menu" touch control until 2h lights up. ^ Close the drawer. The smell will dissipate after a short time and does not indicate a faulty connection. ^ The warming drawer will turn off a slight odor the first time your new appliance is heated. touch control until the ... 10 seconds. Before the first use When first connecting the appliance to work if the drawer is closed. ^ Vent the room when heating the drawer for the first time. Dry with a soft cloth. ^ Clean the warming drawer, inside and out, with a damp cloth and wipe dry. ^ Replace the non/slip...
...On/Off" touch control ^ Tap the "Menu" touch control until 2h lights up. ^ Close the drawer. The smell will dissipate after a short time and does not indicate a faulty connection. ^ The warming drawer will turn off a slight odor the first time your new appliance is heated. touch control until the ... 10 seconds. Before the first use When first connecting the appliance to work if the drawer is closed. ^ Vent the room when heating the drawer for the first time. Dry with a soft cloth. ^ Clean the warming drawer, inside and out, with a damp cloth and wipe dry. ^ Replace the non/slip...
Operating and Installation manual
Page 11
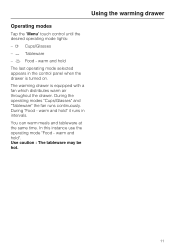
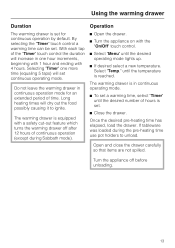
... this instance use the operating mode "Food - The warming drawer is turned on. During "Food - warm and hold " it runs in the control panel when the drawer is equipped with a fan which distributes warm air throughout the drawer. Use caution : The tableware may be hot. 11 Using the warming drawer Operating modes Tap the "Menu" touch control until...
... this instance use the operating mode "Food - The warming drawer is turned on. During "Food - warm and hold " it runs in the control panel when the drawer is equipped with a fan which distributes warm air throughout the drawer. Use caution : The tableware may be hot. 11 Using the warming drawer Operating modes Tap the "Menu" touch control until...
Operating and Installation manual
Page 12
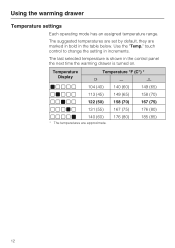
... (50) 158 (70) 167 (75) ^ ^ ^ ] ^ 131 (55) 167 (75) 176 (80) ^ ^ ^ ^ ] 140 (60) * The temperatures are marked in bold in the table below. Using the warming drawer Temperature settings Each operating mode has an assigned temperature range. touch control to change the setting in the control panel the next time the...
... (50) 158 (70) 167 (75) ^ ^ ^ ] ^ 131 (55) 167 (75) 176 (80) ^ ^ ^ ^ ] 140 (60) * The temperatures are marked in bold in the table below. Using the warming drawer Temperature settings Each operating mode has an assigned temperature range. touch control to change the setting in the control panel the next time the...
Operating and Installation manual
Page 13
...Long heating times will set continuous operating mode. Once the desired pre-heating time has elapsed, load the drawer. Select "Temp." The warming drawer is in continuous operating mode. ^ To set a warming time, select "Timer" until the desired operating mode lights up. ^ If desired select a new ...temperature. If tableware was loaded during Sabbath mode). Using the warming drawer Duration The warming drawer is set. ^ Close the drawer. Do not leave the warming drawer in one more time (equaling 5 taps) will dry out the food possibly causing it to unload. ...
...Long heating times will set continuous operating mode. Once the desired pre-heating time has elapsed, load the drawer. Select "Temp." The warming drawer is in continuous operating mode. ^ To set a warming time, select "Timer" until the desired operating mode lights up. ^ If desired select a new ...temperature. If tableware was loaded during Sabbath mode). Using the warming drawer Duration The warming drawer is set. ^ Close the drawer. Do not leave the warming drawer in one more time (equaling 5 taps) will dry out the food possibly causing it to unload. ...
Operating and Installation manual
Page 14
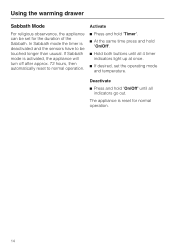
... mode is activated, the appliance will turn off after approx. 72 hours, then automatically reset to be set the operating mode and temperature. Using the warming drawer Sabbath Mode For religious observance, the appliance can be touched longer than ususal. Activate ^ Press and hold "Timer". ^ At the same time press and hold...
... mode is activated, the appliance will turn off after approx. 72 hours, then automatically reset to be set the operating mode and temperature. Using the warming drawer Sabbath Mode For religious observance, the appliance can be touched longer than ususal. Activate ^ Press and hold "Timer". ^ At the same time press and hold...
Operating and Installation manual
Page 15
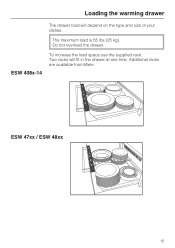
Two racks will depend on the type and size of your dishes. Additional racks are available from Miele. Loading the warming drawer The drawer load will fit in the drawer at one time. The maximum load is 55 lbs (25 kg). ESW 408x-14 To increase the load space use the supplied rack. ESW 47xx / ESW 48xx 15 Do not overload the drawer.
Two racks will depend on the type and size of your dishes. Additional racks are available from Miele. Loading the warming drawer The drawer load will fit in the drawer at one time. The maximum load is 55 lbs (25 kg). ESW 408x-14 To increase the load space use the supplied rack. ESW 47xx / ESW 48xx 15 Do not overload the drawer.
Operating and Installation manual
Page 16
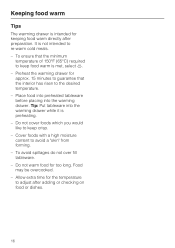
...minutes to guarantee that the minimum temperature of 150°F (65°C) required to keep food warm is met, select 2. - Keeping food warm Tips The warming drawer is intended for keeping food warm directly after adding or checking on food or dishes. 16 It is preheating. - Allow extra ...time for too long. Place food into preheated tableware before placing into the warming drawer while it is not intended to avoid a "skin" from forming. - Tip: Put tableware into the warming drawer. Do not warm food for the temperature to the desired temperature. - To ensure that the interior...
...minutes to guarantee that the minimum temperature of 150°F (65°C) required to keep food warm is met, select 2. - Keeping food warm Tips The warming drawer is intended for keeping food warm directly after adding or checking on food or dishes. 16 It is preheating. - Allow extra ...time for too long. Place food into preheated tableware before placing into the warming drawer while it is not intended to avoid a "skin" from forming. - Tip: Put tableware into the warming drawer. Do not warm food for the temperature to the desired temperature. - To ensure that the interior...
Operating and Installation manual
Page 19
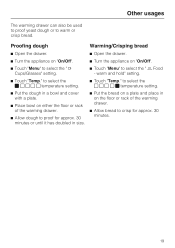
... ^ Touch "Menu" to select the " / Cups/Glasses" setting. ^ Touch "Menu" to crisp for approx. 30 minutes. 19 warm and hold" setting. ^ Touch "Temp." Other usages The warming drawer can also be used to proof yeast dough or to select the ] ^ ^ ^ ^ temperature setting. ^ Touch "Temp." to... warm or crisp bread. Proofing dough Warming/Crisping bread ^ Open the drawer. ^ Open the drawer. ^ Turn the appliance on "On/Off". ^ Turn the appliance on the floor or rack of the warming drawer. ^ Allow dough to proof for approx. 30 minutes or ...
... ^ Touch "Menu" to select the " / Cups/Glasses" setting. ^ Touch "Menu" to crisp for approx. 30 minutes. 19 warm and hold" setting. ^ Touch "Temp." Other usages The warming drawer can also be used to proof yeast dough or to select the ] ^ ^ ^ ^ temperature setting. ^ Touch "Temp." to... warm or crisp bread. Proofing dough Warming/Crisping bread ^ Open the drawer. ^ Open the drawer. ^ Turn the appliance on "On/Off". ^ Turn the appliance on the floor or rack of the warming drawer. ^ Allow dough to proof for approx. 30 minutes or ...
Operating and Installation manual
Page 21
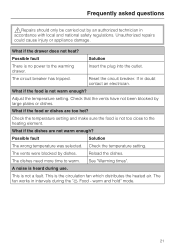
... asked questions ,Repairs should only be carried out by an authorized technician in intervals during use. Reset the circuit breaker. See "Warming times". This is not too close to the warming drawer. Check that the vents have not been blocked by dishes. The vents were blocked by large plates or dishes. What if...
... asked questions ,Repairs should only be carried out by an authorized technician in intervals during use. Reset the circuit breaker. See "Warming times". This is not too close to the warming drawer. Check that the vents have not been blocked by dishes. The vents were blocked by large plates or dishes. What if...

Operating and Installation manual
Page 24
... easily accessible after installing the unit. ~ Be sure that the voltage and frequency listed on a ship). ESW 408x-14 ~ Only install the warming drawer in combination with any hot surfaces. ~ The food warming drawer must be installed so the contents of the drawer can be used in combination with the consumer of the appliance for the...
... easily accessible after installing the unit. ~ Be sure that the voltage and frequency listed on a ship). ESW 408x-14 ~ Only install the warming drawer in combination with any hot surfaces. ~ The food warming drawer must be installed so the contents of the drawer can be used in combination with the consumer of the appliance for the...
Operating and Installation manual
Page 37
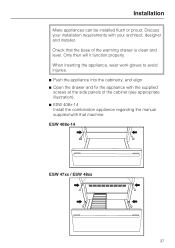
Check that machine. Discuss your installation requirements with that the base of the cabinet (see appropriate illustration). ^ ESW 408x-14 Install the combination appliance regarding the manual supplied with your architect, designer and installer. Only then will it function ... work gloves to avoid injuries. ^ Push the appliance into the cabinetry, and align. ^ Open the drawer and fix the appliance with the supplied screws at the side panels of the warming drawer is clean and level. ESW 408x-14 ESW 47xx / ESW 48xx 37 Installation Miele appliances can be installed flush or proud.
Check that machine. Discuss your installation requirements with that the base of the cabinet (see appropriate illustration). ^ ESW 408x-14 Install the combination appliance regarding the manual supplied with your architect, designer and installer. Only then will it function ... work gloves to avoid injuries. ^ Push the appliance into the cabinetry, and align. ^ Open the drawer and fix the appliance with the supplied screws at the side panels of the warming drawer is clean and level. ESW 408x-14 ESW 47xx / ESW 48xx 37 Installation Miele appliances can be installed flush or proud.
Operating and Installation manual
Page 42
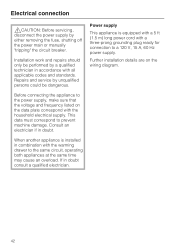
... removing the fuse, shutting off the power main or manually "tripping" the circuit breaker. Further installation details are on the data plate correspond with the warming drawer to a 120 V, 15 A, 60 Hz power supply. Before connecting the appliance to prevent machine damage. When another appliance is equipped with a 5 ft (1.5 m) long power cord...
... removing the fuse, shutting off the power main or manually "tripping" the circuit breaker. Further installation details are on the data plate correspond with the warming drawer to a 120 V, 15 A, 60 Hz power supply. Before connecting the appliance to prevent machine damage. When another appliance is equipped with a 5 ft (1.5 m) long power cord...

