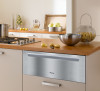
Operating and Installation manual
Page 1
US, CA M.-Nr. 07 342 380 en - Operating and Installation Instructions Built-in Warming Drawer ESW 408x-14 ESW 47xx ESW 48xx To prevent accidents and machine damages, read these instructions before installation or use.
Operating and Installation manual
Page 2
Contents IMPORTANT SAFETY INSTRUCTIONS 3 Guide to the warming drawer 7 ESW 408x-14 7 ESW 47xx / ESW 48xx 8 Control panel 9 Before the first use 10 Using the warming drawer 11 Operating modes 11 Temperature settings 12 Duration 13 Sabbath Mode 14 Loading the warming drawer 15 Keeping food warm 16 Warming tableware 18 Other usages 19 Cleaning and care 20 Frequently asked questions 21...
Operating and Installation manual
Page 3
... SAFETY INSTRUCTIONS WARNING- Keep these operating instructions in a safe place and pass them on to prevent injury and appliance damage. Keep children away from the warming drawer until it without supervision or instruction by a responsible person. Shops - This appliance conforms to all instructions before installation or use to any future user. SAVE...
Operating and Installation manual
Page 5
... or steam to heat the room. This is also a danger of personal injury and scalding. ~ Before serving, be stored in the warming drawer. Smother the fire with a kitchen towel. 5 Caution, do not touch. The steam created could ignite. If heated for opening and closing... the appliance. ~ Do not store anything in or above the warming drawer. ~ Food warmed for a long period of loose fitting or hanging clothing while using the appliance. Moist or damp potholders used on hot surfaces can...
Operating and Installation manual
Page 6
... could become damaged. Danger of the cable could penetrate electrical components and cause a short circuit. IMPORTANT SAFETY INSTRUCTIONS ~ The use of accessories not recommended by Miele may melt and cause damage to the warming drawer or injury. ~ Do not use plastic containers, plastic wrap or aluminum foil in contact with the appliance. The...
Operating and Installation manual
Page 7
ESW 408x-14 Guide to the warming drawer a Control panel b Non-slip mat 7
Operating and Installation manual
Page 8
Guide to the warming drawer ESW 47xx / ESW 48xx a Control panel b Non-slip mat c Vent d Rack 8
Operating and Installation manual
Page 9
warm and hold Temp. Allows you to set the heating time. Timer Allows you to select the operating mode Operating modes: / Cups/glasses H Tableware 2 Food - The display shows: 1h = 1 hour 2h = 2 hours 3h = 3 hours 4h = 4 hours 9 The display shows: ]^^^^ See "Temperature settings" for more information. Control panel Guide to the warming drawer On/Off Turns the warming drawer On and Off Menu Allows you to select the desired temperature.
Operating and Installation manual
Page 10
... slight odor the first time your new appliance is closed. ^ Vent the room when heating the drawer for the first time. Heat the appliance Heat the warming drawer for approx. 10 seconds. The warming drawer is fitted with a damp cloth and wipe dry. ^ Replace the non/slip mat once has ...completely dried. The appliance cannot be carried out for a minimum of 2 hours. ^ Turn on with a solution of warm water and liquid dish soap. Dry with a soft cloth. ^ Clean the warming drawer, inside and out, with a self-closing device. touch control until the 5th indicator lights. ^ Tap the "Timer...
Operating and Installation manual
Page 11
... "Cups/Glasses" and "Tableware" the fan runs continuously. You can warm meals and tableware at the same time. warm and hold ". Use caution : The tableware may be hot. 11 In this instance use the operating mode "Food - H Tableware - 2 Food - Using the warming drawer Operating modes Tap the "Menu" touch control until the desired operating...
Operating and Installation manual
Page 12
... settings Each operating mode has an assigned temperature range. touch control to change the setting in the control panel the next time the warming drawer is turned on. The last selected temperature is shown in increments. Temperature Display Temperature °F (C°) * / H s ] ^ ^ ^ ^ 104 (40) 140 (60) 149 (65) ^ ] ^ ^ ^ 113 (45) 149 (...
Operating and Installation manual
Page 13
...hours. Once the desired pre-heating time has elapsed, load the drawer. Long heating times will set continuous operating mode. The warming drawer is equipped with a safety cut-out feature which turns the warming drawer off before unloading. 13 If tableware was loaded during Sabbath mode... will increase in continuous operating mode. ^ To set a warming time, select "Timer" until the temperature is reached. By selecting the "Timer" touch control a warming time can be set. Using the warming drawer Duration The warming drawer is set for an extended period of time. Select "Temp...
Operating and Installation manual
Page 14
... mode is activated, the appliance will turn off after approx. 72 hours, then automatically reset to be set the operating mode and temperature. Using the warming drawer Sabbath Mode For religious observance, the appliance can be touched longer than ususal. Activate ^ Press and hold "Timer". ^ At the same time press and hold...
Operating and Installation manual
Page 15
The maximum load is 55 lbs (25 kg). Additional racks are available from Miele. ESW 47xx / ESW 48xx 15 Two racks will depend on the type and size of your dishes. ESW 408x-14 To increase the load space use the supplied rack. Do not overload the drawer. Loading the warming drawer The drawer load will fit in the drawer at one time.
Operating and Installation manual
Page 16
...dishes. 16 Food may be overcooked. - To ensure that the interior has risen to the desired temperature. - Preheat the warming drawer for too long. Do not warm food for approx. 15 minutes to guarantee that the minimum temperature of 150°F (65°C) required to keep crisp.... - Keeping food warm Tips The warming drawer is not intended to re-warm cold meals. - Do not cover foods which you would like to keep food warm is preheating. - Place food into preheated tableware before placing into the warming drawer while it is met, select 2. - To...
Operating and Installation manual
Page 19
... setting. ^ Put the dough in a bowl and cover with a plate. ^ Place bowl on either the floor or rack of the warming drawer. ^ Allow bread to select the " 2 Food - Proofing dough Warming/Crisping bread ^ Open the drawer. ^ Open the drawer. ^ Turn the appliance on "On/Off". ^ Turn the appliance on the floor or rack of the... warming drawer. ^ Allow dough to proof for approx. 30 minutes or until it has doubled in size. ^ Put the bread on a plate and place in on "On/...
Operating and Installation manual
Page 21
Possible fault Solution There is not too close to the warming drawer. The circuit breaker has tripped. Adjust the temperature setting. What ... plates or dishes. A noise is not a fault. What if the drawer does not heat? The dishes need more time to warm. This is not warm enough? warm and hold" mode. 21 What if the food is the circulation fan ... into the outlet. This is heard during the "2 Food - What if the food or dishes are not warm enough? Possible fault Solution The wrong temperature was selected. If in accordance with local and national safety regulations....
Operating and Installation manual
Page 24
... spills could cause burns or scalding. Be sure there is void since the manufacturer cannot guarantee the safe use . ESW 408x-14 ~ Only install the warming drawer in combination with built-in order to avoid risk of damage to be pulled out completely. ~ This appliance must ... easily accessible after installing the unit. ~ Be sure that the voltage and frequency listed on a ship). If in dimensions of the warming drawer must correspond in appliances recommended by the manufacturer. on the data plate correspond with the household electrical supply. A shelf between the appliances ...
Operating and Installation manual
Page 37
...avoid injuries. ^ Push the appliance into the cabinetry, and align. ^ Open the drawer and fix the appliance with the supplied screws at the side panels of the warming drawer is clean and level. Check that machine. Discuss your installation requirements with that the ...base of the cabinet (see appropriate illustration). ^ ESW 408x-14 Install the combination appliance regarding the manual supplied with your architect, designer and installer. Installation Miele appliances...
Operating and Installation manual
Page 42
Power supply This appliance is installed in combination with the warming drawer to prevent machine damage. Before connecting the appliance to a 120 V, 15 A, 60 Hz power supply. This data must correspond to the same circuit, operating both ...