Operating and Installation manual
Page 1
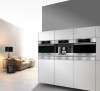
en - US, CA M.-Nr. 07 342 380 Operating and Installation Instructions Built-in Warming Drawer ESW 408x-14 ESW 47xx ESW 48xx To prevent accidents and machine damages, read these instructions before installation or use.
en - US, CA M.-Nr. 07 342 380 Operating and Installation Instructions Built-in Warming Drawer ESW 408x-14 ESW 47xx ESW 48xx To prevent accidents and machine damages, read these instructions before installation or use.
Operating and Installation manual
Page 2
... SAFETY INSTRUCTIONS 3 Guide to the warming drawer 7 ESW 408x-14 7 ESW 47xx / ESW 48xx 8 Control panel 9 Before the first use 10 Using the warming drawer 11 Operating modes 11 Temperature settings 12 Duration 13 Sabbath Mode 14 Loading the warming drawer 15 Keeping food warm 16 ...Other usages 19 Cleaning and care 20 Frequently asked questions 21 Technical Service 22 IMPORTANT SAFETY INSTRUCTIONS 24 ESW 408x-14 25 ESW 408x-14 BRWS 29 ESW 47xx 33 ESW 48xx 35 Installation 37 Aligning the appliance front 38 Integrated installations 40 Electrical connection 42 Help protect ...
... SAFETY INSTRUCTIONS 3 Guide to the warming drawer 7 ESW 408x-14 7 ESW 47xx / ESW 48xx 8 Control panel 9 Before the first use 10 Using the warming drawer 11 Operating modes 11 Temperature settings 12 Duration 13 Sabbath Mode 14 Loading the warming drawer 15 Keeping food warm 16 ...Other usages 19 Cleaning and care 20 Frequently asked questions 21 Technical Service 22 IMPORTANT SAFETY INSTRUCTIONS 24 ESW 408x-14 25 ESW 408x-14 BRWS 29 ESW 47xx 33 ESW 48xx 35 Installation 37 Aligning the appliance front 38 Integrated installations 40 Electrical connection 42 Help protect ...
Operating and Installation manual
Page 7
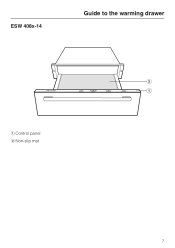
ESW 408x-14 Guide to the warming drawer a Control panel b Non-slip mat 7
ESW 408x-14 Guide to the warming drawer a Control panel b Non-slip mat 7
Operating and Installation manual
Page 14
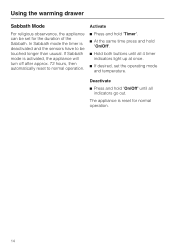
... than ususal. Deactivate ^ Press and hold "On/Off". ^ Hold both buttons until all 4 timer indicators light up at once. ^ If desired, set for normal operation. 14 In Sabbath mode the timer is deactivated and the sensors have to normal operation.
... than ususal. Deactivate ^ Press and hold "On/Off". ^ Hold both buttons until all 4 timer indicators light up at once. ^ If desired, set for normal operation. 14 In Sabbath mode the timer is deactivated and the sensors have to normal operation.
Operating and Installation manual
Page 15
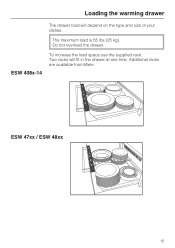
Do not overload the drawer. Loading the warming drawer The drawer load will fit in the drawer at one time. Two racks will depend on the type and size of your dishes. ESW 47xx / ESW 48xx 15 Additional racks are available from Miele. ESW 408x-14 To increase the load space use the supplied rack. The maximum load is 55 lbs (25 kg).
Do not overload the drawer. Loading the warming drawer The drawer load will fit in the drawer at one time. Two racks will depend on the type and size of your dishes. ESW 47xx / ESW 48xx 15 Additional racks are available from Miele. ESW 408x-14 To increase the load space use the supplied rack. The maximum load is 55 lbs (25 kg).

Operating and Installation manual
Page 24
..., consult a qualified technician. ~ The electrical outlet should be easily accessible after installing the unit. ~ Be sure that the voltage and frequency listed on a ship). ESW 408x-14 ~ Only install the warming drawer in combination with built-in order to avoid risk of the drawer can be seen. A shelf between the appliances is...
..., consult a qualified technician. ~ The electrical outlet should be easily accessible after installing the unit. ~ Be sure that the voltage and frequency listed on a ship). ESW 408x-14 ~ Only install the warming drawer in combination with built-in order to avoid risk of the drawer can be seen. A shelf between the appliances is...
Operating and Installation manual
Page 25
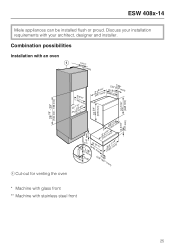
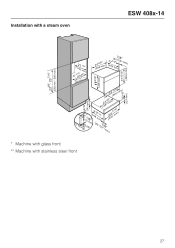
...-out for venting the oven * Machine with glass front ** Machine with your installation requirements with stainless steel front 25 Discuss your architect, designer and installer. ESW 408x-14 Miele appliances can be installed flush or proud.
...-out for venting the oven * Machine with glass front ** Machine with your installation requirements with stainless steel front 25 Discuss your architect, designer and installer. ESW 408x-14 Miele appliances can be installed flush or proud.
Operating and Installation manual
Page 26
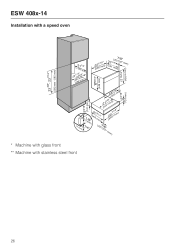
ESW 408x-14 Installation with a speed oven 23 3/8"- 237/16" (593 mm - 595 mm) ( 0 217/8" 555 mm) 22(--51562/610286m"3m/m8m" ) 2(52610/1m6m" ) (254115/1m(62"m2*)7/2/38*"*mm) 17 15/16" (455.5 mm) 17 9/16" (446 mm) 53/16" (131 mm) 5 9/16" (141 mm) 2(3579/156m" m) 2(51317/8m" m) (7 mm) 1(31/4m/8"m"()54281m9(/21m62")*7/2/83*"*m(25m397)5/1m6m" ) * Machine with glass front ** Machine with stainless steel front 26
ESW 408x-14 Installation with a speed oven 23 3/8"- 237/16" (593 mm - 595 mm) ( 0 217/8" 555 mm) 22(--51562/610286m"3m/m8m" ) 2(52610/1m6m" ) (254115/1m(62"m2*)7/2/38*"*mm) 17 15/16" (455.5 mm) 17 9/16" (446 mm) 53/16" (131 mm) 5 9/16" (141 mm) 2(3579/156m" m) 2(51317/8m" m) (7 mm) 1(31/4m/8"m"()54281m9(/21m62")*7/2/83*"*m(25m397)5/1m6m" ) * Machine with glass front ** Machine with stainless steel front 26
Operating and Installation manual
Page 27
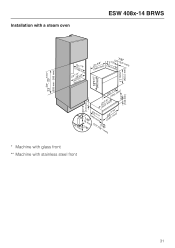
Installation with a steam oven ESW 408x-14 233/8"- 237/16" (593 mm - 595 mm) 22(-(55-1660/20815226mm5"15mm3)/7m8/"8m" ) 2(51459/8m" m) (147441(/m222"m*7/)2/83*"*mm) 17 15/16" (455.5 mm) 17 9/16" (446 mm) 53/16" (131 mm) 5 9/16" (141 mm) 23(579/156m" m) (251317/8m" m) (7 mm) 1(13/4/m8" m"(5)42(812m29/*1m/62")37*/*8m"m(2)53957/m16m" ) * Machine with glass front ** Machine with stainless steel front 27
Installation with a steam oven ESW 408x-14 233/8"- 237/16" (593 mm - 595 mm) 22(-(55-1660/20815226mm5"15mm3)/7m8/"8m" ) 2(51459/8m" m) (147441(/m222"m*7/)2/83*"*mm) 17 15/16" (455.5 mm) 17 9/16" (446 mm) 53/16" (131 mm) 5 9/16" (141 mm) 23(579/156m" m) (251317/8m" m) (7 mm) 1(13/4/m8" m"(5)42(812m29/*1m/62")37*/*8m"m(2)53957/m16m" ) * Machine with glass front ** Machine with stainless steel front 27

Operating and Installation manual
Page 28
17 15/16" (455.5 mm) ESW 408x-14 Installation with a coffee machine 23 3/8"- 23 7/16" (593 mm - 595 mm) 22(-5(-1560/260125826m5"m1m53m7//m8)8""m) 22" (559 mm) (146810/8m"m(2)103m/1m6)" 17 9/16" (446 mm) 5 9/16" (141 mm) 2(3579/516m"m) (7 mm) 1(31/4m/8"m"()54281(2m92/m1m6)"7m2(/5*81/321"7/38(2m5"m39mm57)/*m1*6)m" ) * Machine with glass front ** Machine with stainless steel front 5 3/16" (131 mm) 28
17 15/16" (455.5 mm) ESW 408x-14 Installation with a coffee machine 23 3/8"- 23 7/16" (593 mm - 595 mm) 22(-5(-1560/260125826m5"m1m53m7//m8)8""m) 22" (559 mm) (146810/8m"m(2)103m/1m6)" 17 9/16" (446 mm) 5 9/16" (141 mm) 2(3579/516m"m) (7 mm) 1(31/4m/8"m"()54281(2m92/m1m6)"7m2(/5*81/321"7/38(2m5"m39mm57)/*m1*6)m" ) * Machine with glass front ** Machine with stainless steel front 5 3/16" (131 mm) 28
Operating and Installation manual
Page 29
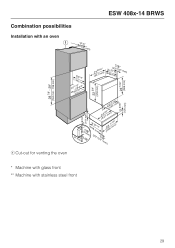
Combination possibilities Installation with an oven a 13/16" (30 mm) ESW 408x-14 BRWS 28 7/8" - 29" (734 mm - 736 mm) 21 22((--15065/210652685m"m5m37m//m88) ""m) 2(51497/1m6m" ) (524189m(/21m267)*//823"**mm) 23 7/16" (596 mm) 22 3/4" (578 mm) 5 3/16" (134 mm) 59/16" (141 mm) 2(3579/516m"m) 2(51317/8m" m) (4 mm) (131/8m/8"m"()542(812m92/*1m/62")37*/*8m"m2(5)3957/m16m" ) a Cut-out for venting the oven * Machine with glass front ** Machine with stainless steel front 29
Combination possibilities Installation with an oven a 13/16" (30 mm) ESW 408x-14 BRWS 28 7/8" - 29" (734 mm - 736 mm) 21 22((--15065/210652685m"m5m37m//m88) ""m) 2(51497/1m6m" ) (524189m(/21m267)*//823"**mm) 23 7/16" (596 mm) 22 3/4" (578 mm) 5 3/16" (134 mm) 59/16" (141 mm) 2(3579/516m"m) 2(51317/8m" m) (4 mm) (131/8m/8"m"()542(812m92/*1m/62")37*/*8m"m2(5)3957/m16m" ) a Cut-out for venting the oven * Machine with glass front ** Machine with stainless steel front 29

Operating and Installation manual
Page 30
ESW 408x-14 BRWS Installation with a speed oven 23 3/8"- 237/16" (593 mm - 595 mm) ( 0 217/8" 555 mm) 22(--51562/610286m"3m/m8m" ) 2(52610/1m6m" ) (254115/1m(62"m2*)7/2/38*"*mm) 17 15/16" (455.5 mm) 17 9/16" (446 mm) 5 3/16" (134 mm) 5 9/16" (141 mm) 2(3579/156m" m) 2(51317/8m" m) (4 mm) 1(31/8m/8"m"()54281m9(/21m62")*7/2/83*"*m(25m397)5/1m6m" ) * Machine with glass front ** Machine with stainless steel front 30
ESW 408x-14 BRWS Installation with a speed oven 23 3/8"- 237/16" (593 mm - 595 mm) ( 0 217/8" 555 mm) 22(--51562/610286m"3m/m8m" ) 2(52610/1m6m" ) (254115/1m(62"m2*)7/2/38*"*mm) 17 15/16" (455.5 mm) 17 9/16" (446 mm) 5 3/16" (134 mm) 5 9/16" (141 mm) 2(3579/156m" m) 2(51317/8m" m) (4 mm) 1(31/8m/8"m"()54281m9(/21m62")*7/2/83*"*m(25m397)5/1m6m" ) * Machine with glass front ** Machine with stainless steel front 30
Operating and Installation manual
Page 31
Installation with a steam oven ESW 408x-14 BRWS 23 3/8"- 237/16" (593 mm - 595 mm) 22(-55(-1660/20812526mm5"1mm537)/m8/8"m" ) 2(51459/8m" m) (147441/m2"m(2)2*7/2/83*"*mm) 17 15/16" (455.5 mm) 17 9/16" (446 mm) 53/16" (134 mm) 5 9/16" (141 mm) 23(579/156m" m) (251317/8m" m) (4 mm) 1(13/8/m8" m"(5)42(812m29/*1m/62")37*/*8m"m(2)53957/m16m" ) * Machine with glass front ** Machine with stainless steel front 31
Installation with a steam oven ESW 408x-14 BRWS 23 3/8"- 237/16" (593 mm - 595 mm) 22(-55(-1660/20812526mm5"1mm537)/m8/8"m" ) 2(51459/8m" m) (147441/m2"m(2)2*7/2/83*"*mm) 17 15/16" (455.5 mm) 17 9/16" (446 mm) 53/16" (134 mm) 5 9/16" (141 mm) 23(579/156m" m) (251317/8m" m) (4 mm) 1(13/8/m8" m"(5)42(812m29/*1m/62")37*/*8m"m(2)53957/m16m" ) * Machine with glass front ** Machine with stainless steel front 31

Operating and Installation manual
Page 32
ESW 408x-14 BRWS Installation with a coffee machine 23 3/8"- 23 7/16" (593 mm - 595 mm) 22(-5(-1560/260125826m5"m1m53m7//m8)8""m) 22" (559 mm) 181/8" (460 mm) 1(32/01m6m" ) 17 15/16" (455.5 mm) 17 9/16" (446 mm) 5 3/16" (134 mm) 5 9/16" (141 mm) 2(3579/516m"m) (4 mm) 1(31/8m/8"m"()54281(2m92/m1m6)"7m2(/5*81/321"7/38(2m5"m39mm57)/*m1*6)m" ) * Machine with glass front ** Machine with stainless steel front 32
ESW 408x-14 BRWS Installation with a coffee machine 23 3/8"- 23 7/16" (593 mm - 595 mm) 22(-5(-1560/260125826m5"m1m53m7//m8)8""m) 22" (559 mm) 181/8" (460 mm) 1(32/01m6m" ) 17 15/16" (455.5 mm) 17 9/16" (446 mm) 5 3/16" (134 mm) 5 9/16" (141 mm) 2(3579/516m"m) (4 mm) 1(31/8m/8"m"()54281(2m92/m1m6)"7m2(/5*81/321"7/38(2m5"m39mm57)/*m1*6)m" ) * Machine with glass front ** Machine with stainless steel front 32
Operating and Installation manual
Page 37
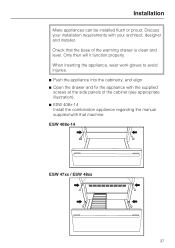
ESW 408x-14 ESW 47xx / ESW 48xx 37 Installation Miele appliances can be installed flush or proud. Discuss your installation requirements with that the base of the cabinet (see appropriate illustration). ^ ESW 408x-14 Install the combination appliance regarding the manual supplied with your architect, designer and installer. When inserting the appliance, wear work gloves to avoid injuries...
ESW 408x-14 ESW 47xx / ESW 48xx 37 Installation Miele appliances can be installed flush or proud. Discuss your installation requirements with that the base of the cabinet (see appropriate illustration). ^ ESW 408x-14 Install the combination appliance regarding the manual supplied with your architect, designer and installer. When inserting the appliance, wear work gloves to avoid injuries...

Operating and Installation manual
Page 38
Installation Aligning the appliance front After installation it may be necessary to pull or damage the power cord. Be careful not to align the appliance front and/or the gap between the appliances/furniture front above. ^ Remove the screws a from the left and right sides of the drawer front. ^ Carefully lift the control panel out of the drawer. ESW 408x-14 ESW 47xx / ESW 48xx 38
Installation Aligning the appliance front After installation it may be necessary to pull or damage the power cord. Be careful not to align the appliance front and/or the gap between the appliances/furniture front above. ^ Remove the screws a from the left and right sides of the drawer front. ^ Carefully lift the control panel out of the drawer. ESW 408x-14 ESW 47xx / ESW 48xx 38

Operating and Installation manual
Page 39
Installation ^ Loosen the 2 screws b on the inside of the drawer front. ^ Align the front. ^ Tighten the screws on the inside of the drawer front. ^ Replace the control panel, use caution with the power cord. ^ Replace the screws on the left and right sides of the drawer front. ESW 408x-14 ESW 47xx / ESW 48xx 39
Installation ^ Loosen the 2 screws b on the inside of the drawer front. ^ Align the front. ^ Tighten the screws on the inside of the drawer front. ^ Replace the control panel, use caution with the power cord. ^ Replace the screws on the left and right sides of the drawer front. ESW 408x-14 ESW 47xx / ESW 48xx 39

ESW4084-14
Page 1
.... Outlet to be installed flush or proud. Product and Cut-out Dimensions Page 1 of 4 Warming Drawer ESW 4084-14 Classic Design Clean Touch Stainless Steel with a DS 4045 Signature Series Handle Installation shown with your installation requirements with a Miele 60 cm Oven 1 Cut out for venting the oven O E Location Codes E - O - 1" ² minimum hole size...
.... Outlet to be installed flush or proud. Product and Cut-out Dimensions Page 1 of 4 Warming Drawer ESW 4084-14 Classic Design Clean Touch Stainless Steel with a DS 4045 Signature Series Handle Installation shown with your installation requirements with a Miele 60 cm Oven 1 Cut out for venting the oven O E Location Codes E - O - 1" ² minimum hole size...

ESW4084-14
Page 2
Product and Cut-out Dimensions Page 2 of 4 Warming Drawer ESW 4084-14 Classic Design Clean Touch Stainless Steel with a DS 4045 Signature Series Handle Installation shown with your installation requirements with a Miele 60 cm Speed Oven O E Location Codes E - Discuss your architect, designer ...and installer. All installations must be installed flush or proud. Outlet to be installed in adjacent cabinetry Notes Miele appliances can be done in accordance with local codes. * Appliances with glass front ** Appliances with a three-prong grounding plug ...
Product and Cut-out Dimensions Page 2 of 4 Warming Drawer ESW 4084-14 Classic Design Clean Touch Stainless Steel with a DS 4045 Signature Series Handle Installation shown with your installation requirements with a Miele 60 cm Speed Oven O E Location Codes E - Discuss your architect, designer ...and installer. All installations must be installed flush or proud. Outlet to be installed in adjacent cabinetry Notes Miele appliances can be done in accordance with local codes. * Appliances with glass front ** Appliances with a three-prong grounding plug ...

ESW4084-14
Page 3
...15 A, 60 Hz power supply. All installations must be installed flush or proud. Product and Cut-out Dimensions Page 3 of 4 Warming Drawer ESW 4084-14 Classic Design Clean Touch Stainless Steel with a DS 4045 Signature Series Handle Installation shown with a three-prong grounding plug ready for plug. The... O E Location Codes E - O - 1" ² minimum hole size for connection to be installed in adjacent cabinetry Notes Miele appliances can be done in accordance with local codes. * Appliances with glass front ** Appliances with your installation requirements with metal front...
...15 A, 60 Hz power supply. All installations must be installed flush or proud. Product and Cut-out Dimensions Page 3 of 4 Warming Drawer ESW 4084-14 Classic Design Clean Touch Stainless Steel with a DS 4045 Signature Series Handle Installation shown with a three-prong grounding plug ready for plug. The... O E Location Codes E - O - 1" ² minimum hole size for connection to be installed in adjacent cabinetry Notes Miele appliances can be done in accordance with local codes. * Appliances with glass front ** Appliances with your installation requirements with metal front...