

Product Manual
Page 2
... container 18 Grease filter 18 Roast probe 19 Temperature / Core temperature 19 Cooking duration 19 Moisture 19 Noise 20 Preheating phase 21 Steam reduction 21 Keep warm 21 Interior lighting 22 Before using for the first time 23 Basic settings 23 Initial cleaning 25 Setting the water hardness level 25 Setting the correct boiling point for water 26 Heating up the appliance 26 Modes / Programs / Menus 27 Operating instructions 30 Filling the...
... container 18 Grease filter 18 Roast probe 19 Temperature / Core temperature 19 Cooking duration 19 Moisture 19 Noise 20 Preheating phase 21 Steam reduction 21 Keep warm 21 Interior lighting 22 Before using for the first time 23 Basic settings 23 Initial cleaning 25 Setting the water hardness level 25 Setting the correct boiling point for water 26 Heating up the appliance 26 Modes / Programs / Menus 27 Operating instructions 30 Filling the...
Product Manual
Page 7
... Combi Steam Oven heats up the glass door, the control panel and the air outlet openings in doubt, consult a qualified electrician. ~ Before installing the Combi Steam Oven, check for children. Children could hurt themselves on the data plate correspond to the appliance. A damaged appliance is dangerous to touch the Combi Steam Oven during operation. ~ Risk of injury! Do not allow children to open door. ~ Installation, repair and maintenance work should only...
... Combi Steam Oven heats up the glass door, the control panel and the air outlet openings in doubt, consult a qualified electrician. ~ Before installing the Combi Steam Oven, check for children. Children could hurt themselves on the data plate correspond to the appliance. A damaged appliance is dangerous to touch the Combi Steam Oven during operation. ~ Risk of injury! Do not allow children to open door. ~ Installation, repair and maintenance work should only...
Product Manual
Page 8
... Steam Oven is dangerous and could melt or catch fire from the power supply by the heating elements, oven interior, cooked food, accessories and hot steam. Tampering with a special cable. See "Electrical connection". ~ Repairs should be reffered to be performed by Miele original spare parts only. All other servicing should only be used on inadvertently. ~ Flammable materials should be stored in mobile locations such as ships. ~ Never open...
... Steam Oven is dangerous and could melt or catch fire from the power supply by the heating elements, oven interior, cooked food, accessories and hot steam. Tampering with a special cable. See "Electrical connection". ~ Repairs should be reffered to be performed by Miele original spare parts only. All other servicing should only be used on inadvertently. ~ Flammable materials should be stored in mobile locations such as ships. ~ Never open...
Product Manual
Page 9
... Combi Steam/Convection Bake, they may ignite if overheated. Never use items in the steam oven which may in rare circumstances combust on the hot heating elements. ~ Always place oven racks and pans in the oven. ~ When handling cooking pans take care not to protect the oven from soiling. Do not use broil modes for baking rolls or bread and for baking or roasting. Cancel the operation by turning the Combi Steam Oven off and unplugging the power cord...
... Combi Steam/Convection Bake, they may ignite if overheated. Never use items in the steam oven which may in rare circumstances combust on the hot heating elements. ~ Always place oven racks and pans in the oven. ~ When handling cooking pans take care not to protect the oven from soiling. Do not use broil modes for baking rolls or bread and for baking or roasting. Cancel the operation by turning the Combi Steam Oven off and unplugging the power cord...
Product Manual
Page 11
... racks installed. Replace them correctly and do not use abrasive cleaners, hard sponges or brushes or sharp metal scrapers for cleaning the glass surface of the door panel can obtain it should be removed for cleaning (see "Cleaning and Care"). SAVE THESE INSTRUCTIONS AND REVIEW THEM PERIODICALLY 11 If the roast probe needs to clean the Combi Steam Oven. IMPORTANT SAFETY INSTRUCTIONS Cleaning and Care ~ Do not use a steam cleaner to be replaced, it from your Miele...
... racks installed. Replace them correctly and do not use abrasive cleaners, hard sponges or brushes or sharp metal scrapers for cleaning the glass surface of the door panel can obtain it should be removed for cleaning (see "Cleaning and Care"). SAVE THESE INSTRUCTIONS AND REVIEW THEM PERIODICALLY 11 If the roast probe needs to clean the Combi Steam Oven. IMPORTANT SAFETY INSTRUCTIONS Cleaning and Care ~ Do not use a steam cleaner to be replaced, it from your Miele...

Product Manual
Page 28
...;C 28 Maxi Broil The entire upper heating element is displayed MasterChef Gourmet 5 separate automatic slow cooking programs that create tender and juicy results. Humidity Plus A special baking program for intense heating from the Browning/Broiling element over the food using the fan. Special Modes Menu Cooking Simultaneous cooking of steak, chops, kebabs, etc. MasterChef The list of a casserole. Modes / Programs / Menus Main Menu Operating Modes Browning For a perfectly...
...;C 28 Maxi Broil The entire upper heating element is displayed MasterChef Gourmet 5 separate automatic slow cooking programs that create tender and juicy results. Humidity Plus A special baking program for intense heating from the Browning/Broiling element over the food using the fan. Special Modes Menu Cooking Simultaneous cooking of steak, chops, kebabs, etc. MasterChef The list of a casserole. Modes / Programs / Menus Main Menu Operating Modes Browning For a perfectly...

Product Manual
Page 30
... desired mode is not displayed, touch one of the display until it up to close the panel. Use only cold tap water (below 68°F / 20°C). or ^ Set the desired temperature using the numeric keypad, and then touch "OK" to the right of the illuminated buttons to confirm. 30 Operating instructions Check before each cooking process that the drain filter is opening or...
... desired mode is not displayed, touch one of the display until it up to close the panel. Use only cold tap water (below 68°F / 20°C). or ^ Set the desired temperature using the numeric keypad, and then touch "OK" to the right of the illuminated buttons to confirm. 30 Operating instructions Check before each cooking process that the drain filter is opening or...
Product Manual
Page 33
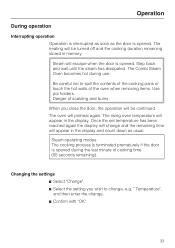
... the set temperature has been reached again the display will change . ^ Confirm with "OK". 33 Operation During operation Interrupting operation Operation is interrupted as soon as usual. The heating will appear in the display. Steam operating modes The cooking process is terminated prematurely if the door is opened during use. Steam will preheat again. Step back and wait until the steam has dissipated. Danger of cooking time (55 seconds remaining). The oven will...
... the set temperature has been reached again the display will change . ^ Confirm with "OK". 33 Operation During operation Interrupting operation Operation is interrupted as soon as usual. The heating will appear in the display. Steam operating modes The cooking process is terminated prematurely if the door is opened during use. Steam will preheat again. Step back and wait until the steam has dissipated. Danger of cooking time (55 seconds remaining). The oven will...

Product Manual
Page 36
... the desired temperature (or setting) and confirm with "OK". ^ Set the moisture level and confirm with "OK". ^ Select "Cooking time" or "Set core temp.". ^ Set the moisture level or core temperature and confirm with 3 cooking stages. ^ Turn the appliance on the rack, slide the universal tray underneath the rack. ^ Select "Combi Steam". ^ Select the desired heating mode. The cooking program will be used for each cooking stage. You can combine...
... the desired temperature (or setting) and confirm with "OK". ^ Set the moisture level and confirm with "OK". ^ Select "Cooking time" or "Set core temp.". ^ Set the moisture level or core temperature and confirm with 3 cooking stages. ^ Turn the appliance on the rack, slide the universal tray underneath the rack. ^ Select "Combi Steam". ^ Select the desired heating mode. The cooking program will be used for each cooking stage. You can combine...

Product Manual
Page 42
... 10 minutes will flash in the display, and a time of day"), you do not turn the appliance on K to set the timer. ^ Touch "Timer". ^ Use the numeric keypad to time separate kitchen activities. The time must be shown in min:sec in the display. Turn the timer off , the time will continue counting upwards in seconds and the "Timer" symbol will be entered in h:min...
... 10 minutes will flash in the display, and a time of day"), you do not turn the appliance on K to set the timer. ^ Touch "Timer". ^ Use the numeric keypad to time separate kitchen activities. The time must be shown in min:sec in the display. Turn the timer off , the time will continue counting upwards in seconds and the "Timer" symbol will be entered in h:min...

Product Manual
Page 47
... is removed from the oven. Select a shorter cooking time, additional time can also be the same. More information about any factors which are prepared in the relevant sections of food does not affect the cooking time. 2 lbs (1 kg) potatoes will not brown when cooked with liquid only fill the cooking pan 2/3 full to cook as for cooking food on a cooktop. General notes when cooking with Steam Cooking time...
... is removed from the oven. Select a shorter cooking time, additional time can also be the same. More information about any factors which are prepared in the relevant sections of food does not affect the cooking time. 2 lbs (1 kg) potatoes will not brown when cooked with liquid only fill the cooking pan 2/3 full to cook as for cooking food on a cooktop. General notes when cooking with Steam Cooking time...

Product Manual
Page 84
... cooking pan or on the packaging. ^ Cover the bowl and place in a perforated cooking pan. Remove the gelatin sheets from the bowl and squeeze them out. Special Modes Proofing Procedure Settings ^ Prepare the dough according to the recipe. ^ Place the open bowl of dough in a bowl with water. The gelatin sheets have to the instructions on the rack. Settings MasterChef > Special > Dissolve Gelatin or Operating Mode > Steam Cooking Temperature...
... cooking pan or on the packaging. ^ Cover the bowl and place in a perforated cooking pan. Remove the gelatin sheets from the bowl and squeeze them out. Special Modes Proofing Procedure Settings ^ Prepare the dough according to the recipe. ^ Place the open bowl of dough in a bowl with water. The gelatin sheets have to the instructions on the rack. Settings MasterChef > Special > Dissolve Gelatin or Operating Mode > Steam Cooking Temperature...

Product Manual
Page 86
.... Operating Mode > Maxi Broil Level 3 Duration: see table Food Duration in minutes Peppers, halved 10 Tomatoes 7 Operating Mode > Steam Cooking Temperature: 212°F / 100°C Duration: see table Food Apricots Almonds Nectarines Peppers Peaches Tomatoes Duration in a perforated pan if cooking with steam or a universal tray if using the rack. ^ To blanch almonds, it is important to be removed. Special Modes Skinning Fruits and Vegetables Procedure Settings ^ Cut...
.... Operating Mode > Maxi Broil Level 3 Duration: see table Food Duration in minutes Peppers, halved 10 Tomatoes 7 Operating Mode > Steam Cooking Temperature: 212°F / 100°C Duration: see table Food Apricots Almonds Nectarines Peppers Peaches Tomatoes Duration in a perforated pan if cooking with steam or a universal tray if using the rack. ^ To blanch almonds, it is important to be removed. Special Modes Skinning Fruits and Vegetables Procedure Settings ^ Cut...

Product Manual
Page 103
... the food some more. If using Convection Bake, reduce the temperatures given for Surround by about 20°F / 20°C. The cooking time will not change. Browning For browning, baking casseroles or layer cakes. Humidity Plus For sponge cakes, choux pastry (e.g. Bake Use this at the end of the baking time to brown the bottom of traditional recipes and preparing soufflé...
... the food some more. If using Convection Bake, reduce the temperatures given for Surround by about 20°F / 20°C. The cooking time will not change. Browning For browning, baking casseroles or layer cakes. Humidity Plus For sponge cakes, choux pastry (e.g. Bake Use this at the end of the baking time to brown the bottom of traditional recipes and preparing soufflé...

Product Manual
Page 105
... baking time, check whether the baked goods are done. 105 Shelf level Use only one shelf level when preparing moist cakes. Notes about the baking table Select the lower temperature shown on the rack covered with parchment paper. Do not set the temperature higher than indicated. Turn the food several times during baking. Bake frozen cakes, pizzas or baguettes on the table. Baking Frozen products When baking...
... baking time, check whether the baked goods are done. 105 Shelf level Use only one shelf level when preparing moist cakes. Notes about the baking table Select the lower temperature shown on the rack covered with parchment paper. Do not set the temperature higher than indicated. Turn the food several times during baking. Bake frozen cakes, pizzas or baguettes on the table. Baking Frozen products When baking...
Product Manual
Page 129
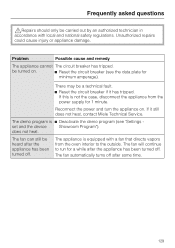
... with a fan that directs vapors from the power supply for 1 minute. be a technical fault. ^ Reset the circuit breaker if it still does not heat, contact Miele Technical Service. The demo program is ^ Deactivate the demo program (see the data plate for a while after the appliance has been turned off . does not heat. The fan automatically turns off after the appliance has been turned off . Problem Possible cause...
... with a fan that directs vapors from the power supply for 1 minute. be a technical fault. ^ Reset the circuit breaker if it still does not heat, contact Miele Technical Service. The demo program is ^ Deactivate the demo program (see the data plate for a while after the appliance has been turned off . does not heat. The fan automatically turns off after the appliance has been turned off . Problem Possible cause...
Product Manual
Page 142
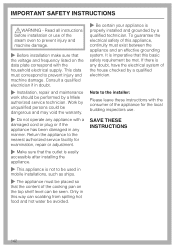
... SAFETY INSTRUCTIONS ,WARNING - Only in mobile installations, such as ships. ~ The appliance must be performed by unqualified persons could be dangerous and may void the warranty. ~ Do not operate any appliance with a damaged cord or plug or if the appliance has been damaged in doubt. ~ Installation, repair and maintenance work should be placed so that the content of the steam oven...
... SAFETY INSTRUCTIONS ,WARNING - Only in mobile installations, such as ships. ~ The appliance must be performed by unqualified persons could be dangerous and may void the warranty. ~ Do not operate any appliance with a damaged cord or plug or if the appliance has been damaged in doubt. ~ Installation, repair and maintenance work should be placed so that the content of the steam oven...
Specs
Page 2
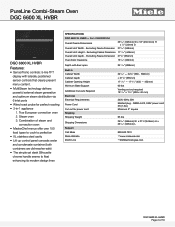
... chrome handle seems to float enhancing its modern design lines SPECIFICATIONS DGC 6600 XL HVBR - Item 23660002USA Overall Fascia Dimensions 237/16" (595mm) W x 18" (455.5mm) H x 7/8" (23mm) D Overall Unit Width - Steam oven 3. PureLine Combi-Steam Oven DGC 6600 XL HVBR FOREVER BETTER DGC 6600 XL HVBR Features: • SensorTronic controls: 5-line TFT display with door open 3411/16" (898mm) Built-In Cabinet Width Cabinet Depth Cabinet Opening Height Minimum Base Support Additional Cut-outs Required Electrical Electrical Requirements Power Cord Cut out for perfect roasting •...
... chrome handle seems to float enhancing its modern design lines SPECIFICATIONS DGC 6600 XL HVBR - Item 23660002USA Overall Fascia Dimensions 237/16" (595mm) W x 18" (455.5mm) H x 7/8" (23mm) D Overall Unit Width - Steam oven 3. PureLine Combi-Steam Oven DGC 6600 XL HVBR FOREVER BETTER DGC 6600 XL HVBR Features: • SensorTronic controls: 5-line TFT display with door open 3411/16" (898mm) Built-In Cabinet Width Cabinet Depth Cabinet Opening Height Minimum Base Support Additional Cut-outs Required Electrical Electrical Requirements Power Cord Cut out for perfect roasting •...
Specs
Page 8
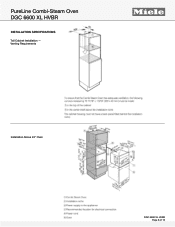
Venting Requirements FOREVER BETTER Installation Above 24" Oven DGC 6600 XL HVBR Page 8 of 10 PureLine Combi-Steam Oven DGC 6600 XL HVBR INSTALLATION SPECIFICATIONS Tall Cabinet Installation -
Venting Requirements FOREVER BETTER Installation Above 24" Oven DGC 6600 XL HVBR Page 8 of 10 PureLine Combi-Steam Oven DGC 6600 XL HVBR INSTALLATION SPECIFICATIONS Tall Cabinet Installation -
Specs
Page 9
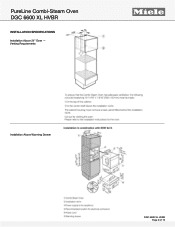
Venting Requirements FOREVER BETTER Installation Above Warming Drawer DGC 6600 XL HVBR Page 9 of 10 PureLine Combi-Steam Oven DGC 6600 XL HVBR INSTALLATION SPECIFICATIONS Installation Above 24" Oven -
Venting Requirements FOREVER BETTER Installation Above Warming Drawer DGC 6600 XL HVBR Page 9 of 10 PureLine Combi-Steam Oven DGC 6600 XL HVBR INSTALLATION SPECIFICATIONS Installation Above 24" Oven -


