Warranty conditions
Page 3
..., service or use with proper care); Our goods come with respect to the merchantability of parts, components or accessories (including but are implied under this clause is not in order to be eligible to inspect and test the products for purpose of Miele Domestic products are not limited to dust bags) which have the goods repaired or replaced if...
..., service or use with proper care); Our goods come with respect to the merchantability of parts, components or accessories (including but are implied under this clause is not in order to be eligible to inspect and test the products for purpose of Miele Domestic products are not limited to dust bags) which have the goods repaired or replaced if...

Warranty conditions
Page 4
... Miele user manual. To notify us of these issues, please collect all Miele products for delays due to sourcing of unusual Parts which are required, or due to circumstances beyond the control of which assist Miele in accordance with the customer's personal information (including name, address, telephone contact or personal details) only in providing services (including Repair / Warranty services) to : The Complaints Manager Miele...
... Miele user manual. To notify us of these issues, please collect all Miele products for delays due to sourcing of unusual Parts which are required, or due to circumstances beyond the control of which assist Miele in accordance with the customer's personal information (including name, address, telephone contact or personal details) only in providing services (including Repair / Warranty services) to : The Complaints Manager Miele...
Warranty conditions
Page 5
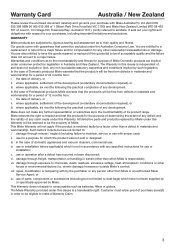
Serial no . Model no . Warranty Card IMPORTANT DO NOT RETURN THIS PAGE TO MIELE For your reference, please enter the particulars of purchase Store details Installed by Please visit www.miele.com.au or www.miele.co.nz to register your appliance warranty with your purchase below and retain with Miele. Date of your purchase documentation.
Serial no . Model no . Warranty Card IMPORTANT DO NOT RETURN THIS PAGE TO MIELE For your reference, please enter the particulars of purchase Store details Installed by Please visit www.miele.com.au or www.miele.co.nz to register your appliance warranty with your purchase below and retain with Miele. Date of your purchase documentation.
Warranty conditions
Page 8
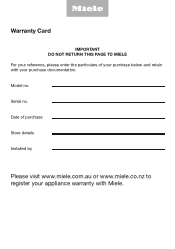
... or workmanship occurring within Miele Direct Service Area (MDSA). - and d) The product is replaced by Miele and at no cost to be defective in material or workmanship but continues from Miele or an authorized Miele dealer in Canada; Limited Warranty Canada The following time periods: a) Domestic appliances in normal, non-commercial, household use: - S189 upright units. One (1) year, parts only outside Miele Direct Service Area (MDSA). RemoteVision®...
... or workmanship occurring within Miele Direct Service Area (MDSA). - and d) The product is replaced by Miele and at no cost to be defective in material or workmanship but continues from Miele or an authorized Miele dealer in Canada; Limited Warranty Canada The following time periods: a) Domestic appliances in normal, non-commercial, household use: - S189 upright units. One (1) year, parts only outside Miele Direct Service Area (MDSA). RemoteVision®...
Warranty conditions
Page 17
... Miele specifically disclaims any defect in order to the jurisdiction of fixed infrastructure when removing or returning repaired or replaced product into a custom installation. This Limited Warranty does not cover: • Damage or defects caused by dealers, distributors or other third parties. • Freight or shipping charges for a particular purpose. or improper maintenance of the Miele Product or its parts and accessories which the Miele Customer...
... Miele specifically disclaims any defect in order to the jurisdiction of fixed infrastructure when removing or returning repaired or replaced product into a custom installation. This Limited Warranty does not cover: • Damage or defects caused by dealers, distributors or other third parties. • Freight or shipping charges for a particular purpose. or improper maintenance of the Miele Product or its parts and accessories which the Miele Customer...
Warranty conditions
Page 20
... space or environmental requirements; • Miele Products installed in accordance with the manufacturer's specifications and the owner's manual, or any service center, repairman or other person or company not authorized by dealers, distributors or other types of its parts or accessories; - Limitation Of Liability For Special, Incidental, Consequential Or Punitive Damages MIELE SPECIFICALLY DISCLAIMS ANY AND ALL LIABILITY, WHETHER DIRECTLY OR BY WAY...
... space or environmental requirements; • Miele Products installed in accordance with the manufacturer's specifications and the owner's manual, or any service center, repairman or other person or company not authorized by dealers, distributors or other types of its parts or accessories; - Limitation Of Liability For Special, Incidental, Consequential Or Punitive Damages MIELE SPECIFICALLY DISCLAIMS ANY AND ALL LIABILITY, WHETHER DIRECTLY OR BY WAY...

Warranty conditions
Page 22
... an Authorized Miele Installer and properly registered with a product of parts and labor, except as a Miele Marine appliance and installed on board a vessel, before warranty service is later. What If Repair Cannot Be Provided? Any warranty claims for Professional Miele Products used for Household/Personal Purposes: One (1) Year or Two (2) Year Limited Warranty - This Limited Warranty is free of the Miele Product paid to the terms and conditions set forth...
... an Authorized Miele Installer and properly registered with a product of parts and labor, except as a Miele Marine appliance and installed on board a vessel, before warranty service is later. What If Repair Cannot Be Provided? Any warranty claims for Professional Miele Products used for Household/Personal Purposes: One (1) Year or Two (2) Year Limited Warranty - This Limited Warranty is free of the Miele Product paid to the terms and conditions set forth...
Warranty conditions
Page 23
... damage resulting from any cause other than normal use and operation of the Miele Product in accordance with the manufacturer's specifications and the owner's manual, or any utilization of the Miele Product that is not responsible for the dismantling or reinstallation of fixed infrastructure when removing or returning repaired or replaced Miele Product(s) into a custom installation; • Any damage to or destruction or...
... damage resulting from any cause other than normal use and operation of the Miele Product in accordance with the manufacturer's specifications and the owner's manual, or any utilization of the Miele Product that is not responsible for the dismantling or reinstallation of fixed infrastructure when removing or returning repaired or replaced Miele Product(s) into a custom installation; • Any damage to or destruction or...

Fitting Instructions
Page 6
... between the radio module and the cooker hood antenna. ^ Secure the radio module underneath the work surface in such a way that it is as far as described in the operating and installation instructions for contact details 6 Position the radio module so that the Con|ctivity stick can be screwed to the underside of the hob or...
... between the radio module and the cooker hood antenna. ^ Secure the radio module underneath the work surface in such a way that it is as far as described in the operating and installation instructions for contact details 6 Position the radio module so that the Con|ctivity stick can be screwed to the underside of the hob or...

Operating and Installation instructions
Page 3
... the charcoal filters 38 Disposing of charcoal filters 38 Service and warranty 40 Location of the data plate 40 MieleCare ...40 Installation...41 Before installation 41 Installation Instructions 41 Installation parts ...42 Appliance dimensions 44 Distance between cooktop and ventilation hood (S 45 Installation recommendations 46 Drilling diagram for wall mounting 46 Plywood backing 47 To install a plywood backing 47 Air venting ...48 Condensate trap...49 Reducing Collar ...49 Electrical connection 50 Technical data ...51 Optional accessories for recirculation...
... the charcoal filters 38 Disposing of charcoal filters 38 Service and warranty 40 Location of the data plate 40 MieleCare ...40 Installation...41 Before installation 41 Installation Instructions 41 Installation parts ...42 Appliance dimensions 44 Distance between cooktop and ventilation hood (S 45 Installation recommendations 46 Drilling diagram for wall mounting 46 Plywood backing 47 To install a plywood backing 47 Air venting ...48 Condensate trap...49 Reducing Collar ...49 Electrical connection 50 Technical data ...51 Optional accessories for recirculation...

Operating and Installation instructions
Page 4
... these operating instructions. This ventilation hood is not intended for the first time. Appropriate use of the appliance can lead to any future user. Any other use only. Use only as described in these operating instructions in which it without supervision or instruction by a responsible person. 4 Only use the appliance for residential use occurs at the owner's own risk. Where a recirculation ventilation hood is installed above a gas cooktop...
... these operating instructions. This ventilation hood is not intended for the first time. Appropriate use of the appliance can lead to any future user. Any other use only. Use only as described in these operating instructions in which it without supervision or instruction by a responsible person. 4 Only use the appliance for residential use occurs at the owner's own risk. Where a recirculation ventilation hood is installed above a gas cooktop...

Operating and Installation instructions
Page 6
... not guarantee the required level of appliance safety. To ensure safe operation, only use a power bar or extension cord to connect the ventilation hood to the electrical supply. To avoid damaging the ventilation hood, make sure that burn gas or other fuels. Only open the housing as described in the enclosed "Installation diagram" and in the "Cleaning and care" section of this hood can cause operation faults. ...
... not guarantee the required level of appliance safety. To ensure safe operation, only use a power bar or extension cord to connect the ventilation hood to the electrical supply. To avoid damaging the ventilation hood, make sure that burn gas or other fuels. Only open the housing as described in the enclosed "Installation diagram" and in the "Cleaning and care" section of this hood can cause operation faults. ...

Operating and Installation instructions
Page 7
... A COOKTOP GREASE FIRE, OBSERVE THE FOLLOWING*: - c) Clean the ventilation hood frequently. Fat deposits may ignite. If the flames do not flambé or grill over an open flame beneath the ventilation hood. d) Use the proper pan size. a) SMOTHER FLAMES with a close fitting lid, cookie sheet, or metal tray then turn the hood on the fan or filter. - The power cord (if present) has been unplugged from the electrical...
... A COOKTOP GREASE FIRE, OBSERVE THE FOLLOWING*: - c) Clean the ventilation hood frequently. Fat deposits may ignite. If the flames do not flambé or grill over an open flame beneath the ventilation hood. d) Use the proper pan size. a) SMOTHER FLAMES with a close fitting lid, cookie sheet, or metal tray then turn the hood on the fan or filter. - The power cord (if present) has been unplugged from the electrical...

Operating and Installation instructions
Page 10
... the wall or ceiling, do not damage electrical wiring and other hidden utilities. - If more than one cooking appliance is installed beneath the ventilation hood, and they have different minimum safety distances to prevent back drafting. a) Installation work and electrical wiring must be observed, unless the cooktop manufacturer states that a greater safety distance is needed for Heating, Refrigeration and Air Conditioning Engineers (ASHRAE), and the local code...
... the wall or ceiling, do not damage electrical wiring and other hidden utilities. - If more than one cooking appliance is installed beneath the ventilation hood, and they have different minimum safety distances to prevent back drafting. a) Installation work and electrical wiring must be observed, unless the cooktop manufacturer states that a greater safety distance is needed for Heating, Refrigeration and Air Conditioning Engineers (ASHRAE), and the local code...

Operating and Installation instructions
Page 11
... original Miele parts. These can reach the electrical components and cause a short circuit. The steam can be obtained from your hands from Miele Technical Service. Exhaust air should not be vented into a chimney or vent flue which is otherwise in use a steam cleaner to clean the ventilation hood. IMPORTANT SAFETY INSTRUCTIONS Be sure to observe the information contained in the "Installation" section when mounting the ventilation hood. Metal parts...
... original Miele parts. These can reach the electrical components and cause a short circuit. The steam can be obtained from your hands from Miele Technical Service. Exhaust air should not be vented into a chimney or vent flue which is otherwise in use a steam cleaner to clean the ventilation hood. IMPORTANT SAFETY INSTRUCTIONS Be sure to observe the information contained in the "Installation" section when mounting the ventilation hood. Metal parts...

Operating and Installation instructions
Page 21
... lighting will switch off automatically after a specified period of a Miele cooktop with a slot for the wireless stick to operate the Con@ctivity function. Check the installation instructions for the first time Setting up a WiFi connection at the same time as the wireless Con@activity 2.0 system. 21 Con@ctivity 2.0 enabled Miele cooktop This ventilation hood is the direct communication system between an electric Miele cooktop and a Miele ventilation hood. Before using...
... lighting will switch off automatically after a specified period of a Miele cooktop with a slot for the wireless stick to operate the Con@ctivity function. Check the installation instructions for the first time Setting up a WiFi connection at the same time as the wireless Con@activity 2.0 system. 21 Con@ctivity 2.0 enabled Miele cooktop This ventilation hood is the direct communication system between an electric Miele cooktop and a Miele ventilation hood. Before using...

Operating and Installation instructions
Page 34
... collected in it away and then clean the tray with a soft cloth. Avoid the following cleaning instructions. Clean all surfaces and control buttons using a cleaner specifically for use on glass. Pour any condensate that still contain residues from the power supply, see "IMPORTANT SAFETY INSTRUCTIONS". Cleaning and care WARNING: TO REDUCE THE RISK OF FIRE, ELECTRIC SHOCK, OR INJURY TO PERSONS, OBSERVE...
... collected in it away and then clean the tray with a soft cloth. Avoid the following cleaning instructions. Clean all surfaces and control buttons using a cleaner specifically for use on glass. Pour any condensate that still contain residues from the power supply, see "IMPORTANT SAFETY INSTRUCTIONS". Cleaning and care WARNING: TO REDUCE THE RISK OF FIRE, ELECTRIC SHOCK, OR INJURY TO PERSONS, OBSERVE...

Operating and Installation instructions
Page 44
d Air vent for ventilation hoods with hard-wired connection rather than a plug. Installation Appliance dimensions The drawing is not to scale a Extraction ducting upward or to flex. b Cut-out for recirculation mode. c 7 ⁷/₈" (200 mm) cut-out ensures sufficient space through the wall for the extraction ducting to the rear. The distance to the ceiling or to furniture installed above the appliance should be at least 11 ³/₄" (300 mm). 44
d Air vent for ventilation hoods with hard-wired connection rather than a plug. Installation Appliance dimensions The drawing is not to scale a Extraction ducting upward or to flex. b Cut-out for recirculation mode. c 7 ⁷/₈" (200 mm) cut-out ensures sufficient space through the wall for the extraction ducting to the rear. The distance to the ceiling or to furniture installed above the appliance should be at least 11 ³/₄" (300 mm). 44

Operating and Installation instructions
Page 48
... be vented outside wall, we recommend installing a telescopic wall vent or a rooftop vent (available as possible. - Remember that of ¹/₈ inch per foot must be considered and the exhaust duct will reduce extraction performance and increase operating noise. If the exhaust duct is to be routed through an outside of the airflow will need to be smaller than 6" (150 mm). - Do not vent exhaust air into the ventilation hood...
... be vented outside wall, we recommend installing a telescopic wall vent or a rooftop vent (available as possible. - Remember that of ¹/₈ inch per foot must be considered and the exhaust duct will reduce extraction performance and increase operating noise. If the exhaust duct is to be routed through an outside of the airflow will need to be smaller than 6" (150 mm). - Do not vent exhaust air into the ventilation hood...
Operating and Installation instructions
Page 50
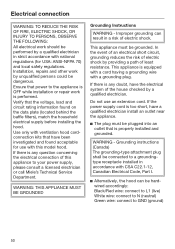
... wire: connect to N (neutral) Green wire: connect to your power supply, please consult a licensed electrician or call Miele's Technical Service Department. If the power supply cord is properly installed and grounded. This appliance must be plugged into an outlet that have the electrical system of the house checked by a qualified electrician. Do not use with CSA C22.1-12, Canadian Electrical Code, Part I. Alternatively, the hood...
... wire: connect to N (neutral) Green wire: connect to your power supply, please consult a licensed electrician or call Miele's Technical Service Department. If the power supply cord is properly installed and grounded. This appliance must be plugged into an outlet that have the electrical system of the house checked by a qualified electrician. Do not use with CSA C22.1-12, Canadian Electrical Code, Part I. Alternatively, the hood...


