Operating and Installation manual
Page 1
US, CA M.-Nr. 09 045 140 Operating and Installation Instructions Downdraft Ventilation System DA 6480, DA 6490 DAG 500, DAG 1000 To prevent accidents and appliance damage, read these instructions before installation or use. en -
US, CA M.-Nr. 09 045 140 Operating and Installation Instructions Downdraft Ventilation System DA 6480, DA 6490 DAG 500, DAG 1000 To prevent accidents and appliance damage, read these instructions before installation or use. en -
Operating and Installation manual
Page 2
Contents IMPORTANT SAFETY INSTRUCTIONS 3 Functional description 7 Description of the appliance 8 Operation 10 Raising the vent / Turning on the fan 10 Selecting the power level 10 Delayed shut-off feature ¢15 10 Temperature warning 11 Cleaning and Care 12 Grease filters 13 After Sales Service 15 Installation instructions 17 Caring for the environment 19 Appliance dimensions 20 Installation 26 Installation with the DAG 1000 external blower 34 Air extraction 35 Electrical connection 37 2
Contents IMPORTANT SAFETY INSTRUCTIONS 3 Functional description 7 Description of the appliance 8 Operation 10 Raising the vent / Turning on the fan 10 Selecting the power level 10 Delayed shut-off feature ¢15 10 Temperature warning 11 Cleaning and Care 12 Grease filters 13 After Sales Service 15 Installation instructions 17 Caring for the environment 19 Appliance dimensions 20 Installation 26 Installation with the DAG 1000 external blower 34 Air extraction 35 Electrical connection 37 2
Operating and Installation manual
Page 3
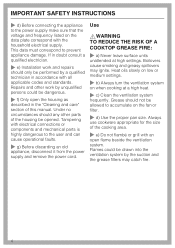
... PERSONS, OBSERVE THE FOLLOWING: ~ a) Use this appliance, continuity must not be used in a safe place and pass them on accidentally. If you have questions, contact Miele. ~ b) Before servicing or cleaning the appliance, switch power off at the service panel and lock the service disconnecting means to prevent power from being switched...
... PERSONS, OBSERVE THE FOLLOWING: ~ a) Use this appliance, continuity must not be used in a safe place and pass them on accidentally. If you have questions, contact Miele. ~ b) Before servicing or cleaning the appliance, switch power off at the service panel and lock the service disconnecting means to prevent power from being switched...
Operating and Installation manual
Page 4
Repairs and other parts of this manual. Heat oils slowly on low or medium settings. ~ b) Always turn the ventilation system on the fan or filter. ~ d) Use the proper pan size. If in accordance with all applicable codes and standards. IMPORTANT SAFETY INSTRUCTIONS ~ d) Before connecting the appliance to the power supply make sure that the voltage and frequency listed on the data plate correspond with electrical connections or components and mechanical parts is highly dangerous to the user and can cause operational faults. ~ g) Before discarding an old appliance, disconnect it ...
Repairs and other parts of this manual. Heat oils slowly on low or medium settings. ~ b) Always turn the ventilation system on the fan or filter. ~ d) Use the proper pan size. If in accordance with all applicable codes and standards. IMPORTANT SAFETY INSTRUCTIONS ~ d) Before connecting the appliance to the power supply make sure that the voltage and frequency listed on the data plate correspond with electrical connections or components and mechanical parts is highly dangerous to the user and can cause operational faults. ~ g) Before discarding an old appliance, disconnect it ...
Operating and Installation manual
Page 5
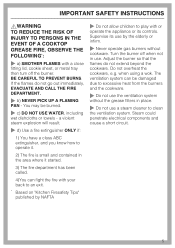
Supervise its controls. If the flames do not extend beyond the cookware. when using a wok. You may be damaged due to excessive heat from the burners and the cookware. ~ Do not use the ventilation system without cookware. Adjust the burner so that the flames do not go out immediately, EVACUATE AND CALL THE FIRE DEPARTMENT. ~ b) NEVER PICK UP A FLAMING PAN - Steam could penetrate electrical components and cause a short circuit. 5 Turn the burner off when not in use by NAFTA ~ Do not allow children to clean the ventilation system. The ventilation system can fight the fire...
Supervise its controls. If the flames do not extend beyond the cookware. when using a wok. You may be damaged due to excessive heat from the burners and the cookware. ~ Do not use the ventilation system without cookware. Adjust the burner so that the flames do not go out immediately, EVACUATE AND CALL THE FIRE DEPARTMENT. ~ b) NEVER PICK UP A FLAMING PAN - Steam could penetrate electrical components and cause a short circuit. 5 Turn the burner off when not in use by NAFTA ~ Do not allow children to clean the ventilation system. The ventilation system can fight the fire...
Operating and Installation manual
Page 6
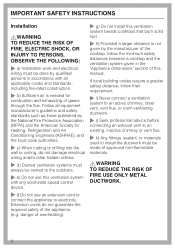
If local building codes require a greater safety distance, follow the minimum safety distances between a cooktop and the ventilation system given in accordance with any solid-state speed control device. ~ f) Do not use an extension cord to connect the appliance to electricity. Extension cords do not damage electrical wiring and/or other hidden utilities. ~ d) Ducted ventilation systems must be made of this manual. IMPORTANT SAFETY INSTRUCTIONS Installation ,WARNING TO REDUCE THE RISK OF FIRE, ELECTRIC SHOCK, OR INJURY TO PERSONS, OBSERVE THE FOLLOWING: ~ a) Installation work and ...
If local building codes require a greater safety distance, follow the minimum safety distances between a cooktop and the ventilation system given in accordance with any solid-state speed control device. ~ f) Do not use an extension cord to connect the appliance to electricity. Extension cords do not damage electrical wiring and/or other hidden utilities. ~ d) Ducted ventilation systems must be made of this manual. IMPORTANT SAFETY INSTRUCTIONS Installation ,WARNING TO REDUCE THE RISK OF FIRE, ELECTRIC SHOCK, OR INJURY TO PERSONS, OBSERVE THE FOLLOWING: ~ a) Installation work and ...

Operating and Installation manual
Page 7
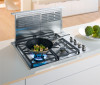
The external blower is operated via the ventilation system's control panel. 7 The external blower is connected to the ventilation system by a control cable, and exhaust ductwork and is designed to be installed in a different location than the ventilation system. The air is drawn through and cleaned by the grease filters and then directed outside . Functional description The ventilation system offers two installation options: with the internal DAG 500 exhaust blower (not included) with the DAG 1000 external blower (not included) The air is drawn through and cleaned by the ...
The external blower is operated via the ventilation system's control panel. 7 The external blower is connected to the ventilation system by a control cable, and exhaust ductwork and is designed to be installed in a different location than the ventilation system. The air is drawn through and cleaned by the grease filters and then directed outside . Functional description The ventilation system offers two installation options: with the internal DAG 500 exhaust blower (not included) with the DAG 1000 external blower (not included) The air is drawn through and cleaned by the ...

Operating and Installation manual
Page 8
Description of the appliance 8
Description of the appliance 8
Operating and Installation manual
Page 9
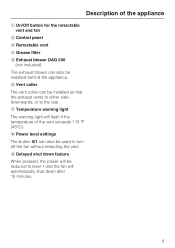
Description of the vent exceeds 113 °F (45°C). g Temperature warning light The warning light will automatically shut down feature When pressed, the power will be reduced to level 1 and the fan will flash if the temperature of the appliance a On/Off button for the retractable vent and fan b Control panel c Retractable vent d Grease filter e Exhaust blower DAG 500 (not included) The exhaust blower can also be used to the rear. i Delayed shut down after 15 minutes. 9 h Power level settings The button 0/1 can also be installed so that the exhaust vents to either side, ...
Description of the vent exceeds 113 °F (45°C). g Temperature warning light The warning light will automatically shut down feature When pressed, the power will be reduced to level 1 and the fan will flash if the temperature of the appliance a On/Off button for the retractable vent and fan b Control panel c Retractable vent d Grease filter e Exhaust blower DAG 500 (not included) The exhaust blower can also be used to the rear. i Delayed shut down after 15 minutes. 9 h Power level settings The button 0/1 can also be installed so that the exhaust vents to either side, ...
Operating and Installation manual
Page 10
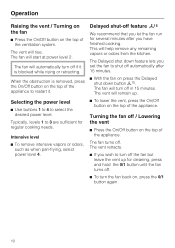
When the obstruction is blocked while rising or retracting. The Delayed shut down feature lets you wish to restart it is removed, press the On/Off button on press the Delayed shut down button ¢15. The fan will automatically turn off / Lowering the vent ^ Press the On/Off button on , press the 0/1 button again. 10 Turning the fan off in 15 minutes. The vent retracts. ^ If you set the fan to shut off the fan but leave the vent up . ^ To lower the vent, press the On/Off button on the top of the ventilation system. The fan will help remove any remaining vapors or ...
When the obstruction is blocked while rising or retracting. The Delayed shut down feature lets you wish to restart it is removed, press the On/Off button on press the Delayed shut down button ¢15. The fan will automatically turn off / Lowering the vent ^ Press the On/Off button on , press the 0/1 button again. 10 Turning the fan off in 15 minutes. The vent retracts. ^ If you set the fan to shut off the fan but leave the vent up . ^ To lower the vent, press the On/Off button on the top of the ventilation system. The fan will help remove any remaining vapors or ...
Operating and Installation manual
Page 11
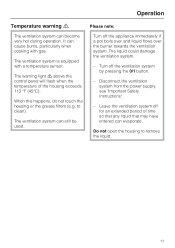
Turn off the ventilation system by pressing the 0/1 button. - Leave the ventilation system off for an extended period of the housing exceeds 113 °F (45°C). When this happens, do not touch the housing or the grease filters (e.g. The ventilation system can become very hot during operation. Do not open the housing to clean). Operation Temperature warning § Please note: The ventilation system can still be used. to remove the liquid. 11 The ventilation system is equipped with gas. Disconnect the ventilation system from the power supply, see "Important ...
Turn off the ventilation system by pressing the 0/1 button. - Leave the ventilation system off for an extended period of the housing exceeds 113 °F (45°C). When this happens, do not touch the housing or the grease filters (e.g. The ventilation system can become very hot during operation. Do not open the housing to clean). Operation Temperature warning § Please note: The ventilation system can still be used. to remove the liquid. 11 The ventilation system is equipped with gas. Disconnect the ventilation system from the power supply, see "Important ...

Operating and Installation manual
Page 12
... of warm water and liquid dish soap applied with abrasive cleaning agents. Cleaning and Care Before cleaning or servicing the ventilation system, disconnect it from Miele. 12
... of warm water and liquid dish soap applied with abrasive cleaning agents. Cleaning and Care Before cleaning or servicing the ventilation system, disconnect it from Miele. 12
Operating and Installation manual
Page 13
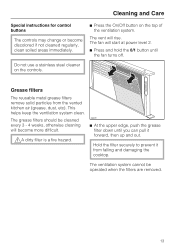
Cleaning and Care Special instructions for control buttons The controls may change or become more difficult. ,A dirty filter is a fire hazard. ^ At the upper edge, push the grease filter down until the fan turns off. The grease filters should be operated when the filters are removed. 13 The vent will become discolored if not cleaned regularly, clean soiled areas immediately. ^ Press the On/Off button on the controls. Grease filters The reusable metal grease filters remove solid particles from falling and damaging the cooktop. This helps keep the ventilation system ...
Cleaning and Care Special instructions for control buttons The controls may change or become more difficult. ,A dirty filter is a fire hazard. ^ At the upper edge, push the grease filter down until the fan turns off. The grease filters should be operated when the filters are removed. 13 The vent will become discolored if not cleaned regularly, clean soiled areas immediately. ^ Press the On/Off button on the controls. Grease filters The reusable metal grease filters remove solid particles from falling and damaging the cooktop. This helps keep the ventilation system ...

Operating and Installation manual
Page 14
"Heavy Soil" or "Pots and pans". Depending on the detergent, cleaning the grease filters in the bottom of the vent. If the retractable vent does not work after the cleaned filters have been replaced: ^ Press the grease filters firmly into the frame at the top, behind the grease filters. Use the recommended amount of warm water and mild dish soap. Filter performance will not be affected by this discoloration. ^ After cleaning, place the filters on a towel to turn the appliance on when the grease filters are removed, clean any dirt or grease from being turned on . Press them ...
"Heavy Soil" or "Pots and pans". Depending on the detergent, cleaning the grease filters in the bottom of the vent. If the retractable vent does not work after the cleaned filters have been replaced: ^ Press the grease filters firmly into the frame at the top, behind the grease filters. Use the recommended amount of warm water and mild dish soap. Filter performance will not be affected by this discoloration. ^ After cleaning, place the filters on a towel to turn the appliance on when the grease filters are removed, clean any dirt or grease from being turned on . Press them ...
Operating and Installation manual
Page 15
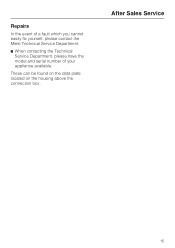
Repairs In the event of a fault which you cannot easily fix yourself, please contact the Miele Technical Service Department. ^ When contacting the Technical Service Department, please have the model and serial number of your appliance available. These can be found on the data plate located on the housing above the connection box. After Sales Service 15
Repairs In the event of a fault which you cannot easily fix yourself, please contact the Miele Technical Service Department. ^ When contacting the Technical Service Department, please have the model and serial number of your appliance available. These can be found on the data plate located on the housing above the connection box. After Sales Service 15

Operating and Installation manual
Page 17
Installation Instructions Read these instructions with the appliance for the consumer/user. Information is subject to obtain the most current product specification, technical & warranty information. Leave these instructions and the "Important Safety Instructions" before installing this ventilation system. The installation steps are described in the enclosed "Installation Diagram". Please refer to our website to change.
Installation Instructions Read these instructions with the appliance for the consumer/user. Information is subject to obtain the most current product specification, technical & warranty information. Leave these instructions and the "Important Safety Instructions" before installing this ventilation system. The installation steps are described in the enclosed "Installation Diagram". Please refer to our website to change.
Operating and Installation manual
Page 19
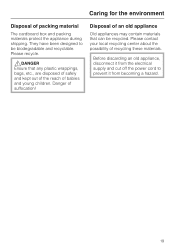
Caring for the environment Disposal of suffocation! Danger of packing material The cardboard box and packing materials protect the appliance during shipping. Disposal of babies and young children. Please recycle. ,DANGER Ensure that any plastic wrappings, bags, etc., are disposed of safely and kept out of the reach of an old appliance Old appliances may contain materials that can be biodegradable and recyclable. They have been designed to prevent it from becoming a hazard. 19 Before discarding an old appliance, disconnect it from the electrical supply and cut off the power cord ...
Caring for the environment Disposal of suffocation! Danger of packing material The cardboard box and packing materials protect the appliance during shipping. Disposal of babies and young children. Please recycle. ,DANGER Ensure that any plastic wrappings, bags, etc., are disposed of safely and kept out of the reach of an old appliance Old appliances may contain materials that can be biodegradable and recyclable. They have been designed to prevent it from becoming a hazard. 19 Before discarding an old appliance, disconnect it from the electrical supply and cut off the power cord ...
Operating and Installation manual
Page 21
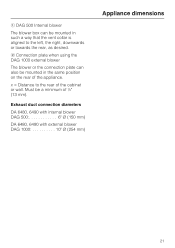
... in the same position on the rear of the appliance. Must be a minimum of ½" (13 mm). Exhaust duct connection diameters DA 6480, 6490 with internal blower DAG 500 6" C (150 mm) DA 6480, 6490 with external blower DAG 1000 10" C (254 mm) Appliance dimensions 21 x = Distance to the left, the right, downwards or towards...
... in the same position on the rear of the appliance. Must be a minimum of ½" (13 mm). Exhaust duct connection diameters DA 6480, 6490 with internal blower DAG 500 6" C (150 mm) DA 6480, 6490 with external blower DAG 1000 10" C (254 mm) Appliance dimensions 21 x = Distance to the left, the right, downwards or towards...
Operating and Installation manual
Page 23
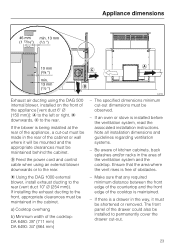
... to the rear. Ensure that any required minimum distance between the front edge of the countertop and the front edge of the cooktop: DA 6480: 28" (711 mm) DA 6490: 34" (864 mm) - If an oven or stove is being installed at the rear of kitchen cabinets, back splashes and/or racks in...
... to the rear. Ensure that any required minimum distance between the front edge of the countertop and the front edge of the cooktop: DA 6480: 28" (711 mm) DA 6490: 34" (864 mm) - If an oven or stove is being installed at the rear of kitchen cabinets, back splashes and/or racks in...
Operating and Installation manual
Page 24
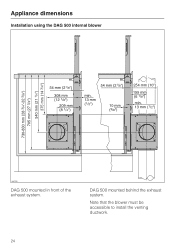
DAG 500 mounted behind the exhaust system. Note that the blower must be accessible to install the venting ductwork. 24 Appliance dimensions Installation using the DAG 500 internal blower DAG 500 mounted in front of the exhaust system.
DAG 500 mounted behind the exhaust system. Note that the blower must be accessible to install the venting ductwork. 24 Appliance dimensions Installation using the DAG 500 internal blower DAG 500 mounted in front of the exhaust system.