Operating and Installation manual
Page 1
US, CA M.-Nr. 07 838 180 Operating and Installation Instructions Ventilation System DA 5341 D To prevent accidents and appliance damage, read these instructions before installation or use. en -
US, CA M.-Nr. 07 838 180 Operating and Installation Instructions Ventilation System DA 5341 D To prevent accidents and appliance damage, read these instructions before installation or use. en -
Operating and Installation manual
Page 2
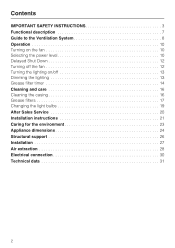
... 7 Guide to the Ventilation System 8 Operation 10 Turning on the fan 10 Selecting the power level 10 Delayed Shut Down 12 Turning off the fan 12 Turning the lighting on/off 13 Dimming the lighting 13 Grease filter timer 14 Cleaning and care 16 Cleaning the casing 16 Grease filters 17 Changing the light bulbs 19 After Sales Service 20 Installation instructions 21 Caring for the environment 23 Appliance dimensions 24 Structural support 26 Installation 27 Air extraction 28 Electrical connection 30...
... 7 Guide to the Ventilation System 8 Operation 10 Turning on the fan 10 Selecting the power level 10 Delayed Shut Down 12 Turning off the fan 12 Turning the lighting on/off 13 Dimming the lighting 13 Grease filter timer 14 Cleaning and care 16 Cleaning the casing 16 Grease filters 17 Changing the light bulbs 19 After Sales Service 20 Installation instructions 21 Caring for the environment 23 Appliance dimensions 24 Structural support 26 Installation 27 Air extraction 28 Electrical connection 30...
Operating and Installation manual
Page 3
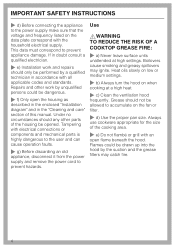
... appliance is suitable for installation above gas or electric cooking surfaces. ~ This appliance is properly installed and grounded by the manufacturer. To guarantee the electrical safety of the appliance can lead to any doubt, have questions, contact Miele. ~ b) Before servicing or cleaning the appliance, switch power off at the service panel and lock the service disconnecting means to prevent power from being switched on to personal...
... appliance is suitable for installation above gas or electric cooking surfaces. ~ This appliance is properly installed and grounded by the manufacturer. To guarantee the electrical safety of the appliance can lead to any doubt, have questions, contact Miele. ~ b) Before servicing or cleaning the appliance, switch power off at the service panel and lock the service disconnecting means to prevent power from being switched on to personal...
Operating and Installation manual
Page 4
... grease filters may ignite. Heat oils slowly on low or medium settings. ~ b) Always turn the hood on the fan or filter. ~ d) Use the proper pan size. Under no circumstances should only be allowed to accumulate on when cooking at high settings. IMPORTANT SAFETY INSTRUCTIONS ~ d) Before connecting the appliance to the power supply make sure that the voltage and frequency listed on the data plate correspond with all applicable codes...
... grease filters may ignite. Heat oils slowly on low or medium settings. ~ b) Always turn the hood on the fan or filter. ~ d) Use the proper pan size. Under no circumstances should only be allowed to accumulate on when cooking at high settings. IMPORTANT SAFETY INSTRUCTIONS ~ d) Before connecting the appliance to the power supply make sure that the voltage and frequency listed on the data plate correspond with all applicable codes...

Operating and Installation manual
Page 5
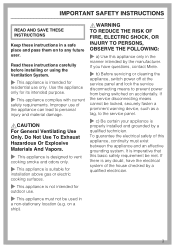
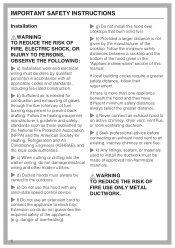
...sheet, or metal tray then turn on the hood when using a wok. BE CAREFUL TO PREVENT BURNS. The hood can fight the fire with your back to an exit. * Based on "Kitchen Firesafety Tips" published by the elderly or infirm. ~ Always turn off when not in use...use the hood without cookware. Supervise its controls. when using the cooktop to clean the hood. a violent steam explosion will result. ~ d) Use a fire extinguisher ONLY if: 1) You have a class ABC extinguisher, and you know how to excessive heat from condensation. ~ Never operate gas burners without the grease filters...
...sheet, or metal tray then turn on the hood when using a wok. BE CAREFUL TO PREVENT BURNS. The hood can fight the fire with your back to an exit. * Based on "Kitchen Firesafety Tips" published by the elderly or infirm. ~ Always turn off when not in use...use the hood without cookware. Supervise its controls. when using the cooktop to clean the hood. a violent steam explosion will result. ~ d) Use a fire extinguisher ONLY if: 1) You have a class ABC extinguisher, and you know how to excessive heat from condensation. ~ Never operate gas burners without the grease filters...
Operating and Installation manual
Page 6
... electrical wiring and other hidden utilities. ~ d) Ducted hoods must be vented to the outdoors. ~ e) Do not use an extension cord to connect the appliance to electricity. If there is more than one appliance beneath the hood and they have different minimum safety distances always select the greater distance. ~ i) Never connect an exhaust hood to an active chimney, dryer vent, vent flue, or room ventilating ductwork. ~ j) Seek professional advice before connecting an exhaust hood vent...
... electrical wiring and other hidden utilities. ~ d) Ducted hoods must be vented to the outdoors. ~ e) Do not use an extension cord to connect the appliance to electricity. If there is more than one appliance beneath the hood and they have different minimum safety distances always select the greater distance. ~ i) Never connect an exhaust hood to an active chimney, dryer vent, vent flue, or room ventilating ductwork. ~ j) Seek professional advice before connecting an exhaust hood vent...

Operating and Installation manual
Page 7
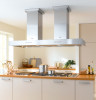
When the hood is turned on, the air pressure of outside air and room air can occur. The air is turned off so that no exchange of the exhaust fan automatically opens the flap blowing the inside air and cooking odors outside. 7 Functional description The ventilation hood works by the grease filter and directed outside. This flap automatically closes when the hood is drawn in each chimney. The hood comes equipped with a non-return flap in and cleaned by air extraction.
When the hood is turned on, the air pressure of outside air and room air can occur. The air is turned off so that no exchange of the exhaust fan automatically opens the flap blowing the inside air and cooking odors outside. 7 Functional description The ventilation hood works by the grease filter and directed outside. This flap automatically closes when the hood is drawn in each chimney. The hood comes equipped with a non-return flap in and cleaned by air extraction.
Operating and Installation manual
Page 9
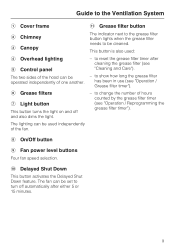
... lighting can be used independently of hours counted by the grease filter timer (see "Operation / Grease filter timer"). to turn off and also dims the light. - This button is also used: d Overhead lighting e Control panel The two sides of the hood can be operated independently of one another. - The fan can be cleaned. Guide to the Ventilation System a Cover frame k Grease filter button b Chimney c Canopy The indicator next to the grease filter button lights when the grease filter needs to be set to change the number...
... lighting can be used independently of hours counted by the grease filter timer (see "Operation / Grease filter timer"). to turn off and also dims the light. - This button is also used: d Overhead lighting e Control panel The two sides of the hood can be operated independently of one another. - The fan can be cleaned. Guide to the Ventilation System a Cover frame k Grease filter button b Chimney c Canopy The indicator next to the grease filter button lights when the grease filter needs to be set to change the number...
Operating and Installation manual
Page 10
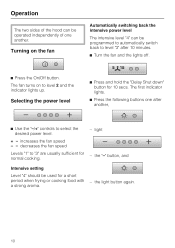
.... The first indicator lights. ^ Press the following buttons one another , ^ Use the "-/+" controls to select the desired power level. + = increases the fan speed - = decreases the fan speed Levels "1" to level "3" after another . The fan turns on the fan Automatically switching back the intensive power level The intensive level "4" can be operated independently of the hood can be programmed to automatically switch back to "3" are usually sufficient for normal cooking. - Selecting the power level ^ Press and...
.... The first indicator lights. ^ Press the following buttons one another , ^ Use the "-/+" controls to select the desired power level. + = increases the fan speed - = decreases the fan speed Levels "1" to level "3" after another . The fan turns on the fan Automatically switching back the intensive power level The intensive level "4" can be operated independently of the hood can be programmed to automatically switch back to "3" are usually sufficient for normal cooking. - Selecting the power level ^ Press and...
Operating and Installation manual
Page 16
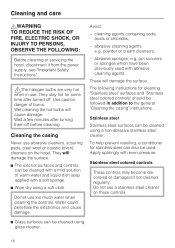
... following instructions for stainless steel can be used with even pressure. Apply sparingly with abrasive cleaning agents. Stainless steel colored controls These controls may become discolored or damaged if not cleaned regularly. Cleaning and care ,WARNING TO REDUCE THE RISK OF FIRE, ELECTRIC SHOCK, OR INJURY TO PERSONS, OBSERVE THE FOLLOWING: Before cleaning or servicing the hood, disconnect it from the power supply, see "Important Safety Instructions". ,The halogen bulbs...
... following instructions for stainless steel can be used with even pressure. Apply sparingly with abrasive cleaning agents. Stainless steel colored controls These controls may become discolored or damaged if not cleaned regularly. Cleaning and care ,WARNING TO REDUCE THE RISK OF FIRE, ELECTRIC SHOCK, OR INJURY TO PERSONS, OBSERVE THE FOLLOWING: Before cleaning or servicing the hood, disconnect it from the power supply, see "Important Safety Instructions". ,The halogen bulbs...
Operating and Installation manual
Page 18
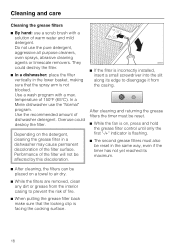
... returning the grease filters the timer must be reset. ^ While the fan is on, press and hold the grease filter control until only the first "-/+" indicator is not blocked. Cleaning and care Cleaning the grease filters ^ By hand: use a scrub brush with a max. Use a wash program with a solution of the filter surface. In a Miele dishwasher use the pure detergent, aggressive all purpose cleaners, oven sprays, abrasive cleaning agents or...
... returning the grease filters the timer must be reset. ^ While the fan is on, press and hold the grease filter control until only the first "-/+" indicator is not blocked. Cleaning and care Cleaning the grease filters ^ By hand: use a scrub brush with a max. Use a wash program with a solution of the filter surface. In a Miele dishwasher use the pure detergent, aggressive all purpose cleaners, oven sprays, abrasive cleaning agents or...

Operating and Installation manual
Page 19
... power supply, see "Important Safety Instructions". Please follow the manufacturer's instructions. ^ To change the bulbs until they have had sufficient time to cool. Please follow the manufacturer's instructions. ^ Flip the light cover back up, making sure it clicks into place. 19 The cover will decrease its life. Cleaning and care Note: The appliance has 2 electrical connections, each must be flipped down. ^ Using a cloth or glove, insert...
... power supply, see "Important Safety Instructions". Please follow the manufacturer's instructions. ^ To change the bulbs until they have had sufficient time to cool. Please follow the manufacturer's instructions. ^ Flip the light cover back up, making sure it clicks into place. 19 The cover will decrease its life. Cleaning and care Note: The appliance has 2 electrical connections, each must be flipped down. ^ Using a cloth or glove, insert...
Operating and Installation manual
Page 20
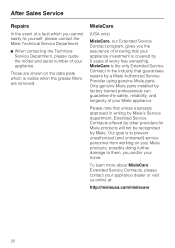
These are removed. After Sales Service Repairs In the event of a fault which is covered by Miele. MieleCare (USA only) MieleCare, our Extended Service Contract program, gives you the assurance of knowing that guarantees repairs by factory trained professionals can guarantee the safety, reliability, and longevity of your appliance. Only genuine Miele parts installed by a Miele Authorized Service Provider using genuine Miele parts. MieleCare is to prevent...
These are removed. After Sales Service Repairs In the event of a fault which is covered by Miele. MieleCare (USA only) MieleCare, our Extended Service Contract program, gives you the assurance of knowing that guarantees repairs by factory trained professionals can guarantee the safety, reliability, and longevity of your appliance. Only genuine Miele parts installed by a Miele Authorized Service Provider using genuine Miele parts. MieleCare is to prevent...
Operating and Installation manual
Page 25
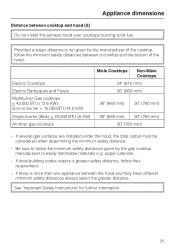
... burner (Wok) < 20,500 BTU (6 KW) All other gas cooktops Miele Cooktops Non-Miele Cooktops 24" (610 mm) 26" (660 mm) 26" (660 mm) 30" (760 mm) 26" (660 mm) 30" (760 mm) 30" (760 mm) - If local building codes require a greater safety distance, follow the minimum safety distances between cooktop and hood (S) Do not install this exhaust hood over cooktops burning solid fuel.
... burner (Wok) < 20,500 BTU (6 KW) All other gas cooktops Miele Cooktops Non-Miele Cooktops 24" (610 mm) 26" (660 mm) 26" (660 mm) 30" (760 mm) 26" (660 mm) 30" (760 mm) 30" (760 mm) - If local building codes require a greater safety distance, follow the minimum safety distances between cooktop and hood (S) Do not install this exhaust hood over cooktops burning solid fuel.

Operating and Installation manual
Page 27
... during transport. ^ Peel off the film before installing the casing parts. ,CAUTION To avoid risk of hand or other injury, avoid contact with 8 Washers for securing the ceiling plate. (S8 wall anchors included in the packaging are not for use in USA) 4 Screws M 4 x 8 mm for adjusting the chimney. 8 leveling plates for correcting an uneven ceiling. 2 exhaust connectors 2 hose clips for securing the ducting. 27
... during transport. ^ Peel off the film before installing the casing parts. ,CAUTION To avoid risk of hand or other injury, avoid contact with 8 Washers for securing the ceiling plate. (S8 wall anchors included in the packaging are not for use in USA) 4 Screws M 4 x 8 mm for adjusting the chimney. 8 leveling plates for correcting an uneven ceiling. 2 exhaust connectors 2 hose clips for securing the ducting. 27

Operating and Installation manual
Page 28
... connections are secure. - If flat ducting is used . 28 Gas cooking appliances release carbon monoxide that can be used , the cross section must not be smaller than 6" (150 mm). - To achieve the most efficient air extraction and quietest noise levels, consider the following: - The exhaust duct must slope away from approved non-flammable materials for exhaust ducting. Make sure all local building codes when installing the hood...
... connections are secure. - If flat ducting is used . 28 Gas cooking appliances release carbon monoxide that can be used , the cross section must not be smaller than 6" (150 mm). - To achieve the most efficient air extraction and quietest noise levels, consider the following: - The exhaust duct must slope away from approved non-flammable materials for exhaust ducting. Make sure all local building codes when installing the hood...

Operating and Installation manual
Page 29
... to reduce condensation. ^ When installing a condensate trap, ensure that it may occur. Seek professional advice before connecting an exhaust hood vent to collect and evaporate any condensate which may need to be required to an existing, inactive chimney or vent flue. Important If the ductwork runs through rooms, ceilings, garages, etc. where temperature variations exist, it is available for ducts 5" (125 mm) and...
... to reduce condensation. ^ When installing a condensate trap, ensure that it may occur. Seek professional advice before connecting an exhaust hood vent to collect and evaporate any condensate which may need to be required to an existing, inactive chimney or vent flue. Important If the ductwork runs through rooms, ceilings, garages, etc. where temperature variations exist, it is available for ducts 5" (125 mm) and...
Operating and Installation manual
Page 30
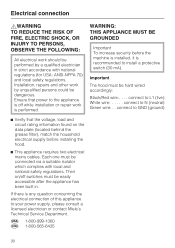
... install a protective switch (30 mA). connect to L1 (live) White wire: . . . . . Ensure that the voltage, load and circuit rating information found on /off while installation or repair work by a qualified electrician in . connect to N (neutral) Green wire: . . Installation, repairs and other work is off switches must be hard wired accordingly: Black/Red wire:. . . . If there is recommended to your power supply, please consult a licensed electrician or contact Miele's Technical Service...
... install a protective switch (30 mA). connect to L1 (live) White wire: . . . . . Ensure that the voltage, load and circuit rating information found on /off while installation or repair work by a qualified electrician in . connect to N (neutral) Green wire: . . Installation, repairs and other work is off switches must be hard wired accordingly: Black/Red wire:. . . . If there is recommended to your power supply, please consult a licensed electrician or contact Miele's Technical Service...

DA5341D
Page 1
Product Dimensions Decorator Island Hood DA5341D E 15 3/16" E 14 3/4" 2 1/8" 12" 11 5/8" 4 3/4" Side Perspective 42" 27 9/16" Location Codes E - (2) 120 Volt - 15 Amp 3-wire power supplies connect at top of chimneys. 70 13/16" NOTE: Drawing is not to mounting plate at top of chimneys. SPECIFICATION SHEETS 010107 Notes • All installations must be done in accordance with local codes. • Mounting plates must be used. • 6" ducts connect to scale.
Product Dimensions Decorator Island Hood DA5341D E 15 3/16" E 14 3/4" 2 1/8" 12" 11 5/8" 4 3/4" Side Perspective 42" 27 9/16" Location Codes E - (2) 120 Volt - 15 Amp 3-wire power supplies connect at top of chimneys. 70 13/16" NOTE: Drawing is not to mounting plate at top of chimneys. SPECIFICATION SHEETS 010107 Notes • All installations must be done in accordance with local codes. • Mounting plates must be used. • 6" ducts connect to scale.

DA5341D
Page 2
Notes • Center unit over cooking surface • Bolt spacers to structural members • Attach ceiling mounting plate to spacers in ceiling. SPECIFICATION SHEETS 010107 Chimney Mounting Bolts NOTE: Drawing is not to ceiling mounting plate using supplied mounting bolts • External ducting connects to ceiling mounting plate • Connect chimney mounting plate to scale. Installation Dimensions Decorator Island Hood DA5341D Ceiling Mounting Plate Detail 8 1/2" 10 1/4" Ceiling mounting plate Chimney mounting plate 10 1/4" 28 9/16" Structural Ceiling Members (16" ...
Notes • Center unit over cooking surface • Bolt spacers to structural members • Attach ceiling mounting plate to spacers in ceiling. SPECIFICATION SHEETS 010107 Chimney Mounting Bolts NOTE: Drawing is not to ceiling mounting plate using supplied mounting bolts • External ducting connects to ceiling mounting plate • Connect chimney mounting plate to scale. Installation Dimensions Decorator Island Hood DA5341D Ceiling Mounting Plate Detail 8 1/2" 10 1/4" Ceiling mounting plate Chimney mounting plate 10 1/4" 28 9/16" Structural Ceiling Members (16" ...


