Operating and Installation manual
Page 1
US M.-Nr. 09 382 400 Operating and Installation Instructions Ventilation System DA 1160 DA 1180 To prevent accidents and appliance damage, read these instructions before installation or use. en -
US M.-Nr. 09 382 400 Operating and Installation Instructions Ventilation System DA 1160 DA 1180 To prevent accidents and appliance damage, read these instructions before installation or use. en -
Operating and Installation manual
Page 2
Contents IMPORTANT SAFETY INSTRUCTIONS 3 Description of functions 7 Guide to the ventilation system 8 Turning the light on/off 9 Fan control 9 Cleaning and care 10 Grease filters 11 Odor-free filter (active charcoal filter 13 Changing the light bulbs 14 After Sales Service 15 Installation instructions 17 Caring for the environment 18 Appliance dimensions 19 Installation 21 Diverter 21 Under-cabinet installation 22 Wall mounting 23 Electrical connection 27 Exhaust ducting 28 Condensate trap 30 Technical data 31 2
Contents IMPORTANT SAFETY INSTRUCTIONS 3 Description of functions 7 Guide to the ventilation system 8 Turning the light on/off 9 Fan control 9 Cleaning and care 10 Grease filters 11 Odor-free filter (active charcoal filter 13 Changing the light bulbs 14 After Sales Service 15 Installation instructions 17 Caring for the environment 18 Appliance dimensions 19 Installation 21 Diverter 21 Under-cabinet installation 22 Wall mounting 23 Electrical connection 27 Exhaust ducting 28 Condensate trap 30 Technical data 31 2
Operating and Installation manual
Page 3
... grounded by a qualified technician. If the service disconnecting means cannot be used in a safe place and pass them on to any doubt, have questions, contact Miele. ~ b) Before servicing or cleaning the appliance, switch power off at the service panel and lock the service disconnecting means to personal injury and material damage...
... grounded by a qualified technician. If the service disconnecting means cannot be used in a safe place and pass them on to any doubt, have questions, contact Miele. ~ b) Before servicing or cleaning the appliance, switch power off at the service panel and lock the service disconnecting means to personal injury and material damage...
Operating and Installation manual
Page 4
Tampering with the household electrical supply. Repairs and other work and repairs should any other parts of the casing be opened. Heat oils slowly on low or medium settings. ~ b) Always turn the hood on when cooking at high settings. Boilovers cause smoking and greasy spillovers may catch fire. 4 Flames could be drawn up into the hood by the suction and the grease filter may ignite. If in doubt consult a qualified electrician. ~ e) Installation work by a qualified technician in accordance with an open the casing as described in the enclosed "Installation diagram" ...
Tampering with the household electrical supply. Repairs and other work and repairs should any other parts of the casing be opened. Heat oils slowly on low or medium settings. ~ b) Always turn the hood on when cooking at high settings. Boilovers cause smoking and greasy spillovers may catch fire. 4 Flames could be drawn up into the hood by the suction and the grease filter may ignite. If in doubt consult a qualified electrician. ~ e) Installation work by a qualified technician in accordance with an open the casing as described in the enclosed "Installation diagram" ...

Operating and Installation manual
Page 5
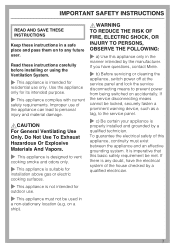
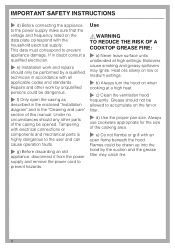
IMPORTANT SAFETY INSTRUCTIONS ,WARNING TO REDUCE THE RISK OF INJURY TO PERSONS IN THE EVENT OF A COOKTOP GREASE FIRE, OBSERVE THE FOLLOWING*: ~ a) SMOTHER FLAMES with or operate the appliance or its use . You may be damaged due to excessive heat from the burners and the cookware. ~ Do not use the hood without the grease filter in use by NAFTA ~ Do not allow children to play with a close fitting lid, cookie sheet, or metal tray then turn on the hood when using a wok. Turn the burner off the burner. Adjust the burner so that the flames do not go out immediately, EVACUATE AND ...
IMPORTANT SAFETY INSTRUCTIONS ,WARNING TO REDUCE THE RISK OF INJURY TO PERSONS IN THE EVENT OF A COOKTOP GREASE FIRE, OBSERVE THE FOLLOWING*: ~ a) SMOTHER FLAMES with or operate the appliance or its use . You may be damaged due to excessive heat from the burners and the cookware. ~ Do not use the hood without the grease filter in use by NAFTA ~ Do not allow children to play with a close fitting lid, cookie sheet, or metal tray then turn on the hood when using a wok. Turn the burner off the burner. Adjust the burner so that the flames do not go out immediately, EVACUATE AND ...

Operating and Installation manual
Page 6
If local building codes require a greater safety distance, follow the minimum safety distances between a cooktop and the bottom of the hood given in accordance with all applicable codes and standards, including fire-rated construction. ~ b) Sufficient air is needed for Heating, Refrigeration and Air Conditioning Engineers (ASHRAE), and the local code authorities. ~ c) When cutting or drilling into the wall or ceiling, do not guarantee the required safety of fuel burning equipment to prevent back drafting. danger of overheating). ~ g) Do not install this hood over cooktops that burn ...
If local building codes require a greater safety distance, follow the minimum safety distances between a cooktop and the bottom of the hood given in accordance with all applicable codes and standards, including fire-rated construction. ~ b) Sufficient air is needed for Heating, Refrigeration and Air Conditioning Engineers (ASHRAE), and the local code authorities. ~ c) When cutting or drilling into the wall or ceiling, do not guarantee the required safety of fuel burning equipment to prevent back drafting. danger of overheating). ~ g) Do not install this hood over cooktops that burn ...

Operating and Installation manual
Page 7
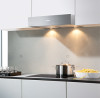
When the hood is then recirculated back into the kitchen. The filtered air is turned on, the air pressure of the exhaust fan automatically opens the flap blowing the inside air and cooking odors outside. In air recirculation mode, please ensure that no exchange of outside . The air is in place, see "Cleaning and care". 7 Description of functions The ventilation system can occur. This flap automatically closes when the hood is turned off so that the odor-free filter is drawn in and cleaned by the grease filters and directed outside air and room air can be operated: Air...
When the hood is then recirculated back into the kitchen. The filtered air is turned on, the air pressure of the exhaust fan automatically opens the flap blowing the inside air and cooking odors outside. In air recirculation mode, please ensure that no exchange of outside . The air is in place, see "Cleaning and care". 7 Description of functions The ventilation system can occur. This flap automatically closes when the hood is turned off so that the odor-free filter is drawn in and cleaned by the grease filters and directed outside air and room air can be operated: Air...

Operating and Installation manual
Page 8
Guide to the ventilation system 8
Guide to the ventilation system 8

Operating and Installation manual
Page 9
Light off "1" - Light on Fan control ^ This switch k allows you have finished cooking. This helps clear the kitchen air of time when frying or cooking food with a strong aroma. Fan off ^ Levels "1" to "3" are usually sufficient for normal cooking. ^ The "IS" level should be turned on and off and to select the fan power level. ^ "0" - After cooking In both air extraction mode and recirculation mode we recommend that you run the fan for several minutes after you to turn the fan on and off separately j. Guide to the ventilation system a Control panel b Overhead lighting c Odor-...
Light off "1" - Light on Fan control ^ This switch k allows you have finished cooking. This helps clear the kitchen air of time when frying or cooking food with a strong aroma. Fan off ^ Levels "1" to "3" are usually sufficient for normal cooking. ^ The "IS" level should be turned on and off and to select the fan power level. ^ "0" - After cooking In both air extraction mode and recirculation mode we recommend that you run the fan for several minutes after you to turn the fan on and off separately j. Guide to the ventilation system a Control panel b Overhead lighting c Odor-...
Operating and Installation manual
Page 10
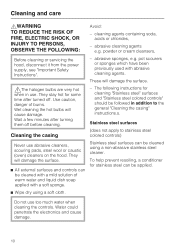
Use caution, danger of warm water and liquid dish soap applied with abrasive cleaning agents. Stainless steel surfaces (does not apply to the general "Cleaning the casing" instructions.s. To help prevent resoiling, a conditioner for stainless steel can be followed in use abrasive cleaners, scouring pads, steel wool or caustic (oven) cleaners on the hood. pot scourers or sponges which have been previously used with a soft sponge. These will damage the surface. ,The halogen bulbs are very hot when in addition to stainless steel colored controls) Never use . They stay hot for ...
Use caution, danger of warm water and liquid dish soap applied with abrasive cleaning agents. Stainless steel surfaces (does not apply to the general "Cleaning the casing" instructions.s. To help prevent resoiling, a conditioner for stainless steel can be followed in use abrasive cleaners, scouring pads, steel wool or caustic (oven) cleaners on the hood. pot scourers or sponges which have been previously used with a soft sponge. These will damage the surface. ,The halogen bulbs are very hot when in addition to stainless steel colored controls) Never use . They stay hot for ...

Operating and Installation manual
Page 11
Grease filters The reusable metal grease filters in this type of the ventilation system. Do not use a stainless steel cleaner on these controls. To prevent damage to remove. It is halogen light in the kitchen. This can become discolored or damaged if not cleaned regularly. Do not use a stainless steel cleaner on the surface material. We recommend cleaning the grease filters every 3-4 weeks, before the residues solidify. ,A dirty filter is a fire hazard! Stainless steel colored controls These controls may become particularly noticeable if there is very difficult to clean ...
Grease filters The reusable metal grease filters in this type of the ventilation system. Do not use a stainless steel cleaner on these controls. To prevent damage to remove. It is halogen light in the kitchen. This can become discolored or damaged if not cleaned regularly. Do not use a stainless steel cleaner on the surface material. We recommend cleaning the grease filters every 3-4 weeks, before the residues solidify. ,A dirty filter is a fire hazard! Stainless steel colored controls These controls may become particularly noticeable if there is very difficult to clean ...

Operating and Installation manual
Page 12
... surface. Cleaning and care Cleaning the filter ^ By hand: use a scrub brush with a max. Depending on a towel to prevent the risk of dishwasher detergent. In a Miele dishwasher use the pure detergent, aggressive all purpose cleaners, oven sprays, abrasive cleaning agents or limescale removers. temperature of warm water and mild detergent. Performance...
... surface. Cleaning and care Cleaning the filter ^ By hand: use a scrub brush with a max. Depending on a towel to prevent the risk of dishwasher detergent. In a Miele dishwasher use the pure detergent, aggressive all purpose cleaners, oven sprays, abrasive cleaning agents or limescale removers. temperature of warm water and mild detergent. Performance...

Operating and Installation manual
Page 13
Cleaning and care Odor-free filter (active charcoal filter) For recirculation mode an odor-free filter must be discarded with the household waste. 13 It is inserted above the grease filter. ^ Remove the odor-free filter from the packaging. ^ Insert the odor-free filter into the duct and push upward until it is positioned under the vent. ^ Remove the grease filters. ^ Slide the cover of the odor-free filter duct slightly to the right and downward to absorb cooking odors. Replace the filter every 6 months or when it is no longer absorbing cooking odors. ^ Used odor-free filters may ...
Cleaning and care Odor-free filter (active charcoal filter) For recirculation mode an odor-free filter must be discarded with the household waste. 13 It is inserted above the grease filter. ^ Remove the odor-free filter from the packaging. ^ Insert the odor-free filter into the duct and push upward until it is positioned under the vent. ^ Remove the grease filters. ^ Slide the cover of the odor-free filter duct slightly to the right and downward to absorb cooking odors. Replace the filter every 6 months or when it is no longer absorbing cooking odors. ^ Used odor-free filters may ...

Operating and Installation manual
Page 14
When in place. 14 Do not attempt to change the bulbs until they have had sufficient time to cool. ^ Loosen the light fastening screw slightly. ^ Slide the screw and the light down. ^ Fasten the screw again. ^ Turn the light counterclockwise and pull it with a light of the same type: GU/GZ 10, 120 V, 50 W. ^ Install the new light in the reverse order. ^ Put the grease filter back in use halogen bulbs become extremely hot, and can burn your hands. Replace it out. Cleaning and care Changing the light bulbs ^ Remove the grease filter. ,WARNING TO REDUCE THE RISK OF FIRE, ELECTRIC ...
When in place. 14 Do not attempt to change the bulbs until they have had sufficient time to cool. ^ Loosen the light fastening screw slightly. ^ Slide the screw and the light down. ^ Fasten the screw again. ^ Turn the light counterclockwise and pull it with a light of the same type: GU/GZ 10, 120 V, 50 W. ^ Install the new light in the reverse order. ^ Put the grease filter back in use halogen bulbs become extremely hot, and can burn your hands. Replace it out. Cleaning and care Changing the light bulbs ^ Remove the grease filter. ,WARNING TO REDUCE THE RISK OF FIRE, ELECTRIC ...
Operating and Installation manual
Page 15
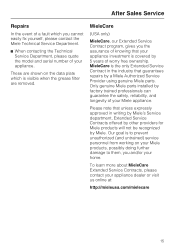
...home. MieleCare is the only Extended Service Contract in writing by Miele's Service department, Extended Service Contracts offered by other providers for Miele products will not be recognized by a Miele Authorized Service Provider using genuine Miele parts. Our goal is covered by factory trained professionals can ...guarantee the safety, reliability, and longevity of your appliance. Only genuine Miele parts installed by 5 years of worry free ownership. Please note that your appliance investment is to prevent unauthorized (and...
...home. MieleCare is the only Extended Service Contract in writing by Miele's Service department, Extended Service Contracts offered by other providers for Miele products will not be recognized by a Miele Authorized Service Provider using genuine Miele parts. Our goal is covered by factory trained professionals can ...guarantee the safety, reliability, and longevity of your appliance. Only genuine Miele parts installed by 5 years of worry free ownership. Please note that your appliance investment is to prevent unauthorized (and...

Operating and Installation manual
Page 17
Installation Instructions Read these instructions with the appliance for the consumer/user. The installation steps are described in the enclosed "Installation Diagram". Information is subject to obtain the most current product specification, technical & warranty information. Please refer to our website to change. Leave these instructions and the "Important Safety Instructions" before installing this ventilation system.
Installation Instructions Read these instructions with the appliance for the consumer/user. The installation steps are described in the enclosed "Installation Diagram". Information is subject to obtain the most current product specification, technical & warranty information. Please refer to our website to change. Leave these instructions and the "Important Safety Instructions" before installing this ventilation system.

Operating and Installation manual
Page 18
Disposal of an old appliance Old appliances may contain materials that any plastic wrappings, bags, etc., are disposed of safely and kept out of the reach of suffocation! Before discarding an old appliance, disconnect it from the electrical supply and cut off the power cord to be recycled. Please contact your local recycling center about the possibility of packing material The cardboard box and packing materials protect the appliance during shipping. Caring for the environment Disposal of recycling these materials. Danger of babies and young children. Please recycle. ,...
Disposal of an old appliance Old appliances may contain materials that any plastic wrappings, bags, etc., are disposed of safely and kept out of the reach of suffocation! Before discarding an old appliance, disconnect it from the electrical supply and cut off the power cord to be recycled. Please contact your local recycling center about the possibility of packing material The cardboard box and packing materials protect the appliance during shipping. Caring for the environment Disposal of recycling these materials. Danger of babies and young children. Please recycle. ,...
Operating and Installation manual
Page 20
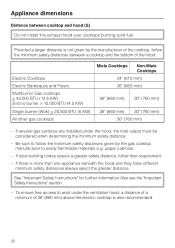
... cooktops < 43,000 BTU (12.6 KW) and no burner > 15,000 BTU (4.5 KW) Single burner (Wok) < 20,500 BTU (6 KW) All other gas cooktops Miele Cooktops Non-Miele Cooktops 24" (610 mm) 26" (660 mm) 26" (660 mm) 30" (760 mm) 26" (660 mm) 30" (760 mm) 30" (760 mm) - Be sure...
... cooktops < 43,000 BTU (12.6 KW) and no burner > 15,000 BTU (4.5 KW) Single burner (Wok) < 20,500 BTU (6 KW) All other gas cooktops Miele Cooktops Non-Miele Cooktops 24" (610 mm) 26" (660 mm) 26" (660 mm) 30" (760 mm) 26" (660 mm) 30" (760 mm) 30" (760 mm) - Be sure...
Operating and Installation manual
Page 21
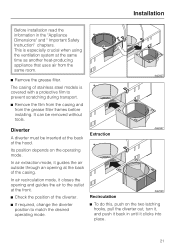
Diverter A diverter must be removed without tools. It can be inserted at the back of stainless steel models is especially crucial when using the ventilation system at the front. ^ Check the position of the hood. Its position depends on the two latching hooks, pull the diverter out, turn it, and push it back in the "Appliance Dimensions" and " Important Safety Instruction" chapters. Extraction Recirculation ^ To do this, push on the operating mode. In air extraction mode, it closes the opening at the back of the diverter. ^ If required, change the diverter position to match ...
Diverter A diverter must be removed without tools. It can be inserted at the back of stainless steel models is especially crucial when using the ventilation system at the front. ^ Check the position of the hood. Its position depends on the two latching hooks, pull the diverter out, turn it, and push it back in the "Appliance Dimensions" and " Important Safety Instruction" chapters. Extraction Recirculation ^ To do this, push on the operating mode. In air extraction mode, it closes the opening at the back of the diverter. ^ If required, change the diverter position to match ...

Operating and Installation manual
Page 22
Installation Under-cabinet installation Several holes for fastening the device under a cabinet are provided in recirculation mode, cover the opening at the back with the odor-free filter which is available as an optional accessory (active charcoal filter). ,Use only the holes on the drill template. Use only the specified screws. Faulty installation can damage the ventilation system and impair the electrical safety (e.g. If using the recirculation mode with a very deep cabinet it must be ensured that the cabinet does not cover the recirculation air outlet. ^ Fasten the cut-out ...
Installation Under-cabinet installation Several holes for fastening the device under a cabinet are provided in recirculation mode, cover the opening at the back with the odor-free filter which is available as an optional accessory (active charcoal filter). ,Use only the holes on the drill template. Use only the specified screws. Faulty installation can damage the ventilation system and impair the electrical safety (e.g. If using the recirculation mode with a very deep cabinet it must be ensured that the cabinet does not cover the recirculation air outlet. ^ Fasten the cut-out ...