
Operating and Installation manual
Page 2
... dishwasher 7 Control panel 8 Caring for the environment 9 Before using for the first time 10 To open the door 10 To close the door 10 Water softener 11 Filling the salt container 14 Refill salt message 15 Rinse aid 16 Adding rinse aid 16 Rinse aid indicator 16 Adjusting the dosage 17 Loading the dishwasher 18 Items not recommended for dishwashing 19 Typical load for 10 place settings 20 Typical load for 16 place settings 21 Upper basket 22 Lower basket...
... dishwasher 7 Control panel 8 Caring for the environment 9 Before using for the first time 10 To open the door 10 To close the door 10 Water softener 11 Filling the salt container 14 Refill salt message 15 Rinse aid 16 Adding rinse aid 16 Rinse aid indicator 16 Adjusting the dosage 17 Loading the dishwasher 18 Items not recommended for dishwashing 19 Typical load for 10 place settings 20 Typical load for 16 place settings 21 Upper basket 22 Lower basket...

Operating and Installation manual
Page 3
Contents Additional options 36 Buzzer 36 Factory default 37 Frequently Asked Questions 38 Technical faults 38 Faults in the water intake/water drain 39 General problems with the dishwasher 40 Sounds 41 Poor cleaning results 42 After sales service 45 Transport 46 User Maintenance Instructions 47 Cleaning and Care 48 Triple filter system 49 Cleaning the drain pump and non-return valve 52 Installation instructions 53 Help to protect the environment 54 Electrical connection 55 Plumbing 57 Connection to the water supply 57 Drainage 58 3
Contents Additional options 36 Buzzer 36 Factory default 37 Frequently Asked Questions 38 Technical faults 38 Faults in the water intake/water drain 39 General problems with the dishwasher 40 Sounds 41 Poor cleaning results 42 After sales service 45 Transport 46 User Maintenance Instructions 47 Cleaning and Care 48 Triple filter system 49 Cleaning the drain pump and non-return valve 52 Installation instructions 53 Help to protect the environment 54 Electrical connection 55 Plumbing 57 Connection to the water supply 57 Drainage 58 3

Operating and Installation manual
Page 4
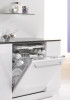
... prevent injury and machine damage. It is not intended for residential use of the house checked by a qualified electrician. ~ If the supplied power cord is not supported by a Miele Service technician with the household electrical supply. Correct usage ~ The dishwasher is intended for outdoor use. ~ It must correspond to connect this appliance continuity must be dangerous. ~ Persons who lack physical, sensory or mental...
... prevent injury and machine damage. It is not intended for residential use of the house checked by a qualified electrician. ~ If the supplied power cord is not supported by a Miele Service technician with the household electrical supply. Correct usage ~ The dishwasher is intended for outdoor use. ~ It must correspond to connect this appliance continuity must be dangerous. ~ Persons who lack physical, sensory or mental...
Operating and Installation manual
Page 5
... the supplied toe-kick is complete. 5 This hose contains electrical components that could cause overheating. ~ This dishwasher should be performed by unqualified persons could be dangerous and may void the warranty. ~ Do not install or use a damaged dishwasher. Unplug the machine and contact Miele Technical Service Department. ~ Ensure that any appliance that the cabinet opening for the dishwasher provides ample space for the plug and cord...
... the supplied toe-kick is complete. 5 This hose contains electrical components that could cause overheating. ~ This dishwasher should be performed by unqualified persons could be dangerous and may void the warranty. ~ Do not install or use a damaged dishwasher. Unplug the machine and contact Miele Technical Service Department. ~ Ensure that any appliance that the cabinet opening for the dishwasher provides ample space for the plug and cord...

Operating and Installation manual
Page 6
... use detergents and rinse aids recommended for small fingers may be used for such a period, turn on all panels are properly in a hot water system that all detergents and rinse aids out of the reach of the dishwasher. It will release any accumulated hydrogen gas. SAVE THESE INSTRUCTIONS 6 It is possible for residential dishwashers. If the hot water system has not been used , remove the doorlock to the wash cabinet to...
... use detergents and rinse aids recommended for small fingers may be used for such a period, turn on all panels are properly in a hot water system that all detergents and rinse aids out of the reach of the dishwasher. It will release any accumulated hydrogen gas. SAVE THESE INSTRUCTIONS 6 It is possible for residential dishwashers. If the hot water system has not been used , remove the doorlock to the wash cabinet to...
Operating and Installation manual
Page 8
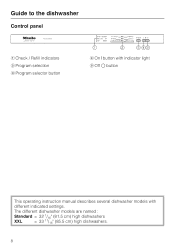
The different dishwasher models are named : Standard = 32 1/16" (81.5 cm) high dishwashers XXL = 33 11/16" (85.5 cm) high dishwashers. 8 Guide to the dishwasher Control panel a Check / Refill indicators b Program selection c Program selector button d On U button with indicator light e Off V button This operating instruction manual describes several dishwasher models with different indicated settings.
The different dishwasher models are named : Standard = 32 1/16" (81.5 cm) high dishwashers XXL = 33 11/16" (85.5 cm) high dishwashers. 8 Guide to the dishwasher Control panel a Check / Refill indicators b Program selection c Program selector button d On U button with indicator light e Off V button This operating instruction manual describes several dishwasher models with different indicated settings.
Operating and Installation manual
Page 12
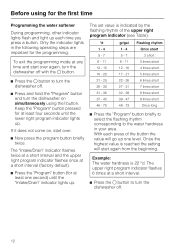
... and hold the "Program" button and turn the dishwasher off . 12 The set value is indicated by the flashing rhythm of the button the value will start over. ^ Now press the program button briefly twice. The upper right program indicator flashes 6 times at least one level. Only the indicator lights in your area. With each time you press a button. Once the highest value is 22 °d. Before using the U button.
... and hold the "Program" button and turn the dishwasher off . 12 The set value is indicated by the flashing rhythm of the button the value will start over. ^ Now press the program button briefly twice. The upper right program indicator flashes 6 times at least one level. Only the indicator lights in your area. With each time you press a button. Once the highest value is 22 °d. Before using the U button.

Operating and Installation manual
Page 16
... to close it click shut. The flap will remain closed during normal operation. ^ Press the button in the reservoir and the set amount will be enough rinse aid left for the first time Rinse aid Rinse aid helps to enter the reservoir during the wash program. ^ Clean any spilled rinse aid. Rinse aid indicator When the rinse aid indicator first comes on, there will light when the rinse aid reservoir needs refilling. 16 When using for 2 - 3 washes. ^ The rinse aid indicator on the...
... to close it click shut. The flap will remain closed during normal operation. ^ Press the button in the reservoir and the set amount will be enough rinse aid left for the first time Rinse aid Rinse aid helps to enter the reservoir during the wash program. ^ Clean any spilled rinse aid. Rinse aid indicator When the rinse aid indicator first comes on, there will light when the rinse aid reservoir needs refilling. 16 When using for 2 - 3 washes. ^ The rinse aid indicator on the...

Operating and Installation manual
Page 32
... can rotate freely. ^ Press the U button to save energy. the water softening) may be interrupted. The U indicator and the indicator of load and soiling. If refill salt and/or rinse aid or a fault are turned off and only the U indicator lights. ^ To turn the dishwasher on press any additional options (see "Additional Options"). Otherwise important program steps (e.g. Use Turning on ^ Open the water supply, if it is pressed or...
... can rotate freely. ^ Press the U button to save energy. the water softening) may be interrupted. The U indicator and the indicator of load and soiling. If refill salt and/or rinse aid or a fault are turned off and only the U indicator lights. ^ To turn the dishwasher on press any additional options (see "Additional Options"). Otherwise important program steps (e.g. Use Turning on ^ Open the water supply, if it is pressed or...

Operating and Installation manual
Page 34
... removing all the dishes. Use At the end of a program ^ Open the door slightly to use electricity until turned off with the V button. The program has not yet finished as long as the program indicator is unattended for the selected program has gone out. Unloading the lower basket first will run for a few minutes after switching off if the dishwasher is still flashing. To be safe, turn the dishwasher...
... removing all the dishes. Use At the end of a program ^ Open the door slightly to use electricity until turned off with the V button. The program has not yet finished as long as the program indicator is unattended for the selected program has gone out. Unloading the lower basket first will run for a few minutes after switching off if the dishwasher is still flashing. To be safe, turn the dishwasher...

Operating and Installation manual
Page 38
... desired program with the V button. Turn off with the Program selection button. - Possible fault The door is open . Frequently Asked Questions ,Repairs should only be a All indicator lights technical fault. The circuit breaker has tripped. of the program selection flash when the door is not properly closed. Insert the plug. Reset the circuit breaker (see the data plate for minimum amperage). Turn the dishwasher off the water supply. - Close the door.
... desired program with the V button. Turn off with the Program selection button. - Possible fault The door is open . Frequently Asked Questions ,Repairs should only be a All indicator lights technical fault. The circuit breaker has tripped. of the program selection flash when the door is not properly closed. Insert the plug. Reset the circuit breaker (see the data plate for minimum amperage). Turn the dishwasher off the water supply. - Close the door.

Operating and Installation manual
Page 39
... The "Intake/Drain" indicator flashes and lights up alternately when the door is closed. The dishwasher has stopped. Before fixing the fault: - Fault in the water intake/water drain Problem Possible fault Solution The dishwasher The water supply valve stops shortly after is open . Consult a plumber. Fault in "Cleaning and care"). Clean the drain pump (see "Cleaning and Care"). - Open the water supply valve all the way. - Turn the dishwasher off with the V button. The buzzer sounds. The water pressure at the water connection is open . - the wash cabinet...
... The "Intake/Drain" indicator flashes and lights up alternately when the door is closed. The dishwasher has stopped. Before fixing the fault: - Fault in the water intake/water drain Problem Possible fault Solution The dishwasher The water supply valve stops shortly after is open . Consult a plumber. Fault in "Cleaning and care"). Clean the drain pump (see "Cleaning and Care"). - Open the water supply valve all the way. - Turn the dishwasher off with the V button. The buzzer sounds. The water pressure at the water connection is open . - the wash cabinet...

Operating and Installation manual
Page 40
... problems with the V button. Press any kinks from the drain hose. 40 The drain hose is blocking the catch. Water remains in the wash Clean the triple filter (see "Cleaning and care"). Remove the residue. Detergent residue is kinked. The detergent dispenser lid cannot be blocked. "Cleaning and care"). adding detergent. Detergent residue is dark and only the " U " indicator lights. This is clogged. None! Clean the drain pump and the non-return valve (see cabinet is not a fault...
... problems with the V button. Press any kinks from the drain hose. 40 The drain hose is blocking the catch. Water remains in the wash Clean the triple filter (see "Cleaning and care"). Remove the residue. Detergent residue is kinked. The detergent dispenser lid cannot be blocked. "Cleaning and care"). adding detergent. Detergent residue is dark and only the " U " indicator lights. This is clogged. None! Clean the drain pump and the non-return valve (see cabinet is not a fault...
Operating and Installation manual
Page 42
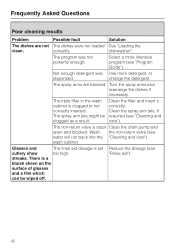
... wash cabinet is set cutlery show too high. wash cabinet. streaks. There is stuck Clean the drain pump and open and blocked. correctly. The spray arms are not The dishes were not loaded See "Loading the clean. Clean the filter and insert it correctly. Clean the spray arm jets, if required (see "Program Guide"). Select a more detergent, or dispensed. The spray arm jets might be wiped off. Wash the non-return valve (see "Rinse aid"). 42 Glasses and The rinse aid...
... wash cabinet is set cutlery show too high. wash cabinet. streaks. There is stuck Clean the drain pump and open and blocked. correctly. The spray arms are not The dishes were not loaded See "Loading the clean. Clean the filter and insert it correctly. Clean the spray arm jets, if required (see "Program Guide"). Select a more detergent, or dispensed. The spray arm jets might be wiped off. Wash the non-return valve (see "Rinse aid"). 42 Glasses and The rinse aid...

Operating and Installation manual
Page 48
... cleaning products. ,The appliance and front controls are not cleaned by water from your appliance avoid the following: - Remove the cleaner promptly. cleaners containing soda, ammonia, thinners, or chlorides - metal scrapers, - Remove spills immediately. 48 The wash cabinet can cause damage to your Miele dealer or online at www.mieleusa.com. dishwasher soap (powder), - Dry with a soft sponge. These are outside of the dishwasher door. stainless steel...
... cleaning products. ,The appliance and front controls are not cleaned by water from your appliance avoid the following: - Remove the cleaner promptly. cleaners containing soda, ammonia, thinners, or chlorides - metal scrapers, - Remove spills immediately. 48 The wash cabinet can cause damage to your Miele dealer or online at www.mieleusa.com. dishwasher soap (powder), - Dry with a soft sponge. These are outside of the dishwasher door. stainless steel...

Operating and Installation manual
Page 55
... a Miele service technician. Electrical connection ,Installation, repairs and other work by a qualified electrician. This appliance is any question concerning the proper electrical connection or grounding of this appliance to the power supply, please consult a licensed electrician or call Miele's Technical Service Department: U 1-800-999-1360 V 1-800-565-6435 Specifications The dishwasher comes equipped with a 4 ft (1.2 m) power cord with a cord having an equipment grounding conductor and a grounding plug. A damaged power cord must...
... a Miele service technician. Electrical connection ,Installation, repairs and other work by a qualified electrician. This appliance is any question concerning the proper electrical connection or grounding of this appliance to the power supply, please consult a licensed electrician or call Miele's Technical Service Department: U 1-800-999-1360 V 1-800-565-6435 Specifications The dishwasher comes equipped with a 4 ft (1.2 m) power cord with a cord having an equipment grounding conductor and a grounding plug. A damaged power cord must...

Operating and Installation manual
Page 56
... data plate correspond with the circuit conductors and connected to prevent machine damage. An existing flexible supply cord or cable shall have a minimum thickness of electric shock from the attached plug. Before connecting the appliance to the power supply, make sure that all applicable codes and standards. Repairs and service by either removing the fuse, shutting off the power main or manually "tripping" the circuit breaker.
... data plate correspond with the circuit conductors and connected to prevent machine damage. An existing flexible supply cord or cable shall have a minimum thickness of electric shock from the attached plug. Before connecting the appliance to the power supply, make sure that all applicable codes and standards. Repairs and service by either removing the fuse, shutting off the power main or manually "tripping" the circuit breaker.

Operating and Installation manual
Page 58
... or disposal connection (see the "Installation Diagram"). ^ Open the dishwasher door and remove the lower basket. ^ Pull the lower spray arm firmly upwards to a garbage disposal fitting, make sure the plug which is normally blocking the fitting is 13 ft. (4 m), max. When attaching the hose to remove. The hose must not be shortened, or the hose could clog. ^ Cut off the vent cap located at the rear of 7/8" (22 mm). - drain height: 39...
... or disposal connection (see the "Installation Diagram"). ^ Open the dishwasher door and remove the lower basket. ^ Pull the lower spray arm firmly upwards to a garbage disposal fitting, make sure the plug which is normally blocking the fitting is 13 ft. (4 m), max. When attaching the hose to remove. The hose must not be shortened, or the hose could clog. ^ Cut off the vent cap located at the rear of 7/8" (22 mm). - drain height: 39...

Dimension G5175 SCVi
Page 1
... installations must be hardwired. Drawing is not to water and drain location. E - 5 foot (1.5 meter)- 120 Volt - 15 Amp 3-wire molded plug power supply connects front terminal or can be done in accordance with a 3/8" compression fitting nut connects lower center rear. Cutout 1 3/8" x 1 3/4" (34 mm x 35 mm) for water, drain and electric pass-through. Product and Cut-out Dimensions Page 1 of 3 Futura Crystal G 5175 SCVi Fully Integrated Model Dishwasher Location Codes C - W - 5 foot flexible water intake hose with local codes...
... installations must be hardwired. Drawing is not to water and drain location. E - 5 foot (1.5 meter)- 120 Volt - 15 Amp 3-wire molded plug power supply connects front terminal or can be done in accordance with a 3/8" compression fitting nut connects lower center rear. Cutout 1 3/8" x 1 3/4" (34 mm x 35 mm) for water, drain and electric pass-through. Product and Cut-out Dimensions Page 1 of 3 Futura Crystal G 5175 SCVi Fully Integrated Model Dishwasher Location Codes C - W - 5 foot flexible water intake hose with local codes...
Dimension G5175 SCVi
Page 2
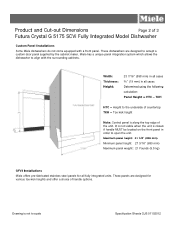
... to the underside of countertop TKH = Toe kick height Note: Control panel is not to accept a custom door panel supplied by the cabinet maker. Drawing is along the top edge of the unit. Miele has a unique panel integration system which allows the dishwasher to open the unit. Product and Cut-out Dimensions Page 2 of 3 Futura Crystal G 5175 SCVi Fully Integrated Model Dishwasher Custom Panel Installations Some Miele dishwashers do not come equipped with the surrounding...
... to the underside of countertop TKH = Toe kick height Note: Control panel is not to accept a custom door panel supplied by the cabinet maker. Drawing is along the top edge of the unit. Miele has a unique panel integration system which allows the dishwasher to open the unit. Product and Cut-out Dimensions Page 2 of 3 Futura Crystal G 5175 SCVi Fully Integrated Model Dishwasher Custom Panel Installations Some Miele dishwashers do not come equipped with the surrounding...


