Specs
Page 2
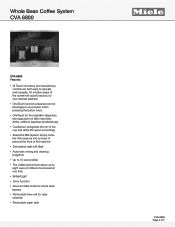
...; Automatic rinsing and cleaning programs • Up to 10 user profiles • The coffee pot function allows up to eight cups of 7 An intuitive swipe of the screen will quickly lead you to your desired selection • OneTouch function prepares two hot beverages in succession when pressing the button twice • OneTouch for easy cleaning • Removable water tank FOREVER BETTER CVA 6800 Page 2 of coffee to operate...
...; Automatic rinsing and cleaning programs • Up to 10 user profiles • The coffee pot function allows up to eight cups of 7 An intuitive swipe of the screen will quickly lead you to your desired selection • OneTouch function prepares two hot beverages in succession when pressing the button twice • OneTouch for easy cleaning • Removable water tank FOREVER BETTER CVA 6800 Page 2 of coffee to operate...
Product Manual
Page 2
... Preparing multiple cups of coffee, one directly after another (Coffee pot 25 Preparing coffee drinks from ground coffee 25 Beverages with milk 27 Instructions for the milk container 27 Preparing hot water 28 Preparing drinks using a profile 28 After preparing drinks 28 Customizing your coffee 29 Grinder setting 29 Changing the drink parameters 30 Amount of ground coffee 30 Brewing temperature 30 Pre-brewing ground coffee 31 Setting the serving size 32 Resetting drinks 34...
... Preparing multiple cups of coffee, one directly after another (Coffee pot 25 Preparing coffee drinks from ground coffee 25 Beverages with milk 27 Instructions for the milk container 27 Preparing hot water 28 Preparing drinks using a profile 28 After preparing drinks 28 Customizing your coffee 29 Grinder setting 29 Changing the drink parameters 30 Amount of ground coffee 30 Brewing temperature 30 Pre-brewing ground coffee 31 Setting the serving size 32 Resetting drinks 34...

Product Manual
Page 4
... the milk pipework manually 50 Cleaning the milk pipework using the milk line cleaner 51 Milk container with lid 52 Main dispenser 53 Cleaning the milk valve 55 Sensor cover 55 Water tank 56 Waste unit 56 Drip tray 57 Drip tray cover 58 Bean container 58 Main dispenser connector 58 Interior and front door 59 Brew unit 59 Removing the brew unit and rinse it by hand 59 Degreasing the brew unit 61 Exterior 62 Descaling...
... the milk pipework manually 50 Cleaning the milk pipework using the milk line cleaner 51 Milk container with lid 52 Main dispenser 53 Cleaning the milk valve 55 Sensor cover 55 Water tank 56 Waste unit 56 Drip tray 57 Drip tray cover 58 Bean container 58 Main dispenser connector 58 Interior and front door 59 Brew unit 59 Removing the brew unit and rinse it by hand 59 Degreasing the brew unit 61 Exterior 62 Descaling...
Product Manual
Page 5
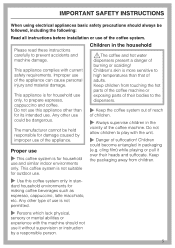
... these instructions carefully to high temperatures than for making coffee beverages such as espresso, cappuccino, latte macchiato, etc. Keep children from children. ~ Use this appliance other use and similar indoor environments only. Keep the packaging away from touching the hot parts of the coffee machine or exposing parts of suffocation! This appliance complies with the unit. ~ Danger of their heads and suffocate. IMPORTANT SAFETY INSTRUCTIONS When using electrical...
... these instructions carefully to high temperatures than for making coffee beverages such as espresso, cappuccino, latte macchiato, etc. Keep children from children. ~ Use this appliance other use and similar indoor environments only. Keep the packaging away from touching the hot parts of the coffee machine or exposing parts of suffocation! This appliance complies with the unit. ~ Danger of their heads and suffocate. IMPORTANT SAFETY INSTRUCTIONS When using electrical...

Product Manual
Page 6
... by either removing the fuse, "tripping" the circuit breaker or unplugging the unit. 6 Do not close the cabinet door when the coffee machine is installed in a closed kitchen cabinet, use the coffee machine in ambient temperatures between +50°F/10°C and +100°F/38 °C. ~ Ensure that this before connecting the machine. IMPORTANT SAFETY INSTRUCTIONS Technical safety ~ Installation work and repairs must only...
... by either removing the fuse, "tripping" the circuit breaker or unplugging the unit. 6 Do not close the cabinet door when the coffee machine is installed in a closed kitchen cabinet, use the coffee machine in ambient temperatures between +50°F/10°C and +100°F/38 °C. ~ Ensure that this before connecting the machine. IMPORTANT SAFETY INSTRUCTIONS Technical safety ~ Installation work and repairs must only...

Product Manual
Page 7
... lighting directly or with a damaged cord or plug, or after the appliance malfunctions or has been damaged in any appliance with an optical instrument. ~ Do not use the coffee machine to clean objects. ~ Before the first use, clean the coffee system and milk container thoroughly (see "Cleaning and care"). 7 To disconnect, turn the machine off, then remove the plug from the areas under the coffee and hot water...
... lighting directly or with a damaged cord or plug, or after the appliance malfunctions or has been damaged in any appliance with an optical instrument. ~ Do not use the coffee machine to clean objects. ~ Before the first use, clean the coffee system and milk container thoroughly (see "Cleaning and care"). 7 To disconnect, turn the machine off, then remove the plug from the areas under the coffee and hot water...

Product Manual
Page 8
.... Hot water or other sugar-containing liquids. ~ Do not fill anything but ground coffee or a Miele cleaning tablet for the water hardness level in your clothing when removing or inserting containers or other inside components . 8 Change the water every day to clean the coffee machine. - Never use plain milk. Do not use mineral water. Be careful of the coffee used, the brew unit can clog the coffee system. Depending on the open coffee machine door...
.... Hot water or other sugar-containing liquids. ~ Do not fill anything but ground coffee or a Miele cleaning tablet for the water hardness level in your clothing when removing or inserting containers or other inside components . 8 Change the water every day to clean the coffee machine. - Never use plain milk. Do not use mineral water. Be careful of the coffee used, the brew unit can clog the coffee system. Depending on the open coffee machine door...
Product Manual
Page 12
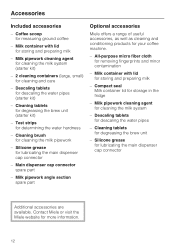
... grease for degreasing the brew unit (starter kit) - Descaling tablets for more information. 12 Contact Miele or visit the Miele website for descaling the water pipes - Coffee scoop for determining the water hardness - Test strips for measuring ground coffee - Milk container with lid for your coffee machine. - Milk pipework angle section spare part Optional accessories Miele offers a range of useful accessories, as well as cleaning and conditioning products for storing and preparing...
... grease for degreasing the brew unit (starter kit) - Descaling tablets for more information. 12 Contact Miele or visit the Miele website for descaling the water pipes - Coffee scoop for determining the water hardness - Test strips for measuring ground coffee - Milk container with lid for your coffee machine. - Milk pipework angle section spare part Optional accessories Miele offers a range of useful accessories, as well as cleaning and conditioning products for storing and preparing...

Product Manual
Page 16
... the brightness of the display or the volume of the audio signals are selected via a bar chart. The system lock is activated for the time display. The timer is active (see "Settings - This symbol appears when descaling is being cleaned. (The symbol is selected for "Turn on at" (see "Settings - Timer"). Confirm the messages with "OK". Indicates information and instructions about operating the coffee system.
... the brightness of the display or the volume of the audio signals are selected via a bar chart. The system lock is activated for the time display. The timer is active (see "Settings - This symbol appears when descaling is being cleaned. (The symbol is selected for "Turn on at" (see "Settings - Timer"). Confirm the messages with "OK". Indicates information and instructions about operating the coffee system.

Product Manual
Page 17
Clean the coffee machine thoroughly (see "Cleaning and care") before the first use. Time of day) ^ Touch the On/Off button K. Date - Setting the language ^ Touch the desired language and then "OK". ^ Touch the desired country and then "OK". Setting the time (of day is set. ^ Touch "OK". The setting is now saved. 17 The setting is now saved. See the "Installation instructions". ^ Remove any protective coverings. The display briefly...
Clean the coffee machine thoroughly (see "Cleaning and care") before the first use. Time of day) ^ Touch the On/Off button K. Date - Setting the language ^ Touch the desired language and then "OK". ^ Touch the desired country and then "OK". Setting the time (of day is set. ^ Touch "OK". The setting is now saved. 17 The setting is now saved. See the "Installation instructions". ^ Remove any protective coverings. The display briefly...

Product Manual
Page 35
... open in addition to delete a profile. If you wish to use the most recently selected user profile. ^ Touch the desired profile and then "OK". 35 Change profile to determine whether the coffee system automatically reverts to the standard Miele profile after each profile (see "Setting the serving sizes"). Creating a user profile ^ Touch "Create profile". The name of the current...
... open in addition to delete a profile. If you wish to use the most recently selected user profile. ^ Touch the desired profile and then "OK". 35 Change profile to determine whether the coffee system automatically reverts to the standard Miele profile after each profile (see "Setting the serving sizes"). Creating a user profile ^ Touch "Create profile". The name of the current...

Product Manual
Page 45
... has been activated, the timer function "Turn on - In the "Info" option, the number of the lighting while the system is turned on, the lighting will remain on . - Settings Lighting Info (displaying information) The following options are available: - As soon as the coffee system is turned off. - Adjust the brightness of uses until descaling:"). of the lighting while the system is turned off after the last...
... has been activated, the timer function "Turn on - In the "Info" option, the number of the lighting while the system is turned on, the lighting will remain on . - Settings Lighting Info (displaying information) The following options are available: - As soon as the coffee system is turned off. - Adjust the brightness of uses until descaling:"). of the lighting while the system is turned off after the last...
Product Manual
Page 51
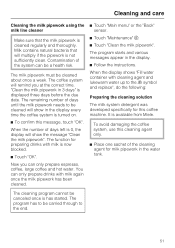
... is available from Miele. The cleaning program cannot be a health risk. Contamination of the cleaning agent for preparing drinks with milk again once the milk pipework has been cleaned. ^ Touch "Main menu" or the "Back" sensor. ^ Touch "Maintenance" y. ^ Touch "Clean the milk pipework". Cleaning and care Cleaning the milk pipework using the milk line cleaner Make sure that will remind you can only prepare espresso, coffee, large coffee and hot water. Milk contains natural bacteria...
... is available from Miele. The cleaning program cannot be a health risk. Contamination of the cleaning agent for preparing drinks with milk again once the milk pipework has been cleaned. ^ Touch "Main menu" or the "Back" sensor. ^ Touch "Maintenance" y. ^ Touch "Clean the milk pipework". Cleaning and care Cleaning the milk pipework using the milk line cleaner Make sure that will remind you can only prepare espresso, coffee, large coffee and hot water. Milk contains natural bacteria...

Product Manual
Page 52
... the water tank to malfunction. ^ The milk container (glass) can cause the system to the mark. Milk container with lukewarm water up to the 8 mark and stir the solution. After cleaning, dry the milk container. Otherwise, the cleaning process will be cleaned in the water tank. The cleaning process is complete when "Program finished" is displayed: ^ Rinse the water tank carefully with fresh tap water. Step 1: Cleaning the milk pipework in the lid...
... the water tank to malfunction. ^ The milk container (glass) can cause the system to the mark. Milk container with lukewarm water up to the 8 mark and stir the solution. After cleaning, dry the milk container. Otherwise, the cleaning process will be cleaned in the water tank. The cleaning process is complete when "Program finished" is displayed: ^ Rinse the water tank carefully with fresh tap water. Step 1: Cleaning the milk pipework in the lid...

Product Manual
Page 60
..., making sure it is straight. ^ Clean the brew unit by hand under running hot water. When the brew unit has been pulled out, do so with difficulty, the brew unit is not in the reverse order: ^ Push the brew unit back into the coffee system. To replace the brew unit, repeat the previous steps in the correct position (see "Frequently asked questions"). Do not use soap. ^ Push the button...
..., making sure it is straight. ^ Clean the brew unit by hand under running hot water. When the brew unit has been pulled out, do so with difficulty, the brew unit is not in the reverse order: ^ Push the brew unit back into the coffee system. To replace the brew unit, repeat the previous steps in the correct position (see "Frequently asked questions"). Do not use soap. ^ Push the button...

Product Manual
Page 61
... aromatic coffee and operates problem-free. These cleaning tablets were specially formulated for use in the display. ^ Drop the cleaning tablet into the chute. ^ Close the lid, put the cover back on the natural oil content of the coffee used, the brew unit can become blocked quite quickly. This message will show the message "Degrease brew unit". The cleaning program cannot be stopped once is displayed: ^ Touch "OK". Degrease the brew unit regularly. The brew unit...
... aromatic coffee and operates problem-free. These cleaning tablets were specially formulated for use in the display. ^ Drop the cleaning tablet into the chute. ^ Close the lid, put the cover back on the natural oil content of the coffee used, the brew unit can become blocked quite quickly. This message will show the message "Degrease brew unit". The cleaning program cannot be stopped once is displayed: ^ Touch "OK". Degrease the brew unit regularly. The brew unit...

Product Manual
Page 68
... Unusual behavior of the coffee system. Lighting"). The On/Off sensor K was last used, the lighting automatically turns off time has been reached. buttons do not ^ Open the front door of the coffee system Problem Possible cause and solution The lighting does The lighting has been turned off. no longer be ^ Unplug the coffee system. turns off suddenly. ^ If desired, set a new turn -off . The lighting system was not...
... Unusual behavior of the coffee system. Lighting"). The On/Off sensor K was last used, the lighting automatically turns off time has been reached. buttons do not ^ Open the front door of the coffee system Problem Possible cause and solution The lighting does The lighting has been turned off. no longer be ^ Unplug the coffee system. turns off suddenly. ^ If desired, set a new turn -off . The lighting system was not...

Product Manual
Page 69
... may need to read. The milk pipework The milk pipework or the air intake hose is being automatically turned on again. is clogged. No milk or milk The milk pipework or the air intake hose is displayed. Timers"). ^ Turn the system on at the programmed time No days of ^ Follow the instructions in chapter "Cleaning clogged milk the main pipework". The message "Fill and insert water container is clogged. The displayed messages are...
... may need to read. The milk pipework The milk pipework or the air intake hose is being automatically turned on again. is clogged. No milk or milk The milk pipework or the air intake hose is displayed. Timers"). ^ Turn the system on at the programmed time No days of ^ Follow the instructions in chapter "Cleaning clogged milk the main pipework". The message "Fill and insert water container is clogged. The displayed messages are...

Product Manual
Page 75
... milk residue has been removed. 75 Make sure not to slide the beveled end of the milk intake hose into the milk hose d. If necessary, replace it with the supplied spare part. ^ Insert the brush into the seal. "Blowing through" can damage the parts. ^ Open the service cover on the back of the angled section. ^ Clean the air intake hose a using the supplied cleaning...
... milk residue has been removed. 75 Make sure not to slide the beveled end of the milk intake hose into the milk hose d. If necessary, replace it with the supplied spare part. ^ Insert the brush into the seal. "Blowing through" can damage the parts. ^ Open the service cover on the back of the angled section. ^ Clean the air intake hose a using the supplied cleaning...
Product Manual
Page 81
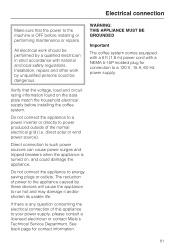
... the normal electrical grid (i.e. Installation, repairs and other work should be dangerous. If there is OFF before installing the coffee system. direct solar or wind power source). Electrical connection Make sure that the voltage, load and circuit rating information found on , and could be performed by these devices will cause the appliance to run hot and may damage it and...
... the normal electrical grid (i.e. Installation, repairs and other work should be dangerous. If there is OFF before installing the coffee system. direct solar or wind power source). Electrical connection Make sure that the voltage, load and circuit rating information found on , and could be performed by these devices will cause the appliance to run hot and may damage it and...


