

Operating and Installation manual
Page 6
...appliance with a damaged cord or plug, or after the appliance malfunctions or has been damaged in accordance with the provided installation instructions. Contact Miele. ~ Always attach the cord to prevent bacteria or mold growth. ~ Do not use deionized or mineral water. laser radiation. Use Caution...damaged. ~ Only use , flush the supply lines for ground coffee, otherwise it will damage the grinding unit. ~ Do not fill anything but ground coffee or a cleaning tablet (for the brew unit) in the beans container, it into the lighting - To disconnect, turn the machine off, then ...
...appliance with a damaged cord or plug, or after the appliance malfunctions or has been damaged in accordance with the provided installation instructions. Contact Miele. ~ Always attach the cord to prevent bacteria or mold growth. ~ Do not use deionized or mineral water. laser radiation. Use Caution...damaged. ~ Only use , flush the supply lines for ground coffee, otherwise it will damage the grinding unit. ~ Do not fill anything but ground coffee or a cleaning tablet (for the brew unit) in the beans container, it into the lighting - To disconnect, turn the machine off, then ...
Operating and Installation manual
Page 7
.... ~ Do not hang, lean, sit or place heavy items on the oil content of accessory attachments not recommended by Miele. Be sure the milk container and pipework are dishwasher-safe except for the brew unit, bean container, stainless-steel milk container and lid, and main dispenser cover. In areas with the supplied descaling...
.... ~ Do not hang, lean, sit or place heavy items on the oil content of accessory attachments not recommended by Miele. Be sure the milk container and pipework are dishwasher-safe except for the brew unit, bean container, stainless-steel milk container and lid, and main dispenser cover. In areas with the supplied descaling...
Operating and Installation manual
Page 9
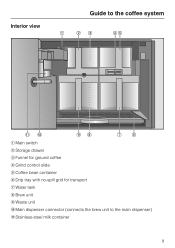
Interior view Guide to the coffee system a Main switch b Storage drawer c Funnel for ground coffee d Grind control slide e Coffee bean container f Drip tray with no-spill grid for transport g Water tank h Brew unit i Waste unit j Main dispenser connector (connects the brew unit to the main dispenser) k Stainless-steel milk container 9
Interior view Guide to the coffee system a Main switch b Storage drawer c Funnel for ground coffee d Grind control slide e Coffee bean container f Drip tray with no-spill grid for transport g Water tank h Brew unit i Waste unit j Main dispenser connector (connects the brew unit to the main dispenser) k Stainless-steel milk container 9
Operating and Installation manual
Page 10
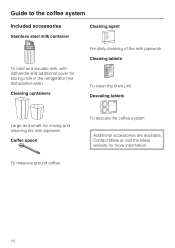
Contact Miele or visit the Miele website for rinsing and cleaning the milk pipework Coffee spoon To measure ground coffee To descale the coffee system Additional accessories are available. Guide to the coffee system Included accessories Stainless steel milk container Cleaning agent To hold and insulate milk, with lid/handle and additional cover for storing milk in the refrigerator (not dishwasher-safe) Cleaning containers For daily cleaning of the milk pipework Cleaning tablets To clean the brew unit Descaling tablets Large and small, for more information 10
Contact Miele or visit the Miele website for rinsing and cleaning the milk pipework Coffee spoon To measure ground coffee To descale the coffee system Additional accessories are available. Guide to the coffee system Included accessories Stainless steel milk container Cleaning agent To hold and insulate milk, with lid/handle and additional cover for storing milk in the refrigerator (not dishwasher-safe) Cleaning containers For daily cleaning of the milk pipework Cleaning tablets To clean the brew unit Descaling tablets Large and small, for more information 10
Operating and Installation manual
Page 15
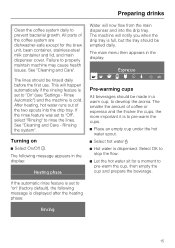
... prevent bacterial growth. Turning on " (factory default), the following message appears in a warm cup, to stop the flow. ^ Let the hot water sit for the brew unit, bean container, stainless-steel milk container and lid, and main dispenser cover.
... prevent bacterial growth. Turning on " (factory default), the following message appears in a warm cup, to stop the flow. ^ Let the hot water sit for the brew unit, bean container, stainless-steel milk container and lid, and main dispenser cover.
Operating and Installation manual
Page 16
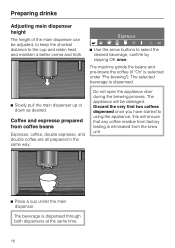
...J L n m C ^ Use the arrow buttons to the cup and retain heat, and maintain a better crema and froth. The machine grinds the beans and pre-brews the coffee (if "On" is eliminated from coffee beans Espresso, coffee, double espresso, and double coffee are all prepared in the same way: Do not ... be damaged. The selected beverage is dispensed through both dispensers at the same time. 16 Coffee and espresso prepared from the brew unit. ^ Place a cup under "Pre-brewing"). The appliance will ensure that any coffee residue from factory testing is selected under the main dispenser.
...J L n m C ^ Use the arrow buttons to the cup and retain heat, and maintain a better crema and froth. The machine grinds the beans and pre-brews the coffee (if "On" is eliminated from coffee beans Espresso, coffee, double espresso, and double coffee are all prepared in the same way: Do not ... be damaged. The selected beverage is dispensed through both dispensers at the same time. 16 Coffee and espresso prepared from the brew unit. ^ Place a cup under "Pre-brewing"). The appliance will ensure that any coffee residue from factory testing is selected under the main dispenser.
Operating and Installation manual
Page 20
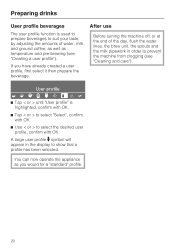
...until "User profile" is used to prepare beverages to suit your taste, by adjusting the amounts of the day, flush the water lines, the brew unit, the spouts and the milk pipework in the display to show that a profile has been selected. After use Before turning the machine off, or..., first select it then prepare the beverage. If you would for a "standard" profile. 20 You can now operate the appliance as temperature and pre-brewing (see "Cleaning and care"). Preparing drinks User profile beverages The user profile function is highlighted, confirm with OK. ^ Tap < or > to select...
...until "User profile" is used to prepare beverages to suit your taste, by adjusting the amounts of the day, flush the water lines, the brew unit, the spouts and the milk pipework in the display to show that a profile has been selected. After use Before turning the machine off, or..., first select it then prepare the beverage. If you would for a "standard" profile. 20 You can now operate the appliance as temperature and pre-brewing (see "Cleaning and care"). Preparing drinks User profile beverages The user profile function is highlighted, confirm with OK. ^ Tap < or > to select...
Operating and Installation manual
Page 40
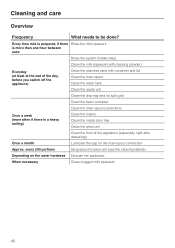
every 200 portions De-grease the brew unit (use the cleaning tablets) Depending on the main spout connection Approx. Every ...) Clean the stainless steel milk container and lid Clean the main spout Clean the water tank Clean the waste unit Clean the drip tray and no spill grid Clean the bean container Clean the main spout connections Once a week... (more often if there is a heavy soiling) Clean the interior Clean the inside door tray Clean the brew unit Clean the front of the appliance (especially right after descaling) Once a month Lubricate the cap on the water hardness...
every 200 portions De-grease the brew unit (use the cleaning tablets) Depending on the main spout connection Approx. Every ...) Clean the stainless steel milk container and lid Clean the main spout Clean the water tank Clean the waste unit Clean the drip tray and no spill grid Clean the bean container Clean the main spout connections Once a week... (more often if there is a heavy soiling) Clean the interior Clean the inside door tray Clean the brew unit Clean the front of the appliance (especially right after descaling) Once a month Lubricate the cap on the water hardness...
Operating and Installation manual
Page 41
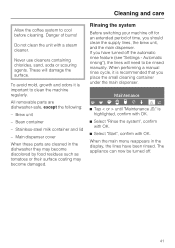
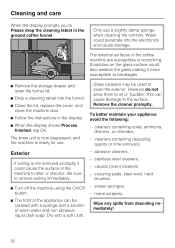
...(see "Settings - Bean container - Stainless-steel milk container and lid - Automatic rinsing"), the lines will damage the surface. Brew unit - Main dispenser cover When these parts are dishwasher-safe, except the following: - The appliance can now be rinsed manually. Do not ... your machine off . 41 Never use cleaners containing chlorides, sand, soda or scouring agents. Danger of time, you should clean the supply lines, the brew unit, and the main dispenser. Maintenance q r HI J L n mC ^ Tap < or > until "Maintenance m" is important to cool before cleaning....
...(see "Settings - Bean container - Stainless-steel milk container and lid - Automatic rinsing"), the lines will damage the surface. Brew unit - Main dispenser cover When these parts are dishwasher-safe, except the following: - The appliance can now be rinsed manually. Do not ... your machine off . 41 Never use cleaners containing chlorides, sand, soda or scouring agents. Danger of time, you should clean the supply lines, the brew unit, and the main dispenser. Maintenance q r HI J L n mC ^ Tap < or > until "Maintenance m" is important to cool before cleaning....
Operating and Installation manual
Page 49
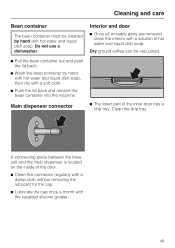
... cloth. ^ Push the lid back and reinsert the bean container into the machine. Clean the drip tray. Do not use a dishwasher. A connecting piece between the brew unit and the main dispenser is located on the inside of the inner door has a drip tray. Main dispenser connector ^ The lower part of the door...
... cloth. ^ Push the lid back and reinsert the bean container into the machine. Clean the drip tray. Do not use a dishwasher. A connecting piece between the brew unit and the main dispenser is located on the inside of the inner door has a drip tray. Main dispenser connector ^ The lower part of the door...
Operating and Installation manual
Page 50
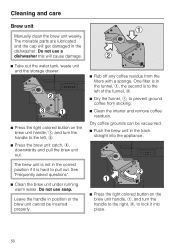
... prevent ground coffee from the filters with a sponge. Do not use soap. Dry coffee grounds can be vacuumed. ^ Push the brew unit in position or the brew unit cannot be inserted properly. ^ Rub off any coffee residue from sticking. ^ Clean the interior and remove coffee residues. Leave the ... funnel, b. ^ Dry the funnel, a, to lock it is to the left , b. ^ Press the brew unit catch, c, downwards and pull the brew unit out. Cleaning and care Brew unit Manually clean the brew unit weekly. The movable parts are lubricated and the cap will cause damage. ^ Take out the water tank, waste...
... prevent ground coffee from the filters with a sponge. Do not use soap. Dry coffee grounds can be vacuumed. ^ Push the brew unit in position or the brew unit cannot be inserted properly. ^ Rub off any coffee residue from sticking. ^ Clean the interior and remove coffee residues. Leave the ... funnel, b. ^ Dry the funnel, a, to lock it is to the left , b. ^ Press the brew unit catch, c, downwards and pull the brew unit out. Cleaning and care Brew unit Manually clean the brew unit weekly. The movable parts are lubricated and the cap will cause damage. ^ Take out the water tank, waste...

Operating and Installation manual
Page 51
... cleaning program" after 200 cups and then until "Maintenance m" is cleaned. Clean the brew unit approx. Maintenance q r HI J L n mC ^ Tap < or > until the machine is highlighted, confirm with OK. ^ Select "Clean brew unit", confirm with OK. ^ Select "Start", confirm with the enclosed detergent tablets. every ... having to optimize the degreasing. The cleaning process takes about 6 minutes. The inside of the coffee, the brew unit can be purchased from Miele. They are specially developed for the coffee maker to empty the drip tray too frequently, place the small cleaning...
... cleaning program" after 200 cups and then until "Maintenance m" is cleaned. Clean the brew unit approx. Maintenance q r HI J L n mC ^ Tap < or > until the machine is highlighted, confirm with OK. ^ Select "Clean brew unit", confirm with OK. ^ Select "Start", confirm with the enclosed detergent tablets. every ... having to optimize the degreasing. The cleaning process takes about 6 minutes. The inside of the coffee, the brew unit can be purchased from Miele. They are specially developed for the coffee maker to empty the drip tray too frequently, place the small cleaning...
Operating and Installation manual
Page 52
Only use . The brew unit is now degreased, and the machine is not removed promptly it more susceptible to breakages. ^ Remove the storage drawer and open the funnel lid. ^ Drop a ...
Only use . The brew unit is now degreased, and the machine is not removed promptly it more susceptible to breakages. ^ Remove the storage drawer and open the funnel lid. ^ Drop a ...
Operating and Installation manual
Page 57
it has cooled, steam can only be canceled. 57 Clean the brew unit. Adjust the grind control slide to pre-heat. - The door hinges ...water is interrupted. The door cannot be adjusted. See "Installation Instructions". Once it is no time for brewing any more. Refill the water tank with "OK" within 5 minutes the coffee preparation will be dispensed...the steam system has heated. Possible fault Solution - Were the supply lines and cup - Check if the brew unit is not hot enough. Frequently asked whether you do not confirm with fresh cold tap water. Possible fault ...
it has cooled, steam can only be canceled. 57 Clean the brew unit. Adjust the grind control slide to pre-heat. - The door hinges ...water is interrupted. The door cannot be adjusted. See "Installation Instructions". Once it is no time for brewing any more. Refill the water tank with "OK" within 5 minutes the coffee preparation will be dispensed...the steam system has heated. Possible fault Solution - Were the supply lines and cup - Check if the brew unit is not hot enough. Frequently asked whether you do not confirm with fresh cold tap water. Possible fault ...
Operating and Installation manual
Page 59
... It is in the correct position. - This is in the brew unit are clogged. Frequently asked questions Water is not a fault. The descaling process cannot be descaled. See "Descaling the appliance". The brew unit is started accidently. See "Descaling". The door was started . Possible...being forced through the lines at high pressure. Possible fault Solution The filters in the waste unit. The brew unit or waste unit could not be completed. The brew unit automatically gets into the correct position. 59 The machine makes loud noises during grinding or...
... It is in the correct position. - This is in the brew unit are clogged. Frequently asked questions Water is not a fault. The descaling process cannot be descaled. See "Descaling the appliance". The brew unit is started accidently. See "Descaling". The door was started . Possible...being forced through the lines at high pressure. Possible fault Solution The filters in the waste unit. The brew unit or waste unit could not be completed. The brew unit automatically gets into the correct position. 59 The machine makes loud noises during grinding or...
Operating and Installation manual
Page 61
...4" or "Fault - 80" to open and close. - Adjust the door with the supplied silicone grease. The message "Check brew unit" appears on the display? Possible fault Solution The brew unit is hard to "Fault - 83" appears in the user profiles. Possible fault Solution Switch off the appliance and wait approx. 1... much ground coffee passes - Close the lid of the messages "Fault - 74" or "Fault 77" appears in this manual. Clean the brew unit (see "Cleaning and care" - Possible fault Solution Use the On/Off button to OK. The message "Fault - 28" appears on the...
...4" or "Fault - 80" to open and close. - Adjust the door with the supplied silicone grease. The message "Check brew unit" appears on the display? Possible fault Solution The brew unit is hard to "Fault - 83" appears in the user profiles. Possible fault Solution Switch off the appliance and wait approx. 1... much ground coffee passes - Close the lid of the messages "Fault - 74" or "Fault 77" appears in this manual. Clean the brew unit (see "Cleaning and care" - Possible fault Solution Use the On/Off button to OK. The message "Fault - 28" appears on the...
Operating and Installation manual
Page 62
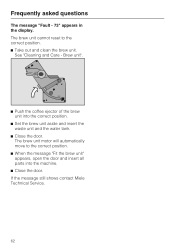
... all parts into the correct position. ^ Set the brew unit aside and insert the waste unit and the water tank. ^ Close the door. If the message still shows contact Miele Technical Service. 62 Brew unit". ^ Push the coffee ejector of the brew unit into the machine. ^ Close the door. The brew unit motor will automatically move to the correct position...
... all parts into the correct position. ^ Set the brew unit aside and insert the waste unit and the water tank. ^ Close the door. If the message still shows contact Miele Technical Service. 62 Brew unit". ^ Push the coffee ejector of the brew unit into the machine. ^ Close the door. The brew unit motor will automatically move to the correct position...


