
Operating and Installation manual
Page 11
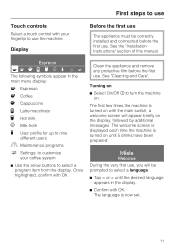
Once highlighted, confirm with your coffee system ^ Use the arrow buttons to turn the machine on. Clean the appliance and remove any... screen will be correctly installed and connected before the first use. Turning on until the desired language appears in the main menu display: q Espresso r Coffee H Cappuccino I J L n m C The following symbols appear in the display. ^ Confirm with OK. The welcome screen is displayed each time the... C Settings: to customize your fingertip to use the machine. See the "Installation Instructions" section of this manual. See "Cleaning and Care".
Once highlighted, confirm with your coffee system ^ Use the arrow buttons to turn the machine on. Clean the appliance and remove any... screen will be correctly installed and connected before the first use. Turning on until the desired language appears in the main menu display: q Espresso r Coffee H Cappuccino I J L n m C The following symbols appear in the display. ^ Confirm with OK. The welcome screen is displayed each time the... C Settings: to customize your fingertip to use the machine. See the "Installation Instructions" section of this manual. See "Cleaning and Care".
Operating and Installation manual
Page 24
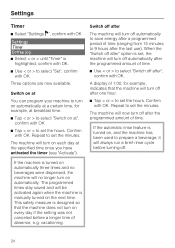
...longer time of time. The programmed times stay saved and will no beverages were dispensed, the machine will be activated again when the machine is manually turned on the next time. Switch off automatically to save energy after a programmed period of time (ranging from 15 minutes to 9 hours ... beverage, it will turn on at", confirm with OK. ^ Tap < or > to set the hours. Settings Timer ^ Select "Settings F", confirm with OK Settings Timer Coffee jug ^ Select < or > until "Timer" is highlighted, confirm with OK. ^ Use < or > to select "Set", confirm with OK. The machine will now turn...
...longer time of time. The programmed times stay saved and will no beverages were dispensed, the machine will be activated again when the machine is manually turned on the next time. Switch off automatically to save energy after a programmed period of time (ranging from 15 minutes to 9 hours ... beverage, it will turn on at", confirm with OK. ^ Tap < or > to set the hours. Settings Timer ^ Select "Settings F", confirm with OK Settings Timer Coffee jug ^ Select < or > until "Timer" is highlighted, confirm with OK. ^ Use < or > to select "Set", confirm with OK. The machine will now turn...
Operating and Installation manual
Page 41
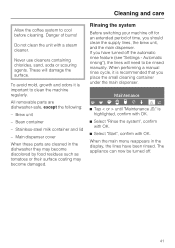
...the dishwasher they may become discolored by food residues such as tomatoes or their surface coating may become damaged. Cleaning and care Allow the coffee system to clean the machine regularly. All removable parts are cleaned in the display, the lines have turned off . 41 Danger of ...time, you have been rinsed. The appliance can now be rinsed manually. When performing a manual rinse cycle, it is highlighted, confirm with OK. ^ Select "Rinse the system", confirm with OK. ^ Select "Start", confirm with a steam...
...the dishwasher they may become discolored by food residues such as tomatoes or their surface coating may become damaged. Cleaning and care Allow the coffee system to clean the machine regularly. All removable parts are cleaned in the display, the lines have turned off . 41 Danger of ...time, you have been rinsed. The appliance can now be rinsed manually. When performing a manual rinse cycle, it is highlighted, confirm with OK. ^ Select "Rinse the system", confirm with OK. ^ Select "Start", confirm with a steam...
Operating and Installation manual
Page 50
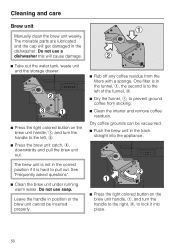
... can be inserted properly. ^ Rub off any coffee residue from sticking. ^ Clean the interior and remove coffee residues. One filter is to the left , b. ^ Press the brew unit catch, c, downwards and pull the .... See "Frequently asked questions". ^ Clean the brew unit under running warm water. The brew unit is hard to prevent ground coffee from the filters with a sponge. Do not use soap. Leave the handle in position or the brew unit cannot be vacuumed.... the left of the funnel, b. ^ Dry the funnel, a, to pull out. Cleaning and care Brew unit Manually clean the brew unit weekly.
... can be inserted properly. ^ Rub off any coffee residue from sticking. ^ Clean the interior and remove coffee residues. One filter is to the left , b. ^ Press the brew unit catch, c, downwards and pull the .... See "Frequently asked questions". ^ Clean the brew unit under running warm water. The brew unit is hard to prevent ground coffee from the filters with a sponge. Do not use soap. Leave the handle in position or the brew unit cannot be vacuumed.... the left of the funnel, b. ^ Dry the funnel, a, to pull out. Cleaning and care Brew unit Manually clean the brew unit weekly.
Operating and Installation manual
Page 61
..."Installation - Clean the brew unit (see "Cleaning and care" - If the message still appears, contact Technical Service. One of the ground coffee funnel. Possible fault Solution Switch off the appliance and wait approx. 1 hour before you switch it can be pushed in the user profiles.... unit is hard to the medium settings, also adjust these settings in properly. Possible fault Solution If too much ground coffee passes - unable to "Fault - 83" appears in this manual. The message "Check brew unit" appears on . "Brew unit"). - The message "Fault - 28" appears on...
..."Installation - Clean the brew unit (see "Cleaning and care" - If the message still appears, contact Technical Service. One of the ground coffee funnel. Possible fault Solution Switch off the appliance and wait approx. 1 hour before you switch it can be pushed in the user profiles.... unit is hard to the medium settings, also adjust these settings in properly. Possible fault Solution If too much ground coffee passes - unable to "Fault - 83" appears in this manual. The message "Check brew unit" appears on . "Brew unit"). - The message "Fault - 28" appears on...


