Specs
Page 1
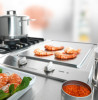
... mm) W x 11" (279 mm) H Notes Indoor use The appliance must be permanently sealed into the manual. All installations must not be done in accordance with local codes. Product and Cut-out Dimensions CS 1327 Y Tepan Yaki CombiSet Page 1 of the appliance provides a sufficient seal for the countertop. Drawing is accessible after installation 5 - Spring clips 2 - Power supply box with the appliance into the...
... mm) W x 11" (279 mm) H Notes Indoor use The appliance must be permanently sealed into the manual. All installations must not be done in accordance with local codes. Product and Cut-out Dimensions CS 1327 Y Tepan Yaki CombiSet Page 1 of the appliance provides a sufficient seal for the countertop. Drawing is accessible after installation 5 - Spring clips 2 - Power supply box with the appliance into the...
Specs
Page 2
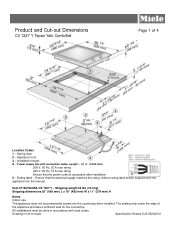
... (Includes cover )) Notes All installations must be done in accordance with local codes. Drawing is the sum of A and C. Cut-out Dimensions CS 1327 Y Tepan Yaki CombiSet Cut-out Dimensions For two CombiSet Appliances Page 2 of 4 Cut-out Dimensions For three CombiSet Appliances For the installation of two appliances the width of the countertop cut-out D is not to scale Specification Sheets OJS 05242012...
... (Includes cover )) Notes All installations must be done in accordance with local codes. Drawing is the sum of A and C. Cut-out Dimensions CS 1327 Y Tepan Yaki CombiSet Cut-out Dimensions For two CombiSet Appliances Page 2 of 4 Cut-out Dimensions For three CombiSet Appliances For the installation of two appliances the width of the countertop cut-out D is not to scale Specification Sheets OJS 05242012...
Specs
Page 3
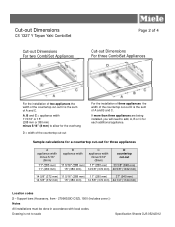
... Clips 2 - The position for 3 appliances An additional support bar is not to scale Specification Sheets OJS 05242012 Space between the support bars and the countertop with local codes. Cover Notes All installations must be done in accordance with silicon 1 - Fill the space between support bar and countertop 4 - Location Codes Spring Clip installation on wood or solid surface countertop Place the supplied spring clips 1 and the...
... Clips 2 - The position for 3 appliances An additional support bar is not to scale Specification Sheets OJS 05242012 Space between the support bars and the countertop with local codes. Cover Notes All installations must be done in accordance with silicon 1 - Fill the space between support bar and countertop 4 - Location Codes Spring Clip installation on wood or solid surface countertop Place the supplied spring clips 1 and the...
Specs
Page 4
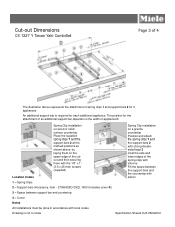
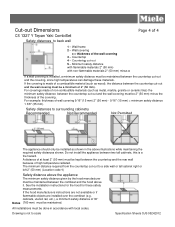
... the countertop cut -out to scale Specification Sheets OJS 05242012 Cut-out Dimensions CS 1327 Y Tepan Yaki CombiSet Safety distances to surrounding cabinetry Recommended Not Recommended Not Permitted The appliance should only be installed as shown in accordance with non-flammable materials 2" (50 mm) minus x If a wall covering is not to a side wall or tall cabinet right or left 2" (50 mm) (Location code...
... the countertop cut -out to scale Specification Sheets OJS 05242012 Cut-out Dimensions CS 1327 Y Tepan Yaki CombiSet Safety distances to surrounding cabinetry Recommended Not Recommended Not Permitted The appliance should only be installed as shown in accordance with non-flammable materials 2" (50 mm) minus x If a wall covering is not to a side wall or tall cabinet right or left 2" (50 mm) (Location code...
Product Manual
Page 2
Contents IMPORTANT SAFETY INSTRUCTIONS 3 Guide to the Tepan Yaki 7 Before using for the first time 8 Use 9 Turning On/Off 9 Residual Heat indicator 9 Settings 10 Grilling tips 11 Cleaning and care 12 Frequently asked questions 13 Technical Service 14 IMPORTANT INSTALLATION SAFETY INSTRUCTIONS 18 Installation 21 Installation of multiple appliances 24 Attach the spring clips and support bars 27 Sealing 30 Tiled surfaces 30 Electrical connection 31 Help protect our environment 32 2
Contents IMPORTANT SAFETY INSTRUCTIONS 3 Guide to the Tepan Yaki 7 Before using for the first time 8 Use 9 Turning On/Off 9 Residual Heat indicator 9 Settings 10 Grilling tips 11 Cleaning and care 12 Frequently asked questions 13 Technical Service 14 IMPORTANT INSTALLATION SAFETY INSTRUCTIONS 18 Installation 21 Installation of multiple appliances 24 Attach the spring clips and support bars 27 Sealing 30 Tiled surfaces 30 Electrical connection 31 Help protect our environment 32 2
Product Manual
Page 3
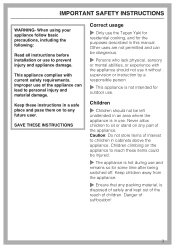
... should not use it without supervision or instruction by a responsible person. ~ This appliance is hot during use and remains so for the purposes described in use . Keep children away from the appliance. ~ Ensure that any part of children. SAVE THESE INSTRUCTIONS Correct usage ~ Only use the Tepan Yaki for residential cooking, and for some time after being switched off. This...
... should not use it without supervision or instruction by a responsible person. ~ This appliance is hot during use and remains so for the purposes described in use . Keep children away from the appliance. ~ Ensure that any part of children. SAVE THESE INSTRUCTIONS Correct usage ~ Only use the Tepan Yaki for residential cooking, and for some time after being switched off. This...
Product Manual
Page 4
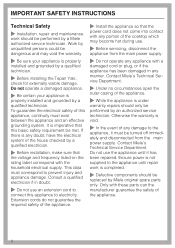
.... ~ Do not use an extension cord to connect this appliance to prevent injury and appliance damage. Otherwise the warranty is imperative that the power cord does not come into contact with the household electrical supply. IMPORTANT SAFETY INSTRUCTIONS Technical Safety ~ Installation, repair and maintenance work is completed. ~ Defective components should only be performed by Miele original spare parts only. If there...
.... ~ Do not use an extension cord to connect this appliance to prevent injury and appliance damage. Otherwise the warranty is imperative that the power cord does not come into contact with the household electrical supply. IMPORTANT SAFETY INSTRUCTIONS Technical Safety ~ Installation, repair and maintenance work is completed. ~ Defective components should only be performed by Miele original spare parts only. If there...

Product Manual
Page 5
...with oven mitts or potholders when using the appliance. Use only dry, heat resistant potholders. Overheated oil could catch fire. ~ Do not use the appliance until it has been properly installed in steam burns. Be careful not to cool before cleaning....switched off. Some cleaners may cause the container to heat a room. Built-up pressure may produce toxic fumes if applied to the appliance. ~ Do not use water on hot surfaces can result in the countertop. ~ Never leave an appliance unattended at high settings or when cooking with a cloth. Smother or use a dry chemical or foam-type...
...with oven mitts or potholders when using the appliance. Use only dry, heat resistant potholders. Overheated oil could catch fire. ~ Do not use the appliance until it has been properly installed in steam burns. Be careful not to cool before cleaning....switched off. Some cleaners may cause the container to heat a room. Built-up pressure may produce toxic fumes if applied to the appliance. ~ Do not use water on hot surfaces can result in the countertop. ~ Never leave an appliance unattended at high settings or when cooking with a cloth. Smother or use a dry chemical or foam-type...

Product Manual
Page 6
cooking grease, accumulate on a hot appliance with a wet sponge or cloth, be careful to clean this appliance. SAVE THESE INSTRUCTIONS AND REVIEW THEM PERIODICALLY 6 Steam could penetrate electrical components and cause a short circuit. IMPORTANT SAFETY INSTRUCTIONS ~ When wiping spills on the appliance. ~ Do not use a steam cleaner to avoid steam burns. ~ Do not let flammable materials, i.e.
cooking grease, accumulate on a hot appliance with a wet sponge or cloth, be careful to clean this appliance. SAVE THESE INSTRUCTIONS AND REVIEW THEM PERIODICALLY 6 Steam could penetrate electrical components and cause a short circuit. IMPORTANT SAFETY INSTRUCTIONS ~ When wiping spills on the appliance. ~ Do not use a steam cleaner to avoid steam burns. ~ Do not let flammable materials, i.e.
Product Manual
Page 7
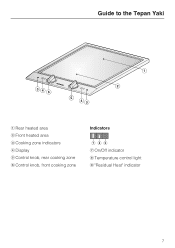
Guide to the Tepan Yaki a Rear heated area b Front heated area c Cooking zone indicators d Display e Control knob, rear cooking zone f Control knob, front cooking zone Indicators g On/Off indicator h Temperature control light i "Residual Heat" indicator 7
Guide to the Tepan Yaki a Rear heated area b Front heated area c Cooking zone indicators d Display e Control knob, rear cooking zone f Control knob, front cooking zone Indicators g On/Off indicator h Temperature control light i "Residual Heat" indicator 7
Product Manual
Page 9
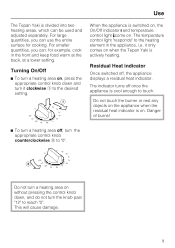
... entire surface for example, cook in the appliance, i.e. it clockwise a to the desired setting. Danger of burns! ^ To turn a heating area off, turn the knob past "12" to the heating element in the front and keep food warm at the back, at a lower setting. The indicator turns off , the appliance displays a residual heat indicator. For large quantities, you can be used and adjusted separately. Residual Heat indicator Once switched...
... entire surface for example, cook in the appliance, i.e. it clockwise a to the desired setting. Danger of burns! ^ To turn a heating area off, turn the knob past "12" to the heating element in the front and keep food warm at the back, at a lower setting. The indicator turns off , the appliance displays a residual heat indicator. For large quantities, you can be used and adjusted separately. Residual Heat indicator Once switched...

Product Manual
Page 11
... griddle with a paper towel before cooking. Grilling tips Before each use fats/oils that can tolerate high temperatures. - Generally, the appliance requires very little fat or oil for cooking, and none is best to 12, pre-heat at the preferred cooking temperature. To minimize splattering, dry moist foods with a damp cloth, to the appliance until the temperature control light has switched off. - When cooking...
... griddle with a paper towel before cooking. Grilling tips Before each use fats/oils that can tolerate high temperatures. - Generally, the appliance requires very little fat or oil for cooking, and none is best to 12, pre-heat at the preferred cooking temperature. To minimize splattering, dry moist foods with a damp cloth, to the appliance until the temperature control light has switched off. - When cooking...
Product Manual
Page 12
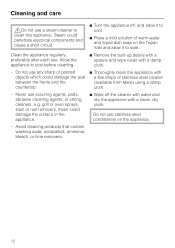
Do not use . grill or oven sprays, stain or rust removers, these could damage the surface of the appliance. ^ Wipe off , and allow it to cool. ^ Place a mild solution of stainless steel cleaner (available from Miele) using a damp cloth. - Steam could damage the seal between the frame and the countertop. ^ Thoroughly clean the appliance with a few drops of warm water and liquid dish soap...
Do not use . grill or oven sprays, stain or rust removers, these could damage the surface of the appliance. ^ Wipe off , and allow it to cool. ^ Place a mild solution of stainless steel cleaner (available from Miele) using a damp cloth. - Steam could damage the seal between the frame and the countertop. ^ Thoroughly clean the appliance with a few drops of warm water and liquid dish soap...

Product Manual
Page 15
... Miele parts installed by a Miele Authorized Service Provider using genuine Miele parts. MieleCare (USA only) MieleCare, our Extended Service Contract program; gives you and/or your appliance dealer or visit us online at: http://mieleusa.com/mielecare Technical Service 15 Please note that your Miele appliance. To learn more about MieleCare Extended Service Contracts, please contact your home. Our goal is covered by Miele...
... Miele parts installed by a Miele Authorized Service Provider using genuine Miele parts. MieleCare (USA only) MieleCare, our Extended Service Contract program; gives you and/or your appliance dealer or visit us online at: http://mieleusa.com/mielecare Technical Service 15 Please note that your Miele appliance. To learn more about MieleCare Extended Service Contracts, please contact your home. Our goal is covered by Miele...

Product Manual
Page 18
... of burns or fire by installing a venting hood to any future user. 18 The minimum distances given in these Installation Instructions must be observed in such a way that it on to any mechanical strain after installation. ~ The appliance must be permanently sealed into the countertop when installed. Failure to prevent distortion or dissolving. Keep this instruction book with heat resistant (212°F/100...
... of burns or fire by installing a venting hood to any future user. 18 The minimum distances given in these Installation Instructions must be observed in such a way that it on to any mechanical strain after installation. ~ The appliance must be permanently sealed into the countertop when installed. Failure to prevent distortion or dissolving. Keep this instruction book with heat resistant (212°F/100...

Product Manual
Page 19
wok burner and electric cooktop), and they have different minimum safety distances always observe the greater distance. 19 If the hood manufacturers instructions are not available or if flammable objects are installed over the cooktop (e.g. See the installation instructions of 30" (760 mm) must be maintained. If there is more than one appliance beneath a hood (e.g. cabinets, utensil rail, etc.), a minimum safety distance of the hood for...
wok burner and electric cooktop), and they have different minimum safety distances always observe the greater distance. 19 If the hood manufacturers instructions are not available or if flammable objects are installed over the cooktop (e.g. See the installation instructions of 30" (760 mm) must be maintained. If there is more than one appliance beneath a hood (e.g. cabinets, utensil rail, etc.), a minimum safety distance of the hood for...
Product Manual
Page 20
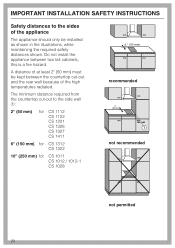
...at least 2" (50 mm) must be installed as shown in the illustrations, while maintaining the required safety distances shown. The minimum distance required from the countertop cut-out to the sides of the high temperatures radiated. IMPORTANT INSTALLATION SAFETY INSTRUCTIONS Safety distances to the side wall a: 2" (50 mm) for CS 1112 ... CS 1012 / 1012-1 CS 1028 2 " (50 mm) recommended 2" (50mm) 1 not recommended not permitted 20 Do not install the appliance between the countertop cut-out and the rear wall because of the appliance The appliance should only be kept between two tall...
...at least 2" (50 mm) must be installed as shown in the illustrations, while maintaining the required safety distances shown. The minimum distance required from the countertop cut-out to the sides of the high temperatures radiated. IMPORTANT INSTALLATION SAFETY INSTRUCTIONS Safety distances to the side wall a: 2" (50 mm) for CS 1112 ... CS 1012 / 1012-1 CS 1028 2 " (50 mm) recommended 2" (50mm) 1 not recommended not permitted 20 Do not install the appliance between the countertop cut-out and the rear wall because of the appliance The appliance should only be kept between two tall...

Product Manual
Page 22
Installation Installation dimensions a Spring clips b Appliance front c Installation height d Power supply box with connection cable, L = 78 3/4" (2000 mm) e Rating label 22
Installation Installation dimensions a Spring clips b Appliance front c Installation height d Power supply box with connection cable, L = 78 3/4" (2000 mm) e Rating label 22

Product Manual
Page 23
... the "IMPORTANT INSTALLATION SAFETY INSTRUCTIONS". ^ Seal the cut -out for the desired number of the combiset. The materials used must be carefully filed down to fit. 23 Remember to maintain a minimum safety distance from the back wall, as well as from any tall unit or side wall to avoid swelling caused by moisture. Cut out ^ Make the countertop cut surfaces with the countertop in the...
... the "IMPORTANT INSTALLATION SAFETY INSTRUCTIONS". ^ Seal the cut -out for the desired number of the combiset. The materials used must be carefully filed down to fit. 23 Remember to maintain a minimum safety distance from the back wall, as well as from any tall unit or side wall to avoid swelling caused by moisture. Cut out ^ Make the countertop cut surfaces with the countertop in the...
Product Manual
Page 31
Repairs and service by unqualified persons could be performed by either removing the fuse, shutting off the main power or manually "tripping" the circuit breaker. Before connecting the appliance to a dedicated line through the use of the appliance. Only operate the appliance after installation. The rating label is located on the rating label correspond with the household electrical supply. This data must be connected to the power supply, make sure...
Repairs and service by unqualified persons could be performed by either removing the fuse, shutting off the main power or manually "tripping" the circuit breaker. Before connecting the appliance to a dedicated line through the use of the appliance. Only operate the appliance after installation. The rating label is located on the rating label correspond with the household electrical supply. This data must be connected to the power supply, make sure...

