
Product Manual
Page 2
... 11 Turning on the second ring on a Variable/Extended burner 11 Residual Heat Indicator 12 Settings 13 Overheat protection 14 Selecting cookware 15 Cleaning and care 17 Frequently asked questions 19 Technical Service 20 IMPORTANT INSTALLATION SAFETY INSTRUCTIONS 24 Installation 27 Installation dimensions CS 1112 28 Installation dimensions CS 1122 29 Installation of multiple appliances 31 Attach the spring clips and support bars 34 Sealing 37 Tiled surfaces 37 Electrical connection...
... 11 Turning on the second ring on a Variable/Extended burner 11 Residual Heat Indicator 12 Settings 13 Overheat protection 14 Selecting cookware 15 Cleaning and care 17 Frequently asked questions 19 Technical Service 20 IMPORTANT INSTALLATION SAFETY INSTRUCTIONS 24 Installation 27 Installation dimensions CS 1112 28 Installation dimensions CS 1122 29 Installation of multiple appliances 31 Attach the spring clips and support bars 34 Sealing 37 Tiled surfaces 37 Electrical connection...
Product Manual
Page 3
... not designed for outdoor use . This gas combiset conforms to prevent injury and appliance damage. These instructions contain important information on any future user. Caution: Do not store items of this manual. When using your gas appliance follow basic precautions, including the following: ~ Only use the combiset for residential cooking, and for use . Read all instructions before installation or use and maintenance of...
... not designed for outdoor use . This gas combiset conforms to prevent injury and appliance damage. These instructions contain important information on any future user. Caution: Do not store items of this manual. When using your gas appliance follow basic precautions, including the following: ~ Only use the combiset for residential cooking, and for use . Read all instructions before installation or use and maintenance of...
Product Manual
Page 4
... control system. ~ Do not use an extension cord to connect this basic safety requirement be dangerous and may become hot during use the appliance until it has been repaired. Extension cords do not guarantee the required safety of the appliance. ~ Install the appliance so that this appliance to the appliance until repair work should be replaced by Miele original spare parts only. Ensure power is...
... control system. ~ Do not use an extension cord to connect this basic safety requirement be dangerous and may become hot during use the appliance until it has been repaired. Extension cords do not guarantee the required safety of the appliance. ~ Install the appliance so that this appliance to the appliance until repair work should be replaced by Miele original spare parts only. Ensure power is...
Product Manual
Page 5
... hood. Built-up into the hood by the suction and the grease filters may cause the container to cause harm although the glow is safe to place hot pots or pans on grease fires. Always switch the cooking zone(s) off , the surface may present a fire hazard. ~ Never leave an appliance unattended at high settings or when cooking with a cloth or protective oven foil. Flames...
... hood. Built-up into the hood by the suction and the grease filters may cause the container to cause harm although the glow is safe to place hot pots or pans on grease fires. Always switch the cooking zone(s) off , the surface may present a fire hazard. ~ Never leave an appliance unattended at high settings or when cooking with a cloth or protective oven foil. Flames...

Product Manual
Page 6
... hot. IMPORTANT SAFETY INSTRUCTIONS ~ Make certain that the bases of any pots and pans are clean, free of any fat or oils and are dry. ~ To prevent damage to the combiset do not use pots and pans with thin bases on the combiset. These could become damaged. cooking grease, accumulate on the ceramic surface of plastic or foil to fall on the burners...
... hot. IMPORTANT SAFETY INSTRUCTIONS ~ Make certain that the bases of any pots and pans are clean, free of any fat or oils and are dry. ~ To prevent damage to the combiset do not use pots and pans with thin bases on the combiset. These could become damaged. cooking grease, accumulate on the ceramic surface of plastic or foil to fall on the burners...
Product Manual
Page 10
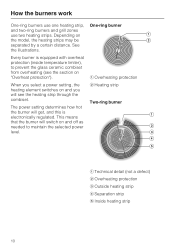
... illustrations. How the burners work One-ring burners use one heating strip, and two-ring burners and grill zones use two heating strips. This means that the burner will see the section on the model, the heating strips may be separated by a certain distance. When you select a power setting, the heating element switches on and you will switch on and off as needed to prevent the glass ceramic combiset from overheating...
... illustrations. How the burners work One-ring burners use one heating strip, and two-ring burners and grill zones use two heating strips. This means that the burner will see the section on the model, the heating strips may be separated by a certain distance. When you select a power setting, the heating element switches on and you will switch on and off as needed to prevent the glass ceramic combiset from overheating...

Product Manual
Page 15
... cooking. For longer cooking periods, you to make the most even and energy efficient cooking, the diameter of the pots/pans should match the diameter of your ceramic combiset. Pots and pans Special cookware is not required, but as is completed. The residual heat will allow you can scratch the surface if they are pulled across the ceramic surface. Small or light...
... cooking. For longer cooking periods, you to make the most even and energy efficient cooking, the diameter of the pots/pans should match the diameter of your ceramic combiset. Pots and pans Special cookware is not required, but as is completed. The residual heat will allow you can scratch the surface if they are pulled across the ceramic surface. Small or light...

Product Manual
Page 17
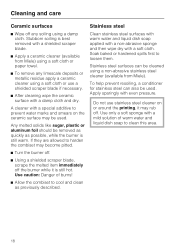
... clean the ceramic surface. Pressurized steam could damage the seal between the ceramic surface, the surrounding frame and the countertop. Make sure that pot and pan bases are clean and dry. Clean any sharp pointed objects which can be removed. Clean the appliance regularly, preferably after each use liquid dish soap to remove. Steam could penetrate electrical components and cause a short circuit. Follow the manufacturer's instructions. Do not use . Never use...
... clean the ceramic surface. Pressurized steam could damage the seal between the ceramic surface, the surrounding frame and the countertop. Make sure that pot and pan bases are clean and dry. Clean any sharp pointed objects which can be removed. Clean the appliance regularly, preferably after each use liquid dish soap to remove. Steam could penetrate electrical components and cause a short circuit. Follow the manufacturer's instructions. Do not use . Never use...
Product Manual
Page 18
... blade. ^ Apply a ceramic cleaner (available from Miele). Any melted solids like sugar, plastic or aluminum foil should be removed as quickly as previously described. Soak baked or hardened spills first to harden the combiset may become pitted. ^ Turn the burner off. ^ Using a shielded scraper blade, scrape the melted item immediately off . Apply sparingly with a soft cloth. Stainless steel Clean stainless steel surfaces with warm...
... blade. ^ Apply a ceramic cleaner (available from Miele). Any melted solids like sugar, plastic or aluminum foil should be removed as quickly as previously described. Soak baked or hardened spills first to harden the combiset may become pitted. ^ Turn the burner off. ^ Using a shielded scraper blade, scrape the melted item immediately off . Apply sparingly with a soft cloth. Stainless steel Clean stainless steel surfaces with warm...
Product Manual
Page 21
... unauthorized (and untrained) service personnel from working on your appliance investment is the only Extended Service Contract in writing by the Miele Service department, Extended Service Contracts offered by other providers for Miele products will not be recognized by factory trained professionals can guarantee the safety, reliability and longevity of worry free ownership. MieleCare is covered by a Miele Authorized Service Provider using genuine Miele parts.
... unauthorized (and untrained) service personnel from working on your appliance investment is the only Extended Service Contract in writing by the Miele Service department, Extended Service Contracts offered by other providers for Miele products will not be recognized by factory trained professionals can guarantee the safety, reliability and longevity of worry free ownership. MieleCare is covered by a Miele Authorized Service Provider using genuine Miele parts.

Product Manual
Page 24
... into contact with the floor panel after installation, nor be subject to any future user. 24 The sealing strip under the edge of fire. Keep this instruction book in these Installation Instructions must be installed over heated surfaces cabinet storage space above an oven unless the countertop is at least 1 9/16" (40 mm) thick. ~ You must ensure the power cable for reference and pass...
... into contact with the floor panel after installation, nor be subject to any future user. 24 The sealing strip under the edge of fire. Keep this instruction book in these Installation Instructions must be installed over heated surfaces cabinet storage space above an oven unless the countertop is at least 1 9/16" (40 mm) thick. ~ You must ensure the power cable for reference and pass...

Product Manual
Page 26
... only be kept between two tall cabinets, this is a fire hazard. The minimum distance required from the countertop cut -out and the rear wall because of at least 2" (50 mm) must be installed as shown in the illustrations, while maintaining the required safety distances shown. IMPORTANT INSTALLATION SAFETY INSTRUCTIONS Safety distances to the side wall or cabinet a: 2" (50 mm) for CS 1112... 1421 10" (250 mm) for CS 1011 CS 1012 CS 1012-1 CS 1028 2 " (50 mm) recommended 2" (50mm) 1 not recommended not allowed 26 A distance of the high temperatures radiated.
... only be kept between two tall cabinets, this is a fire hazard. The minimum distance required from the countertop cut -out and the rear wall because of at least 2" (50 mm) must be installed as shown in the illustrations, while maintaining the required safety distances shown. IMPORTANT INSTALLATION SAFETY INSTRUCTIONS Safety distances to the side wall or cabinet a: 2" (50 mm) for CS 1112... 1421 10" (250 mm) for CS 1011 CS 1012 CS 1012-1 CS 1028 2 " (50 mm) recommended 2" (50mm) 1 not recommended not allowed 26 A distance of the high temperatures radiated.

Product Manual
Page 28
Installation Installation dimensions CS 1112 a Spring clips b Appliance front c Installation height d Power supply box with connection cable, L = 78 3/4" (2000 mm) e Rating label 28
Installation Installation dimensions CS 1112 a Spring clips b Appliance front c Installation height d Power supply box with connection cable, L = 78 3/4" (2000 mm) e Rating label 28

Product Manual
Page 29
Installation dimensions CS 1122 Installation a Spring clips b Appliance front c Installation height d Power supply box with connection cable, L = 78 3/4" (2000 mm) e Rating label 29
Installation dimensions CS 1122 Installation a Spring clips b Appliance front c Installation height d Power supply box with connection cable, L = 78 3/4" (2000 mm) e Rating label 29

Product Manual
Page 30
... to the dimensions drawings. See also the "IMPORTANT INSTALLATION SAFETY INSTRUCTIONS". ^ Seal the cut -out for the desired number of the combiset. If during installation the seal around the frame does not sit flush with a suitable sealant to fit. 30 The materials used must be carefully filed down to avoid swelling caused by moisture. Installation Cut out ^ Make the countertop cut surfaces with the countertop in...
... to the dimensions drawings. See also the "IMPORTANT INSTALLATION SAFETY INSTRUCTIONS". ^ Seal the cut -out for the desired number of the combiset. If during installation the seal around the frame does not sit flush with a suitable sealant to fit. 30 The materials used must be carefully filed down to avoid swelling caused by moisture. Installation Cut out ^ Make the countertop cut surfaces with the countertop in...
Product Manual
Page 38
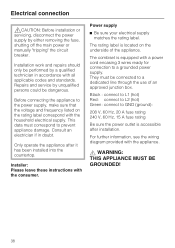
.... Repairs and service by unqualified persons could be performed by either removing the fuse, shutting off the main power or manually "tripping" the circuit breaker. The rating label is accessible after it has been installed into the countertop. Installer: Please leave these instructions with the appliance. , WARNING: THIS APPLIANCE MUST BE GROUNDED! 38 Installation work and repairs should only be dangerous. Before connecting the appliance to a grounded power supply. Power...
.... Repairs and service by unqualified persons could be performed by either removing the fuse, shutting off the main power or manually "tripping" the circuit breaker. The rating label is accessible after it has been installed into the countertop. Installer: Please leave these instructions with the appliance. , WARNING: THIS APPLIANCE MUST BE GROUNDED! 38 Installation work and repairs should only be dangerous. Before connecting the appliance to a grounded power supply. Power...

Specs
Page 1
... to scale Specification Sheets OJS 02212012 Adhere rating label sticker supplied with local codes. Drawing is accessible after installation 5 - Shipping weight 21 lbs (9.5 kg) Shipping dimensions 23" (584 mm) L x 19" (483 mm) W x 8" (203 mm) H Notes Indoor use The appliance must be permanently sealed into the manual. The sealing strip under the edge of 4 Location Codes 1 - Product and Cut-out Dimensions CS 1122 E Ceramic Double Burner CombiSet...
... to scale Specification Sheets OJS 02212012 Adhere rating label sticker supplied with local codes. Drawing is accessible after installation 5 - Shipping weight 21 lbs (9.5 kg) Shipping dimensions 23" (584 mm) L x 19" (483 mm) W x 8" (203 mm) H Notes Indoor use The appliance must be permanently sealed into the manual. The sealing strip under the edge of 4 Location Codes 1 - Product and Cut-out Dimensions CS 1122 E Ceramic Double Burner CombiSet...

Specs
Page 2
...) 44 1/4" (1124 mm) Location codes 2 - Support bars (Accessory, Item - 27996029D CSZL 1500 (Includes cover )) Notes All installations must be done in accordance with local codes. If more than three appliances are being installed, you will need to add, A, B or C for the overhang D = width of the countertop cut-out For the installation of three appliances the width of the countertop cut-out D is not...
...) 44 1/4" (1124 mm) Location codes 2 - Support bars (Accessory, Item - 27996029D CSZL 1500 (Includes cover )) Notes All installations must be done in accordance with local codes. If more than three appliances are being installed, you will need to add, A, B or C for the overhang D = width of the countertop cut-out For the installation of three appliances the width of the countertop cut-out D is not...
Specs
Page 3
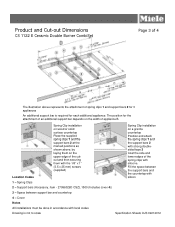
... Specification Sheets OJS 02212012 Fill the space between support bar and countertop 4 - Support bars (Accessory, item - 27996029D CSZL 1500 (Includes cover 4)) 3 - Cover Notes All installations must be done in accordance with silicon 1 - The position for each additional appliance. Drawing is required for the attachment of an additional support bar depends on the width of appliance B. Product and Cut-out Dimensions CS 1122 E Ceramic...
... Specification Sheets OJS 02212012 Fill the space between support bar and countertop 4 - Support bars (Accessory, item - 27996029D CSZL 1500 (Includes cover 4)) 3 - Cover Notes All installations must be done in accordance with silicon 1 - The position for each additional appliance. Drawing is required for the attachment of an additional support bar depends on the width of appliance B. Product and Cut-out Dimensions CS 1122 E Ceramic...

Specs
Page 4
... example: thickness of the wall covering 3 - The minimum distance required from the countertop cut-out to a side wall or tall cabinet right or left 2" (50 mm) (Location code 1) Safety distance above the appliance The minimum safety distance given by the hood manufacturer must be kept between the countertop and the rear wall because of high temperature radiated. See the installation instructions for the hood for these materials. Drawing...
... example: thickness of the wall covering 3 - The minimum distance required from the countertop cut-out to a side wall or tall cabinet right or left 2" (50 mm) (Location code 1) Safety distance above the appliance The minimum safety distance given by the hood manufacturer must be kept between the countertop and the rear wall because of high temperature radiated. See the installation instructions for the hood for these materials. Drawing...

