Specs
Page 1
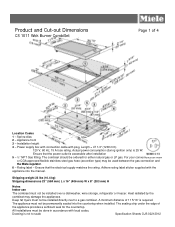
... must be used between the gas connection and the Miele regulator. 6 - Heat radiated by the combiset may be done in accordance with local codes. A minimum distance of 11 5/16" is 25 W. All installations must not be installed directly next to scale Specification Sheets OJS 02212012 Rating label - Product and Cut-out Dimensions CS 1011 Wok Burner CombiSet Page 1 of the appliance provides a sufficient seal for either natural gas or LP gas. Spring...
... must be used between the gas connection and the Miele regulator. 6 - Heat radiated by the combiset may be done in accordance with local codes. A minimum distance of 11 5/16" is 25 W. All installations must not be installed directly next to scale Specification Sheets OJS 02212012 Rating label - Product and Cut-out Dimensions CS 1011 Wok Burner CombiSet Page 1 of the appliance provides a sufficient seal for either natural gas or LP gas. Spring...
Specs
Page 2
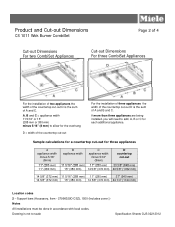
... 5/8" (372 mm) 44 1/4" (1124 mm) Location codes 2 - If more than three appliances are being installed, you will need to scale Specification Sheets OJS 02212012 Drawing is not to add, A, B or C for three appliances A appliance width minus 5/16" (8mm) 11" (280 mm) 11" (280 mm) B appliance width C appliance width minus 5/16" (8mm) D countertop cut -out D is the sum of...
... 5/8" (372 mm) 44 1/4" (1124 mm) Location codes 2 - If more than three appliances are being installed, you will need to scale Specification Sheets OJS 02212012 Drawing is not to add, A, B or C for three appliances A appliance width minus 5/16" (8mm) 11" (280 mm) 11" (280 mm) B appliance width C appliance width minus 5/16" (8mm) D countertop cut -out D is the sum of...
Specs
Page 3
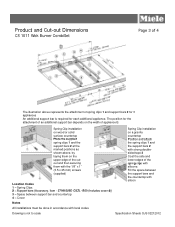
... for 3 appliances An additional support bar is not to scale Specification Sheets OJS 02212012 Cover Spring Clip installation on a granite countertop Position and attach the spring clips 1 and the support bars 2 with strong doublesided tape 3 Coat the side and lower edges of the spring clips with the 1/8" x 1" (3.5 x 25 mm) screws (supplied) Location Codes 1 - Product and Cut-out Dimensions CS 1011 Wok Burner CombiSet Page 3 of...
... for 3 appliances An additional support bar is not to scale Specification Sheets OJS 02212012 Cover Spring Clip installation on a granite countertop Position and attach the spring clips 1 and the support bars 2 with strong doublesided tape 3 Coat the side and lower edges of the spring clips with the 1/8" x 1" (3.5 x 25 mm) screws (supplied) Location Codes 1 - Product and Cut-out Dimensions CS 1011 Wok Burner CombiSet Page 3 of...
Specs
Page 4
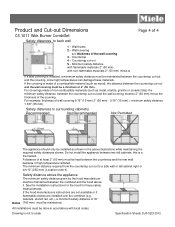
... flammable objects are installed over the combiset (e.g. Do not install the appliance between two tall cabinets, this is made of 4 1 - Minimum safety distance with flammable materials 2" (50 mm) with local codes. The minimum distance required from the countertop cut -out 5 - Drawing is installed, a minimum safety distance must be maintained. Product and Cut-out Dimensions CS 1011 Wok Burner CombiSet Safety distances to scale Specification Sheets OJS 02212012
... flammable objects are installed over the combiset (e.g. Do not install the appliance between two tall cabinets, this is made of 4 1 - Minimum safety distance with flammable materials 2" (50 mm) with local codes. The minimum distance required from the countertop cut -out 5 - Drawing is installed, a minimum safety distance must be maintained. Product and Cut-out Dimensions CS 1011 Wok Burner CombiSet Safety distances to scale Specification Sheets OJS 02212012
Product Manual
Page 2
... with the consumer for the local electrical/gas inspector's use. 2 Follow the gas supplier's instructions. ß If you cannot reach your gas supplier from a neighbor's phone. Note to light any appliance. ß Do not touch any electrical switch. ß Do not use gasoline or other appliance. - Installation and service must be performed by a qualified installer, service agency or the gas supplier. (In Massachusetts a licensed plumber...
... with the consumer for the local electrical/gas inspector's use. 2 Follow the gas supplier's instructions. ß If you cannot reach your gas supplier from a neighbor's phone. Note to light any appliance. ß Do not touch any electrical switch. ß Do not use gasoline or other appliance. - Installation and service must be performed by a qualified installer, service agency or the gas supplier. (In Massachusetts a licensed plumber...
Product Manual
Page 3
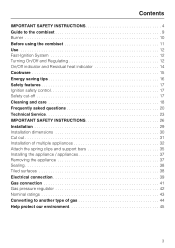
... 17 Ignition safety control 17 Safety cut-off 17 Cleaning and care 18 Frequently asked questions 20 Technical Service 23 IMPORTANT SAFETY INSTRUCTIONS 26 Installation 29 Installation dimensions 30 Cut out 31 Installation of multiple appliances 32 Attach the spring clips and support bars 35 Installing the appliance / appliances 37 Removing the appliance 37 Sealing 38 Tiled surfaces 38 Electrical connection 39 Gas connection 41 Gas pressure regulator 42 Nominal ratings 43 Converting to another type of gas...
... 17 Ignition safety control 17 Safety cut-off 17 Cleaning and care 18 Frequently asked questions 20 Technical Service 23 IMPORTANT SAFETY INSTRUCTIONS 26 Installation 29 Installation dimensions 30 Cut out 31 Installation of multiple appliances 32 Attach the spring clips and support bars 35 Installing the appliance / appliances 37 Removing the appliance 37 Sealing 38 Tiled surfaces 38 Electrical connection 39 Gas connection 41 Gas pressure regulator 42 Nominal ratings 43 Converting to another type of gas...

Product Manual
Page 4
... households and in similar working and residential environments such as: - Keep children away from the appliance. ~ Keep all pots and pans out of the reach of the appliance. Never allow children to any part of children. Children climbing on installation, safety, use . SAVE THESE INSTRUCTIONS Correct usage ~ This appliance is hot during use . Other uses are not permitted and...
... households and in similar working and residential environments such as: - Keep children away from the appliance. ~ Keep all pots and pans out of the reach of the appliance. Never allow children to any part of children. Children climbing on installation, safety, use . SAVE THESE INSTRUCTIONS Correct usage ~ This appliance is hot during use . Other uses are not permitted and...

Product Manual
Page 5
... requirement be dangerous and may become hot during use an extension cord to connect this appliance, continuity must correspond to electricity. A damaged gas combiset is imperative that the voltage and frequency listed on the rating label correspond with an external timer or a remote control system. ~ Do not use . ~ The combiset is under warranty repairs should be performed by a Miele authorized service technician. Work by a Miele authorized service...
... requirement be dangerous and may become hot during use an extension cord to connect this appliance, continuity must correspond to electricity. A damaged gas combiset is imperative that the voltage and frequency listed on the rating label correspond with an external timer or a remote control system. ~ Do not use . ~ The combiset is under warranty repairs should be performed by a Miele authorized service technician. Work by a Miele authorized service...
Product Manual
Page 6
... specific requirements. ~ After connecting the appliance test for some time after being switched off the gas valve and disconnect the power supply by either removing the fuse, unplugging the unit or manually"tripping" the circuit breaker. ~ This equipment has not been designed for maritime use or for use this appliance as aircraft or recreational vehicles. Use only dry, heat resistant potholders. Moist or damp potholders used on hot surfaces...
... specific requirements. ~ After connecting the appliance test for some time after being switched off the gas valve and disconnect the power supply by either removing the fuse, unplugging the unit or manually"tripping" the circuit breaker. ~ This equipment has not been designed for maritime use or for use this appliance as aircraft or recreational vehicles. Use only dry, heat resistant potholders. Moist or damp potholders used on hot surfaces...

Product Manual
Page 7
... circuit. ~ Spills containing salt or sugar should be adjusted to be sure not to place hot pots or pans on the center line. Steam could damage the seal. ~ Do not let cooking grease or other , be the same size as the flames can climb the sides of plastic or aluminum. IMPORTANT SAFETY INSTRUCTIONS ~ Do not use pans that the burner is always covered with a pan. ~ Only use cooking...
... circuit. ~ Spills containing salt or sugar should be adjusted to be sure not to place hot pots or pans on the center line. Steam could damage the seal. ~ Do not let cooking grease or other , be the same size as the flames can climb the sides of plastic or aluminum. IMPORTANT SAFETY INSTRUCTIONS ~ Do not use pans that the burner is always covered with a pan. ~ Only use cooking...

Product Manual
Page 8
..., turn off valve and disconnect completely from becoming a hazard. Contact the Miele Technical Service Department. SAVE THESE INSTRUCTIONS AND REVIEW THEM PERIODICALLY 8 IMPORTANT SAFETY INSTRUCTIONS ~ If there is carried out. ~ Before discarding an old appliance, disconnect it from the gas and electrical supply, and cut off the power cord to be placed in the drawer, they must be made of a heat-resistant...
..., turn off valve and disconnect completely from becoming a hazard. Contact the Miele Technical Service Department. SAVE THESE INSTRUCTIONS AND REVIEW THEM PERIODICALLY 8 IMPORTANT SAFETY INSTRUCTIONS ~ If there is carried out. ~ Before discarding an old appliance, disconnect it from the gas and electrical supply, and cut off the power cord to be placed in the drawer, they must be made of a heat-resistant...

Product Manual
Page 10
Guide to the combiset Burner g Small burner cap h Large burner cap i Burner ring j Burner k Ignition safety control (Thermocouple) l Ignitor m Burner base Positioning the burner parts The proper function of the burner is only guaranteed if the burner parts are positioned correctly the burner cannot be turned. 10 If the parts are positioned correctly: The notch a on the burner must securely fit into the recess in the lower part of the burner b. The notch c on the burner cap must securely fit into the recess of the burner base d.
Guide to the combiset Burner g Small burner cap h Large burner cap i Burner ring j Burner k Ignition safety control (Thermocouple) l Ignitor m Burner base Positioning the burner parts The proper function of the burner is only guaranteed if the burner parts are positioned correctly the burner cannot be turned. 10 If the parts are positioned correctly: The notch a on the burner must securely fit into the recess in the lower part of the burner b. The notch c on the burner cap must securely fit into the recess of the burner base d.

Product Manual
Page 13
... the pan. Now set so that requires you to press the knob down while turning it, in order to get from the high flame zone to the low flame zone. ^ To reduce the flames from a low to high setting, turn it counterclockwise to the largest flame symbol. Use Turning on ^ To turn on the burner, press the control knob down to pass the resistance, then release the pressure and turn the control knob...
... the pan. Now set so that requires you to press the knob down while turning it, in order to get from the high flame zone to the low flame zone. ^ To reduce the flames from a low to high setting, turn it counterclockwise to the largest flame symbol. Use Turning on ^ To turn on the burner, press the control knob down to pass the resistance, then release the pressure and turn the control knob...

Product Manual
Page 18
... temperature before removing the grates. ^ Clean the grates, combiset and knobs with even pressure. Keep the ignitor in the burner dry. These cleaning products are available from Miele. Do not use stainless steel cleaner on or around the printing, it will not spark. Cleaning and care Never use a steam cleaner to clean this area. 18 If it gets wet it may rub off. The stainless steel surfaces can also be used. Use only...
... temperature before removing the grates. ^ Clean the grates, combiset and knobs with even pressure. Keep the ignitor in the burner dry. These cleaning products are available from Miele. Do not use stainless steel cleaner on or around the printing, it will not spark. Cleaning and care Never use a steam cleaner to clean this area. 18 If it gets wet it may rub off. The stainless steel surfaces can also be used. Use only...
Product Manual
Page 21
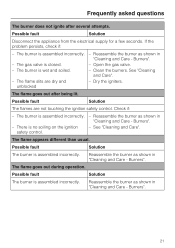
... gas valve is wet and soiled. - Reassemble the burner as shown in "Cleaning and Care - Dry the igniters. The burner is closed. - The flame slits are not touching the ignition safety control. Possible fault Solution The burner is assembled incorrectly. - Open the gas valve. - Reassemble the burner as shown in "Cleaning and Care - The burner is assembled incorrectly. Possible fault Solution Disconnect the appliance from the electrical supply...
... gas valve is wet and soiled. - Reassemble the burner as shown in "Cleaning and Care - Dry the igniters. The burner is closed. - The flame slits are not touching the ignition safety control. Possible fault Solution The burner is assembled incorrectly. - Open the gas valve. - Reassemble the burner as shown in "Cleaning and Care - The burner is assembled incorrectly. Possible fault Solution Disconnect the appliance from the electrical supply...

Product Manual
Page 26
... that the power cord or gas piping does not come into contact with any pressure testing of the system performed in excess of ½ psi (3.5 kPa). Heat radiated by the combiset may become hot during use. This appliance must be disconnected from the gas supply during any portion of fire. Gas flames can ignite splattering oil. IMPORTANT SAFETY INSTRUCTIONS Installation The minimum distances...
... that the power cord or gas piping does not come into contact with any pressure testing of the system performed in excess of ½ psi (3.5 kPa). Heat radiated by the combiset may become hot during use. This appliance must be disconnected from the gas supply during any portion of fire. Gas flames can ignite splattering oil. IMPORTANT SAFETY INSTRUCTIONS Installation The minimum distances...

Product Manual
Page 31
The materials used must be carefully filed down to fit. 31 Installation Cut out ^ Make the countertop cut surfaces with the countertop in the corners, the corner radius, maximum 3/16" (4 mm), can be heat resistant. See also the "IMPORTANT SAFETY INSTRUCTIONS". ^ Seal the cut -out for the desired number of the combiset. If during installation the seal around the frame does not sit flush with a suitable...
The materials used must be carefully filed down to fit. 31 Installation Cut out ^ Make the countertop cut surfaces with the countertop in the corners, the corner radius, maximum 3/16" (4 mm), can be heat resistant. See also the "IMPORTANT SAFETY INSTRUCTIONS". ^ Seal the cut -out for the desired number of the combiset. If during installation the seal around the frame does not sit flush with a suitable...

Product Manual
Page 39
... not cut or remove the grounding prong from the main power supply before installation or service. The supply line should be connected to the appropriate outlet. Actual power consumption (during ignition only) is imperative that the appliance is equipped with the consumer or the appliance. 39 It should be plugged directly into a properly grounded outlet. Note to the installer Please leave these instructions...
... not cut or remove the grounding prong from the main power supply before installation or service. The supply line should be connected to the appropriate outlet. Actual power consumption (during ignition only) is imperative that the appliance is equipped with the consumer or the appliance. 39 It should be plugged directly into a properly grounded outlet. Note to the installer Please leave these instructions...

Product Manual
Page 41
... individual manual shut off the gas supply after the appliance is required. Any pipe connections must be performed by closing its individual shut off valve must be easily accessible to the consumer to turn on or shut off valve at test pressures equal to a gas leak and subsequent explosion. 41 the current Can/CGA B 149.1 and .2 Installation Codes for gas burning appliances for natural gas: 10" w.c. for Canada...
... individual manual shut off the gas supply after the appliance is required. Any pipe connections must be performed by closing its individual shut off valve must be easily accessible to the consumer to turn on or shut off valve at test pressures equal to a gas leak and subsequent explosion. 41 the current Can/CGA B 149.1 and .2 Installation Codes for gas burning appliances for natural gas: 10" w.c. for Canada...

Product Manual
Page 42
... approved flexible stainless steel gas hose (accordion type) may cause a gas leak. Make sure the regulator is : natural gas - 4" w.c. Do not use any doubt concerning installation contact the Miele Technical Service Department. It will also have a sharp, blue inner core that will be used between the gas connection and the regulator. This will not be lifted out of the combiset. This item has been customized by Miele. Flame adjustment will...
... approved flexible stainless steel gas hose (accordion type) may cause a gas leak. Make sure the regulator is : natural gas - 4" w.c. Do not use any doubt concerning installation contact the Miele Technical Service Department. It will also have a sharp, blue inner core that will be used between the gas connection and the regulator. This will not be lifted out of the combiset. This item has been customized by Miele. Flame adjustment will...

