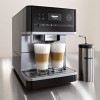
Product Manual
Page 2
... machine On / Off 18 Cup heating 19 Adjusting the coffee dispensers to the cup height 20 How to prepare beverages 21 Coffee specialties 21 Double portion 22 Canceling preparation 22 Making coffee with ground coffee 23 Adding ground coffee 23 Making coffee with ready ground coffee 24 Drinks with milk 24 Preparing hot water (CM 6310 27 Preparing User profile drinks 27 Coffee the way you like it 28 Grinder setting 28 Displaying and changing...
... machine On / Off 18 Cup heating 19 Adjusting the coffee dispensers to the cup height 20 How to prepare beverages 21 Coffee specialties 21 Double portion 22 Canceling preparation 22 Making coffee with ground coffee 23 Adding ground coffee 23 Making coffee with ready ground coffee 24 Drinks with milk 24 Preparing hot water (CM 6310 27 Preparing User profile drinks 27 Coffee the way you like it 28 Grinder setting 28 Displaying and changing...
Product Manual
Page 3
Contents Profiles 34 Accessing a profile 34 Creating a profile 34 Selecting a User profile 35 Changing the name 35 Deleting a profile 35 Changing a profile 36 Settings 37 Accessing the "Settings" menu 37 Changing and saving settings 37 Setting options 38 Language 39 Time of day 39 Timer 39 Eco mode 40 Lighting (CM 6310 40 Info (displaying information 41 Locking the coffee system (System lock 0 41 Water hardness 41 Display brightness 41 Volume (CM 6310 41 Cup heating (CM 6310 41 Factory default 42 Showroom program (demo mode 42 3
Contents Profiles 34 Accessing a profile 34 Creating a profile 34 Selecting a User profile 35 Changing the name 35 Deleting a profile 35 Changing a profile 36 Settings 37 Accessing the "Settings" menu 37 Changing and saving settings 37 Setting options 38 Language 39 Time of day 39 Timer 39 Eco mode 40 Lighting (CM 6310 40 Info (displaying information 41 Locking the coffee system (System lock 0 41 Water hardness 41 Display brightness 41 Volume (CM 6310 41 Cup heating (CM 6310 41 Factory default 42 Showroom program (demo mode 42 3
Product Manual
Page 4
Contents Cleaning and care 43 Quick guide 43 Rinsing the coffee system 44 Milk pipework 45 Main dispenser with cappuccinatore 47 Milk container (CM 6310 48 Water container 49 Drip tray cover 49 Drip tray and waste container 50 Bean container and ground coffee chute 51 Brew unit 51 Remove the brew unit and wash by hand 51 Degreasing the brew unit 53 Housing 54 Descaling the machine 55 Frequently Asked Questions 58...
Contents Cleaning and care 43 Quick guide 43 Rinsing the coffee system 44 Milk pipework 45 Main dispenser with cappuccinatore 47 Milk container (CM 6310 48 Water container 49 Drip tray cover 49 Drip tray and waste container 50 Bean container and ground coffee chute 51 Brew unit 51 Remove the brew unit and wash by hand 51 Degreasing the brew unit 53 Housing 54 Descaling the machine 55 Frequently Asked Questions 58...

Product Manual
Page 5
... usage is not supported. ~ Persons who are supervised while doing so. 5 Any other use could be dangerous. ~ The coffee system is not suitable for damage caused by non-compliance with current safety requirements. Improper use of coffee-based drinks such as espresso, cappuccino, latte macchiato, hot water, steam, frothed milk, etc. Read this safety information carefully before installation or use of coffee, cappuccino, espresso, etc. To avoid...
... usage is not supported. ~ Persons who are supervised while doing so. 5 Any other use could be dangerous. ~ The coffee system is not suitable for damage caused by non-compliance with current safety requirements. Improper use of coffee-based drinks such as espresso, cappuccino, latte macchiato, hot water, steam, frothed milk, etc. Read this safety information carefully before installation or use of coffee, cappuccino, espresso, etc. To avoid...

Product Manual
Page 7
... may void the warranty. ~ Defective components should be replaced by Miele may not be used in mobile installations such as ships. ~ Only use . ~ Protect the coffee system from outlet when not in use of the appliance. ~ To disconnect, turn main switch to "0", then remove plug from wall outlet. ~ Unplug from water and water spray. ~ Installation, maintenance and repairs may become void. If parts or accessories from...
... may void the warranty. ~ Defective components should be replaced by Miele may not be used in mobile installations such as ships. ~ Only use . ~ Protect the coffee system from outlet when not in use of the appliance. ~ To disconnect, turn main switch to "0", then remove plug from wall outlet. ~ Unplug from water and water spray. ~ Installation, maintenance and repairs may become void. If parts or accessories from...

Product Manual
Page 9
... "Cleaning and care"). IMPORTANT SAFETY INSTRUCTIONS ~ Please note the following with regard to cleaning the coffee system: ~ Do not use a steam cleaner to clean this machine. Do not use the coffee system to clog. Descale the machine more frequently in areas with very hard water. Turn the coffee system off at the main switch before cleaning. - Instead, dispose of the appropriate concentration. ~ Degrease the brew unit regularly with Miele cleaning tablets. Make...
... "Cleaning and care"). IMPORTANT SAFETY INSTRUCTIONS ~ Please note the following with regard to cleaning the coffee system: ~ Do not use a steam cleaner to clean this machine. Do not use the coffee system to clog. Descale the machine more frequently in areas with very hard water. Turn the coffee system off at the main switch before cleaning. - Instead, dispose of the appropriate concentration. ~ Degrease the brew unit regularly with Miele cleaning tablets. Make...
Product Manual
Page 10
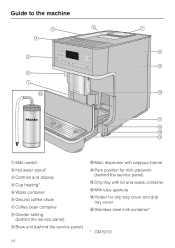
Guide to the machine a Main switch b Hot water spout* c Controls and display d Cup heating* e Water container f Ground coffee chute g Coffee bean container h Grinder setting (behind the service panel) i Brew unit (behind the service panel) 10 j Main dispenser with cappuccinatore k Park position for milk pipework (behind the service panel) l Drip tray with lid and waste container m Milk tube aperture n Holder for drip tray cover and drip tray cover o Stainless steel milk container* * CM 6310
Guide to the machine a Main switch b Hot water spout* c Controls and display d Cup heating* e Water container f Ground coffee chute g Coffee bean container h Grinder setting (behind the service panel) i Brew unit (behind the service panel) 10 j Main dispenser with cappuccinatore k Park position for milk pipework (behind the service panel) l Drip tray with lid and waste container m Milk tube aperture n Holder for drip tray cover and drip tray cover o Stainless steel milk container* * CM 6310
Product Manual
Page 11
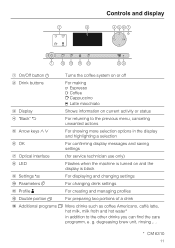
... service technician use only) h LED Flashes when the machine is turned on or off b Drink buttons For making . degreasing brew unit, rinsing ,... * CM 6310 11 g. Turns the coffee system on and the display is black i Settings X For displaying and changing settings j Parameters , For changing drink settings k Profile { For creating and managing profiles l Double portion ° For preparing two portions of a drink m Additional programs x More drinks such as coffee Americano, caffè latte, hot milk, milk...
... service technician use only) h LED Flashes when the machine is turned on or off b Drink buttons For making . degreasing brew unit, rinsing ,... * CM 6310 11 g. Turns the coffee system on and the display is black i Settings X For displaying and changing settings j Parameters , For changing drink settings k Profile { For creating and managing profiles l Double portion ° For preparing two portions of a drink m Additional programs x More drinks such as coffee Americano, caffè latte, hot milk, milk...
Product Manual
Page 12
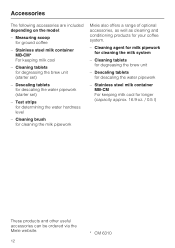
... the model: - Measuring scoop for your coffee system. - Stainless steel milk container MB-CM* For keeping milk cool - Stainless steel milk container MB-CM For keeping milk cool for descaling the water pipework - Descaling tablets for longer (capacity approx. 16.9 oz. / 0.5 l) These products and other useful accessories can be ordered via the Miele website. 12 * CM 6310 Test strips for degreasing the brew unit (starter set ) - Cleaning tablets for determining the water hardness level - Descaling...
... the model: - Measuring scoop for your coffee system. - Stainless steel milk container MB-CM* For keeping milk cool - Stainless steel milk container MB-CM For keeping milk cool for descaling the water pipework - Descaling tablets for longer (capacity approx. 16.9 oz. / 0.5 l) These products and other useful accessories can be ordered via the Miele website. 12 * CM 6310 Test strips for degreasing the brew unit (starter set ) - Cleaning tablets for determining the water hardness level - Descaling...

Product Manual
Page 13
... two cups of coffee/espresso drinks when using the machine for your specific requirements, please continue to work through these operating instructions. ^ Set the main switch on for the first time. Before using it for the first time, the following message will now appear in the coffee system (see "Installation"). Then touch OK. Clean the machine thoroughly before using for the first time ^ Set up successfully completed" will appear in the display: "Miele...
... two cups of coffee/espresso drinks when using the machine for your specific requirements, please continue to work through these operating instructions. ^ Set the main switch on for the first time. Before using it for the first time, the following message will now appear in the coffee system (see "Installation"). Then touch OK. Clean the machine thoroughly before using for the first time ^ Set up successfully completed" will appear in the display: "Miele...

Product Manual
Page 18
... machine is turned on. Hot water will come out of day will be used for a longer period of time: ^ Empty the drip tray, the waste container and the water container. ^ Clean all parts thoroughly, including the brew unit. ^ Turn the machine off for longer periods of the milk pipe into the aperture in the display. If a drink has been made using the main switch. Turning off using milk, the message "Place milk...
... machine is turned on. Hot water will come out of day will be used for a longer period of time: ^ Empty the drip tray, the waste container and the water container. ^ Clean all parts thoroughly, including the brew unit. ^ Turn the machine off for longer periods of the milk pipe into the aperture in the display. If a drink has been made using the main switch. Turning off using milk, the message "Place milk...

Product Manual
Page 34
... every time the machine is turned on, or whether it , ^ use the arrow keys to select from the User profiles that you can select with different coffee preferences, you can use the arrow keys to select the check mark ( and touch OK. Delete profile if you make settings for individual drinks (portion size, amount of ground coffee, brewing temperature and pre-brewing). You...
... every time the machine is turned on, or whether it , ^ use the arrow keys to select from the User profiles that you can select with different coffee preferences, you can use the arrow keys to select the check mark ( and touch OK. Delete profile if you make settings for individual drinks (portion size, amount of ground coffee, brewing temperature and pre-brewing). You...
Product Manual
Page 38
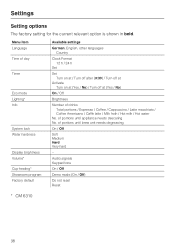
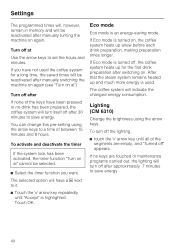
... Language Time of day Timer Eco mode Lighting* Info System lock Water hardness Display brightness Volume* Cup heating* Showroom program Factory default Available settings German, English, other languages Country Clock Format 12 h / 24 h Set Set Turn on at / Turn off after (0:30) / Turn off at Activate Turn on at (Yes / No) / Turn off at (Yes / No) On / Off Brightness Number of portions until appliance needs descaling No. of portions until brew unit needs...
... Language Time of day Timer Eco mode Lighting* Info System lock Water hardness Display brightness Volume* Cup heating* Showroom program Factory default Available settings German, English, other languages Country Clock Format 12 h / 24 h Set Set Turn on at / Turn off after (0:30) / Turn off at Activate Turn on at (Yes / No) / Turn off at (Yes / No) On / Off Brightness Number of portions until appliance needs descaling No. of portions until brew unit needs...
Product Manual
Page 40
.... You can change this pre-setting using the arrow keys. Lighting (CM 6310) Change the brightness using the arrow keys to a time of the keys have been pressed or no keys are empty, and "Turned off after approximately 7 minutes to it. ^ Touch the X arrow key repeatedly until all of the segments are touched or maintenance programs carried out, the lighting will be reactivated...
.... You can change this pre-setting using the arrow keys. Lighting (CM 6310) Change the brightness using the arrow keys to a time of the keys have been pressed or no keys are empty, and "Turned off after approximately 7 minutes to it. ^ Touch the X arrow key repeatedly until all of the segments are touched or maintenance programs carried out, the lighting will be reactivated...
Product Manual
Page 41
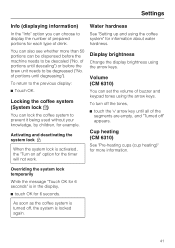
... system is in the display, ^ touch OK for each type of drink. Cup heating (CM 6310) See "Pre-heating cups (cup heating)" for the timer will not work. To return to the previous display: ^ Touch OK. of portions until degreasing"). of portions until descaling") or before the machine needs to be degreased ("No. Water hardness See "Setting up and using the coffee system" for example. Locking the coffee system (System lock...
... system is in the display, ^ touch OK for each type of drink. Cup heating (CM 6310) See "Pre-heating cups (cup heating)" for the timer will not work. To return to the previous display: ^ Touch OK. of portions until degreasing"). of portions until descaling") or before the machine needs to be degreased ("No. Water hardness See "Setting up and using the coffee system" for example. Locking the coffee system (System lock...

Product Manual
Page 49
... up by the lid to prevent a build-up of the water container and the surface the water container sits on the container. 49 Otherwise the water container will not sit correctly. Cleaning and care Water container Clean the water container lid by hand using warm water and liquid dish soap. Change the water every day to remove it. ^ Refit the drip tray cover making sure that the valve...
... up by the lid to prevent a build-up of the water container and the surface the water container sits on the container. 49 Otherwise the water container will not sit correctly. Cleaning and care Water container Clean the water container lid by hand using warm water and liquid dish soap. Change the water every day to remove it. ^ Refit the drip tray cover making sure that the valve...

Product Manual
Page 51
... using warm water. If necessary, clean the ground coffee chute: ^ Open the ground coffee chute. ^ Remove any coffee beans. ^ Clean the bean container with a dry, soft cloth. Clean the brew unit by hand The brew unit can now be removed for cleaning. ^ Open the coffee system door. ^ Press the button on the end of the handle of the brew unit a and while doing so turn the handle counterclockwise b. ^ Carefully pull the brew unit...
... using warm water. If necessary, clean the ground coffee chute: ^ Open the ground coffee chute. ^ Remove any coffee beans. ^ Clean the bean container with a dry, soft cloth. Clean the brew unit by hand The brew unit can now be removed for cleaning. ^ Open the coffee system door. ^ Press the button on the end of the handle of the brew unit a and while doing so turn the handle counterclockwise b. ^ Carefully pull the brew unit...

Product Manual
Page 55
... machine will be descaled. you will guide you through the descaling process. of portions until appliance needs descaling: 50" appears in the display, proceed as follows: Preparing the descaling solution We recommend using Miele descaling tablets to empty the drip tray or fill the water container. When the number of descaling solution are wiped up to the F symbol and replace it needs to be prompted to clean the brew unit. Descaling...
... machine will be descaled. you will guide you through the descaling process. of portions until appliance needs descaling: 50" appears in the display, proceed as follows: Preparing the descaling solution We recommend using Miele descaling tablets to empty the drip tray or fill the water container. When the number of descaling solution are wiped up to the F symbol and replace it needs to be prompted to clean the brew unit. Descaling...
Product Manual
Page 61
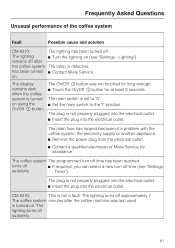
... of a problem with the coffee system, the electricity supply or another appliance. ^ Remove the power plug from the electrical outlet. ^ Contact a qualified electrician or Miele Service for at least 3 seconds. The display remains dark when the coffee The On/Off K button was last used. CM 6310: This is turned on using the ^ Set the main switch to "0". The lighting turns off . on (see "Settings suddenly. - on . turns off ^ If...
... of a problem with the coffee system, the electricity supply or another appliance. ^ Remove the power plug from the electrical outlet. ^ Contact a qualified electrician or Miele Service for at least 3 seconds. The display remains dark when the coffee The On/Off K button was last used. CM 6310: This is turned on using the ^ Set the main switch to "0". The lighting turns off . on (see "Settings suddenly. - on . turns off ^ If...

Product Manual
Page 75
... Contact Miele Technical Service. Installation, repairs and other work should be at the back drip tray inside the coffee system. This data must be next to the appliance and easily accessible. The data plate can ...Miele's Technical Service Department. Do not operate any question concerning the electrical connection of injury, do not drape cord over unintentionally. Electrical connection All electrical work by these devices will cause the appliance to run hot and may damage it and/or shorten its usable life. Verify that the voltage, load and circuit rating information...
... Contact Miele Technical Service. Installation, repairs and other work should be at the back drip tray inside the coffee system. This data must be next to the appliance and easily accessible. The data plate can ...Miele's Technical Service Department. Do not operate any question concerning the electrical connection of injury, do not drape cord over unintentionally. Electrical connection All electrical work by these devices will cause the appliance to run hot and may damage it and/or shorten its usable life. Verify that the voltage, load and circuit rating information...


