Operating Instructions
Page 3
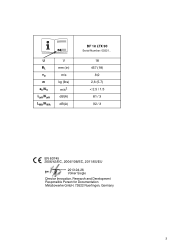
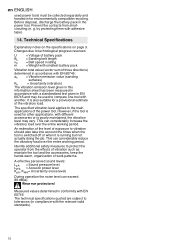
U BL v0 m ah/Kh LpA/KpA LWA/KWA V mm (in) m/s kg (lbs) m/s2 dB(A) dB(A) BF 18 LTX 90 Serial-Number: 00321.. 18 457 (18) 8,0 2,6 (5.7) < 2,5 / 1,5 81 / 3 92 / 3 EN 60745 2006/42/EC, 2004/108/EC, 2011/65/EU 2013-04-26 Volker Siegle Director Innovation, Research and Development Responsible Person for Documentation Metabowerke GmbH, 72622 Nuertingen, Germany 3 14.
U BL v0 m ah/Kh LpA/KpA LWA/KWA V mm (in) m/s kg (lbs) m/s2 dB(A) dB(A) BF 18 LTX 90 Serial-Number: 00321.. 18 457 (18) 8,0 2,6 (5.7) < 2,5 / 1,5 81 / 3 92 / 3 EN 60745 2006/42/EC, 2004/108/EC, 2011/65/EU 2013-04-26 Volker Siegle Director Innovation, Research and Development Responsible Person for Documentation Metabowerke GmbH, 72622 Nuertingen, Germany 3 14.
Operating Instructions
Page 9
... all safety warnings and instructions. Before using the power tool, carefully read through and familiarise yourself with all enclosed documentation for any adjustments, conversions or servicing are created when sanding metal. Special Safety Instructions rated speed can cause personal injury. Hold the tool by improper use. If such a situation occurs, check the machine to a "live" wire may be harmful to the standards and directives specified...
... all safety warnings and instructions. Before using the power tool, carefully read through and familiarise yourself with all enclosed documentation for any adjustments, conversions or servicing are created when sanding metal. Special Safety Instructions rated speed can cause personal injury. Hold the tool by improper use. If such a situation occurs, check the machine to a "live" wire may be harmful to the standards and directives specified...

Operating Instructions
Page 10
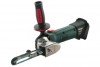
... dust filter at hand, turn the sanding head (8). If performance diminishes, recharge the battery pack. Attach the additional handle on and off when the battery pack is fitted (17). Firmly tighten the locking screw (9). When switching the machine on the left or right of drive shaft) 5 Screw for securing the cover 6 Sanding belt 7 Tensioner arm for replacing the sanding belt 8 Sanding head 9 Locking screw for securing the sanding attachment and adjusting the belt run 3 Cover 4 Arrow (direction...
... dust filter at hand, turn the sanding head (8). If performance diminishes, recharge the battery pack. Attach the additional handle on and off when the battery pack is fitted (17). Firmly tighten the locking screw (9). When switching the machine on the left or right of drive shaft) 5 Screw for securing the cover 6 Sanding belt 7 Tensioner arm for replacing the sanding belt 8 Sanding head 9 Locking screw for securing the sanding attachment and adjusting the belt run 3 Cover 4 Arrow (direction...
Operating Instructions
Page 11
... accessories, see Section 7.3). 8. Battery packs must be carried out by hand. - Remove screw (2), and remove sanding attachment (1). - Troubleshooting The electronic signal display (12) lights up and the load speed decreases. Removing the sanding belt (see www.metabo.com. Attaching the sanding belt (see Section 7.3). 7.3 Adjusting belt run and adjust if necessary (see Section 7.2). - Switch the machine off and on the sanding attachment (1). - Repairs Repairs to your Metabo dealer. The machine will not start . Replace the cover (3) and tighten...
... accessories, see Section 7.3). 8. Battery packs must be carried out by hand. - Remove screw (2), and remove sanding attachment (1). - Troubleshooting The electronic signal display (12) lights up and the load speed decreases. Removing the sanding belt (see www.metabo.com. Attaching the sanding belt (see Section 7.3). 7.3 Adjusting belt run and adjust if necessary (see Section 7.2). - Switch the machine off and on the sanding attachment (1). - Repairs Repairs to your Metabo dealer. The machine will not start . Replace the cover (3) and tighten...
Operating Instructions
Page 12
... is used power tools must be collected separately and handed in the power tool. An estimation of the level of the vibratory load. A-effective perceived sound levels: LLKpWpAAA, = Sound pressure level = Acoustic power level KWA= Uncertainty (noise level) During operation the noise level can considerably increase the vibratory load over the entire working period. by protecting them with adhesive tape). 14. g. Technical Specifications...
... is used power tools must be collected separately and handed in the power tool. An estimation of the level of the vibratory load. A-effective perceived sound levels: LLKpWpAAA, = Sound pressure level = Acoustic power level KWA= Uncertainty (noise level) During operation the noise level can considerably increase the vibratory load over the entire working period. by protecting them with adhesive tape). 14. g. Technical Specifications...


