User's Manual
Page 7
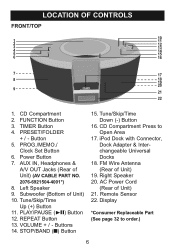
.... VOLUME + / - Tune/Skip/Time Down (-) Button 16. FM Wire Antenna (Rear of Unit) 10. PRESET/FOLDER + / - Power Button 7. Left Speaker 9. CD Compartment Press to order.) 6 Remote Sensor 22. REPEAT Button 13. Subwoofer (Bottom of Unit) 19. Buttons 14. AC Power Cord (Rear of Unit) (AV CABLE PART NO. 2076-6921504-4001...
.... VOLUME + / - Tune/Skip/Time Down (-) Button 16. FM Wire Antenna (Rear of Unit) 10. PRESET/FOLDER + / - Power Button 7. Left Speaker 9. CD Compartment Press to order.) 6 Remote Sensor 22. REPEAT Button 13. Subwoofer (Bottom of Unit) 19. Buttons 14. AC Power Cord (Rear of Unit) (AV CABLE PART NO. 2076-6921504-4001...
User's Manual
Page 8
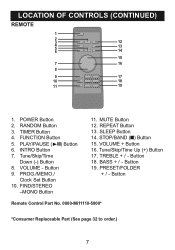
... 4. Tune/Skip/Time Down (-) Button 8. FIND/STEREO -MONO Button 11. Tune/Skip/Time Up (+) Button 17. RANDOM Button 3. MUTE Button 12. REPEAT Button 13. Button Remote Control Part No. 0000-Mi11110-5800* *Consumer Replaceable Part (See page 32 to order.) 7 PLAY/PAUSE (®p) Button 6. LOCATION OF CONTROLS (CONTINUED...
... 4. Tune/Skip/Time Down (-) Button 8. FIND/STEREO -MONO Button 11. Tune/Skip/Time Up (+) Button 17. RANDOM Button 3. MUTE Button 12. REPEAT Button 13. Button Remote Control Part No. 0000-Mi11110-5800* *Consumer Replaceable Part (See page 32 to order.) 7 PLAY/PAUSE (®p) Button 6. LOCATION OF CONTROLS (CONTINUED...
User's Manual
Page 9
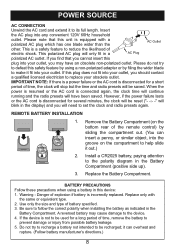
...unit is incorrectly replaced. If you should contact a qualified licensed electrician to the polarity diagram in a AC Plug polarized AC outlet. REMOTE BATTERY INSTALLATION 1. Use only the size and type of explosion if battery is equipped with the same or equivalent type. 2. Replace the...you cannot insert this plug does not fit into any convenient 120V 60Hz household outlet. Do not try to reduce the likelihood of the remote control) by using a battery in this safety feature by sliding the compartment out. (You can overheat and rupture. (Follow battery ...
...unit is incorrectly replaced. If you should contact a qualified licensed electrician to the polarity diagram in a AC Plug polarized AC outlet. REMOTE BATTERY INSTALLATION 1. Use only the size and type of explosion if battery is equipped with the same or equivalent type. 2. Replace the...you cannot insert this plug does not fit into any convenient 120V 60Hz household outlet. Do not try to reduce the likelihood of the remote control) by using a battery in this safety feature by sliding the compartment out. (You can overheat and rupture. (Follow battery ...
User's Manual
Page 14
...OPERATION (CONTINUED) ADJUSTING THE VOLUME CONTROLS 1 2 1 1 2 To adjust the main volume: Press the VOLUME + and/or button 1 on the remote (shown) or on the main unit to unmute. button 1 on the remote (shown) or on the main unit to increase and/or decrease the bass. button on again, the volume will blink... the VOLUME + / - To adjust the treble: Press the TREBLE + and/or button on the remote;"MUTE" will resume at the level which you set before turning the unit off and back on the remote to increase and/or decrease the volume. To mute the main volume: Press the MUTE button...
...OPERATION (CONTINUED) ADJUSTING THE VOLUME CONTROLS 1 2 1 1 2 To adjust the main volume: Press the VOLUME + and/or button 1 on the remote (shown) or on the main unit to unmute. button 1 on the remote (shown) or on the main unit to increase and/or decrease the bass. button on again, the volume will blink... the VOLUME + / - To adjust the treble: Press the TREBLE + and/or button on the remote;"MUTE" will resume at the level which you set before turning the unit off and back on the remote to increase and/or decrease the volume. To mute the main volume: Press the MUTE button...
User's Manual
Page 15
... the desired band (AM or FM). Antennas FM: Unravel and extend the FM wire antenna for better AM reception. 14 Repeat this unit on the remote. To choose between stereo and mono playback, press the FIND/STEREO-MONO button on by pressing the Power button; the tuner will appear in stereo...
... the desired band (AM or FM). Antennas FM: Unravel and extend the FM wire antenna for better AM reception. 14 Repeat this unit on the remote. To choose between stereo and mono playback, press the FIND/STEREO-MONO button on by pressing the Power button; the tuner will appear in stereo...
User's Manual
Page 20
... play the intro (the first 10 seconds) of each track/file on the disc, while in the Stop mode, press the INTRO button on the remote; To play the tracks/files on the disc, while in the Stop mode, press the RANDOM button on the... remote; OPERATION (CONTINUED) REPEAT PLAYBACK 1 2 While in the Stop mode, press the When the playback mode is REPEAT button to cycle through the selected, press the ...
... play the intro (the first 10 seconds) of each track/file on the disc, while in the Stop mode, press the INTRO button on the remote; To play the tracks/files on the disc, while in the Stop mode, press the RANDOM button on the... remote; OPERATION (CONTINUED) REPEAT PLAYBACK 1 2 While in the Stop mode, press the When the playback mode is REPEAT button to cycle through the selected, press the ...
User's Manual
Page 24
... a letter/number that does not contain any files, "NONE" and "001" will appear in the Stop mode, press the FIND/ STEREO-MONO button on the remote;
... a letter/number that does not contain any files, "NONE" and "001" will appear in the Stop mode, press the FIND/ STEREO-MONO button on the remote;
User's Manual
Page 25
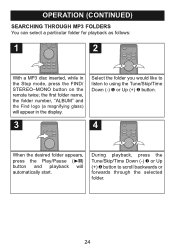
... desired folder appears, press the Play/Pause (®p) button and playback will appear in the Stop mode, press the FIND/ STEREO-MONO button on the remote twice; the first folder name, the folder number, "ALBUM" and the Find logo (a magnifying glass) will automatically start. OPERATION (CONTINUED) SEARCHING THROUGH MP3 FOLDERS You...
... desired folder appears, press the Play/Pause (®p) button and playback will appear in the Stop mode, press the FIND/ STEREO-MONO button on the remote twice; the first folder name, the folder number, "ALBUM" and the Find logo (a magnifying glass) will automatically start. OPERATION (CONTINUED) SEARCHING THROUGH MP3 FOLDERS You...
User's Manual
Page 28
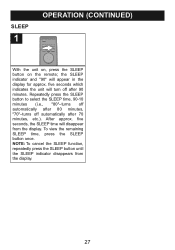
... off automatically after 80 minutes, "70"-turns off after 70 minutes, etc.). SLEEP 1 OPERATION (CONTINUED) With the unit on, press the SLEEP button on the remote; five seconds, the SLEEP time will disappear from the display. 27 NOTE: To cancel the SLEEP function, repeatedly press the SLEEP button until the SLEEP...
... off automatically after 80 minutes, "70"-turns off after 70 minutes, etc.). SLEEP 1 OPERATION (CONTINUED) With the unit on, press the SLEEP button on the remote; five seconds, the SLEEP time will disappear from the display. 27 NOTE: To cancel the SLEEP function, repeatedly press the SLEEP button until the SLEEP...
User's Manual
Page 33
... notice. PLEASE KEEP ALL PACKAGING MATERIAL FOR AT LEAST 90 DAYS IN CASE YOU NEED TO RETURN THIS PRODUCT TO YOUR PLACE OF PURCHASE OR MEMOREX. FOR CONSUMER REPLACEABLE PART(S), SEE PART NUMBER(S) ON PAGES 6, 7, 28 AND 29 AND THEN CONTACT FOX INTERNATIONAL AT 1-800-321-6993. 32 FOR ADDITIONAL SET... OUR WEBSITE AT: WWW.MEMOREXELECTRONICS.COM OR CONTACT CUSTOMER SERVICE AT (954) 660-7100. SPECIFICATIONS GENERAL Power Source (Main Unit AC 120V, 60Hz Power Source (Remote Control) . . . .
... notice. PLEASE KEEP ALL PACKAGING MATERIAL FOR AT LEAST 90 DAYS IN CASE YOU NEED TO RETURN THIS PRODUCT TO YOUR PLACE OF PURCHASE OR MEMOREX. FOR CONSUMER REPLACEABLE PART(S), SEE PART NUMBER(S) ON PAGES 6, 7, 28 AND 29 AND THEN CONTACT FOX INTERNATIONAL AT 1-800-321-6993. 32 FOR ADDITIONAL SET... OUR WEBSITE AT: WWW.MEMOREXELECTRONICS.COM OR CONTACT CUSTOMER SERVICE AT (954) 660-7100. SPECIFICATIONS GENERAL Power Source (Main Unit AC 120V, 60Hz Power Source (Remote Control) . . . .

