
User Guide
Page 3
WARNING: TO PREVENT FIRE OR SHOCK HAZARD, DO NOT EXPOSE THIS UNIT TO RAIN OR MOISTURE. Lightning and power surges ARE NOT covered under warranty for this equipment does cause harmful interference to radio or television reception, which can radiate radio frequency energy and, ...
WARNING: TO PREVENT FIRE OR SHOCK HAZARD, DO NOT EXPOSE THIS UNIT TO RAIN OR MOISTURE. Lightning and power surges ARE NOT covered under warranty for this equipment does cause harmful interference to radio or television reception, which can radiate radio frequency energy and, ...

User Guide
Page 4
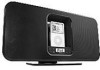
MODE Button 6. Right Speaker 11. TUNE Up/Down/ Skip n / o Buttons 13. SET Button 14. FM Wire Antenna (Rear of Unit) 9. LOCATION OF CONTROLS MAIN UNIT 1. iPod® Dock with ... PART NO. 044E5016KBBSP*) *Consumer Replaceable Part (See page 14 to order.) 3 POWER IN Jack (Rear of Unit) 3. VOLUME Up/Down Buttons 7. Headphones Jack (Side of Unit) (DETACHABLE POWER CORD 17 WHITE PART NO. 070EB0202W, BLACK PART NO. 070E0202* AC ADAPTER POWER CORD WHITE PART NO. 0250457055W, BLACK PART NO. 0250457055*) 15. PRESET Button...
MODE Button 6. Right Speaker 11. TUNE Up/Down/ Skip n / o Buttons 13. SET Button 14. FM Wire Antenna (Rear of Unit) 9. LOCATION OF CONTROLS MAIN UNIT 1. iPod® Dock with ... PART NO. 044E5016KBBSP*) *Consumer Replaceable Part (See page 14 to order.) 3 POWER IN Jack (Rear of Unit) 3. VOLUME Up/Down Buttons 7. Headphones Jack (Side of Unit) (DETACHABLE POWER CORD 17 WHITE PART NO. 070EB0202W, BLACK PART NO. 070E0202* AC ADAPTER POWER CORD WHITE PART NO. 0250457055W, BLACK PART NO. 0250457055*) 15. PRESET Button...
User Guide
Page 5
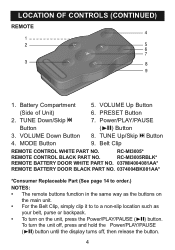
...• The remote buttons function in the same way as your belt, purse or backpack. • To turn the unit off, press and hold the Power/PLAY/PAUSE (®p) button until the display turns off, then release the button. 4 TUNE Up/Skip n Button 4. PRESET Button 2. MODE Button 9. ...See page 14 to a non-slip location such as the buttons on the unit, press the Power/PLAY/PAUSE (®p) button. TUNE Down/Skip o 7. VOLUME Down Button 8. VOLUME Up Button (Side of Unit) 6. Power/PLAY/PAUSE Button (®p) Button 3. Belt Clip REMOTE CONTROL WHITE PART NO. RC-MI3005*...
...• The remote buttons function in the same way as your belt, purse or backpack. • To turn the unit off, press and hold the Power/PLAY/PAUSE (®p) button until the display turns off, then release the button. 4 TUNE Up/Skip n Button 4. PRESET Button 2. MODE Button 9. ...See page 14 to a non-slip location such as the buttons on the unit, press the Power/PLAY/PAUSE (®p) button. TUNE Down/Skip o 7. VOLUME Down Button 8. VOLUME Up Button (Side of Unit) 6. Power/PLAY/PAUSE Button (®p) Button 3. Belt Clip REMOTE CONTROL WHITE PART NO. RC-MI3005*...

User Guide
Page 6
...Only use the supplied AC Adapter which has the following specs: DC 12V Z REMOTE BATTERY INSTALLATION 1. 2. 3. If the AC plug does not fit into the POWER IN jack (located on the tab and then sliding the compartment out. Remove the Battery Compartment by pressing in this device: 1. Be sure to be...; The AC adapter supplied with the unit is not to be recharged; If the device is polarized to the polarity diagram in the Battery Compartment. POWER SOURCE AC CONNECTION Insert the small end of the AC adapter into a nonpolarized AC outlet, do not file or cut the wide blade....
...Only use the supplied AC Adapter which has the following specs: DC 12V Z REMOTE BATTERY INSTALLATION 1. 2. 3. If the AC plug does not fit into the POWER IN jack (located on the tab and then sliding the compartment out. Remove the Battery Compartment by pressing in this device: 1. Be sure to be...; The AC adapter supplied with the unit is not to be recharged; If the device is polarized to the polarity diagram in the Battery Compartment. POWER SOURCE AC CONNECTION Insert the small end of the AC adapter into a nonpolarized AC outlet, do not file or cut the wide blade....
User Guide
Page 7
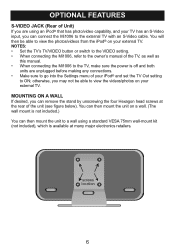
MOUNTING ON A WALL If desired, you can connect the Mi1006 to the external TV with an S-Video cable. NOTES: • Set the TV's TV/VIDEO button or switch to the VIDEO setting. • When connecting the Mi1006, refer to the owner's manual of the TV, as well as this manual. • When connecting... the Mi1006 to the TV, make sure the power is off and both units are using a standard VESA 75mm wall-mount kit (not included), which is not included.) You can then mount the unit ...
MOUNTING ON A WALL If desired, you can connect the Mi1006 to the external TV with an S-Video cable. NOTES: • Set the TV's TV/VIDEO button or switch to the VIDEO setting. • When connecting the Mi1006, refer to the owner's manual of the TV, as well as this manual. • When connecting... the Mi1006 to the TV, make sure the power is off and both units are using a standard VESA 75mm wall-mount kit (not included), which is not included.) You can then mount the unit ...

User Guide
Page 8
Gently push down so the connector on the iPod® slides onto the connector on the Mi1006. Then, if you disconnect the iPod®, the Mi1006 will not be heard through the Mi1006's speakers. The external player's output sound will be able to select between iPod (dock)/LINE IN/AM/FM mode as desired....the LCD backlight will revert back to the AM/FM/LINE IN mode. If the Mi1006 is turned off the unit, press the Power button. • BACKLIGHT: When the unit is positioned inside the cavity. Press the Power button to turn off , once you connect the iPod®, it will start charging...
Gently push down so the connector on the iPod® slides onto the connector on the Mi1006. Then, if you disconnect the iPod®, the Mi1006 will not be heard through the Mi1006's speakers. The external player's output sound will be able to select between iPod (dock)/LINE IN/AM/FM mode as desired....the LCD backlight will revert back to the AM/FM/LINE IN mode. If the Mi1006 is turned off the unit, press the Power button. • BACKLIGHT: When the unit is positioned inside the cavity. Press the Power button to turn off , once you connect the iPod®, it will start charging...

User Guide
Page 9
Adjust the volu1me a1s desired by pressing the Power button (if it is 6. When done, press the Power button and also turn off and then on again, the volume level will be disconnected when headphones are plugged in headphones into the dock, you ... inserted into the Headphones jack on the side of 6. 8 Th1e sp1eakers will be heard through the Mi1006's speakers. OPERATION USING AN IPOD® WITH THIS UNIT 1 2 With an iPod® connected (see previous page), turn the Mi1006 on by pressing the Volume Up/Down buttons. 3 For private listening, plug in . After your have...
Adjust the volu1me a1s desired by pressing the Power button (if it is 6. When done, press the Power button and also turn off and then on again, the volume level will be disconnected when headphones are plugged in headphones into the dock, you ... inserted into the Headphones jack on the side of 6. 8 Th1e sp1eakers will be heard through the Mi1006's speakers. OPERATION USING AN IPOD® WITH THIS UNIT 1 2 With an iPod® connected (see previous page), turn the Mi1006 on by pressing the Volume Up/Down buttons. 3 For private listening, plug in . After your have...

User Guide
Page 11
... favorite AM stations. the tuner will be necessary to find the position that the internal antenna is located inside the unit. The speakers will search and then stop on the next strong station it finds. FM-Extend the FM antenna for Better Reception AM-The AM... the desired frequency appears in the display starts to manually advance the frequency in headphones into the Headphones jack on the rear1of th1e Mi1006. Adjust the volume as desired by pressing the Power button; OPERATION (CONTINUED) USING THE RADIO 1 2 Turn the Mi1006 on by pressing the Volume Up/Down buttons.
... favorite AM stations. the tuner will be necessary to find the position that the internal antenna is located inside the unit. The speakers will search and then stop on the next strong station it finds. FM-Extend the FM antenna for Better Reception AM-The AM... the desired frequency appears in the display starts to manually advance the frequency in headphones into the Headphones jack on the rear1of th1e Mi1006. Adjust the volume as desired by pressing the Power button; OPERATION (CONTINUED) USING THE RADIO 1 2 Turn the Mi1006 on by pressing the Volume Up/Down buttons.

User Guide
Page 12
... TUNE Up/Down/Skip n / o buttons 1 (or you can also press the PRESET button) to confirm, the station will be erased if the unit is without power (AC adapter isn't connected) for a long period of time. 10 Press the SET button "P1" (if no presets have ever been set), will be saved...
... TUNE Up/Down/Skip n / o buttons 1 (or you can also press the PRESET button) to confirm, the station will be erased if the unit is without power (AC adapter isn't connected) for a long period of time. 10 Press the SET button "P1" (if no presets have ever been set), will be saved...

User Guide
Page 15
... not Rotate unit until best positioned correctly. Station is Increase volume. iPod® mode, no sound. Check the connection. Press the Power button, then the MODE button to select iPod® mode. 13 antenna. Press the MODE button to select AM/FM. Volume is not tuned Retune ...
... not Rotate unit until best positioned correctly. Station is Increase volume. iPod® mode, no sound. Check the connection. Press the Power button, then the MODE button to select iPod® mode. 13 antenna. Press the MODE button to select AM/FM. Volume is not tuned Retune ...

User Guide
Page 16
... TO RETURN THIS PRODUCT TO YOUR PLACE OF PURCHASE OR MEMOREX. FOR CONSUMER REPLACEABLE PART(S), SEE PART NUMBER(S) ON PAGES 3, 4 AND 11 AND THEN CONTACT FOX INTERNATIONAL AT 1-800-321-6993. 14 SPECIFICATIONS GENERAL: Power Source DC 12V Adapter (Center Positive) Speaker 2 x 4 ohms Output Power 2 x 6W RADIO SECTION: Frequency Range (FM 87.5-108 MHz...
... TO RETURN THIS PRODUCT TO YOUR PLACE OF PURCHASE OR MEMOREX. FOR CONSUMER REPLACEABLE PART(S), SEE PART NUMBER(S) ON PAGES 3, 4 AND 11 AND THEN CONTACT FOX INTERNATIONAL AT 1-800-321-6993. 14 SPECIFICATIONS GENERAL: Power Source DC 12V Adapter (Center Positive) Speaker 2 x 4 ohms Output Power 2 x 6W RADIO SECTION: Frequency Range (FM 87.5-108 MHz...