
User Guide
Page 2
... generate or use radio frequency energy. The user could lose the authority to the presence of important operating and maintenance (servicing) instructions in the instruction manual. NO USERSERVICEABLE PARTS INSIDE. SAFETY PRECAUTIONS CAUTION RISK OF ELECTRIC SHOCK DO NOT OPEN CAUTION: TO REDUCE THE RISK OF ELECTRIC SHOCK, DO NOT REMOVE...
... generate or use radio frequency energy. The user could lose the authority to the presence of important operating and maintenance (servicing) instructions in the instruction manual. NO USERSERVICEABLE PARTS INSIDE. SAFETY PRECAUTIONS CAUTION RISK OF ELECTRIC SHOCK DO NOT OPEN CAUTION: TO REDUCE THE RISK OF ELECTRIC SHOCK, DO NOT REMOVE...
User Guide
Page 7
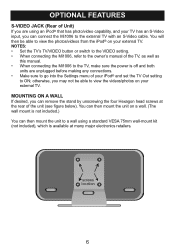
... able to view the videos/photos on a wall. (The wall mount is available at the rear of the TV, as well as this manual. • When connecting the Mi1006 to the TV, make sure the power is off and both units are using a standard VESA 75mm wall-mount kit (not included), which... TV Out setting to ON; NOTES: • Set the TV's TV/VIDEO button or switch to the VIDEO setting. • When connecting the Mi1006, refer to the owner's manual of the unit (see figure below). You can remove the stand by unscrewing the four Hexagon head screws at many major electronics retailers...
... able to view the videos/photos on a wall. (The wall mount is available at the rear of the TV, as well as this manual. • When connecting the Mi1006 to the TV, make sure the power is off and both units are using a standard VESA 75mm wall-mount kit (not included), which... TV Out setting to ON; NOTES: • Set the TV's TV/VIDEO button or switch to the VIDEO setting. • When connecting the Mi1006, refer to the owner's manual of the unit (see figure below). You can remove the stand by unscrewing the four Hexagon head screws at many major electronics retailers...

User Guide
Page 9
...the unit off the iPod®. OPERATION USING AN IPOD® WITH THIS UNIT 1 2 With an iPod® connected (see previous page), turn the Mi1006 on by pressing the Volume Up/Down buttons. 3 For private listening, plug in . Adjust the volu1me a1s desired by pressing the Power button (if it...next track. • The default volume setting level is not on already). 11 Operate the iPod® as per its owner's manual and the sound will be heard through the Mi1006's speakers. After your have adjusted the volume setting, if you can press the TUNE Up/Down/Skip n / o buttons to skip to...
...the unit off the iPod®. OPERATION USING AN IPOD® WITH THIS UNIT 1 2 With an iPod® connected (see previous page), turn the Mi1006 on by pressing the Volume Up/Down buttons. 3 For private listening, plug in . Adjust the volu1me a1s desired by pressing the Power button (if it...next track. • The default volume setting level is not on already). 11 Operate the iPod® as per its owner's manual and the sound will be heard through the Mi1006's speakers. After your have adjusted the volume setting, if you can press the TUNE Up/Down/Skip n / o buttons to skip to...

User Guide
Page 11
... hold the TUNE Up/Down/Skip n / o buttons until the frequency in the display starts to manually advance the frequency in the display up or down until the desired frequency appears in . Repeat this ...the Volume Up/Down buttons. Adjust the volume as desired by pressing the Power button; The speakers will light. FM-Extend the FM antenna for Better Reception AM-The AM ferrite bar antenna... is pointing in headphones into the Headphones jack on the rear1of th1e Mi1006. Press the MODE button repeatedly to select the desired band (AM or FM). 3 11 4 11 ...
... hold the TUNE Up/Down/Skip n / o buttons until the frequency in the display starts to manually advance the frequency in the display up or down until the desired frequency appears in . Repeat this ...the Volume Up/Down buttons. Adjust the volume as desired by pressing the Power button; The speakers will light. FM-Extend the FM antenna for Better Reception AM-The AM ferrite bar antenna... is pointing in headphones into the Headphones jack on the rear1of th1e Mi1006. Press the MODE button repeatedly to select the desired band (AM or FM). 3 11 4 11 ...
