User Guide
Page 3
...SEE SERVICE PROCEDURE. VISIBLE LASER RADIATION MAY BE PRESENT WHEN THE ENCLOSURE IS OPENED. However, there is recommended to use only shielded cables when connecting to radio communications. CAUTION: THIS DIGITAL VIDEO DISC PLAYER EMPLOYS A LASER SYSTEM. TO ENSURE PROPER USE OF THIS PRODUCT, PLEASE... READ THIS OWNER'S MANUAL CAREFULLY AND RETAIN FOR FUTURE REFERENCE. TO PREVENT DIRECT EXPOSURE TO LASER BEAM, DO NOT TRY TO OPEN THE ENCLOSURE. "Dolby" and the...
...SEE SERVICE PROCEDURE. VISIBLE LASER RADIATION MAY BE PRESENT WHEN THE ENCLOSURE IS OPENED. However, there is recommended to use only shielded cables when connecting to radio communications. CAUTION: THIS DIGITAL VIDEO DISC PLAYER EMPLOYS A LASER SYSTEM. TO ENSURE PROPER USE OF THIS PRODUCT, PLEASE... READ THIS OWNER'S MANUAL CAREFULLY AND RETAIN FOR FUTURE REFERENCE. TO PREVENT DIRECT EXPOSURE TO LASER BEAM, DO NOT TRY TO OPEN THE ENCLOSURE. "Dolby" and the...
User Guide
Page 4
...than the other sources, refer to . 10. ATTACHMENTS Do not use a mounting accessory recommended by the manufacturer. or near a swimming pool. 8. The openings should be walked on a bed, sofa, rug or other electric light or power circuits, or where it from the appliance. 13. For example, this... PLEASE KEEP ALL PACKAGING MATERIAL FOR AT LEAST 90 DAYS IN CASE YOU NEED TO RETURN THIS PRODUCT TO YOUR PLACE OF PURCHASE OR TO MEMOREX. Use a dry cloth for ventilation, to ensure reliable operation of the product should follow the manufacturer's instructions, and should still fail to...
...than the other sources, refer to . 10. ATTACHMENTS Do not use a mounting accessory recommended by the manufacturer. or near a swimming pool. 8. The openings should be walked on a bed, sofa, rug or other electric light or power circuits, or where it from the appliance. 13. For example, this... PLEASE KEEP ALL PACKAGING MATERIAL FOR AT LEAST 90 DAYS IN CASE YOU NEED TO RETURN THIS PRODUCT TO YOUR PLACE OF PURCHASE OR TO MEMOREX. Use a dry cloth for ventilation, to ensure reliable operation of the product should follow the manufacturer's instructions, and should still fail to...
User Guide
Page 5
... Do not overload wall outlets and extension cords as recommended by the manufacturer. 22. SERVICING Do not attempt to service this product through openings as they may result in fire, electric shock or other hazards. REPLACEMENT PARTS When replacement parts are covered by a qualified technician to ...product from the wall outlet and refer servicing to Article 820-40 of the NEC that have fallen into this product yourself as opening or removing covers may result in damage and will often require extensive work by the operating instructions, as an adjustment of other products...
... Do not overload wall outlets and extension cords as recommended by the manufacturer. 22. SERVICING Do not attempt to service this product through openings as they may result in fire, electric shock or other hazards. REPLACEMENT PARTS When replacement parts are covered by a qualified technician to ...product from the wall outlet and refer servicing to Article 820-40 of the NEC that have fallen into this product yourself as opening or removing covers may result in damage and will often require extensive work by the operating instructions, as an adjustment of other products...
User Guide
Page 7
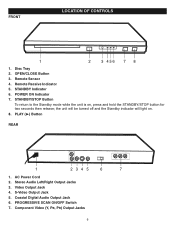
... is on . 8. PLAY (®) Button REAR 1 2345 6 7 1. OPEN/CLOSE Button 3. STANDBY Indicator 6. Component Video (Y, PB, PR) Output Jacks 6 the unit will be turned off and the Standby indicator will light on , press and hold the STANDBY/STOP button for two seconds then release; PROGRESSIVE SCAN ON/OFF Switch 7. POWER ON Indicator 7. Stereo Audio...
... is on . 8. PLAY (®) Button REAR 1 2345 6 7 1. OPEN/CLOSE Button 3. STANDBY Indicator 6. Component Video (Y, PB, PR) Output Jacks 6 the unit will be turned off and the Standby indicator will light on , press and hold the STANDBY/STOP button for two seconds then release; PROGRESSIVE SCAN ON/OFF Switch 7. POWER ON Indicator 7. Stereo Audio...
User Guide
Page 8
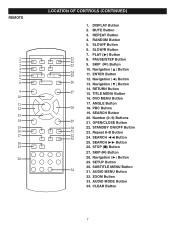
... Button 28 18. ZOOM Button 33. RANDOM Button 5. PAUSE/STEP Button 9. Navigation (ƒ) Button 14. PBC Button 19. Number (0-9) Buttons 29 21. CLEAR Button 7 DVD MENU Button 17. OPEN/CLOSE Button 30 22. SETUP Button 30. Navigation (œ) Button 24 25 11. Navigation (‹) Button 29. REMOTE 1 2 3 4 5 6 7 8 9 10 11 12 13 14...
... Button 28 18. ZOOM Button 33. RANDOM Button 5. PAUSE/STEP Button 9. Navigation (ƒ) Button 14. PBC Button 19. Number (0-9) Buttons 29 21. CLEAR Button 7 DVD MENU Button 17. OPEN/CLOSE Button 30 22. SETUP Button 30. Navigation (œ) Button 24 25 11. Navigation (‹) Button 29. REMOTE 1 2 3 4 5 6 7 8 9 10 11 12 13 14...
User Guide
Page 9
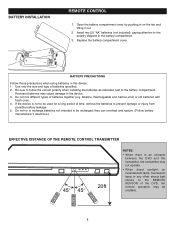
... Reversed batteries may be unstable. 8 Do not try to recharge batteries not intended to be used for a long period of the DVD, the remote operation may cause damage to the device. 3. Be sure to follow the correct polarity when installing the batteries as indicated... fresh ones. 4. BATTERY PRECAUTIONS Follow these precautions when using batteries in on the REMOTE SENSOR of time, remove the batteries to be recharged; Open the battery compartment cover by pushing in this device: 1. BATTERY INSTALLATION - + + - they can overheat and rupture. (Follow battery manufacturer's...
... Reversed batteries may be unstable. 8 Do not try to recharge batteries not intended to be used for a long period of the DVD, the remote operation may cause damage to the device. 3. Be sure to follow the correct polarity when installing the batteries as indicated... fresh ones. 4. BATTERY PRECAUTIONS Follow these precautions when using batteries in on the REMOTE SENSOR of time, remove the batteries to be recharged; Open the battery compartment cover by pushing in this device: 1. BATTERY INSTALLATION - + + - they can overheat and rupture. (Follow battery manufacturer's...
User Guide
Page 21
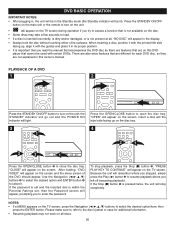
... or is not available on the disc. • Some discs may not work on the disc tray. 4 2 1 2 3 1 Press the OPEN/CLOSE button ‚ to the disc's jacket or case for each DVD disc, so they are on this owner's manual. Please make sure to refer to close the disc tray. There are... mode (the Standby indicator will light. 3 1 Press the OPEN/CLOSE button to enter the password. the STANDBY indicator will go out and the POWER ON indicator will be used with certain DVDs. Insert a disc will the label side facing up , align it in this DVD player that is not present at all discs. 20...
... or is not available on the disc. • Some discs may not work on the disc tray. 4 2 1 2 3 1 Press the OPEN/CLOSE button ‚ to the disc's jacket or case for each DVD disc, so they are on this owner's manual. Please make sure to refer to close the disc tray. There are... mode (the Standby indicator will light. 3 1 Press the OPEN/CLOSE button to enter the password. the STANDBY indicator will go out and the POWER ON indicator will be used with certain DVDs. Insert a disc will the label side facing up , align it in this DVD player that is not present at all discs. 20...

User Guide
Page 25
... will appear on the TV screen. 24 The FOLDER/TRACK menu will appear on the disc tray. 3 4 1 2 2 3 1 2 Press the OPEN/CLOSE button ‚ to close the disc tray. Press the STOP (I) button „ to confirm. Press the ENTER button ‚ to stop playback. ...button ‚. Press the NAVIGATION (œ,ƒ) button ƒ to select another folder, while in the right column. Press the OPEN/CLOSE button to open the disc tray, "OPEN" will appear again on the screen and the display. After loading, the FOLDER/TRACK menu will begin immediately. Press the Navigation (&#...
... will appear on the TV screen. 24 The FOLDER/TRACK menu will appear on the disc tray. 3 4 1 2 2 3 1 2 Press the OPEN/CLOSE button ‚ to close the disc tray. Press the STOP (I) button „ to confirm. Press the ENTER button ‚ to stop playback. ...button ‚. Press the NAVIGATION (œ,ƒ) button ƒ to select another folder, while in the right column. Press the OPEN/CLOSE button to open the disc tray, "OPEN" will appear again on the screen and the display. After loading, the FOLDER/TRACK menu will begin immediately. Press the Navigation (&#...

User Guide
Page 27
Press the OPEN/CLOSE button to open the disc tray, "OPEN" will appear on the disc tray. 3 4 2 1 Press the OPEN/CLOSE button to close the disc tray. If the Stop (I ) button ‚; Insert a disc will appear on the unit; "PRESS PLAY TO CONTINUE" will the ...
Press the OPEN/CLOSE button to open the disc tray, "OPEN" will appear on the disc tray. 3 4 2 1 Press the OPEN/CLOSE button to close the disc tray. If the Stop (I ) button ‚; Insert a disc will appear on the unit; "PRESS PLAY TO CONTINUE" will the ...

User Guide
Page 30
... the Skip (n) or (o) button ƒ to on, the screen saver will appear on the TV screen. "LOADING" will remain on the disc tray. 3 1 2 3 2 4 3 Press the OPEN/CLOSE button ‚ to close the disc tray. The unit will playback all the pictures on the disc, then the last picture will appear on...
... the Skip (n) or (o) button ƒ to on, the screen saver will appear on the TV screen. "LOADING" will remain on the disc tray. 3 1 2 3 2 4 3 Press the OPEN/CLOSE button ‚ to close the disc tray. The unit will playback all the pictures on the disc, then the last picture will appear on...

