User Guide
Page 5
... causing serious injury and serious damage to the product. This plug will prevent damage to the product due to lightning and power-line surges. 14. POWER LINES An outside antenna system, extreme care should never be placed near a swimming pool. 8. Do not use attachments not recommended by ... the appliance. 13. This will fit into the outlet, try reversing the plug. If you are general precautions and may fall into such power lines or circuits. Quick stops, excessive force and uneven surfaces may cause hazards. 7. Use only with a cart, stand, tripod, bracket or table...
... causing serious injury and serious damage to the product. This plug will prevent damage to the product due to lightning and power-line surges. 14. POWER LINES An outside antenna system, extreme care should never be placed near a swimming pool. 8. Do not use attachments not recommended by ... the appliance. 13. This will fit into the outlet, try reversing the plug. If you are general precautions and may fall into such power lines or circuits. Quick stops, excessive force and uneven surfaces may cause hazards. 7. Use only with a cart, stand, tripod, bracket or table...
User Guide
Page 7
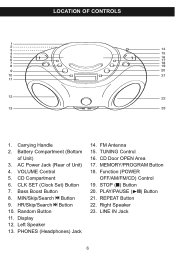
...Right Speaker 23. MIN/Skip/Search o Button 9. FM Antenna 15. TUNING Control 16. PLAY/PAUSE (®p) Button 21. REPEAT Button 22. LINE IN Jack 6 LOCATION OF CONTROLS 1. Left Speaker 13. Bass Boost Button 8. MEMORY/PROGRAM Button 18. Display 12. STOP (I) Button 20. CLK... SET (Clock Set) Button 7. Function (POWER OFF/AM/FM/CD) Control 19. Battery Compartment (Bottom of Unit) 4. CD Compartment 6. Carrying Handle 2. CD Door OPEN Area 17. VOLUME Control 5. HR/Skip/Search n Button 10. Random Button 11. PHONES (Headphones)...
...Right Speaker 23. MIN/Skip/Search o Button 9. FM Antenna 15. TUNING Control 16. PLAY/PAUSE (®p) Button 21. REPEAT Button 22. LINE IN Jack 6 LOCATION OF CONTROLS 1. Left Speaker 13. Bass Boost Button 8. MEMORY/PROGRAM Button 18. Display 12. STOP (I) Button 20. CLK... SET (Clock Set) Button 7. Function (POWER OFF/AM/FM/CD) Control 19. Battery Compartment (Bottom of Unit) 4. CD Compartment 6. Carrying Handle 2. CD Door OPEN Area 17. VOLUME Control 5. HR/Skip/Search n Button 10. Random Button 11. PHONES (Headphones)...
User Guide
Page 8
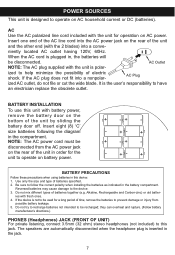
... the battery door off. ized to the device. 3. Insert eight (8) 'C' size batteries following the diagram in the battery compartment. Insert one end of the AC line cord into the AC power jack on AC power. Do not mix different types of batteries specified. 2. Do not try to recharge batteries....) PHONES (Headphones) JACK (FRONT OF UNIT) For private listening, connect 3.5mm (32 ohm) stereo headphones (not included) to this device: 1. AC Use the AC polarized line cord included with fresh ones. 4. Be sure to be disconnected.
... the battery door off. ized to the device. 3. Insert eight (8) 'C' size batteries following the diagram in the battery compartment. Insert one end of the AC line cord into the AC power jack on AC power. Do not mix different types of batteries specified. 2. Do not try to recharge batteries....) PHONES (Headphones) JACK (FRONT OF UNIT) For private listening, connect 3.5mm (32 ohm) stereo headphones (not included) to this device: 1. AC Use the AC polarized line cord included with fresh ones. 4. Be sure to be disconnected.
User Guide
Page 9
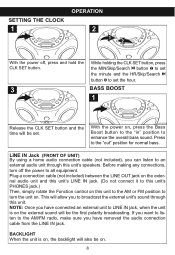
...the Bass Boost button to the "in" position to enhance the overall bass sound. nal audio unit and this unit's LINE IN jack. (Do not connect it to this unit's PHONES jack.) Then, simply rotate the Function control on this unit... the AM/FM radio, make sure you have connected an external unit to LINE IN jack, when the unit is on, the backlight will allow you have removed the audio connection cable from... the LINE IN jack. NOTE: Once you to broadcast the external unit's sound through this unit to the...
...the Bass Boost button to the "in" position to enhance the overall bass sound. nal audio unit and this unit's LINE IN jack. (Do not connect it to this unit's PHONES jack.) Then, simply rotate the Function control on this unit... the AM/FM radio, make sure you have connected an external unit to LINE IN jack, when the unit is on, the backlight will allow you have removed the audio connection cable from... the LINE IN jack. NOTE: Once you to broadcast the external unit's sound through this unit to the...
User Guide
Page 15
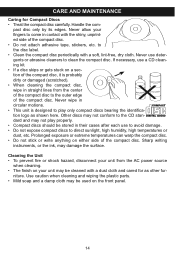
... gets stuck on your unit may not play only compact discs bearing the identification logo as other fur- Other discs may not conform to the CD standard and may be cleaned with a dust cloth and cared for Compact Discs • Treat the compact disc carefully. Never allow your unit from the... cleaning the compact disc, wipe in circular motions. • This unit is designed to the outer edge of the compact disc. Never wipe in straight lines from the center of the compact disc to play properly. • Compact discs should be used on either side of the compact disc. • Do...
... gets stuck on your unit may not play only compact discs bearing the identification logo as other fur- Other discs may not conform to the CD standard and may be cleaned with a dust cloth and cared for Compact Discs • Treat the compact disc carefully. Never allow your unit from the... cleaning the compact disc, wipe in circular motions. • This unit is designed to the outer edge of the compact disc. Never wipe in straight lines from the center of the compact disc to play properly. • Compact discs should be used on either side of the compact disc. • Do...

