
User Guide
Page 1
MLT1522 User's Guide 15" LCD Stereo Monitor with Integrated TV Tuner * High Definition (HDTV) monitors require an optional set-top box to receive true digital high definition broadcasts. Before operating this product, please read these instructions completely.
MLT1522 User's Guide 15" LCD Stereo Monitor with Integrated TV Tuner * High Definition (HDTV) monitors require an optional set-top box to receive true digital high definition broadcasts. Before operating this product, please read these instructions completely.

User Guide
Page 2
...16 • PC Setup...17 Setting the System and Setting the Channels into Memory 19 Adding and Skipping Channels ...20 TV Operation ...21 • Mute ...22 • Jump ...22 • TV/Video ...22 • Sleep Timer ...22 • Info ...23 • Earphone...23 Closed Captions ...24 Setting... V-Chip ...25 • V-Chip Set-up...25 • MPAA Rating Set-up ...26 • TV Rating (Class Option) Set-up ...27 • Changing the Password...28 Troubleshooting Guide ...29 Reception Disturbances...30 Specifications ...31 Care and Maintenance ...32 1
...16 • PC Setup...17 Setting the System and Setting the Channels into Memory 19 Adding and Skipping Channels ...20 TV Operation ...21 • Mute ...22 • Jump ...22 • TV/Video ...22 • Sleep Timer ...22 • Info ...23 • Earphone...23 Closed Captions ...24 Setting... V-Chip ...25 • V-Chip Set-up...25 • MPAA Rating Set-up ...26 • TV Rating (Class Option) Set-up ...27 • Changing the Password...28 Troubleshooting Guide ...29 Reception Disturbances...30 Specifications ...31 Care and Maintenance ...32 1
User Guide
Page 3
... between the equipment and receiver. • Connect the equipment into an outlet on , the user is connected. • Consult the dealer or an experienced radio/TV technician for help.
... between the equipment and receiver. • Connect the equipment into an outlet on , the user is connected. • Consult the dealer or an experienced radio/TV technician for help.
User Guide
Page 6
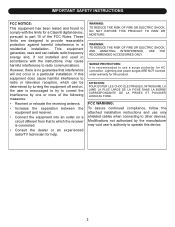
... . POWER Button-Press to a wall outlet having 120V AC, 60Hz only. Press again to access the on ; turn the TV on - 7. VOLUME Down/Navigation Left Button-Press to select a lower-numbered channel or navigate down in the setting menu. 6. MENU/ENTER Button-Press to 11. ...
... . POWER Button-Press to a wall outlet having 120V AC, 60Hz only. Press again to access the on ; turn the TV on - 7. VOLUME Down/Navigation Left Button-Press to select a lower-numbered channel or navigate down in the setting menu. 6. MENU/ENTER Button-Press to 11. ...

User Guide
Page 8
...control not working properly? • The remote control is not aimed at the sensor. • The remote control is an obstacle between the TV and the transmitter, the transmitter may not operate. • When direct sunlight, incandescent lamp, fluorescent lamp or any other strong light... paying attention to be recharged; BATTERY INSTALLATION 1 REMOTE CONTROL To remove the battery compartment cover, press in on the REMOTE SENSOR of the TV, the remote operation may be unstable. Do not try to recharge batteries not intended to the polarity diagram in this device: 1. Alkaline, ...
...control not working properly? • The remote control is not aimed at the sensor. • The remote control is an obstacle between the TV and the transmitter, the transmitter may not operate. • When direct sunlight, incandescent lamp, fluorescent lamp or any other strong light... paying attention to be recharged; BATTERY INSTALLATION 1 REMOTE CONTROL To remove the battery compartment cover, press in on the REMOTE SENSOR of the TV, the remote operation may be unstable. Do not try to recharge batteries not intended to the polarity diagram in this device: 1. Alkaline, ...

User Guide
Page 9
...use a signal splitter and an A/B switch box (available from the cable company or an electronic supply store). Also, make sure your TV. visit your TV to the output of the converter/descrambler box (usually channel 3 or 4) and use of a descrambler device which basic channels are unscrambled...cables are searching. With the switch in which requires the use the converter/descrambler or satellite box to a satellite service or a cable TV service which the signal is scrambled. Make sure AIR/CABLE is generally provided by the cable company. Follow the connections shown below . ...
...use a signal splitter and an A/B switch box (available from the cable company or an electronic supply store). Also, make sure your TV. visit your TV to the output of the converter/descrambler box (usually channel 3 or 4) and use of a descrambler device which basic channels are unscrambled...cables are searching. With the switch in which requires the use the converter/descrambler or satellite box to a satellite service or a cable TV service which the signal is scrambled. Make sure AIR/CABLE is generally provided by the cable company. Follow the connections shown below . ...
User Guide
Page 11
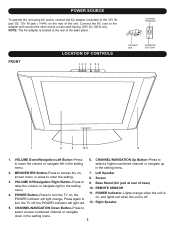
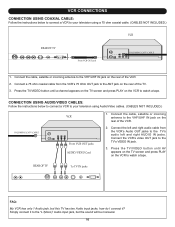
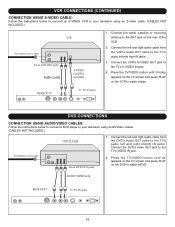
...PLAY on the VCR to watch a tape. FAQ: My VCR has only 1 Audio jack, but this TV has two Audio input jacks, how do I connect it to the "L (Mono)" Audio input jack,...to your television using a 75 ohm coaxial cable. (CABLES NOT INCLUDED.) VCR REAR OF TV From VCR OUT jack INCOMING CATV CABLE 1. Connect a 75 ohm coaxial cable from the VCR's Audio OUT jacks to ...to the VHF/UHF IN jack on the rear of the VCR. 2. Connect the VCR's video OUT jack to the TV's VIDEO IN jack. 3. Simply connect it ? VCR CONNECTIONS CONNECTION USING COAXIAL CABLE: Follow the instructions below to connect ...
...PLAY on the VCR to watch a tape. FAQ: My VCR has only 1 Audio jack, but this TV has two Audio input jacks, how do I connect it to the "L (Mono)" Audio input jack,...to your television using a 75 ohm coaxial cable. (CABLES NOT INCLUDED.) VCR REAR OF TV From VCR OUT jack INCOMING CATV CABLE 1. Connect a 75 ohm coaxial cable from the VCR's Audio OUT jacks to ...to the VHF/UHF IN jack on the rear of the VCR. 2. Connect the VCR's video OUT jack to the TV's VIDEO IN jack. 3. Simply connect it ? VCR CONNECTIONS CONNECTION USING COAXIAL CABLE: Follow the instructions below to connect ...
User Guide
Page 12
... to your television using Audio/Video cables. (CABLES NOT INCLUDED.) 1. Connect the VCR's S-VIDEO OUT jack to watch a tape. Press the TV/VIDEO button until S-Video appears on the TV screen and press PLAY on the rear of the VCR. 2. Connect the left and right audio cable from the VCR's Audio OUT... jacks to the TV's audio left and right IN jacks. 3. Connect the DVD's video OUT jack to the TV's audio left and right audio cable from the DVD's Audio OUT jacks to the...
... to your television using Audio/Video cables. (CABLES NOT INCLUDED.) 1. Connect the VCR's S-VIDEO OUT jack to watch a tape. Press the TV/VIDEO button until S-Video appears on the TV screen and press PLAY on the rear of the VCR. 2. Connect the left and right audio cable from the VCR's Audio OUT... jacks to the TV's audio left and right IN jacks. 3. Connect the DVD's video OUT jack to the TV's audio left and right audio cable from the DVD's Audio OUT jacks to the...
User Guide
Page 13
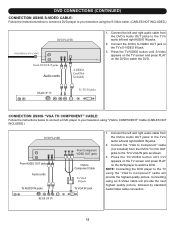
... connection. 12 Connect the "VGA to Component" cable (not included) from the DVD's Audio OUT jacks to the TV's audio left and right audio cable from the DVD's Y,Cr,Cb OUT jacks to the TV's VGA IN jack as shown. 3. Connect the left and right AUDIO IN jacks. 2. NOTE: Connecting the DVD... player to the TV using an S-Video cable will provide the highest quality picture. DVD CONNECTIONS (CONTINUED) CONNECTION USING S-VIDEO CABLE: Follow the instructions below to connect a DVD player ...
... connection. 12 Connect the "VGA to Component" cable (not included) from the DVD's Audio OUT jacks to the TV's audio left and right audio cable from the DVD's Y,Cr,Cb OUT jacks to the TV's VGA IN jack as shown. 3. Connect the left and right AUDIO IN jacks. 2. NOTE: Connecting the DVD... player to the TV using an S-Video cable will provide the highest quality picture. DVD CONNECTIONS (CONTINUED) CONNECTION USING S-VIDEO CABLE: Follow the instructions below to connect a DVD player ...

User Guide
Page 14
... screen will result in damage to the monitor and stand. 13 otherwise, the computer screen may not appear. 2. Attempting this will appear. Refer to the TV's VGA IN jack. 4. COMPUTER CONNECTION Follow the instructions below to connect a computer to your computer (PC). 2. Turn on the... TV screen. 5. Connect a VGA cable from the computer's VGA OUT jack to the computer's owner's manual for the first time; VIEWING ANGLE ADJUSTMENT This unit is ...
... screen will result in damage to the monitor and stand. 13 otherwise, the computer screen may not appear. 2. Attempting this will appear. Refer to the TV's VGA IN jack. 4. COMPUTER CONNECTION Follow the instructions below to connect a computer to your computer (PC). 2. Turn on the... TV screen. 5. Connect a VGA cable from the computer's VGA OUT jack to the computer's owner's manual for the first time; VIEWING ANGLE ADJUSTMENT This unit is ...

User Guide
Page 15
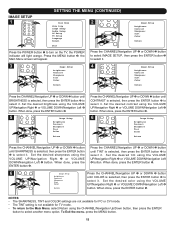
...the menu will light orange. SETTING THE VIDEO Main Menu Main Disp Image Setup Audio Setup PC Setup TV Setup Language Recall Quit 1 1 Main Menu Main Disp Image Setup Audio Setup PC Setup TV Setup Language Recall 2 Quit Main Menu Main Disp Image Setup Audio Setup Press the POWER indicator will ... TURNING THE MAIN POWER ON 1 Press the POWER button to turn on the TV screen. the POWER indicator will disappear on the TV; tEhRe S-QVuiidteo PC CVI 3 Return Main Disp TV AV S-Video PC CVI 2 Main Disp TV AV S-Video PC CVI Return Press the ENTER button to select the desired video...
...the menu will light orange. SETTING THE VIDEO Main Menu Main Disp Image Setup Audio Setup PC Setup TV Setup Language Recall Quit 1 1 Main Menu Main Disp Image Setup Audio Setup PC Setup TV Setup Language Recall 2 Quit Main Menu Main Disp Image Setup Audio Setup Press the POWER indicator will ... TURNING THE MAIN POWER ON 1 Press the POWER button to turn on the TV screen. the POWER indicator will disappear on the TV; tEhRe S-QVuiidteo PC CVI 3 Return Main Disp TV AV S-Video PC CVI 2 Main Disp TV AV S-Video PC CVI Return Press the ENTER button to select the desired video...
User Guide
Page 16
.... VChipPECCnogSnletitrsuohpl • • The TINT To return setting to select it. Return Bass Balance Return TV Setup 15 PC Setup AIR CATV Color the POWER indicator will appear. Press tTLhVaenSgMeutaEugpeNU button 2; Set the...menu oRpTetrtieoublnren. uSvpeigtauption Left 4 6 BRTBaeraltesaubsnrlIcnemeage Setup Balance BRreitguhrtnness Contrast Sharpness Tint Color Return Return Main Disp TV Audio Setup Press the CHANNEL/Navigation UTrPASeV-bV1ildeeoor DOWN 2 button until CONTRAST is 5 to Sharpness Tint...
.... VChipPECCnogSnletitrsuohpl • • The TINT To return setting to select it. Return Bass Balance Return TV Setup 15 PC Setup AIR CATV Color the POWER indicator will appear. Press tTLhVaenSgMeutaEugpeNU button 2; Set the...menu oRpTetrtieoublnren. uSvpeigtauption Left 4 6 BRTBaeraltesaubsnrlIcnemeage Setup Balance BRreitguhrtnness Contrast Sharpness Tint Color Return Return Main Disp TV Audio Setup Press the CHANNEL/Navigation UTrPASeV-bV1ildeeoor DOWN 2 button until CONTRAST is 5 to Sharpness Tint...

User Guide
Page 17
... Right 3 or VOLUME DOWN/NavigaBtaiolanncLeeft 4 button. Return 5 Audio Setup TreblAeudio Setup TBBraaeslbsalnece BBRaaesltsaunrcne Return TV Setup AIR CATV Auto Program Add Erase CH Close Caption VChip Control Press the CHANNEL/Navigation USRPyest1tuermnoSreDtuOp WN...PthCeSeEtNupTER button 5 t4UoPbs/uNetlateovcnitg. When done, press the ENTER button 5. AUDIO SETUP 1 1 2 Main Disp TV AV SPS-CViEdeTo TING THE MENU (CONTINUED) CVI Return Main Menu 2 Main MDaiisnp Menu MIIAPammuCaiadgngiSeeoeDtiSSSuseeepptttuuuppp ATuVdiSoetSueptup PTLLRCVaaenncgSSgaueeulttaalIuuggmppeeage Setup ...
... Right 3 or VOLUME DOWN/NavigaBtaiolanncLeeft 4 button. Return 5 Audio Setup TreblAeudio Setup TBBraaeslbsalnece BBRaaesltsaunrcne Return TV Setup AIR CATV Auto Program Add Erase CH Close Caption VChip Control Press the CHANNEL/Navigation USRPyest1tuermnoSreDtuOp WN...PthCeSeEtNupTER button 5 t4UoPbs/uNetlateovcnitg. When done, press the ENTER button 5. AUDIO SETUP 1 1 2 Main Disp TV AV SPS-CViEdeTo TING THE MENU (CONTINUED) CVI Return Main Menu 2 Main MDaiisnp Menu MIIAPammuCaiadgngiSeeoeDtiSSSuseeepptttuuuppp ATuVdiSoetSueptup PTLLRCVaaenncgSSgaueeulttaalIuuggmppeeage Setup ...
User Guide
Page 18
...; PresPshatsheMeaiMn EDiNspU button 3; SETTING THE MENU (CONTINUED) PC SETUP (MUST BE SET TO PC MODE) 1 Main Menu Main Disp Image Setup Audio Setup PC Setup TV Setup Language Recall 3 2 Quit PC Setup Press the POWER button 1 to turn oConlotrhe...
...; PresPshatsheMeaiMn EDiNspU button 3; SETTING THE MENU (CONTINUED) PC SETUP (MUST BE SET TO PC MODE) 1 Main Menu Main Disp Image Setup Audio Setup PC Setup TV Setup Language Recall 3 2 Quit PC Setup Press the POWER button 1 to turn oConlotrhe...
User Guide
Page 20
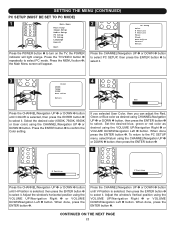
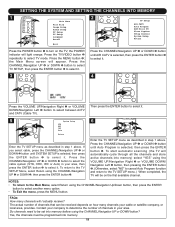
...CHANNEL/Navigation UP 1 or DOWN 2, then press the ENTER button 3. NOTES: PC Setup • To return to select TV SETUP, then press the ENTERPCbCVIutLtaonngua6geto select it . 4 Language English PC Setup Color H Position VPhIPamosasegiteioSnetup BrigChltoncekss ContAruatsot Adjust Press the... VOLUME UP/NavigatioSnharRFRpieengatetuhsurstrne1 or VOLUME DOWN/Navigation Left 2 button tTCoionlstorelect between AirTV and CATV (Cable TV). Do channels need to be programmed into memory before using the VOLUME UP/Navigation Right 3 or VOLUME DOWN/ Navigation...
...CHANNEL/Navigation UP 1 or DOWN 2, then press the ENTER button 3. NOTES: PC Setup • To return to select TV SETUP, then press the ENTERPCbCVIutLtaonngua6geto select it . 4 Language English PC Setup Color H Position VPhIPamosasegiteioSnetup BrigChltoncekss ContAruatsot Adjust Press the... VOLUME UP/NavigatioSnharRFRpieengatetuhsurstrne1 or VOLUME DOWN/Navigation Left 2 button tTCoionlstorelect between AirTV and CATV (Cable TV). Do channels need to be programmed into memory before using the VOLUME UP/Navigation Right 3 or VOLUME DOWN/ Navigation...

User Guide
Page 21
...Main Menu screen will be skipped when LuansgiunaEggneglthiseh CHANNEL/ Navigation UP 1 or DOWN 2 button to select a TV channel while in TV mode. S-Video PC CVI Return 3 TV Setup AIR CATV Auto Program Add Erase CH Close Caption VChip Control System Setup Return Image Setup Brightness Contrast ...DOWN 2 button until ADD ERASE CH is erased, you can select that channel. Press the TPVC /VSeItDuEp O button 2 repeatedly to select the TV modTer.ebSleelect a channel to erase or add using the VOLUME UP/Navigation Right 3 or VOLUME DOWN/Navigation Left 4 button. Select ADD, ERASE ...
...Main Menu screen will be skipped when LuansgiunaEggneglthiseh CHANNEL/ Navigation UP 1 or DOWN 2 button to select a TV channel while in TV mode. S-Video PC CVI Return 3 TV Setup AIR CATV Auto Program Add Erase CH Close Caption VChip Control System Setup Return Image Setup Brightness Contrast ...DOWN 2 button until ADD ERASE CH is erased, you can select that channel. Press the TPVC /VSeItDuEp O button 2 repeatedly to select the TV modTer.ebSleelect a channel to erase or add using the VOLUME UP/Navigation Right 3 or VOLUME DOWN/Navigation Left 4 button. Select ADD, ERASE ...

User Guide
Page 22
...set the channels into memory. Set the AirTV/CATV (CABLE) option and set to AIR, only channels up to these buttons to select the TV mode. NOTES: • When AIR/CATV is selected, the display will not operate if channels are some channels scrambled? This will revert to...1 to the original channel. the POWER indicator will appear at the next channel set to 69 can be indicated on the TV; TV SETUP option must be set into the TV's program memory, see page 19. For proper operation, before selecting channels, they must be selected. Use these channels through ...
...set the channels into memory. Set the AirTV/CATV (CABLE) option and set to AIR, only channels up to these buttons to select the TV mode. NOTES: • When AIR/CATV is selected, the display will not operate if channels are some channels scrambled? This will revert to...1 to the original channel. the POWER indicator will appear at the next channel set to 69 can be indicated on the TV; TV SETUP option must be set into the TV's program memory, see page 19. For proper operation, before selecting channels, they must be selected. Use these channels through ...
User Guide
Page 23
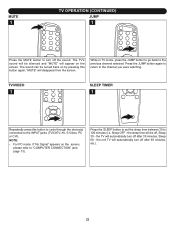
.... NOTE: • For PC mode, if "No Signal" appears on by pressing this button to cycle through the device(s) connected to the INPUT jacks (TV/CATV, AV, S-Video, PC or CVI). Press the SLEEP button to set the sleep time between 30 to "COMPUTER CONNECTION" (see page 13). Press...button again to return to the previous channel selected. "MUTE" will automatically turn off after 60 minutes, etc.). 22 TV/VIDEO 1 SLEEP TIMER 1 Repeatedly press this button again; the unit TV will disappear from the screen. The sound can be silenced and "MUTE" will be turned back on the screen,...
.... NOTE: • For PC mode, if "No Signal" appears on by pressing this button to cycle through the device(s) connected to the INPUT jacks (TV/CATV, AV, S-Video, PC or CVI). Press the SLEEP button to set the sleep time between 30 to "COMPUTER CONNECTION" (see page 13). Press...button again to return to the previous channel selected. "MUTE" will automatically turn off after 60 minutes, etc.). 22 TV/VIDEO 1 SLEEP TIMER 1 Repeatedly press this button again; the unit TV will disappear from the screen. The sound can be silenced and "MUTE" will be turned back on the screen,...

User Guide
Page 24
The speakers will clear automatically. For private listening, insert an earphone into the EARPHONE jack on the rear of the unit. INFO 1 TV OPERATION (CONTINUED) EARPHONE 1 Press the INFO button once to clear the screen or wait three seconds and the screen will be disconnected when the plug is inserted. 23 Press a second time to show the mode (channel number if in TV/CATV mode).
The speakers will clear automatically. For private listening, insert an earphone into the EARPHONE jack on the rear of the unit. INFO 1 TV OPERATION (CONTINUED) EARPHONE 1 Press the INFO button once to clear the screen or wait three seconds and the screen will be disconnected when the plug is inserted. 23 Press a second time to show the mode (channel number if in TV/CATV mode).

User Guide
Page 25
... text intact. CLOSED CAPTIONS WHAT IS CLOSED CAPTIONING? This television has the capability to a commercial or a break in TV mode, press the MENU button and select TV SETUP using the VOLUME UP/Navigation Right or VOLUME DOWN/Navigation Left button; Select the Closed Caption option using an indoor... programs can follow the dialogue. The Closed Captioned text will translate and display text in a Captions mode. then press the ENTER button to TV Setup menu. Words in italics or underlined describe titles, words in effect until it is changed, even if the channel is this normal? ...
... text intact. CLOSED CAPTIONS WHAT IS CLOSED CAPTIONING? This television has the capability to a commercial or a break in TV mode, press the MENU button and select TV SETUP using the VOLUME UP/Navigation Right or VOLUME DOWN/Navigation Left button; Select the Closed Caption option using an indoor... programs can follow the dialogue. The Closed Captioned text will translate and display text in a Captions mode. then press the ENTER button to TV Setup menu. Words in italics or underlined describe titles, words in effect until it is changed, even if the channel is this normal? ...


