
User Guide
Page 2
CONTENTS Contents 1 Important Safety Instructions 2 Precautions 5 Power Source 6 Location of Controls 6 • Front 6 • Rear 7 • Remote 8 Remote Control 9 • Battery Installation 9 • Effective Distance of the Remote Control Transmitter 9 Connection 10 • Connecting the Included Speakers 10 • Connecting the DVD to a TV Using the Video Output Jack 11 • Connecting the ...
CONTENTS Contents 1 Important Safety Instructions 2 Precautions 5 Power Source 6 Location of Controls 6 • Front 6 • Rear 7 • Remote 8 Remote Control 9 • Battery Installation 9 • Effective Distance of the Remote Control Transmitter 9 Connection 10 • Connecting the Included Speakers 10 • Connecting the DVD to a TV Using the Video Output Jack 11 • Connecting the ...
User Guide
Page 7
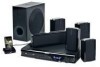
... 12. TIMER Button 11. POWER SOURCE Insert the AC plug (with the unit is the user's responsibility to help minimize the possibility of electric shock. Remote Sensor 4. If the AC plug does not fit into a conveniently located AC outlet having 120V, 60Hz. Stop ( X ) Button 21.
... 12. TIMER Button 11. POWER SOURCE Insert the AC plug (with the unit is the user's responsibility to help minimize the possibility of electric shock. Remote Sensor 4. If the AC plug does not fit into a conveniently located AC outlet having 120V, 60Hz. Stop ( X ) Button 21.
User Guide
Page 9
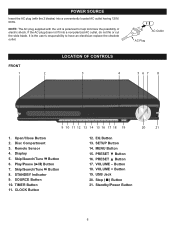
...SLEEP Button 7. Navigation ®/Search l/Tune + Button 32. GOTO/TRACK - SLOW/ALBUM - Navigation √/Search m/Tune - SUBTITLE Button 20. OSD/INFO/ALBUM + Button 35. REMOTE LOCATION OF CONTROLS (CONTINUED) 1 2 3 4 5 6 7 8 9 10 11 12 13 14 16 15 17 18 19 20 21 22 23 24 25 26 27 28... 29 30 31 REMOTE PART NO. 0861- 32 001200-00000* 33 *Consumer Replaceable Part 34 (See page 47 to order.) 35 36 1. AUX Mode Button 2. Standby/Power Button 3. CLOCK...
...SLEEP Button 7. Navigation ®/Search l/Tune + Button 32. GOTO/TRACK - SLOW/ALBUM - Navigation √/Search m/Tune - SUBTITLE Button 20. OSD/INFO/ALBUM + Button 35. REMOTE LOCATION OF CONTROLS (CONTINUED) 1 2 3 4 5 6 7 8 9 10 11 12 13 14 16 15 17 18 19 20 21 22 23 24 25 26 27 28... 29 30 31 REMOTE PART NO. 0861- 32 001200-00000* 33 *Consumer Replaceable Part 34 (See page 47 to order.) 35 36 1. AUX Mode Button 2. Standby/Power Button 3. CLOCK...
User Guide
Page 10
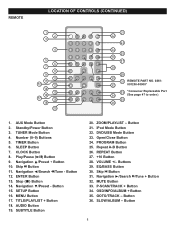
...this device: 1. Use only the size and type of explosion if battery is not to be used for a long period of the DVD, the remote operation may be unstable. 9 A reversed battery may not operate. • When direct sunlight, an incandescent lamp, fluorescent lamp or any... next to the device. 4. Replace the Battery Compartment. it can overheat and rupture. (Follow battery manufacturer's directions.) EFFECTIVE DISTANCE OF THE REMOTE CONTROL TRANSMITTER 30 30 20ft NOTES: • When there is an obstacle between the DVD and the transmitter, the transmitter may cause damage ...
...this device: 1. Use only the size and type of explosion if battery is not to be used for a long period of the DVD, the remote operation may be unstable. 9 A reversed battery may not operate. • When direct sunlight, an incandescent lamp, fluorescent lamp or any... next to the device. 4. Replace the Battery Compartment. it can overheat and rupture. (Follow battery manufacturer's directions.) EFFECTIVE DISTANCE OF THE REMOTE CONTROL TRANSMITTER 30 30 20ft NOTES: • When there is an obstacle between the DVD and the transmitter, the transmitter may cause damage ...
User Guide
Page 15
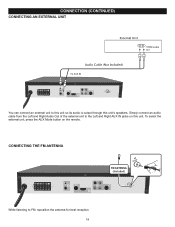
To select the external unit, press the AUX Mode button on this unit's speakers. CONNECTING THE FM ANTENNA 75FoMhm FM ANTENNA (Included) While listening to this unit so its audio is output through this unit. Simply connect an audio cable from the Left and Right Audio Out of the external unit to the Left and Right AUX IN jacks on the remote. CONNECTION (CONTINUED) CONNECTING AN EXTERNAL UNIT You can connect an external unit to FM, reposition the antenna for best reception. 14
To select the external unit, press the AUX Mode button on this unit's speakers. CONNECTING THE FM ANTENNA 75FoMhm FM ANTENNA (Included) While listening to this unit so its audio is output through this unit. Simply connect an audio cable from the Left and Right Audio Out of the external unit to the Left and Right AUX IN jacks on the remote. CONNECTION (CONTINUED) CONNECTING AN EXTERNAL UNIT You can connect an external unit to FM, reposition the antenna for best reception. 14
User Guide
Page 27
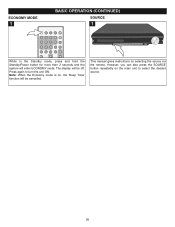
However, you can also press the SOURCE button repeatedly on selecting the source via the remote. This manual gives instructions on the main unit to turn the unit ON. ECONOMY MODE 1 BASIC OPERATION (CONTINUED) SOURCE 1 While in the Standby mode, press and hold the Standby/Power button for more than 2 seconds and the system will be cancelled. The display will enter ECONOMY mode. Note: When the Economy mode is on, the Sleep Timer function will be off. Press again to select the desired source. 26
However, you can also press the SOURCE button repeatedly on selecting the source via the remote. This manual gives instructions on the main unit to turn the unit ON. ECONOMY MODE 1 BASIC OPERATION (CONTINUED) SOURCE 1 While in the Standby mode, press and hold the Standby/Power button for more than 2 seconds and the system will be cancelled. The display will enter ECONOMY mode. Note: When the Economy mode is on, the Sleep Timer function will be off. Press again to select the desired source. 26
User Guide
Page 28
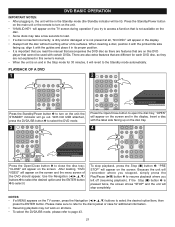
... may take a few seconds to the disc's jacket or case for 30 minutes, it . Press the Standby/Power button on the main unit or the remote to close the disc tray; the STANDBY indicator will appear on the screen. NOTES: • If a MENU appears on the disc tray. 4 2 1 32 Press the...
... may take a few seconds to the disc's jacket or case for 30 minutes, it . Press the Standby/Power button on the main unit or the remote to close the disc tray; the STANDBY indicator will appear on the screen. NOTES: • If a MENU appears on the disc tray. 4 2 1 32 Press the...
User Guide
Page 40
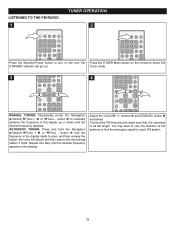
... Standby/Power button to turn on the next strong station it is extended to its full length. the Press the TUNER Mode button on the remote to find the strongest signal for each FM station. 39
... Standby/Power button to turn on the next strong station it is extended to its full length. the Press the TUNER Mode button on the remote to find the strongest signal for each FM station. 39

User Guide
Page 41
the STANDBY indicator will be stored in the display. Press the TUNER Mode button 1 on the remote to select the Tuner mode and tune an FM station as described on the previous page. 3 4 1 3 2 Press the PROGRAM button 1 once and the program number ...will go out. Press the TUNER Mode button on the remote to select the Tuner mode and tune an FM station as described on the previous page. Repeat steps 2 and 3 to turn on the unit; Press...
the STANDBY indicator will be stored in the display. Press the TUNER Mode button 1 on the remote to select the Tuner mode and tune an FM station as described on the previous page. 3 4 1 3 2 Press the PROGRAM button 1 once and the program number ...will go out. Press the TUNER Mode button on the remote to select the Tuner mode and tune an FM station as described on the previous page. Repeat steps 2 and 3 to turn on the unit; Press...
User Guide
Page 43
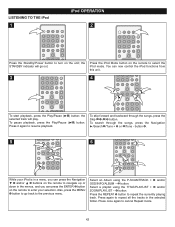
...control the iPod functions from this unit. 3 4 1 2 4 3 To start playback, press the Play/Pause (®p) button; You can press the ENTER 3 button on the remote to navigate up or down in the selected folder. Press the iPod Mode button on the unit; button 4. 5 2 3 1 4 6 5 2 3 1 4 While your ...PLAYLIST - 4 button. Press once again to go out. LISTENING TO THE iPod 1 iPod OPERATION 2 Press the Standby/Power button to turn on the remote to select the iPod mode. To search through the songs, press the Skip o 1 /n 2 button. Also, press the MENU 4 button to cancel ...
...control the iPod functions from this unit. 3 4 1 2 4 3 To start playback, press the Play/Pause (®p) button; You can press the ENTER 3 button on the remote to navigate up or down in the selected folder. Press the iPod Mode button on the unit; button 4. 5 2 3 1 4 6 5 2 3 1 4 While your ...PLAYLIST - 4 button. Press once again to go out. LISTENING TO THE iPod 1 iPod OPERATION 2 Press the Standby/Power button to turn on the remote to select the iPod mode. To search through the songs, press the Skip o 1 /n 2 button. Also, press the MENU 4 button to cancel ...
User Guide
Page 44
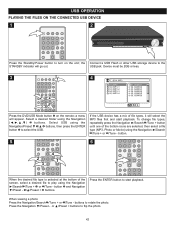
... to the STANDBY indicator will appear. USB OPERATION PLAYING THE FILES ON THE CONNECTED USB DEVICE 1 2 Press the Standby/Power button to turn on the remote; USB jack. Select a desired folder using the Navigation/Preset † 3/π 4 buttons, then press the ENTER button 5 to start playback. a menu will go out. To...
... to the STANDBY indicator will appear. USB OPERATION PLAYING THE FILES ON THE CONNECTED USB DEVICE 1 2 Press the Standby/Power button to turn on the remote; USB jack. Select a desired folder using the Navigation/Preset † 3/π 4 buttons, then press the ENTER button 5 to start playback. a menu will go out. To...
User Guide
Page 47
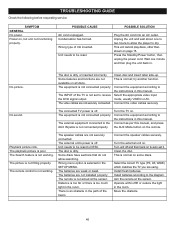
... than shown on all discs. Press the Standby/Power button, then unplug the power cord. The disc is off and then back on the remote. Some features and functions are using. The equipment is normal; The INPUT of CD inserted. The video cables are not securely connected. This is... IN jacks is not working . Playback picture rolls. The playback picture is not connected properly. The Search feature is not connected properly. The remote control is too much light in the room. The speaker cables are not securely connected. Unit needs to be reset. The disc is not ...
... than shown on all discs. Press the Standby/Power button, then unplug the power cord. The disc is off and then back on the remote. Some features and functions are using. The equipment is normal; The INPUT of CD inserted. The video cables are not securely connected. This is... IN jacks is not working . Playback picture rolls. The playback picture is not connected properly. The Search feature is not connected properly. The remote control is too much light in the room. The speaker cables are not securely connected. Unit needs to be reset. The disc is not ...


