
User Guide
Page 2
CONTENTS Contents 1 Important Safety Instructions 2 Precautions 5 Power Source 6 Location of Controls 6 • Front 6 • Rear 7 • Remote 8 Remote Control 9 • Battery Installation 9 • Effective Distance of the Remote Control Transmitter 9 Connection 10 &#...
CONTENTS Contents 1 Important Safety Instructions 2 Precautions 5 Power Source 6 Location of Controls 6 • Front 6 • Rear 7 • Remote 8 Remote Control 9 • Battery Installation 9 • Effective Distance of the Remote Control Transmitter 9 Connection 10 &#...
User Guide
Page 3
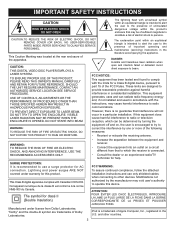
... RISK OF FIRE OR ELECTRIC SHOCK, DO measures: NOT EXPOSE THIS PRODUCT TO RAIN OR MOISTURE. • Reorient or relocate the receiving antenna. Lightning and power surges ARE NOT covered under license from that to which can radiate radio frequency energy and, if not installed and used in accordance with Canadian...
... RISK OF FIRE OR ELECTRIC SHOCK, DO measures: NOT EXPOSE THIS PRODUCT TO RAIN OR MOISTURE. • Reorient or relocate the receiving antenna. Lightning and power surges ARE NOT covered under license from that to which can radiate radio frequency energy and, if not installed and used in accordance with Canadian...

User Guide
Page 4
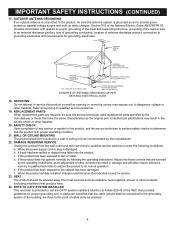
... manufacturer's instructions, and should not be walked on the marking label. OBJECT AND LIQUID ENTRY Never push objects of any type of power source indicated on or pinched by items placed upon or against them might be taken to operate from the wall outlet before the product... shock. Do not defeat the safety purpose of fire or electric shock. 16. This will fit into this product from battery power or other electric light or power circuits or where it from overheating. IMPORTANT SAFETY INSTRUCTIONS (CONTINUED) Before using the unit, be blocked or covered. For example,...
... manufacturer's instructions, and should not be walked on the marking label. OBJECT AND LIQUID ENTRY Never push objects of any type of power source indicated on or pinched by items placed upon or against them might be taken to operate from the wall outlet before the product... shock. Do not defeat the safety purpose of fire or electric shock. 16. This will fit into this product from battery power or other electric light or power circuits or where it from overheating. IMPORTANT SAFETY INSTRUCTIONS (CONTINUED) Before using the unit, be blocked or covered. For example,...
User Guide
Page 5
..., heat registers, stoves or other products (including amplifiers) that the cable ground shall be connected to the grounding system of other hazards. 20. When the power-supply cord or plug is provided to call the CATV system installer's attention to the product, be sure the service technician uses replacement parts specified...
..., heat registers, stoves or other products (including amplifiers) that the cable ground shall be connected to the grounding system of other hazards. 20. When the power-supply cord or plug is provided to call the CATV system installer's attention to the product, be sure the service technician uses replacement parts specified...

User Guide
Page 6
... on the optical pick-up lens and disc drive parts are dirty or worn down, the picture quality becomes poor. Remove the disc, connect the power cord of solvent, such as thinner and benzene, as insect spray, near a TV, radio or VCR, the playback picture may become warm after you do... not use the original shipping carton and packing materials. Keep the DVD player connected to the wall outlet, turn off the power. • If you moved the unit from the TV, radio or VCR.
... on the optical pick-up lens and disc drive parts are dirty or worn down, the picture quality becomes poor. Remove the disc, connect the power cord of solvent, such as thinner and benzene, as insect spray, near a TV, radio or VCR, the playback picture may become warm after you do... not use the original shipping carton and packing materials. Keep the DVD player connected to the wall outlet, turn off the power. • If you moved the unit from the TV, radio or VCR.
User Guide
Page 7
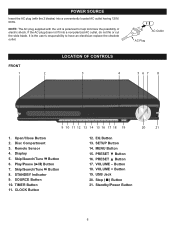
.... EQ Button 13. Button 18. VOLUME + Button 19. TIMER Button 11. Skip/Search/Tune n Button 8. PRESET † Button 16. PRESET π Button 17. Standby/Power Button 6 POWER SOURCE Insert the AC plug (with the unit is the user's responsibility to help minimize the possibility of electric shock. Open/Close Button 2. SETUP Button...
.... EQ Button 13. Button 18. VOLUME + Button 19. TIMER Button 11. Skip/Search/Tune n Button 8. PRESET † Button 16. PRESET π Button 17. Standby/Power Button 6 POWER SOURCE Insert the AC plug (with the unit is the user's responsibility to help minimize the possibility of electric shock. Open/Close Button 2. SETUP Button...

User Guide
Page 8
... is RCA) - PART NO. 0941-001202-00600 Right Font Speaker - PART NO. 0941-001202-00500 Subwoofer - PART NO. 136E-0214000-07 Speaker clip (1 pc) - AC Power Cord 2. REAR LOCATION OF CONTROLS (CONTINUED) 1 2 3 45 67 8 9 1. VIDEO OUT Jack 8. S-VIDEO OUT Jack 9. PART NO. 0701-100000-00000 iPod docking station - AUX IN Left...
... is RCA) - PART NO. 0941-001202-00600 Right Font Speaker - PART NO. 0941-001202-00500 Subwoofer - PART NO. 136E-0214000-07 Speaker clip (1 pc) - AC Power Cord 2. REAR LOCATION OF CONTROLS (CONTINUED) 1 2 3 45 67 8 9 1. VIDEO OUT Jack 8. S-VIDEO OUT Jack 9. PART NO. 0701-100000-00000 iPod docking station - AUX IN Left...
User Guide
Page 9
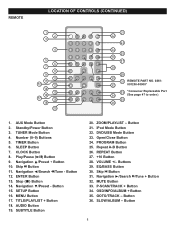
... + Button 10. SUBTITLE Button 20. Skip n Button 31. P-SCAN/TRACK + Button 34. Button 8 Stop ( X ) Button 14. MENU Button 17. AUDIO Button 19. Button 36. Standby/Power Button 3. Button 12. SETUP Button 16. DVD/USB Mode Button 23. EQ/BASS Button 30. MUTE Button 33. Number (0-9) Buttons 5. Button 21. TUNER Mode Button...
... + Button 10. SUBTITLE Button 20. Skip n Button 31. P-SCAN/TRACK + Button 34. Button 8 Stop ( X ) Button 14. MENU Button 17. AUDIO Button 19. Button 36. Standby/Power Button 3. Button 12. SETUP Button 16. DVD/USB Mode Button 23. EQ/BASS Button 30. MUTE Button 33. Number (0-9) Buttons 5. Button 21. TUNER Mode Button...
User Guide
Page 12
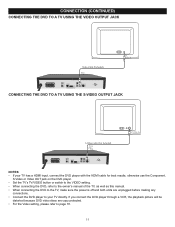
... DVD, refer to the owner's manual of the TV, as well as this manual. • When connecting the DVD to the TV, make sure the power is off and both units are copy protected. • For the Video setting, please refer to page 18. 11
... DVD, refer to the owner's manual of the TV, as well as this manual. • When connecting the DVD to the TV, make sure the power is off and both units are copy protected. • For the Video setting, please refer to page 18. 11
User Guide
Page 13
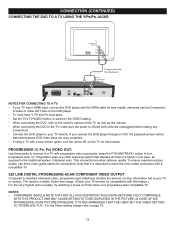
... for best results, otherwise use three video-grade cables for compatibility with this manual. • When connecting the DVD to the TV, make sure the power is a stable, flicker-free image. (Check your TV/monitor for connections. IN CASE OF 525 PROGRESSIVE SCAN PICTURE PROBLEMS, IT IS RECOMMENDED THAT THE USER...
... for best results, otherwise use three video-grade cables for compatibility with this manual. • When connecting the DVD to the TV, make sure the power is a stable, flicker-free image. (Check your TV/monitor for connections. IN CASE OF 525 PROGRESSIVE SCAN PICTURE PROBLEMS, IT IS RECOMMENDED THAT THE USER...
User Guide
Page 14
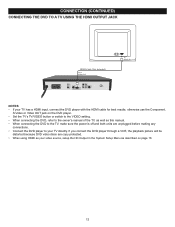
... DVD, refer to the owner's manual of the TV, as well as this manual. • When connecting the DVD to the TV, make sure the power is off and both units are unplugged before making any connections. • Connect the DVD player to your TV has a HDMI input, connect the DVD...
... DVD, refer to the owner's manual of the TV, as well as this manual. • When connecting the DVD to the TV, make sure the power is off and both units are unplugged before making any connections. • Connect the DVD player to your TV has a HDMI input, connect the DVD...

User Guide
Page 25
... press a button within five seconds or the clock will exit the clock setting mode. • The time will then be reset when the power cord is disconnected or if a power failure occurs. • When the unit is on, press the CLOCK button to show the actual clock. the clock will be set...
... press a button within five seconds or the clock will exit the clock setting mode. • The time will then be reset when the power cord is disconnected or if a power failure occurs. • When the unit is on, press the CLOCK button to show the actual clock. the clock will be set...
User Guide
Page 27
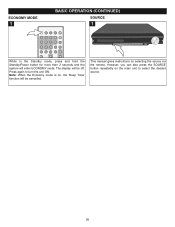
Press again to select the desired source. 26 Note: When the Economy mode is on, the Sleep Timer function will be off. This manual gives instructions on the main unit to turn the unit ON. ECONOMY MODE 1 BASIC OPERATION (CONTINUED) SOURCE 1 While in the Standby mode, press and hold the Standby/Power button for more than 2 seconds and the system will be cancelled. However, you can also press the SOURCE button repeatedly on selecting the source via the remote. The display will enter ECONOMY mode.
Press again to select the desired source. 26 Note: When the Economy mode is on, the Sleep Timer function will be off. This manual gives instructions on the main unit to turn the unit ON. ECONOMY MODE 1 BASIC OPERATION (CONTINUED) SOURCE 1 While in the Standby mode, press and hold the Standby/Power button for more than 2 seconds and the system will be cancelled. However, you can also press the SOURCE button repeatedly on selecting the source via the remote. The display will enter ECONOMY mode.
User Guide
Page 28
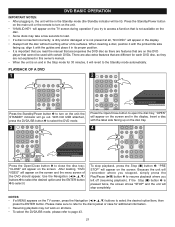
...; Always hold the disc without touching either of the DVD should appear. If the Stop (I ) button 1; To stop completely. PLAYBACK OF A DVD 1 2 1 2 Press the Standby/Power button 1 to turn on the unit. • "INVALID KEY will appear on the TV screen during operation if you try to access a function that is... features that cannot be lit). Insert a disc with the guides and place it . Because the unit will be used with certain DVDs. Press the Standby/Power button on the main unit or the remote to turn on the screen and in the display.
...; Always hold the disc without touching either of the DVD should appear. If the Stop (I ) button 1; To stop completely. PLAYBACK OF A DVD 1 2 1 2 Press the Standby/Power button 1 to turn on the unit. • "INVALID KEY will appear on the TV screen during operation if you try to access a function that is... features that cannot be lit). Insert a disc with the guides and place it . Because the unit will be used with certain DVDs. Press the Standby/Power button on the main unit or the remote to turn on the screen and in the display.
User Guide
Page 33
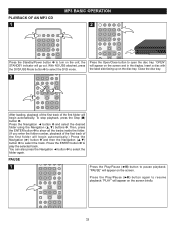
... turn on the unit; Then, press the ENTER button 3 to open the disc tray; PLAYBACK OF AN MP3 CD 1 1 MP3 BASIC OPERATION 2 2 Press the Standby/Power button 1 to resume playback; With NO USB attached, press the DVD/USB Mode button 2 to play the selected track. Press the ENTER button 3 to select...
... turn on the unit; Then, press the ENTER button 3 to open the disc tray; PLAYBACK OF AN MP3 CD 1 1 MP3 BASIC OPERATION 2 2 Press the Standby/Power button 1 to resume playback; With NO USB attached, press the DVD/USB Mode button 2 to play the selected track. Press the ENTER button 3 to select...
User Guide
Page 36
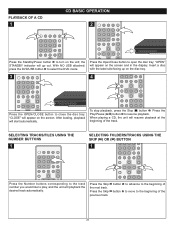
... beginning of the next track. Press the Play/Pause (®p) button 2 to open the disc tray; PLAYBACK OF A CD 1 1 CD BASIC OPERATION 2 2 Press the Standby/Power button 1 to play, and the unit will playback the desired track automatically. SELECTING TRACKS/FILES USING THE NUMBER BUTTONS 1 SELECTING FOLDERS/TRACKS USING THE SKIP...
... beginning of the next track. Press the Play/Pause (®p) button 2 to open the disc tray; PLAYBACK OF A CD 1 1 CD BASIC OPERATION 2 2 Press the Standby/Power button 1 to play, and the unit will playback the desired track automatically. SELECTING TRACKS/FILES USING THE NUMBER BUTTONS 1 SELECTING FOLDERS/TRACKS USING THE SKIP...
User Guide
Page 39
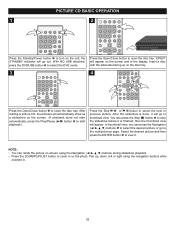
... the slideshow is finished; In thumbnail view, you can press the Navigation buttons 4 to the next/previous page. PICTURE CD BASIC OPERATION 1 2 1 2 Press the Standby/Power button 1 to open the disc tray;
... the slideshow is finished; In thumbnail view, you can press the Navigation buttons 4 to the next/previous page. PICTURE CD BASIC OPERATION 1 2 1 2 Press the Standby/Power button 1 to open the disc tray;
User Guide
Page 40
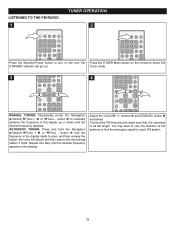
... 2 until the frequency in the display. the Press the TUNER Mode button on the unit; LISTENING TO THE FM RADIO 1 TUNER OPERATION 2 Press the Standby/Power button to turn on the remote to select the STANDBY indicator will search and then stop on the next strong station it is extended to...
... 2 until the frequency in the display. the Press the TUNER Mode button on the unit; LISTENING TO THE FM RADIO 1 TUNER OPERATION 2 Press the Standby/Power button to turn on the remote to select the STANDBY indicator will search and then stop on the next strong station it is extended to...

User Guide
Page 41
... an FM station as described on the unit; Repeat steps 2 and 3 to program additional presets. RECALLING RADIO PRESETS 1 2 1 2 3 Press the Standby/Power button to turn on the previous page. Press the TUNER Mode button 1 on the remote to select the Tuner mode and tune an FM station.... Press the PROGRAM button again and the station will go out. TUNER OPERATION (CONTINUED) SETTING FM RADIO PRESETS (UP TO 10) 1 2 Press the Standby/Power button to turn on the previous page. 3 4 1 3 2 Press the PROGRAM button 1 once and the program number will go out. the STANDBY indicator ...
... an FM station as described on the unit; Repeat steps 2 and 3 to program additional presets. RECALLING RADIO PRESETS 1 2 1 2 3 Press the Standby/Power button to turn on the previous page. Press the TUNER Mode button 1 on the remote to select the Tuner mode and tune an FM station.... Press the PROGRAM button again and the station will go out. TUNER OPERATION (CONTINUED) SETTING FM RADIO PRESETS (UP TO 10) 1 2 Press the Standby/Power button to turn on the previous page. 3 4 1 3 2 Press the PROGRAM button 1 once and the program number will go out. the STANDBY indicator ...
User Guide
Page 43
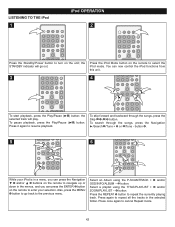
... - To search through the songs, press the Skip o 1 /n 2 button. Press again to select the iPod mode. LISTENING TO THE iPod 1 iPod OPERATION 2 Press the Standby/Power button to repeat the currently playing track. the STANDBY indicator will play.
... - To search through the songs, press the Skip o 1 /n 2 button. Press again to select the iPod mode. LISTENING TO THE iPod 1 iPod OPERATION 2 Press the Standby/Power button to repeat the currently playing track. the STANDBY indicator will play.


