User Guide
Page 2
...Changes or modifications to persons. ATTENTION: The exclamation point within an equilateral triangle is open and interlock failed or defeated. This laser Compact Disc Player is equipped with arrowhead symbol within.... The user could lose the authority to use radio frequency energy. Lightning and power surges ARE NOT covered under warranty for AC connection. DANGEROUS VOLTAGE: The lightning flash... with safety switches to avoid exposure when the CD door is intended to alert the user to beam. Avoid direct exposure to the ...
...Changes or modifications to persons. ATTENTION: The exclamation point within an equilateral triangle is open and interlock failed or defeated. This laser Compact Disc Player is equipped with arrowhead symbol within.... The user could lose the authority to use radio frequency energy. Lightning and power surges ARE NOT covered under warranty for AC connection. DANGEROUS VOLTAGE: The lightning flash... with safety switches to avoid exposure when the CD door is intended to alert the user to beam. Avoid direct exposure to the ...
User Guide
Page 5
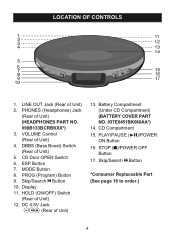
... (Program) Button 9. Skip/Search o Button 10. HOLD (ON/OFF) Switch (Rear of Unit) 13. CD Door OPEN Switch 6. CD Compartment 15. STOP (I)/POWER OFF Button 17. Display 11. DC 4.5V Jack z (Rear of Unit) 12. Battery Compartment (Under CD Compartment) (BATTERY COVER PART NO. 037E6451BK080AA*) 14. PHONES (Headphones) Jack (Rear of Unit) 4. Skip/Search...
... (Program) Button 9. Skip/Search o Button 10. HOLD (ON/OFF) Switch (Rear of Unit) 13. CD Door OPEN Switch 6. CD Compartment 15. STOP (I)/POWER OFF Button 17. Display 11. DC 4.5V Jack z (Rear of Unit) 12. Battery Compartment (Under CD Compartment) (BATTERY COVER PART NO. 037E6451BK080AA*) 14. PHONES (Headphones) Jack (Rear of Unit) 4. Skip/Search...
User Guide
Page 6
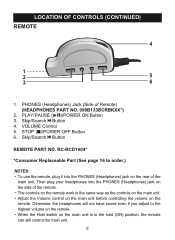
PLAY/PAUSE (®p)/POWER ON Button 3. STOP (I)/POWER OFF Button 6. RC-RCD1004* *Consumer Replaceable Part (See page 16 to the highest volume on the remote. • When the Hold switch on the rear ...
PLAY/PAUSE (®p)/POWER ON Button 3. STOP (I)/POWER OFF Button 6. RC-RCD1004* *Consumer Replaceable Part (See page 16 to the highest volume on the remote. • When the Hold switch on the rear ...
User Guide
Page 7
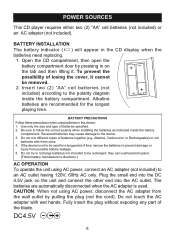
..., remove the batteries to the polarity diagram inside the battery compartment. BATTERY PRECAUTIONS Follow these precautions when using batteries in the CD display when the batteries need replacing. 1. Fully insert the plug without exposing any part of batteries specified. 2. ...2. BATTERY INSTALLATION The battery indicator ( ) will appear in this device: 1. POWER SOURCES This CD player requires either two (2) "AA" cell batteries (not included) or an AC adapter (not included). Open the CD compartment, then open the battery compartment door by pulling the plug (not the ...
..., remove the batteries to the polarity diagram inside the battery compartment. BATTERY PRECAUTIONS Follow these precautions when using batteries in the CD display when the batteries need replacing. 1. Fully insert the plug without exposing any part of batteries specified. 2. ...2. BATTERY INSTALLATION The battery indicator ( ) will appear in this device: 1. POWER SOURCES This CD player requires either two (2) "AA" cell batteries (not included) or an AC adapter (not included). Open the CD compartment, then open the battery compartment door by pulling the plug (not the ...
User Guide
Page 8
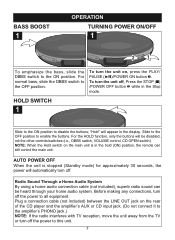
BASS BOOST 1 OPERATION TURNING POWER ON/OFF 1 21 To emphasize the bass, slide the DBBS switch to disable the buttons; HOLD SWITCH 1 Slide to the ON position to the ON position. To turn the unit on the rear of the CD player and the amplifier's AUX or CD input jack. (Do not connect... it to the amplifier's PHONO jack.) NOTE: If the radio interferes with TV reception, move the unit away from the TV or turn off . AUTO POWER OFF When the unit is...
BASS BOOST 1 OPERATION TURNING POWER ON/OFF 1 21 To emphasize the bass, slide the DBBS switch to disable the buttons; HOLD SWITCH 1 Slide to the ON position to the ON position. To turn the unit on the rear of the CD player and the amplifier's AUX or CD input jack. (Do not connect... it to the amplifier's PHONO jack.) NOTE: If the radio interferes with TV reception, move the unit away from the TV or turn off . AUTO POWER OFF When the unit is...
User Guide
Page 9
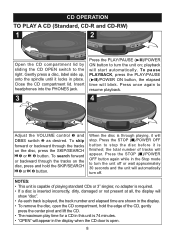
...button. playback will blink. To skip forward or backward through playing, it is finished; the total number of playing standard CDs or 3" singles; Press the STOP (I )/POWER OFF button again while in the Stop mode to turn the unit off . NOTES: • This unit is open. 8 ... PHONES jack. 3 1 2 Press the PLAY/PAUSE (®p)/POWER ON button to stop the disc before it will automatically turn the unit on; CD OPERATION TO PLAY A CD (Standard, CD-R and CD-RW) 1 2 Open the CD compartment lid by sliding the CD OPEN switch to resume playback. 4 3 4 Adjust the VOLUME...
...button. playback will blink. To skip forward or backward through playing, it is finished; the total number of playing standard CDs or 3" singles; Press the STOP (I )/POWER OFF button again while in the Stop mode to turn the unit off . NOTES: • This unit is open. 8 ... PHONES jack. 3 1 2 Press the PLAY/PAUSE (®p)/POWER ON button to stop the disc before it will automatically turn the unit on; CD OPERATION TO PLAY A CD (Standard, CD-R and CD-RW) 1 2 Open the CD compartment lid by sliding the CD OPEN switch to resume playback. 4 3 4 Adjust the VOLUME...
User Guide
Page 10
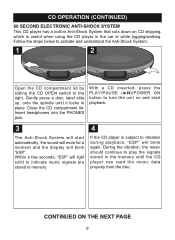
Gently press a disc, label side up, onto the spindle until it locks in the memory until the CD player can read the music data properly from the disc. With a CD inserted, press the PLAY/PAUSE (®p)/POWER ON button to vibration during playback, "ESP" will blink "ESP". Within a few seconds, "ESP"... will light solid to indicate music signals are stored in memory. 4 If the CD player is subject to turn the unit on CD skipping, which is useful when using the CD player in the car...
Gently press a disc, label side up, onto the spindle until it locks in the memory until the CD player can read the music data properly from the disc. With a CD inserted, press the PLAY/PAUSE (®p)/POWER ON button to vibration during playback, "ESP" will blink "ESP". Within a few seconds, "ESP"... will light solid to indicate music signals are stored in memory. 4 If the CD player is subject to turn the unit on CD skipping, which is useful when using the CD player in the car...
User Guide
Page 11
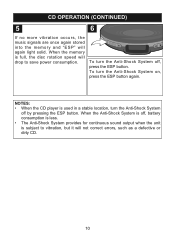
NOTES: • When the CD player is used in a stable location, turn the Anti-Shock System off , press the ESP button. To turn the Anti-Shock System on, press the ESP ... System provides for continuous sound output when the unit is full, the disc rotation speed will drop to vibration, but it will again light solid. CD OPERATION (CONTINUED) 5 6 If no more vibration occurs, the music signals are once again stored into the memory and "ESP" will not correct errors, such as...
NOTES: • When the CD player is used in a stable location, turn the Anti-Shock System off , press the ESP button. To turn the Anti-Shock System on, press the ESP ... System provides for continuous sound output when the unit is full, the disc rotation speed will drop to vibration, but it will again light solid. CD OPERATION (CONTINUED) 5 6 If no more vibration occurs, the music signals are once again stored into the memory and "ESP" will not correct errors, such as...
User Guide
Page 12
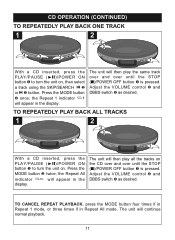
... ALL TO REPEATEDLY PLAY BACK ALL TRACKS 1 2 2 3 2 1 1 With a CD inserted, press the PLAY/PAUSE (®p)/POWER ON button ‚ to turn the unit on the CD over and over until the STOP (I )/POWER OFF button ‚ is pressed. The unit will then play all the tracks on . ... will then play the same track over and over until the STOP (I )/POWER OFF button ‚ is pressed. CD OPERATION (CONTINUED) TO REPEATEDLY PLAY BACK ONE TRACK 1 2 2 3 4 2 3 1 1 With a CD inserted, press the PLAY/PAUSE (®p)/POWER ON button ‚ to turn the unit on, then select a track...
... ALL TO REPEATEDLY PLAY BACK ALL TRACKS 1 2 2 3 2 1 1 With a CD inserted, press the PLAY/PAUSE (®p)/POWER ON button ‚ to turn the unit on the CD over and over until the STOP (I )/POWER OFF button ‚ is pressed. The unit will then play all the tracks on . ... will then play the same track over and over until the STOP (I )/POWER OFF button ‚ is pressed. CD OPERATION (CONTINUED) TO REPEATEDLY PLAY BACK ONE TRACK 1 2 2 3 4 2 3 1 1 With a CD inserted, press the PLAY/PAUSE (®p)/POWER ON button ‚ to turn the unit on, then select a track...
User Guide
Page 13
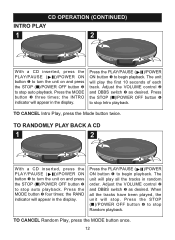
...playback. TO CANCEL Intro Play, press the Mode button twice. CD OPERATION (CONTINUED) INTRO PLAY 1 2 2 3 3 21 41 With a CD inserted, press the PLAY/PAUSE ( )/POWER ON button ‚ to turn the unit on and press the STOP (I )/POWER OFF button … to stop Intro playback. the INTRO indicator...each track. Press the PLAY/PAUSE ( )/POWER ON button ‚ to begin playback. TO RANDOMLY PLAY BACK A CD 1 2 2 3 3 21 41 With a CD inserted, press the PLAY/PAUSE ( )/POWER ON button ‚ to turn the unit on and press the STOP (I )/POWER OFF button … to stop auto playback....
...playback. TO CANCEL Intro Play, press the Mode button twice. CD OPERATION (CONTINUED) INTRO PLAY 1 2 2 3 3 21 41 With a CD inserted, press the PLAY/PAUSE ( )/POWER ON button ‚ to turn the unit on and press the STOP (I )/POWER OFF button … to stop Intro playback. the INTRO indicator...each track. Press the PLAY/PAUSE ( )/POWER ON button ‚ to begin playback. TO RANDOMLY PLAY BACK A CD 1 2 2 3 3 21 41 With a CD inserted, press the PLAY/PAUSE ( )/POWER ON button ‚ to turn the unit on and press the STOP (I )/POWER OFF button … to stop auto playback....
User Guide
Page 14
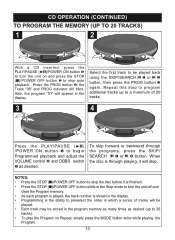
...When the disc is the ability to preselect the order in which a series of 20 tracks. 3 4 2 3 1 1 2 Press the PLAY/PAUSE (®p) /POWER ON button ‚ to begin Programmed playback and adjust the VOLUME control ƒ and DBBS switch „ as desired (up to a maximum of tracks will...SKIP/SEARCH o 1 or n ƒ button, then press the PROG button „ again. CD OPERATION (CONTINUED) TO PROGRAM THE MEMORY (UP TO 20 TRACKS) 1 2 3 21 3 1 2 With a CD inserted, press the PLAY/PAUSE (®p)/POWER ON button 1 to turn the unit off and clear the Program memory. • As each...
...When the disc is the ability to preselect the order in which a series of 20 tracks. 3 4 2 3 1 1 2 Press the PLAY/PAUSE (®p) /POWER ON button ‚ to begin Programmed playback and adjust the VOLUME control ƒ and DBBS switch „ as desired (up to a maximum of tracks will...SKIP/SEARCH o 1 or n ƒ button, then press the PROG button „ again. CD OPERATION (CONTINUED) TO PROGRAM THE MEMORY (UP TO 20 TRACKS) 1 2 3 21 3 1 2 With a CD inserted, press the PLAY/PAUSE (®p)/POWER ON button 1 to turn the unit off and clear the Program memory. • As each...
User Guide
Page 15
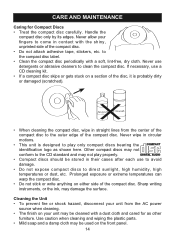
... label. • Clean the compact disc periodically with the shiny, unprinted side of the compact disc. Never wipe in straight lines from the AC power source when cleaning. • The finish on either side of the compact disc. • Do not attach adhesive tape, stickers, etc.... Cleaning the Unit • To prevent fire or shock hazard, disconnect your fingers to the CD standard and may not conform to come in their cases after each use detergents or abrasive cleaners to direct sunlight, high humidity, high temperatures or...
... label. • Clean the compact disc periodically with the shiny, unprinted side of the compact disc. Never wipe in straight lines from the AC power source when cleaning. • The finish on either side of the compact disc. • Do not attach adhesive tape, stickers, etc.... Cleaning the Unit • To prevent fire or shock hazard, disconnect your fingers to the CD standard and may not conform to come in their cases after each use detergents or abrasive cleaners to direct sunlight, high humidity, high temperatures or...
User Guide
Page 17
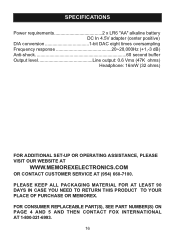
PLEASE KEEP ALL PACKAGING MATERIAL FOR AT LEAST 90 DAYS IN CASE YOU NEED TO RETURN THIS PRODUCT TO YOUR PLACE OF PURCHASE OR MEMOREX. SPECIFICATIONS Power requirements 2 x LR6 "AA" alkaline battery DC In 4.5V adapter (center positive) D/A conversion 1-bit DAC eight times oversampling Frequency response 20~20,000Hz (+1,-3 dB) Anti-shock ...
PLEASE KEEP ALL PACKAGING MATERIAL FOR AT LEAST 90 DAYS IN CASE YOU NEED TO RETURN THIS PRODUCT TO YOUR PLACE OF PURCHASE OR MEMOREX. SPECIFICATIONS Power requirements 2 x LR6 "AA" alkaline battery DC In 4.5V adapter (center positive) D/A conversion 1-bit DAC eight times oversampling Frequency response 20~20,000Hz (+1,-3 dB) Anti-shock ...


