User Guide
Page 2
... Contents 1 Safety Precautions 2 EIA Guidelines 8 Location of Controls 10 Battery Installation 12 Using the Hand Strap 13 Installing the Software 14 • To Install the Driver 15 • To Install PhotoImpressions and VideoImpressions Software 16 Inserting the SD Memory Card ...........17 Downloading and Transferring Files ...18 Safely Removing Hardware 19 Using...
... Contents 1 Safety Precautions 2 EIA Guidelines 8 Location of Controls 10 Battery Installation 12 Using the Hand Strap 13 Installing the Software 14 • To Install the Driver 15 • To Install PhotoImpressions and VideoImpressions Software 16 Inserting the SD Memory Card ...........17 Downloading and Transferring Files ...18 Safely Removing Hardware 19 Using...

User Guide
Page 15
INSTALLING THE SOFTWARE SUPPORTED OPERATING SYSTEMS This unit is compatible with Microsoft Windows XP (Home or Professional Edition with Service Pack 2 or higher) or Vista. See the following pages to install the driver and the bundled software. 14 MEDIA FILES SUPPORTED FORMATS Audio Formats: MP3 files Photo Format: Baseline JPEGs Video Format: AVI-H.264 (max: 1280 x 720 resolution 30 fps) For Windows: Windows will automatically detect the unit and SD Card (if inserted).
INSTALLING THE SOFTWARE SUPPORTED OPERATING SYSTEMS This unit is compatible with Microsoft Windows XP (Home or Professional Edition with Service Pack 2 or higher) or Vista. See the following pages to install the driver and the bundled software. 14 MEDIA FILES SUPPORTED FORMATS Audio Formats: MP3 files Photo Format: Baseline JPEGs Video Format: AVI-H.264 (max: 1280 x 720 resolution 30 fps) For Windows: Windows will automatically detect the unit and SD Card (if inserted).
User Guide
Page 16
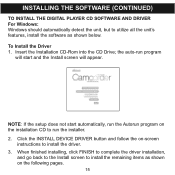
...Drive; NOTE: If the setup does not start and the Install screen will appear. When finished installing, click FINISH to complete the driver installation, and go back to the Install screen to run the Autorun program on the installation CD to install the remaining items as...will start automatically, run the installer. 2. Click the INSTALL DEVICE DRIVER button and follow the on the following pages. 15 To Install the Driver 1. INSTALLING THE SOFTWARE (CONTINUED) TO INSTALL THE DIGITAL PLAYER CD SOFTWARE AND DRIVER For Windows: Windows should automatically detect the unit, but to install...
...Drive; NOTE: If the setup does not start and the Install screen will appear. When finished installing, click FINISH to complete the driver installation, and go back to the Install screen to run the Autorun program on the installation CD to install the remaining items as...will start automatically, run the installer. 2. Click the INSTALL DEVICE DRIVER button and follow the on the following pages. 15 To Install the Driver 1. INSTALLING THE SOFTWARE (CONTINUED) TO INSTALL THE DIGITAL PLAYER CD SOFTWARE AND DRIVER For Windows: Windows should automatically detect the unit, but to install...
User Guide
Page 17
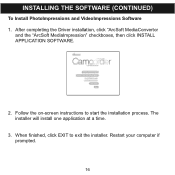
Follow the on-screen instructions to exit the installer. Restart your computer if prompted. 16 When finished, click EXIT to start the installation process. After completing the Driver installation, click "ArcSoft MediaConvertor and the "ArcSoft MediaImpression" checkboxes, then click INSTALL APPLICATION SOFTWARE. 2. The installer will install one application at a time. 3. INSTALLING THE SOFTWARE (CONTINUED) To Install PhotoImpressions and VideoImpressions Software 1.
Follow the on-screen instructions to exit the installer. Restart your computer if prompted. 16 When finished, click EXIT to start the installation process. After completing the Driver installation, click "ArcSoft MediaConvertor and the "ArcSoft MediaImpression" checkboxes, then click INSTALL APPLICATION SOFTWARE. 2. The installer will install one application at a time. 3. INSTALLING THE SOFTWARE (CONTINUED) To Install PhotoImpressions and VideoImpressions Software 1.
