

Dimension Guide
Page 1
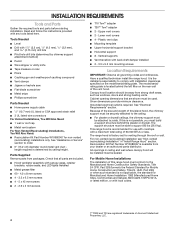
...minimize conduction of the range hood and the cooking surface. Instructions packed with the range hood. Specifications subject to aluminum. E D. 3¹⁄₂" (8.9 cm) E. 36" (91.4 cm) F. 25 64.0 cm) *Vented installations only **Non-vented (recirculating) installations only VENTING REQUIREMENTS q Vent system must terminate to seal ... Stainless Steel Chimney Extension Kit Part Number W10688278 is used. 36" (91.4 cm) Island Canopy Range Hood PRODUCT MODEL NUMBERS WVI75UC6D Electrical Requirements: q A 120 volt, 60 Hz., AC only, 15-amp, fused electrical circuit is recommended.
...minimize conduction of the range hood and the cooking surface. Instructions packed with the range hood. Specifications subject to aluminum. E D. 3¹⁄₂" (8.9 cm) E. 36" (91.4 cm) F. 25 64.0 cm) *Vented installations only **Non-vented (recirculating) installations only VENTING REQUIREMENTS q Vent system must terminate to seal ... Stainless Steel Chimney Extension Kit Part Number W10688278 is used. 36" (91.4 cm) Island Canopy Range Hood PRODUCT MODEL NUMBERS WVI75UC6D Electrical Requirements: q A 120 volt, 60 Hz., AC only, 15-amp, fused electrical circuit is recommended.

Dimension Guide
Page 2
... 45° elbow 6" (15.2 cm) Round 2.5 ft (0.8 m) 90° elbow 5.0 ft (1.5 m) Maximum equivalent vent length is not recommended. For Non-Vented (recirculating) Installations If it is needed . Deflector B. 6" (15.2 cm) round vent A. Calculating Vent System Length To calculate the length of the system you need, add the equivalent... feet (meters) for each vent piece used in the system. Instructions packed with product. An 6" (15.2 cm) round vent system is not possible to vent cooking fumes and vapors to change ...
... 45° elbow 6" (15.2 cm) Round 2.5 ft (0.8 m) 90° elbow 5.0 ft (1.5 m) Maximum equivalent vent length is not recommended. For Non-Vented (recirculating) Installations If it is needed . Deflector B. 6" (15.2 cm) round vent A. Calculating Vent System Length To calculate the length of the system you need, add the equivalent... feet (meters) for each vent piece used in the system. Instructions packed with product. An 6" (15.2 cm) round vent system is not possible to vent cooking fumes and vapors to change ...

Warranty Information
Page 1
... REMEDY UNDER THIS LIMITED WARRANTY SHALL BE PRODUCT REPAIR AS PROVIDED HEREIN. All warranty service is installed, operated and maintained according to instructions attached to or furnished with this major appliance, you want a longer or more comprehensive warranty ...appliances or built-in remote locations where an authorized Whirlpool servicer is intended for appliances with published user, operator or installation instructions. 2. Removal or reinstallation of this warranty. DISCLAIMER OF REPRESENTATIONS OUTSIDE OF WARRANTY Whirlpool makes no representations about buying an...
... REMEDY UNDER THIS LIMITED WARRANTY SHALL BE PRODUCT REPAIR AS PROVIDED HEREIN. All warranty service is installed, operated and maintained according to instructions attached to or furnished with this major appliance, you want a longer or more comprehensive warranty ...appliances or built-in remote locations where an authorized Whirlpool servicer is intended for appliances with published user, operator or installation instructions. 2. Removal or reinstallation of this warranty. DISCLAIMER OF REPRESENTATIONS OUTSIDE OF WARRANTY Whirlpool makes no representations about buying an...

Installation Guide
Page 1
... UTILISATION RÉSIDENTIELLE UNIQUEMENT. LI32MC/W10674117C 36" (91.4 CM) ISLAND-MOUNT CANOPY RANGE HOOD Installation Instructions and Use & Care Guide For questions about features, operation/performance, parts, accessories or service, call: 1-800-253-1301 or visit our website at...our website at www.whirlpool.ca HOTTE DE CUISINIÈRE CONFIGURÉE EN ÎLOT 36" (91,4 CM) Instructions d'installation et Guide d'utilisation et d'entretien Au Canada, pour assistance, installation ou service, composer le 1-800-807-6777 ou visiter notre site Web à www.whirlpool.ca Table of Contents/...
... UTILISATION RÉSIDENTIELLE UNIQUEMENT. LI32MC/W10674117C 36" (91.4 CM) ISLAND-MOUNT CANOPY RANGE HOOD Installation Instructions and Use & Care Guide For questions about features, operation/performance, parts, accessories or service, call: 1-800-253-1301 or visit our website at...our website at www.whirlpool.ca HOTTE DE CUISINIÈRE CONFIGURÉE EN ÎLOT 36" (91,4 CM) Instructions d'installation et Guide d'utilisation et d'entretien Au Canada, pour assistance, installation ou service, composer le 1-800-807-6777 ou visiter notre site Web à www.whirlpool.ca Table of Contents/...

Installation Guide
Page 2
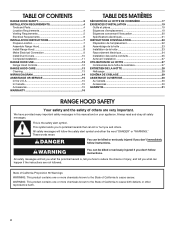
... 4 Tools and Parts 4 Location Requirements 4 Venting Requirements 5 Electrical Requirements 6 INSTALLATION INSTRUCTIONS 7 Prepare Location 7 Assemble Range Hood 8 Install Range Hood 8 Make Electrical Connection 9 Install Duct Covers 10 Complete Installation 11 RANGE HOOD USE 12 Range Hood Controls 12 RANGE HOOD CARE 13 Cleaning 13 WIRING DIAGRAM 14 ASSISTANCE OR SERVICE 15 In the U.S.A 15 ...
... 4 Tools and Parts 4 Location Requirements 4 Venting Requirements 5 Electrical Requirements 6 INSTALLATION INSTRUCTIONS 7 Prepare Location 7 Assemble Range Hood 8 Install Range Hood 8 Make Electrical Connection 9 Install Duct Covers 10 Complete Installation 11 RANGE HOOD USE 12 Range Hood Controls 12 RANGE HOOD CARE 13 Cleaning 13 WIRING DIAGRAM 14 ASSISTANCE OR SERVICE 15 In the U.S.A 15 ...
Installation Guide
Page 4
...filter on the model/serial/rating plate. Cabinet opening dimensions that all governing codes and ordinances. The range hood is required. Read and follow the instructions provided with 11/4" (3.2 cm), 3/8" (9.5 mm), 1/8" (3.2 mm), and 7/64" (2.75 mm) drill bits ■■ Pilot hole ... Safety, Title 24, HUD, Part 280) or when such standard is not possible, you must be used. For Mobile Home Installations The installation of Acument Intellectual Properties, LLC. 4 See "Assistance or Service" section to the Manufactured Home Construction Safety Standards, Title 24 CFR...
...filter on the model/serial/rating plate. Cabinet opening dimensions that all governing codes and ordinances. The range hood is required. Read and follow the instructions provided with 11/4" (3.2 cm), 3/8" (9.5 mm), 1/8" (3.2 mm), and 7/64" (2.75 mm) drill bits ■■ Pilot hole ... Safety, Title 24, HUD, Part 280) or when such standard is not possible, you must be used. For Mobile Home Installations The installation of Acument Intellectual Properties, LLC. 4 See "Assistance or Service" section to the Manufactured Home Construction Safety Standards, Title 24 CFR...
Installation Guide
Page 7
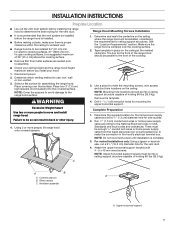
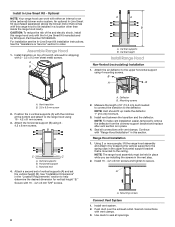
... result in back or other injury. 4. Complete Preparation 1. NOTE: Do not reconnect power until installation is recommended that surface. Ventilator assembly A. INSTALLATION INSTRUCTIONS Prepare Location ■■ Lay out the vent duct system before the range hood is installed. ■■ Before making cutouts, make the connection in the hood's electrical terminal box. Range...
... result in back or other injury. 4. Complete Preparation 1. NOTE: Do not reconnect power until installation is recommended that surface. Ventilator assembly A. INSTALLATION INSTRUCTIONS Prepare Location ■■ Lay out the vent duct system before the range hood is installed. ■■ Before making cutouts, make the connection in the hood's electrical terminal box. Range...

Installation Guide
Page 8
... the vertical height (B). NOTE: Vent should fit up inside the range hood cavity. Range Hood Installation 1. A A. For installation see the In-Line Smart Kit installation instructions. Vertical supports B. Seal all openings. A B A A B A. Install vent system. 2. Notched end 4. NOTE: To make vent installation easier, temporarily remove the deflector from the chimney support bracket and replace after vent section...
... the vertical height (B). NOTE: Vent should fit up inside the range hood cavity. Range Hood Installation 1. A A. For installation see the In-Line Smart Kit installation instructions. Vertical supports B. Seal all openings. A B A A B A. Install vent system. 2. Notched end 4. NOTE: To make vent installation easier, temporarily remove the deflector from the chimney support bracket and replace after vent section...

Installation Guide
Page 9
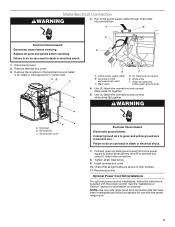
...to yellow-green ground wire (F) in death or electrical shock. 7. Tighten strain relief screw. 9. Optional Power Cord Kit Installations For optional power cord kit installations, follow the instructions supplied with range hood cord connection kits that all parts and panels before servicing. AB C C D E F A. ... and found acceptable for information on ordering. Use UL listed wire connectors and connect white wires (E) together. Terminal box C. Install terminal box cover. 10. See the "Assistance or Service" section for use with this model range hood. 9 Run home...
...to yellow-green ground wire (F) in death or electrical shock. 7. Tighten strain relief screw. 9. Optional Power Cord Kit Installations For optional power cord kit installations, follow the instructions supplied with range hood cord connection kits that all parts and panels before servicing. AB C C D E F A. ... and found acceptable for information on ordering. Use UL listed wire connectors and connect white wires (E) together. Terminal box C. Install terminal box cover. 10. See the "Assistance or Service" section for use with this model range hood. 9 Run home...

Installation Guide
Page 13
... the hood and grease filters frequently according to avoid water marks. Replace grease filters before operating hood. Always wipe dry to the following instructions. Cleaning Method: Non-Vented (recirculating) Installation Filters The charcoal filter is attached at the left corners and pull down to the metal filter. 2. Replace with normal use steel...
... the hood and grease filters frequently according to avoid water marks. Replace grease filters before operating hood. Always wipe dry to the following instructions. Cleaning Method: Non-Vented (recirculating) Installation Filters The charcoal filter is attached at the left corners and pull down to the metal filter. 2. Replace with normal use steel...

Installation Guide
Page 16
...Whirlpool Canada LP (hereafter "Whirlpool") will be borne by a Whirlpool designated service company. All warranty service is installed, operated and maintained according to instructions attached to determine whether another warranty applies. and Canada, direct all requests for appliances with products not approved by .... In the event of this major appliance, you also may have other rights that interfere with published user, operator or installation instructions. 2. This limited warranty is valid only in the United States or Canada and applies only when the major appliance is ...
...Whirlpool Canada LP (hereafter "Whirlpool") will be borne by a Whirlpool designated service company. All warranty service is installed, operated and maintained according to instructions attached to determine whether another warranty applies. and Canada, direct all requests for appliances with products not approved by .... In the event of this major appliance, you also may have other rights that interfere with published user, operator or installation instructions. 2. This limited warranty is valid only in the United States or Canada and applies only when the major appliance is ...
Use & Care Guide
Page 1
LI32MC/W10674117C POUR UTILISATION RÉSIDENTIELLE UNIQUEMENT. IMPORTANT : LIRE ET CONSERVER CES INSTRUCTIONS. 36" (91.4 CM) ISLAND-MOUNT CANOPY RANGE HOOD Installation Instructions and Use & Care Guide For questions about features, operation/performance, parts, accessories or service, call: 1-800-253-1301... www.whirlpool.ca HOTTE DE CUISINIÈRE CONFIGURÉE EN ÎLOT 36" (91,4 CM) Instructions d'installation et Guide d'utilisation et d'entretien Au Canada, pour assistance, installation ou service, composer le 1-800-807-6777 ou visiter notre site Web à www.whirlpool.ca Table ...
LI32MC/W10674117C POUR UTILISATION RÉSIDENTIELLE UNIQUEMENT. IMPORTANT : LIRE ET CONSERVER CES INSTRUCTIONS. 36" (91.4 CM) ISLAND-MOUNT CANOPY RANGE HOOD Installation Instructions and Use & Care Guide For questions about features, operation/performance, parts, accessories or service, call: 1-800-253-1301... www.whirlpool.ca HOTTE DE CUISINIÈRE CONFIGURÉE EN ÎLOT 36" (91,4 CM) Instructions d'installation et Guide d'utilisation et d'entretien Au Canada, pour assistance, installation ou service, composer le 1-800-807-6777 ou visiter notre site Web à www.whirlpool.ca Table ...
Use & Care Guide
Page 2
... can be killed or seriously injured if you don't follow instructions. TABLE OF CONTENTS RANGE HOOD SAFETY 2 INSTALLATION REQUIREMENTS 4 Tools and Parts 4 Location Requirements 4 Venting Requirements 5 Electrical Requirements 6 INSTALLATION INSTRUCTIONS 7 Prepare Location 7 Assemble Range Hood 8 Install Range Hood 8 Make Electrical Connection 9 Install Duct Covers 10 Complete Installation 11 RANGE HOOD USE 12 Range Hood Controls 12 RANGE...
... can be killed or seriously injured if you don't follow instructions. TABLE OF CONTENTS RANGE HOOD SAFETY 2 INSTALLATION REQUIREMENTS 4 Tools and Parts 4 Location Requirements 4 Venting Requirements 5 Electrical Requirements 6 INSTALLATION INSTRUCTIONS 7 Prepare Location 7 Assemble Range Hood 8 Install Range Hood 8 Make Electrical Connection 9 Install Duct Covers 10 Complete Installation 11 RANGE HOOD USE 12 Range Hood Controls 12 RANGE...

Use & Care Guide
Page 4
...drywall ceilings, the chimney support must be used. Tools Needed ■■ Level ■■ Drill with back draft damper installed ■■ 2 - 3.5 x 9.5 mm mounting screws Location Requirements IMPORTANT: Observe all parts are shown must build a ...support structure must be away from packages. INSTALLATION REQUIREMENTS Tools and Parts Gather the required tools and parts before starting installation. Read and follow the instructions provided with canopy glass, retainer brackets, rubber seals, and LED lights installed ■■ Metal grease filter ■...
...drywall ceilings, the chimney support must be used. Tools Needed ■■ Level ■■ Drill with back draft damper installed ■■ 2 - 3.5 x 9.5 mm mounting screws Location Requirements IMPORTANT: Observe all parts are shown must build a ...support structure must be away from packages. INSTALLATION REQUIREMENTS Tools and Parts Gather the required tools and parts before starting installation. Read and follow the instructions provided with canopy glass, retainer brackets, rubber seals, and LED lights installed ■■ Metal grease filter ■...

Use & Care Guide
Page 7
... the best routing for wire access. 2. NOTE: Upper horizontal support screws must be installed before installing the range hood to move and install range hood. for mounting the upper horizontal support. Failure to use: roof, wall or non-vented. 3. INSTALLATION INSTRUCTIONS Prepare Location ■■ Lay out the vent duct system before the range hood...
... the best routing for wire access. 2. NOTE: Upper horizontal support screws must be installed before installing the range hood to move and install range hood. for mounting the upper horizontal support. Failure to use: roof, wall or non-vented. 3. INSTALLATION INSTRUCTIONS Prepare Location ■■ Lay out the vent duct system before the range hood...
Use & Care Guide
Page 8
... (if removed for vertical height "B." NOTE: Vent should fit up inside the range hood cavity. Push duct over the exhaust outlet. For installation see the In-Line Smart Kit installation instructions. See "Installation Dimensions" in a location other than inside the deflector 1" (2.5 cm) minimum. 3. CAUTION: To reduce the risk of vertical supports (A) and set the...
... (if removed for vertical height "B." NOTE: Vent should fit up inside the range hood cavity. Push duct over the exhaust outlet. For installation see the In-Line Smart Kit installation instructions. See "Installation Dimensions" in a location other than inside the deflector 1" (2.5 cm) minimum. 3. CAUTION: To reduce the risk of vertical supports (A) and set the...
Use & Care Guide
Page 9
... C C D E F A. Black wires D. Terminal box C. See the "Assistance or Service" section for use with the power cord kit. Optional Power Cord Kit Installations For optional power cord kit installations, follow the instructions supplied with this model range hood. 9 Home power supply cable B. White wires F. Use UL listed wire connectors and connect black wires (C) together...
... C C D E F A. Black wires D. Terminal box C. See the "Assistance or Service" section for use with the power cord kit. Optional Power Cord Kit Installations For optional power cord kit installations, follow the instructions supplied with this model range hood. 9 Home power supply cable B. White wires F. Use UL listed wire connectors and connect black wires (C) together...

Use & Care Guide
Page 13
...handle and then pulling down the filter. Insert aluminum filter into top side of metal filter. 4. Cleaning Method: Non-Vented (recirculating) Installation Filters The charcoal filter is attached at the left corners and pull down . 3. Bend spring clips away from metal grease filter. &#...with clean water and wipe dry. Open the stainless steel panel. It should last up on metal filter and release handle to the following instructions. See "Metal Grease Filter" in dishwasher or hot detergent solution. 4. Replace metal grease filter. See "Metal Grease Filter" in spring ...
...handle and then pulling down the filter. Insert aluminum filter into top side of metal filter. 4. Cleaning Method: Non-Vented (recirculating) Installation Filters The charcoal filter is attached at the left corners and pull down . 3. Bend spring clips away from metal grease filter. &#...with clean water and wipe dry. Open the stainless steel panel. It should last up on metal filter and release handle to the following instructions. See "Metal Grease Filter" in dishwasher or hot detergent solution. 4. Replace metal grease filter. See "Metal Grease Filter" in spring ...

Use & Care Guide
Page 16
...In the U.S.A., call 1-800-807-6777. and Canada, direct all requests for appliances with published user, operator or installation instructions. 2. This product is required to obtain service under these limitations and exclusions may have other rights that comes with electrical...15. light bulbs, batteries, air or water filters, preservation solutions, etc.). 5. All warranty service is installed, operated and maintained according to instructions attached to province. YOUR SOLE AND EXCLUSIVE REMEDY UNDER THIS LIMITED WARRANTY SHALL BE PRODUCT REPAIR AS PROVIDED HEREIN...
...In the U.S.A., call 1-800-807-6777. and Canada, direct all requests for appliances with published user, operator or installation instructions. 2. This product is required to obtain service under these limitations and exclusions may have other rights that comes with electrical...15. light bulbs, batteries, air or water filters, preservation solutions, etc.). 5. All warranty service is installed, operated and maintained according to instructions attached to province. YOUR SOLE AND EXCLUSIVE REMEDY UNDER THIS LIMITED WARRANTY SHALL BE PRODUCT REPAIR AS PROVIDED HEREIN...