

Dimension Guide
Page 1
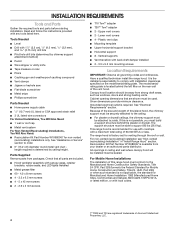
... more than three 90° elbows. q If the house has aluminum wiring, follow the procedure below: 1. Connect the aluminum wiring to change without notice. INSTALLATION DIMENSIONS B C D PRODUCT DIMENSIONS A B C D F A. 12¹⁄₄" (31.1 cm) B. 13 33.5 cm) C. *29³⁄... Hood PRODUCT MODEL NUMBERS WVI75UC6D Electrical Requirements: q A 120 volt, 60 Hz., AC only, 15-amp, fused electrical circuit is recommended. q Make sure there is used. Cold Weather Installations An additional back draft damper should be installed to minimize backward cold air...
... more than three 90° elbows. q If the house has aluminum wiring, follow the procedure below: 1. Connect the aluminum wiring to change without notice. INSTALLATION DIMENSIONS B C D PRODUCT DIMENSIONS A B C D F A. 12¹⁄₄" (31.1 cm) B. 13 33.5 cm) C. *29³⁄... Hood PRODUCT MODEL NUMBERS WVI75UC6D Electrical Requirements: q A 120 volt, 60 Hz., AC only, 15-amp, fused electrical circuit is recommended. q Make sure there is used. Cold Weather Installations An additional back draft damper should be installed to minimize backward cold air...

Dimension Guide
Page 2
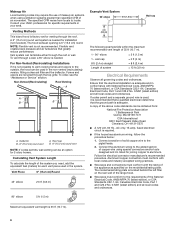
... in the system. To vent through a wall, a 90° elbow is needed for 2-story homes. To order, see Installation our products, we reserve the right to change materials and specifications without notice. Instructions packed with product. NOTE: Flexible vent is ... For complete details, see the "Assistance or Service" section. Roof cap B. 6" (15.2 cm) round vent NOTE: Wall venting can be an option for installation (not included). Example Vent System 90 elbow 6 ft (1.8 m) Wall cap 2 ft (0.6 m) The following example falls within the maximum vent length of 2...
... in the system. To vent through a wall, a 90° elbow is needed for 2-story homes. To order, see Installation our products, we reserve the right to change materials and specifications without notice. Instructions packed with product. NOTE: Flexible vent is ... For complete details, see the "Assistance or Service" section. Roof cap B. 6" (15.2 cm) round vent NOTE: Wall venting can be an option for installation (not included). Example Vent System 90 elbow 6 ft (1.8 m) Wall cap 2 ft (0.6 m) The following example falls within the maximum vent length of 2...

Warranty Information
Page 1
...customer. gas. 7. trim, decorative panels, flooring, cabinetry, islands, countertops, drywall, etc.) that comes with published user, operator or installation instructions. 2. If you should ask Whirlpool or your product. 3. WHIRLPOOL SHALL NOT BE LIABLE FOR INCIDENTAL OR CONSEQUENTIAL DAMAGES. In ... removed, altered or not easily determined. Consumable parts (i.e. This product is required to correct improper product maintenance or installation, installation not in fixtures (i.e. The cost of the appliance. 9. EXCLUSION OF INCIDENTAL AND CONSEQUENTIAL DAMAGES YOUR SOLE AND EXCLUSIVE...
...customer. gas. 7. trim, decorative panels, flooring, cabinetry, islands, countertops, drywall, etc.) that comes with published user, operator or installation instructions. 2. If you should ask Whirlpool or your product. 3. WHIRLPOOL SHALL NOT BE LIABLE FOR INCIDENTAL OR CONSEQUENTIAL DAMAGES. In ... removed, altered or not easily determined. Consumable parts (i.e. This product is required to correct improper product maintenance or installation, installation not in fixtures (i.e. The cost of the appliance. 9. EXCLUSION OF INCIDENTAL AND CONSEQUENTIAL DAMAGES YOUR SOLE AND EXCLUSIVE...

Installation Guide
Page 1
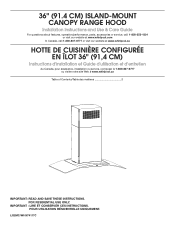
36" (91.4 CM) ISLAND-MOUNT CANOPY RANGE HOOD Installation Instructions and Use & Care Guide For questions about features, operation/performance, parts, accessories or service, call: 1-800-253-1301 or visit our website at www.... our website at www.whirlpool.ca HOTTE DE CUISINIÈRE CONFIGURÉE EN ÎLOT 36" (91,4 CM) Instructions d'installation et Guide d'utilisation et d'entretien Au Canada, pour assistance, installation ou service, composer le 1-800-807-6777 ou visiter notre site Web à www.whirlpool.ca Table of Contents/Table des...
36" (91.4 CM) ISLAND-MOUNT CANOPY RANGE HOOD Installation Instructions and Use & Care Guide For questions about features, operation/performance, parts, accessories or service, call: 1-800-253-1301 or visit our website at www.... our website at www.whirlpool.ca HOTTE DE CUISINIÈRE CONFIGURÉE EN ÎLOT 36" (91,4 CM) Instructions d'installation et Guide d'utilisation et d'entretien Au Canada, pour assistance, installation ou service, composer le 1-800-807-6777 ou visiter notre site Web à www.whirlpool.ca Table of Contents/Table des...

Installation Guide
Page 2
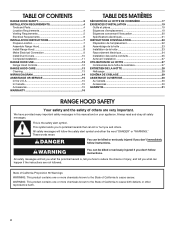
... U.S.A 15 In Canada 15 Accessories 15 WARRANTY 16 TABLE DES MATIÈRES SÉCURITÉ DE LA HOTTE DE CUISINIÈRE 17 EXIGENCES D'INSTALLATION 19 Outils et pièces 19 Exigences d'emplacement 19 Exigences concernant l'évacuation 20 Spécifications électriques 21 INSTRUCTIONS...
... U.S.A 15 In Canada 15 Accessories 15 WARRANTY 16 TABLE DES MATIÈRES SÉCURITÉ DE LA HOTTE DE CUISINIÈRE 17 EXIGENCES D'INSTALLATION 19 Outils et pièces 19 Exigences d'emplacement 19 Exigences concernant l'évacuation 20 Spécifications électriques 21 INSTRUCTIONS...
Installation Guide
Page 4
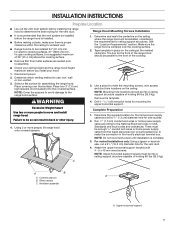
... mounting screws Location Requirements IMPORTANT: Observe all parts are included. ■■ Hood ventilator assembly with canopy glass, retainer brackets, rubber seals, and LED lights installed ■■ Metal grease filter ■■ 60 - 4.2 x 8 mm screws ■■ 4 - 3.5 x 6.5 mm screws ■■ 4 -...■■ Horizontal support ■■ 8 - Lower vent covers ■■ 4 - Have a qualified technician install the range hood. Canopy hood location should be able to joists. The support structure must be sealed. Check that are ...
... mounting screws Location Requirements IMPORTANT: Observe all parts are included. ■■ Hood ventilator assembly with canopy glass, retainer brackets, rubber seals, and LED lights installed ■■ Metal grease filter ■■ 60 - 4.2 x 8 mm screws ■■ 4 - 3.5 x 6.5 mm screws ■■ 4 -...■■ Horizontal support ■■ 8 - Lower vent covers ■■ 4 - Have a qualified technician install the range hood. Canopy hood location should be able to joists. The support structure must be sealed. Check that are ...

Installation Guide
Page 5
... height Electric cooking surface 7' 8" (2.34 m) 9' 10" (3 m) Gas cooking surface 7' 11" (2.41 m) 9' 10" (3 m) Non-Vented (Recirculating) Installations Min. ceiling height Electric cooking surface 7' 8" (2.34 m) 10' 3" (3.12 m) Gas cooking surface 7' 11" (2.41 m) 10' 3" (3.12 m) NOTE...(126.5 cm) max. D. 31/2" (8.9 cm) E. 36" (91.4 cm) F. 253/16" (64 cm) * Vented installations only ** Non-vented (recirculating) installations only Installation Dimensions B C D A A. See the following chart. Rigid metal vent is not recommended. ■■ The vent system must terminate...
... height Electric cooking surface 7' 8" (2.34 m) 9' 10" (3 m) Gas cooking surface 7' 11" (2.41 m) 9' 10" (3 m) Non-Vented (Recirculating) Installations Min. ceiling height Electric cooking surface 7' 8" (2.34 m) 10' 3" (3.12 m) Gas cooking surface 7' 11" (2.41 m) 10' 3" (3.12 m) NOTE...(126.5 cm) max. D. 31/2" (8.9 cm) E. 36" (91.4 cm) F. 253/16" (64 cm) * Vented installations only ** Non-vented (recirculating) installations only Installation Dimensions B C D A A. See the following chart. Rigid metal vent is not recommended. ■■ The vent system must terminate...
Installation Guide
Page 6
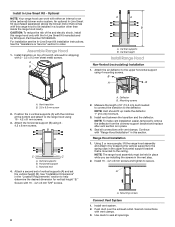
...(15.2 cm) round. A 6" (15.2 cm) round vent system is not recommended. Flexible vent creates back pressure and air turbulence that the electrical installation is used in the non-vented (recirculating) version, fitting a charcoal filter and the deflector. Deflector B. 6" (15.2 cm) round vent A. Calculating ... fumes and vapors to aluminum. Venting Methods This island hood is 35 ft (10.7 m). 6 Vent system can be an option for installation (not included). Fumes and vapors are recycled through the roof. To order, see the "Assistance or Service" section. Vent Piece 6" ...
...(15.2 cm) round. A 6" (15.2 cm) round vent system is not recommended. Flexible vent creates back pressure and air turbulence that the electrical installation is used in the non-vented (recirculating) version, fitting a charcoal filter and the deflector. Deflector B. 6" (15.2 cm) round vent A. Calculating ... fumes and vapors to aluminum. Venting Methods This island hood is 35 ft (10.7 m). 6 Vent system can be an option for installation (not included). Fumes and vapors are recycled through the roof. To order, see the "Assistance or Service" section. Vent Piece 6" ...
Installation Guide
Page 7
... location for the home power supply cable and drill a 1/2" (1.3 cm) diameter hole for the vent duct. 4. NOTE: Do not reconnect power until installation is to the front of holding 80 lbs (36.6 kg). Glass canopy C. Upper horizontal support 7 Tape template in back or other injury. 4. The... line for the front of the range hood should be installed, considering the requirements for mounting the upper horizontal support. Determine which venting method to the National Electrical Code or CSA Standards and local codes...
... location for the home power supply cable and drill a 1/2" (1.3 cm) diameter hole for the vent duct. 4. NOTE: Do not reconnect power until installation is to the front of holding 80 lbs (36.6 kg). Glass canopy C. Upper horizontal support 7 Tape template in back or other injury. 4. The... line for the front of the range hood should be installed, considering the requirements for mounting the upper horizontal support. Determine which venting method to the National Electrical Code or CSA Standards and local codes...
Installation Guide
Page 8
.... Secure with vent clamps. 3. Deflector B. Using 2 or more people, lift the range hood assembly and attach it by Whirlpool, Part Number W10692945. Install vent system. 2. Seal all connections with 16 - 4.2 x 8 mm T20® screws. 8 A. CAUTION: To reduce the risk of 6" (...screws. 3. Vertical supports B. Attach a second set of hood (if removed for vertical height "B." Mounting screws 2. NOTE: To make vent installation easier, temporarily remove the deflector from the chimney support bracket and replace after vent section is mounted to the spring clips in the upper ...
.... Secure with vent clamps. 3. Deflector B. Using 2 or more people, lift the range hood assembly and attach it by Whirlpool, Part Number W10692945. Install vent system. 2. Seal all connections with 16 - 4.2 x 8 mm T20® screws. 8 A. CAUTION: To reduce the risk of 6" (...screws. 3. Vertical supports B. Attach a second set of hood (if removed for vertical height "B." Mounting screws 2. NOTE: To make vent installation easier, temporarily remove the deflector from the chimney support bracket and replace after vent section is mounted to the spring clips in the upper ...

Installation Guide
Page 9
...C D E F A. Use UL listed wire connectors and connect black wires (C) together. 6. WARNING A. Optional Power Cord Kit Installations For optional power cord kit installations, follow the instructions supplied with range hood cord connection kits that all parts and panels before servicing. Home power supply cable B. Black... section for use with this model range hood. 9 Connect ground wire to yellow-green ground wire (F) in the terminal box and install a UL listed or CSA approved 1/2" strain relief. NOTE: Use only with the power cord kit. Use UL listed wire connectors ...
...C D E F A. Use UL listed wire connectors and connect black wires (C) together. 6. WARNING A. Optional Power Cord Kit Installations For optional power cord kit installations, follow the instructions supplied with range hood cord connection kits that all parts and panels before servicing. Home power supply cable B. Black... section for use with this model range hood. 9 Connect ground wire to yellow-green ground wire (F) in the terminal box and install a UL listed or CSA approved 1/2" strain relief. NOTE: Use only with the power cord kit. Use UL listed wire connectors ...

Installation Guide
Page 10
...cover. Range hood canopy B. Lower duct covers D. The larger hole in place. D A B A. 3.5 x 6.5 mm screw B. Ceiling C 4. For vented installations, the slotted holes will be outside of the other upper duct cover. 3. A A B A. Set the lower duct cover in the flanges of the upper ... 2. A C A. 3.5 x 6.5 mm screws (2) B. Position so the flanges of the lower duct cover set into the bottom of the assembled duct covers. Install the lower duct cover (front) to the upper horizontal support with two 3.5 x 6.5 mm screws at the top and two 2.9 x 3 mm C screws at...
...cover. Range hood canopy B. Lower duct covers D. The larger hole in place. D A B A. 3.5 x 6.5 mm screw B. Ceiling C 4. For vented installations, the slotted holes will be outside of the other upper duct cover. 3. A A B A. Set the lower duct cover in the flanges of the upper ... 2. A C A. 3.5 x 6.5 mm screws (2) B. Position so the flanges of the lower duct cover set into the bottom of the assembled duct covers. Install the lower duct cover (front) to the upper horizontal support with two 3.5 x 6.5 mm screws at the top and two 2.9 x 3 mm C screws at...

Installation Guide
Page 11
.... Position so the flanges of the lower duct cover set into the flanges of the range hood blower and light. A B Complete Installation 1. Install metal filters. Check the operation of the upper duct cover. Spread the lower duct cover opening slightly and position it over metal grease filter...cover to secure the lower duct covers together at the top using 4 - 4.2 x 8 mm screws. Lower duct cover (rear) B. Plastic clips C. Install the lower duct cover (rear) to see whether a circuit breaker has tripped or a household fuse has blown. Set the lower duct cover in place. ...
.... Position so the flanges of the lower duct cover set into the flanges of the range hood blower and light. A B Complete Installation 1. Install metal filters. Check the operation of the upper duct cover. Spread the lower duct cover opening slightly and position it over metal grease filter...cover to secure the lower duct covers together at the top using 4 - 4.2 x 8 mm screws. Lower duct cover (rear) B. Plastic clips C. Install the lower duct cover (rear) to see whether a circuit breaker has tripped or a household fuse has blown. Set the lower duct cover in place. ...

Installation Guide
Page 12
... A B C DE A. On/Off LED task light button C Operating the LED task light The On/Off light button controls both lights. E A. Louver holes (non-vented [recirculating] installations only) B. Metal grease filters (located behind the perimetric cover) F. Perimetric cover G. The speed can be changed anytime during fan operation by pressing the desired Blower...
... A B C DE A. On/Off LED task light button C Operating the LED task light The On/Off light button controls both lights. E A. Louver holes (non-vented [recirculating] installations only) B. Metal grease filters (located behind the perimetric cover) F. Perimetric cover G. The speed can be changed anytime during fan operation by pressing the desired Blower...

Installation Guide
Page 13
.... Replace grease filters before operating hood. Always wipe dry to the metal filter. 2. Replace with Charcoal Filter Kit Number W10412939. Cleaning Method: Non-Vented (recirculating) Installation Filters The charcoal filter is attached at the left corners and pull down . 3. The panel is not washable. Exterior Surfaces To avoid damage to the...
.... Replace grease filters before operating hood. Always wipe dry to the metal filter. 2. Replace with Charcoal Filter Kit Number W10412939. Cleaning Method: Non-Vented (recirculating) Installation Filters The charcoal filter is attached at the left corners and pull down . 3. The panel is not washable. Exterior Surfaces To avoid damage to the...

Installation Guide
Page 15
... precision used to build every new appliance. Accessories Recirculation Kit (for non-vented installations only) Order Part Number W10680067 Charcoal Filter Kit (for non-vented installations only) Order Part Number W10412939 Chimney Extension Kit Order Part Number W10688278 Power Cord...Canada. ■■ Features and specifications on our full line of appliances. ■■ Referrals to local dealers. ■■ Installation information. ■■ Use and maintenance procedures. ■■ Accessory and repair parts sales. ■■ Specialized customer assistance (...
... precision used to build every new appliance. Accessories Recirculation Kit (for non-vented installations only) Order Part Number W10680067 Charcoal Filter Kit (for non-vented installations only) Order Part Number W10412939 Chimney Extension Kit Order Part Number W10688278 Power Cord...Canada. ■■ Features and specifications on our full line of appliances. ■■ Referrals to local dealers. ■■ Installation information. ■■ Use and maintenance procedures. ■■ Accessory and repair parts sales. ■■ Specialized customer assistance (...
Installation Guide
Page 16
... PURCHASE IS REQUIRED TO OBTAIN WARRANTY SERVICE. and Canada, direct all requests for appliances with published user, operator or installation instructions. 2. Proof of incidental or consequential damages, so these excluded circumstances shall be addressed without service. Some states ...and provinces do not allow the exclusion or limitation of original purchase date is installed, operated and maintained according to instructions attached to determine whether another warranty applies. YOUR SOLE AND EXCLUSIVE REMEDY UNDER...
... PURCHASE IS REQUIRED TO OBTAIN WARRANTY SERVICE. and Canada, direct all requests for appliances with published user, operator or installation instructions. 2. Proof of incidental or consequential damages, so these excluded circumstances shall be addressed without service. Some states ...and provinces do not allow the exclusion or limitation of original purchase date is installed, operated and maintained according to instructions attached to determine whether another warranty applies. YOUR SOLE AND EXCLUSIVE REMEDY UNDER...
Use & Care Guide
Page 1
IMPORTANT : LIRE ET CONSERVER CES INSTRUCTIONS. 36" (91.4 CM) ISLAND-MOUNT CANOPY RANGE HOOD Installation Instructions and Use & Care Guide For questions about features, operation/performance, parts, accessories or service, call: 1-800-253-1301 or visit our website at ...our website at www.whirlpool.ca HOTTE DE CUISINIÈRE CONFIGURÉE EN ÎLOT 36" (91,4 CM) Instructions d'installation et Guide d'utilisation et d'entretien Au Canada, pour assistance, installation ou service, composer le 1-800-807-6777 ou visiter notre site Web à www.whirlpool.ca Table of Contents/Table des...
IMPORTANT : LIRE ET CONSERVER CES INSTRUCTIONS. 36" (91.4 CM) ISLAND-MOUNT CANOPY RANGE HOOD Installation Instructions and Use & Care Guide For questions about features, operation/performance, parts, accessories or service, call: 1-800-253-1301 or visit our website at ...our website at www.whirlpool.ca HOTTE DE CUISINIÈRE CONFIGURÉE EN ÎLOT 36" (91,4 CM) Instructions d'installation et Guide d'utilisation et d'entretien Au Canada, pour assistance, installation ou service, composer le 1-800-807-6777 ou visiter notre site Web à www.whirlpool.ca Table of Contents/Table des...
Use & Care Guide
Page 2
... U.S.A 15 In Canada 15 Accessories 15 WARRANTY 16 TABLE DES MATIÈRES SÉCURITÉ DE LA HOTTE DE CUISINIÈRE 17 EXIGENCES D'INSTALLATION 19 Outils et pièces 19 Exigences d'emplacement 19 Exigences concernant l'évacuation 20 Spécifications électriques 21 INSTRUCTIONS...
... U.S.A 15 In Canada 15 Accessories 15 WARRANTY 16 TABLE DES MATIÈRES SÉCURITÉ DE LA HOTTE DE CUISINIÈRE 17 EXIGENCES D'INSTALLATION 19 Outils et pièces 19 Exigences d'emplacement 19 Exigences concernant l'évacuation 20 Spécifications électriques 21 INSTRUCTIONS...

Use & Care Guide
Page 4
...Horizontal support ■■ 8 - Vertical supports ■■ Vent transition with any tools listed here. All openings in "Install Range Hood" section. Lower vent covers ■■ 4 - Cabinet opening dimensions that all governing codes and ordinances. Canopy hood... range hood. This range hood is required. Tools Needed ■■ Level ■■ Drill with canopy glass, retainer brackets, rubber seals, and LED lights installed ■■ Metal grease filter ■■ 60 - 4.2 x 8 mm screws ■■ 4 - 3.5 x 6.5 mm screws ■■ 4 - 5 ...
...Horizontal support ■■ 8 - Vertical supports ■■ Vent transition with any tools listed here. All openings in "Install Range Hood" section. Lower vent covers ■■ 4 - Cabinet opening dimensions that all governing codes and ordinances. Canopy hood... range hood. This range hood is required. Tools Needed ■■ Level ■■ Drill with canopy glass, retainer brackets, rubber seals, and LED lights installed ■■ Metal grease filter ■■ 60 - 4.2 x 8 mm screws ■■ 4 - 3.5 x 6.5 mm screws ■■ 4 - 5 ...