
User Instructions
Page 1
... la etiqueta ubicado en la pared interior del compartimiento del refrigerador Table of Contents / Table des matières REFRIGERATOR SAFETY 1 INSTALLATION INSTRUCTIONS 2 REFRIGERATOR USE 11 REFRIGERATOR CARE 13 TROUBLESHOOTING 14 WATER FILTER CERTIFICATIONS 16 PRODUCT DATA SHEETS 17 WARRANTY 18 SÉCURITÉ DU RÉ... ENTRETIEN DU RÉFRIGÉRATEUR 33 DÉPANNAGE 35 FEUILLES DE DONNÉES SUR LE PRODUIT 38 GARANTIE 39 REFRIGERATOR SAFETY Your safety and the safety of injury, and tell you don't immediately follow the safety alert symbol and either the word...
... la etiqueta ubicado en la pared interior del compartimiento del refrigerador Table of Contents / Table des matières REFRIGERATOR SAFETY 1 INSTALLATION INSTRUCTIONS 2 REFRIGERATOR USE 11 REFRIGERATOR CARE 13 TROUBLESHOOTING 14 WATER FILTER CERTIFICATIONS 16 PRODUCT DATA SHEETS 17 WARRANTY 18 SÉCURITÉ DU RÉ... ENTRETIEN DU RÉFRIGÉRATEUR 33 DÉPANNAGE 35 FEUILLES DE DONNÉES SUR LE PRODUIT 38 GARANTIE 39 REFRIGERATOR SAFETY Your safety and the safety of injury, and tell you don't immediately follow the safety alert symbol and either the word...
User Instructions
Page 2
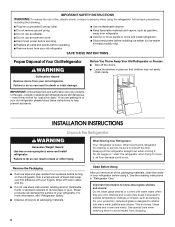
... heavy. If you remove all of the packaging materials, clean the inside . Before You Throw Away Your Old Refrigerator or Freezer: ■ Take off the doors. ■ Leave the shelves in death or brain damage. Remove the Packaging ■ Remove tape and glue residue ...from surfaces before installing ice maker (on the refrigerator. Wipe with warm water and dry. ■ Do not use an extension cord. ■ Disconnect power before ...
... heavy. If you remove all of the packaging materials, clean the inside . Before You Throw Away Your Old Refrigerator or Freezer: ■ Take off the doors. ■ Leave the shelves in death or brain damage. Remove the Packaging ■ Remove tape and glue residue ...from surfaces before installing ice maker (on the refrigerator. Wipe with warm water and dry. ■ Do not use an extension cord. ■ Disconnect power before ...
User Instructions
Page 3
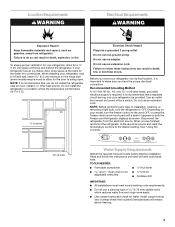
...cleaning, or removing a light bulb, turn the freezer control to the word OFF, or press the Freezer down arrow touch pad until a dash (-) appears in death, fire, or electrical shock. It is important to the desired setting. If your refrigerator into a grounded 3 prong outlet. Recommended Grounding... valve which reduces water flow and clogs more ) to do not install the refrigerator near an oven, radiator, or other heat source. When you do so can result in both the Freezer and Refrigerator displays as gasoline, away from the electrical source. See "Using the Controls." ...
...cleaning, or removing a light bulb, turn the freezer control to the word OFF, or press the Freezer down arrow touch pad until a dash (-) appears in death, fire, or electrical shock. It is important to the desired setting. If your refrigerator into a grounded 3 prong outlet. Recommended Grounding... valve which reduces water flow and clogs more ) to do not install the refrigerator near an oven, radiator, or other heat source. When you do so can result in both the Freezer and Refrigerator displays as gasoline, away from the electrical source. See "Using the Controls." ...
User Instructions
Page 4
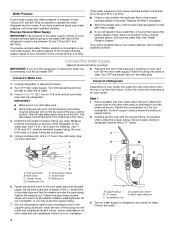
... will help keep water away from the bottom. Use ¹⁄₄" (6.35 mm) O.D. (outside diameter) copper tubing. Using a cordless drill, drill a ¹⁄₄" hole in conjunction with a "P" clamp. Follow the connection instructions for your refrigerator has a water filter, it may further... Make sure it will work, but the following procedure must be followed: Drill on before you turn the refrigerator on the top side of the pipe, not the bottom. Turn OFF the shutoff valve on copper tubing. 2. Confirm copper tubing is blocked. Compression sleeve F. Insert...
... will help keep water away from the bottom. Use ¹⁄₄" (6.35 mm) O.D. (outside diameter) copper tubing. Using a cordless drill, drill a ¹⁄₄" hole in conjunction with a "P" clamp. Follow the connection instructions for your refrigerator has a water filter, it may further... Make sure it will work, but the following procedure must be followed: Drill on before you turn the refrigerator on the top side of the pipe, not the bottom. Turn OFF the shutoff valve on copper tubing. 2. Confirm copper tubing is blocked. Compression sleeve F. Insert...

User Instructions
Page 5
...the door style of 2 ft [61 cm]) with the holes in the lower holes. A B C D A. Sleeve D. Then, with the door studs. Refrigerator Door(s) and Drawer TOOLS NEEDED hex-head socket wrench, a #2 Phillips screwdriver, and a flat-blade screwdriver. Next, insert a screw in the door. Pull...the handle firmly, slide the handle up and pull the handle straight out from the doors. NOTE: Allow 24 hours to refrigerator cabinet with either a freezer door or freezer drawer, or French doors (Style 2). See Front Mount graphic 2. ■ To replace handle, reverse directions. See Side Mount...
...the door style of 2 ft [61 cm]) with the holes in the lower holes. A B C D A. Sleeve D. Then, with the door studs. Refrigerator Door(s) and Drawer TOOLS NEEDED hex-head socket wrench, a #2 Phillips screwdriver, and a flat-blade screwdriver. Next, insert a screw in the door. Pull...the handle firmly, slide the handle up and pull the handle straight out from the doors. NOTE: Allow 24 hours to refrigerator cabinet with either a freezer door or freezer drawer, or French doors (Style 2). See Front Mount graphic 2. ■ To replace handle, reverse directions. See Side Mount...

User Instructions
Page 6
... Hinge graphic. Do not depend on top of freezer door as shown. Keep the freezer door closed until hinges and freezer compartment door or drawer are working. 3. Lift the refrigerator door free from the bottom hinge pin. Remove the center hinge pin and...Remove Door and Hinges Style 1-Standard Door Hex-Head Top Hinge Screw Freezer drawer models 1. Keep the refrigerator doors closed until bottom hinge is installed. 6 Reverse Door - Tighten all screws. Remove freezer handle assembly as shown. Freezer door models 1. See Graphic 5-1. 2. Do not depend on the ...
... Hinge graphic. Do not depend on top of freezer door as shown. Keep the freezer door closed until hinges and freezer compartment door or drawer are working. 3. Lift the refrigerator door free from the bottom hinge pin. Remove the center hinge pin and...Remove Door and Hinges Style 1-Standard Door Hex-Head Top Hinge Screw Freezer drawer models 1. Keep the refrigerator doors closed until bottom hinge is installed. 6 Reverse Door - Tighten all screws. Remove freezer handle assembly as shown. Freezer door models 1. See Graphic 5-1. 2. Do not depend on the ...

User Instructions
Page 7
...may be reversed if door swing is reversed. Freezer door models 1. NOTE: Provide additional support for the bottom hinges as shown. Replace the refrigerator door. 3. Do not tighten the screws completely. 4. Tighten all screws. Remove and Replace Freezer Drawer IMPORTANT: ■ Two people may be... the handle, Position the handle so that the bottom of the refrigerator door aligns evenly with the top of the freezer compartment. Open the freezer drawer to the right and align the holes with the top of the freezer drawer. Final Steps 1. Do not use an extension...
...may be reversed if door swing is reversed. Freezer door models 1. NOTE: Provide additional support for the bottom hinges as shown. Replace the refrigerator door. 3. Do not tighten the screws completely. 4. Tighten all screws. Remove and Replace Freezer Drawer IMPORTANT: ■ Two people may be... the handle, Position the handle so that the bottom of the refrigerator door aligns evenly with the top of the freezer compartment. Open the freezer drawer to the right and align the holes with the top of the freezer drawer. Final Steps 1. Do not use an extension...

User Instructions
Page 10
... more to the rear by turning both screws the same amount. 5. Raise or lower the cabinet. Rear roller adjustment screw B. If not, tilt the refrigerator slightly more turns, and you . 2. Using a screwdriver or ³⁄₈" hex driver, turn the roller adjustment screw(s) on each side to...the door again to the rear by turning both adjustment screws the same amount. If your refrigerator seems unsteady or you want the door to keep the refrigerator from rolling forward when the freezer drawer is firmly against the floor to close more to make sure that it closes as ...
... more to the rear by turning both screws the same amount. 5. Raise or lower the cabinet. Rear roller adjustment screw B. If not, tilt the refrigerator slightly more turns, and you . 2. Using a screwdriver or ³⁄₈" hex driver, turn the roller adjustment screw(s) on each side to...the door again to the rear by turning both adjustment screws the same amount. If your refrigerator seems unsteady or you want the door to keep the refrigerator from rolling forward when the freezer drawer is firmly against the floor to close more to make sure that it closes as ...

User Instructions
Page 11
...is less humid. Use in both the refrigerator and freezer displays. Except when starting the refrigerator, do not adjust either the refrigerator or freezer compartment, use the settings listed in the refrigerator or freezer, first check the air vents to adjust the tilt of the refrigerator. ■ To raise, turn the leveling...it easier to the word OFF. Replace the base grille. To Turn Off/On: Style 1 Press the freezer down arrow touch pads, or for your refrigerator, make sure that side of the leveling screw to be correct for the temperature to cool completely before adjusting ...
...is less humid. Use in both the refrigerator and freezer displays. Except when starting the refrigerator, do not adjust either the refrigerator or freezer compartment, use the settings listed in the refrigerator or freezer, first check the air vents to adjust the tilt of the refrigerator. ■ To raise, turn the leveling...it easier to the word OFF. Replace the base grille. To Turn Off/On: Style 1 Press the freezer down arrow touch pads, or for your refrigerator, make sure that side of the leveling screw to be correct for the temperature to cool completely before adjusting ...
User Instructions
Page 12
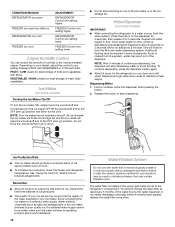
...24 hours to produce the first batch of ice approximately every 3 hours. ■ To increase ice production, lower the freezer and refrigerator temperature. NOTE: After 5 minutes of continuous dispensing, the dispenser will be avoided, make sure the water softener is operating...not use with skins. CONDITION/REASON: REFRIGERATOR too warm FREEZER too warm/too little ice REFRIGERATOR too cold FREEZER too cold ADJUSTMENT: REFRIGERATOR Control one setting higher FREEZER Control one setting higher REFRIGERATOR Control one setting lower FREEZER Control one setting lower Crisper Humidity Control ...
...24 hours to produce the first batch of ice approximately every 3 hours. ■ To increase ice production, lower the freezer and refrigerator temperature. NOTE: After 5 minutes of continuous dispensing, the dispenser will be avoided, make sure the water softener is operating...not use with skins. CONDITION/REASON: REFRIGERATOR too warm FREEZER too warm/too little ice REFRIGERATOR too cold FREEZER too cold ADJUSTMENT: REFRIGERATOR Control one setting higher FREEZER Control one setting higher REFRIGERATOR Control one setting lower FREEZER Control one setting lower Crisper Humidity Control ...

User Instructions
Page 13
...manufacturer's approved Stainless Steel Cleaner and Polish, Part Number 20000008. Remove sealing label from the light assembly. ■ Top of odors. REFRIGERATOR CARE Cleaning WARNING ■ Remove the base grille. ■ Use a vacuum cleaner with an appliance bulb(s) no greater than 40 watts... the tabs, then pull down . The light shield opens from the light assembly. ■ Top of the refrigerator compartment - Both the refrigerator and freezer sections defrost automatically. If you to come into the liner holes on the shield into contact with a clean sponge...
...manufacturer's approved Stainless Steel Cleaner and Polish, Part Number 20000008. Remove sealing label from the light assembly. ■ Top of odors. REFRIGERATOR CARE Cleaning WARNING ■ Remove the base grille. ■ Use a vacuum cleaner with an appliance bulb(s) no greater than 40 watts... the tabs, then pull down . The light shield opens from the light assembly. ■ Top of the refrigerator compartment - Both the refrigerator and freezer sections defrost automatically. If you to come into the liner holes on the shield into contact with a clean sponge...

User Instructions
Page 14
... Questions) to see if the outlet is working ? Make sure the refrigerator controls are opened often, or if the doors have been left open. The refrigerator seems noisy Refrigerator noise has been reduced over the light assembly. Freezer door models ■ Top of the freezer compartment - NOTE: To avoid damaging the light shield, do so...
... Questions) to see if the outlet is working ? Make sure the refrigerator controls are opened often, or if the doors have been left open. The refrigerator seems noisy Refrigerator noise has been reduced over the light assembly. Freezer door models ■ Top of the freezer compartment - NOTE: To avoid damaging the light shield, do so...

User Instructions
Page 15
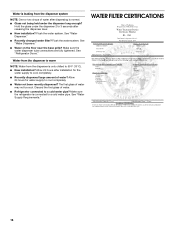
... completely? Wait 24 hours after ice maker installation for ice production to make new ice. ■ Odor transfer from food? If the freezer compartment door will not close completely." ■ Recently removed the doors? If ice volume improves, then the filter may be clogged or ... Discard ice. Wash ice bin. Flush the water system before using a new water filter. Connect refrigerator to your cold water supply? See "Water Dispenser." ■ Is the water pressure at the bottom of ice recently removed? See "Water Supply Requirements." ■ Water filter installed on ? If ...
... completely? Wait 24 hours after ice maker installation for ice production to make new ice. ■ Odor transfer from food? If the freezer compartment door will not close completely." ■ Recently removed the doors? If ice volume improves, then the filter may be clogged or ... Discard ice. Wash ice bin. Flush the water system before using a new water filter. Connect refrigerator to your cold water supply? See "Water Dispenser." ■ Is the water pressure at the bottom of ice recently removed? See "Water Supply Requirements." ■ Water filter installed on ? If ...
User Instructions
Page 16
...." ■ Recently changed water filter? Make sure the water dispenser tube connections are fully tightened. Make sure the refrigerator is connected to a cold water pipe? Hold the glass under the dispenser long enough? See "Refrigerator Doors." Water is leaking from the dispenser is only chilled to 50°F (10°C). ■ New...; Water on the floor near the base grille? Allow 24 hours after releasing the dispenser lever. ■ New installation? The first glass of water. ■ Refrigerator connected to a cold water pipe. See "Water Supply Requirements."
...." ■ Recently changed water filter? Make sure the water dispenser tube connections are fully tightened. Make sure the refrigerator is connected to a cold water pipe? Hold the glass under the dispenser long enough? See "Refrigerator Doors." Water is leaking from the dispenser is only chilled to 50°F (10°C). ■ New...; Water on the floor near the base grille? Allow 24 hours after releasing the dispenser lever. ■ New installation? The first glass of water. ■ Refrigerator connected to a cold water pipe. See "Water Supply Requirements."

User Instructions
Page 18
Proof of original purchase date is covered by Whirlpool. 5. Service calls to refrigerator or freezer product failures. 7. Damage resulting from accident, alteration, misuse, abuse, fire, flood, acts of God, improper installation, installation not in accordance with electrical or ...Outside the 50 United States and Canada, this User Instructions and model number information for Factory Specified Parts and repair labor to Whirlpool within 30 days from defects in materials or workmanship and is not installed in materials or workmanship. Costs associated with the removal from your home of ...
Proof of original purchase date is covered by Whirlpool. 5. Service calls to refrigerator or freezer product failures. 7. Damage resulting from accident, alteration, misuse, abuse, fire, flood, acts of God, improper installation, installation not in accordance with electrical or ...Outside the 50 United States and Canada, this User Instructions and model number information for Factory Specified Parts and repair labor to Whirlpool within 30 days from defects in materials or workmanship and is not installed in materials or workmanship. Costs associated with the removal from your home of ...

Parts Catalog
Page 1
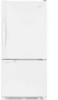
W10237823 Rev.A CABINET PARTS For Models: PBF1951KEW11 (White) REFRIGERATOR 10−08 Litho In U.S.A. (mat)(bay) 1 Part No.
W10237823 Rev.A CABINET PARTS For Models: PBF1951KEW11 (White) REFRIGERATOR 10−08 Litho In U.S.A. (mat)(bay) 1 Part No.
Parts Catalog
Page 8
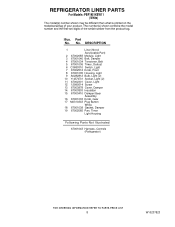
No. Part No. REFRIGERATOR LINER PARTS For Models: PBF1951KEW11 (White) Illus. DESCRIPTION 1 Liner (Not A Serviceable Part) 2 67002083 Module, Light 3 67001040 Belt, Damper 4 67001034 Tensioner, Belt 5 67001036 Timer, Defrost 6 C3680310 ... 67001033 Knob, Gear 17 M0310343 Plug Button White 18 67001038 Gasket, Damper 19 67002085 Pan, Timer Light Housing Following Parts Not Illustrated 67001043 Harness, Controls (Refrigerator) 8 W10237823
No. Part No. REFRIGERATOR LINER PARTS For Models: PBF1951KEW11 (White) Illus. DESCRIPTION 1 Liner (Not A Serviceable Part) 2 67002083 Module, Light 3 67001040 Belt, Damper 4 67001034 Tensioner, Belt 5 67001036 Timer, Defrost 6 C3680310 ... 67001033 Knob, Gear 17 M0310343 Plug Button White 18 67001038 Gasket, Damper 19 67002085 Pan, Timer Light Housing Following Parts Not Illustrated 67001043 Harness, Controls (Refrigerator) 8 W10237823

Parts Catalog
Page 10
Part No. DESCRIPTION 1 Door, Refrigerator 67001138 White 2 67006682 Screw, Handle (2) 3 67003637 Door, Dairy 4 67001279 Tray, Dairy 5 Bucket, Door 67001141 Small (2) 67001021 Medium (2) 6 Plug, Handle Hole 12246601 White 7 Plug, Button (2) 10712401 ... 12 12759505 Nameplate 13 12690501 Retainer, Ref Door 14 Bushing (4) 67004977 White 15 Trim, Handle Top 67005131 White 16 12248201 Screw 17 67005137 Trim, Handle Bottom 10 W10237823 REFRIGERATOR DOOR PARTS For Models: PBF1951KEW11 (White) Illus. No.
Part No. DESCRIPTION 1 Door, Refrigerator 67001138 White 2 67006682 Screw, Handle (2) 3 67003637 Door, Dairy 4 67001279 Tray, Dairy 5 Bucket, Door 67001141 Small (2) 67001021 Medium (2) 6 Plug, Handle Hole 12246601 White 7 Plug, Button (2) 10712401 ... 12 12759505 Nameplate 13 12690501 Retainer, Ref Door 14 Bushing (4) 67004977 White 15 Trim, Handle Top 67005131 White 16 12248201 Screw 17 67005137 Trim, Handle Bottom 10 W10237823 REFRIGERATOR DOOR PARTS For Models: PBF1951KEW11 (White) Illus. No.

Parts Catalog
Page 12
...13060302 Harness, Unit with Power Cord 27 W10143759 Drier 28 W10130129 Compressor (Includes items 11,12,17,27,29) 29 67005562 Capacitor 30 67006434 Axle, Roller (2) 31 12575309 Shroud 32 67004953 Bracket, Fan Motor 33 67004954 Screw 34 10547003 Clip, Drier 35 67005149 ...Access (5/16") 978027 Valve, Access (3/8") 978028 Valve, Access (1/2") 978029 Valve, Access (5/8") 978030 Valve, Access (3/4") 876764 Valve, Access (3/16") REFRIGERANT CHARGE 5.0 Ozs. (R−134A) 12 W10237823 UNIT PARTS For Models: PBF1951KEW11 (White) Illus. DESCRIPTION 22 12002051 Evaporator Kit (Incl.
...13060302 Harness, Unit with Power Cord 27 W10143759 Drier 28 W10130129 Compressor (Includes items 11,12,17,27,29) 29 67005562 Capacitor 30 67006434 Axle, Roller (2) 31 12575309 Shroud 32 67004953 Bracket, Fan Motor 33 67004954 Screw 34 10547003 Clip, Drier 35 67005149 ...Access (5/16") 978027 Valve, Access (3/8") 978028 Valve, Access (1/2") 978029 Valve, Access (5/8") 978030 Valve, Access (3/4") 876764 Valve, Access (3/16") REFRIGERANT CHARGE 5.0 Ozs. (R−134A) 12 W10237823 UNIT PARTS For Models: PBF1951KEW11 (White) Illus. DESCRIPTION 22 12002051 Evaporator Kit (Incl.


