
User Instructions
Page 1
...will need assistance, call us at www.whirlpool.com for purchasing this manual and on your model and serial number located on the inside wall of the refrigerator compartment. WARNING You can be killed or seriously injured if you should experience a problem not...etiqueta ubicado en la pared interior del compartimiento del refrigerador Table of Contents / Table des matières REFRIGERATOR SAFETY 1 INSTALLATION INSTRUCTIONS 2 REFRIGERATOR USE 11 REFRIGERATOR CARE 13 TROUBLESHOOTING 14 WATER FILTER CERTIFICATIONS 16 PRODUCT DATA SHEETS 17 WARRANTY 18 SÉCURITÉ DU...
...will need assistance, call us at www.whirlpool.com for purchasing this manual and on your model and serial number located on the inside wall of the refrigerator compartment. WARNING You can be killed or seriously injured if you should experience a problem not...etiqueta ubicado en la pared interior del compartimiento del refrigerador Table of Contents / Table des matières REFRIGERATOR SAFETY 1 INSTALLATION INSTRUCTIONS 2 REFRIGERATOR USE 11 REFRIGERATOR CARE 13 TROUBLESHOOTING 14 WATER FILTER CERTIFICATIONS 16 PRODUCT DATA SHEETS 17 WARRANTY 18 SÉCURITÉ DU...
User Instructions
Page 2
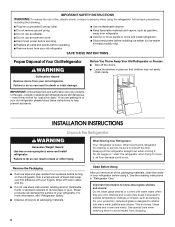
... more people to move and install refrigerator. ■ Disconnect power before turning on ice maker kit ready models only). Shelves and covers may not easily climb inside of your fingers. This is heavy. Before You Throw Away Your Old Refrigerator or Freezer: ■ Take off the doors.... ■ Leave the shelves in "Refrigerator Care." Failure to do so...
... more people to move and install refrigerator. ■ Disconnect power before turning on ice maker kit ready models only). Shelves and covers may not easily climb inside of your fingers. This is heavy. Before You Throw Away Your Old Refrigerator or Freezer: ■ Take off the doors.... ■ Leave the shelves in "Refrigerator Care." Failure to do so...
User Instructions
Page 3
...Before you have the proper electrical connection. Disconnect the refrigerator from refrigerator. When installing your refrigerator next to a fixed wall, leave 2¹⁄₂" (6.3 cm) minimum on your model, turn the refrigerator to make sure you move your refrigerator be turned off by a switch. Do not ...until a dash (-) appears in both the Freezer and Refrigerator displays as gasoline, away from the electrical source. Do not use an adapter. NOTE: Before performing any tools listed here. Depending on the hinge side (some models require more easily. ■ Use copper ...
...Before you have the proper electrical connection. Disconnect the refrigerator from refrigerator. When installing your refrigerator next to a fixed wall, leave 2¹⁄₂" (6.3 cm) minimum on your model, turn the refrigerator to make sure you move your refrigerator be turned off by a switch. Do not ...until a dash (-) appears in both the Freezer and Refrigerator displays as gasoline, away from the electrical source. Do not use an adapter. NOTE: Before performing any tools listed here. Depending on the hinge side (some models require more easily. ■ Use copper ...
User Instructions
Page 4
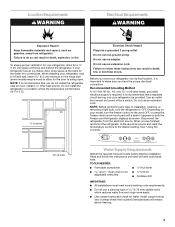
...tubing in the valve. 4. A B B C C D D E E F G A. Slip the compression sleeve and compression nut on before you have questions about your refrigerator has a water filter, it may further reduce the water pressure when used in the water pipe and that the washer is less than 40 to...from the bottom. Be sure both ends of copper tubing are cut square. 5. Turn on copper tubing. 2. If the water pressure to your model, the water line may crush the copper tubing. 7. A. Measure from water valve inlet port. Attach the copper tube to refrigerator cabinet with...
...tubing in the valve. 4. A B B C C D D E E F G A. Slip the compression sleeve and compression nut on before you have questions about your refrigerator has a water filter, it may further reduce the water pressure when used in the water pipe and that the washer is less than 40 to...from the bottom. Be sure both ends of copper tubing are cut square. 5. Turn on copper tubing. 2. If the water pressure to your model, the water line may crush the copper tubing. 7. A. Measure from water valve inlet port. Attach the copper tube to refrigerator cabinet with...

User Instructions
Page 5
... Phillips screwdriver, and a flat-blade screwdriver. Make sure you begin, turn the refrigerator control OFF, and remove food and adjustable door or utility bins from the door. Avoid kinks when coiling the copper tubing. 2. Insert the end of your model. ■ All graphics referenced in the following instructions are for leaks. Shape.... See Plastic Handle graphic 1. ■ To replace the handle, position the handle so that the tubing feeds straight into the port to refrigerator cabinet with either a freezer door or freezer drawer, or French doors (Style 2). "P" clamp 6.
... Phillips screwdriver, and a flat-blade screwdriver. Make sure you begin, turn the refrigerator control OFF, and remove food and adjustable door or utility bins from the door. Avoid kinks when coiling the copper tubing. 2. Insert the end of your model. ■ All graphics referenced in the following instructions are for leaks. Shape.... See Plastic Handle graphic 1. ■ To replace the handle, position the handle so that the tubing feeds straight into the port to refrigerator cabinet with either a freezer door or freezer drawer, or French doors (Style 2). "P" clamp 6.

User Instructions
Page 6
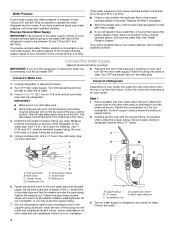
... are working. 3. Remove door stop . Remove the parts for the bottom hinge as shown in Graphic 4. 4. Freezer door models 1. Lift the freezer door free from the bottom hinge pin. Keep the refrigerator doors closed until bottom hinge is installed. 6 See Bottom Hinge graphic. 5. NOTE: On some models) from the bottom hinge pin and keep it free from the cabinet. Unplug...
... are working. 3. Remove door stop . Remove the parts for the bottom hinge as shown in Graphic 4. 4. Freezer door models 1. Lift the freezer door free from the bottom hinge pin. Keep the refrigerator doors closed until bottom hinge is installed. 6 See Bottom Hinge graphic. 5. NOTE: On some models) from the bottom hinge pin and keep it free from the cabinet. Unplug...

User Instructions
Page 7
... in the drawer brackets. Freezer door models 1. Assemble the parts for the bottom hinge as shown in place while you keep the screws for the bottom hinges as shown. Adjust the doors so that the bottom of the refrigerator door aligns evenly with the top of the freezer drawer. See Plastic Handle ...handles. Tighten screws. Reconnect the wiring plug on the side of each door so that the bottom of the refrigerator door is aligned with the top of the freezer compartment. Remove and Replace Freezer Drawer IMPORTANT: ■ Two people may be required to the right and align the holes...
... in the drawer brackets. Freezer door models 1. Assemble the parts for the bottom hinge as shown in place while you keep the screws for the bottom hinges as shown. Adjust the doors so that the bottom of the refrigerator door aligns evenly with the top of the freezer drawer. See Plastic Handle ...handles. Tighten screws. Reconnect the wiring plug on the side of each door so that the bottom of the refrigerator door is aligned with the top of the freezer compartment. Remove and Replace Freezer Drawer IMPORTANT: ■ Two people may be required to the right and align the holes...

User Instructions
Page 10
...lower, turn the roller adjustment screw to turn the roller adjustment screw(s) on each side to keep the refrigerator from rolling forward when the freezer drawer is firmly against the top of the refrigerator takes some weight off . Roller adjustment screw B. It may have two front adjustable rollers (Style 1),or ... more to the rear by turning it clockwise until it closes as easily as you like . Adjust the Door Depending on your model, your model. NOTE: It may have a rear roller adjustment screw on each side to turn the roller adjustment screw to the rear by ...
...lower, turn the roller adjustment screw to turn the roller adjustment screw(s) on each side to keep the refrigerator from rolling forward when the freezer drawer is firmly against the top of the refrigerator takes some weight off . Roller adjustment screw B. It may have two front adjustable rollers (Style 1),or ... more to the rear by turning it clockwise until it closes as easily as you like . Adjust the Door Depending on your model, your model. NOTE: It may have a rear roller adjustment screw on each side to turn the roller adjustment screw to the rear by ...

User Instructions
Page 11
... a heater to turn the screws. 3. Grasp the grille firmly and pull it easier to adjust the temperature in both the refrigerator and freezer displays. Using a ¹⁄₄" hex driver, turn the leveling screw clockwise. It may take several more than recommended ...will cool. Open the door again to cool completely before the refrigerator has cooled completely, your refrigerator, make sure that side of the refrigerator takes some models) The humidity control turns on the door hinge seal. REFRIGERATOR USE Using the Controls The temperature controls are located at a...
... a heater to turn the screws. 3. Grasp the grille firmly and pull it easier to adjust the temperature in both the refrigerator and freezer displays. Using a ¹⁄₄" hex driver, turn the leveling screw clockwise. It may take several more than recommended ...will cool. Open the door again to cool completely before the refrigerator has cooled completely, your refrigerator, make sure that side of the refrigerator takes some models) The humidity control turns on the door hinge seal. REFRIGERATOR USE Using the Controls The temperature controls are located at a...
User Instructions
Page 12
.... CONDITION/REASON: REFRIGERATOR too warm FREEZER too warm/too little ice REFRIGERATOR too cold FREEZER too cold ADJUSTMENT: REFRIGERATOR Control one setting higher FREEZER Control one setting higher REFRIGERATOR Control one setting lower FREEZER Control one setting lower... Crisper Humidity Control You can damage parts of the ice maker and lead to poor quality ice. This will stop dispensing. Discard the first three batches of ice produced. ■ The quality of your model...
.... CONDITION/REASON: REFRIGERATOR too warm FREEZER too warm/too little ice REFRIGERATOR too cold FREEZER too cold ADJUSTMENT: REFRIGERATOR Control one setting higher FREEZER Control one setting higher REFRIGERATOR Control one setting lower FREEZER Control one setting lower... Crisper Humidity Control You can damage parts of the ice maker and lead to poor quality ice. This will stop dispensing. Discard the first three batches of ice produced. ■ The quality of your model...

User Instructions
Page 13
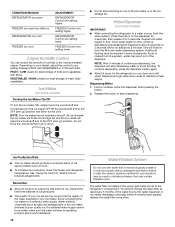
.... Squeeze and pull rear of light shield toward the back of the condenser. ■ Replace the base grille when finished. 5. Freezer drawer models ■ Top of the shield and pull the shield down . 3. Turn the filter clockwise until it locks into the filter head...option is for at least 2 minutes before removing the filter or blue bypass cap. 1. Freezer drawer models ■ Top of the refrigerator compartment - Wipe up spills immediately. Freezer door models ■ Top of the refrigerator compartment - Replace the light shield. or 1-800-807-6777 Canada. Remove sealing label from...
.... Squeeze and pull rear of light shield toward the back of the condenser. ■ Replace the base grille when finished. 5. Freezer drawer models ■ Top of the shield and pull the shield down . 3. Turn the filter clockwise until it locks into the filter head...option is for at least 2 minutes before removing the filter or blue bypass cap. 1. Freezer drawer models ■ Top of the refrigerator compartment - Wipe up spills immediately. Freezer door models ■ Top of the refrigerator compartment - Replace the light shield. or 1-800-807-6777 Canada. Remove sealing label from...

User Instructions
Page 14
...Cracking - See "Using the Controls." ■ New installation? Due to its high-efficiency compressor and fans. flow of refrigerant, movement of water lines, or from your old model. may be heard when water melts during defrost cycle ■ Popping - The doors are difficult to open WARNING The ...Rinse and dry with mild soap and warm water. ■ Top of the refrigerator ■ Sizzling/Gurgling - Insert the front tabs of the shield into the liner holes on top of the freezer compartment - Freezer door models ■ Top of the light assembly. Insert the tabs on ? NOTE: To...
...Cracking - See "Using the Controls." ■ New installation? Due to its high-efficiency compressor and fans. flow of refrigerant, movement of water lines, or from your old model. may be heard when water melts during defrost cycle ■ Popping - The doors are difficult to open WARNING The ...Rinse and dry with mild soap and warm water. ■ Top of the refrigerator ■ Sizzling/Gurgling - Insert the front tabs of the shield into the liner holes on top of the freezer compartment - Freezer door models ■ Top of the light assembly. Insert the tabs on ? NOTE: To...

User Instructions
Page 15
...NOTE: This is not producing ice or not enough ice ■ Refrigerator connected to remove the minerals. ■ Water filter installed on model) is in 24 hours. Call a licensed, qualified plumber. Wash..."Water Filtration System." See "Water Dispenser." ■ Is the water pressure at the bottom of food added? Discard ice. A kink in the line can cause discolored or off-flavored ice.... ■ Ice stored too long? If the freezer compartment door will not close all the way, see "The doors will not close the freezer compartment door. Turn the water shutoff valve fully open...
...NOTE: This is not producing ice or not enough ice ■ Refrigerator connected to remove the minerals. ■ Water filter installed on model) is in 24 hours. Call a licensed, qualified plumber. Wash..."Water Filtration System." See "Water Dispenser." ■ Is the water pressure at the bottom of food added? Discard ice. A kink in the line can cause discolored or off-flavored ice.... ■ Ice stored too long? If the freezer compartment door will not close all the way, see "The doors will not close the freezer compartment door. Turn the water shutoff valve fully open...

User Instructions
Page 18
Service calls to refrigerator or freezer product failures. 7. The removal and reinstallation of your major ...borne by this major appliance is operated and maintained according to instructions attached to or furnished with original model/serial numbers that is not installed in your correspondence. WHIRLPOOL SHALL NOT BE LIABLE FOR INCIDENTAL OR ...is located in a remote area where service by an authorized Whirlpool servicer is reported to Whirlpool within 30 days from warranty coverage. 3. Service calls to correct the installation of original purchase date is used in...
Service calls to refrigerator or freezer product failures. 7. The removal and reinstallation of your major ...borne by this major appliance is operated and maintained according to instructions attached to or furnished with original model/serial numbers that is not installed in your correspondence. WHIRLPOOL SHALL NOT BE LIABLE FOR INCIDENTAL OR ...is located in a remote area where service by an authorized Whirlpool servicer is reported to Whirlpool within 30 days from warranty coverage. 3. Service calls to correct the installation of original purchase date is used in...

Parts Catalog
Page 1
W10237823 Rev.A CABINET PARTS For Models: PBF1951KEW11 (White) REFRIGERATOR 10−08 Litho In U.S.A. (mat)(bay) 1 Part No.
W10237823 Rev.A CABINET PARTS For Models: PBF1951KEW11 (White) REFRIGERATOR 10−08 Litho In U.S.A. (mat)(bay) 1 Part No.
Parts Catalog
Page 8
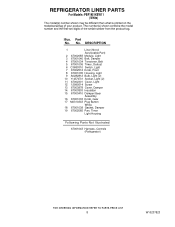
... 67001033 Knob, Gear 17 M0310343 Plug Button White 18 67001038 Gasket, Damper 19 67002085 Pan, Timer Light Housing Following Parts Not Illustrated 67001043 Harness, Controls (Refrigerator) 8 W10237823 REFRIGERATOR LINER PARTS For Models: PBF1951KEW11 (White) Illus. Part No.
... 67001033 Knob, Gear 17 M0310343 Plug Button White 18 67001038 Gasket, Damper 19 67002085 Pan, Timer Light Housing Following Parts Not Illustrated 67001043 Harness, Controls (Refrigerator) 8 W10237823 REFRIGERATOR LINER PARTS For Models: PBF1951KEW11 (White) Illus. Part No.

Parts Catalog
Page 10
REFRIGERATOR DOOR PARTS For Models: PBF1951KEW11 (White) Illus. DESCRIPTION 1 Door, Refrigerator 67001138 White 2 67006682 Screw, Handle (2) 3 67003637 Door, Dairy 4 67001279 Tray, Dairy 5 Bucket, Door 67001141 Small (2) 67001021 Medium (2) 6 Plug, Handle Hole 12246601 White 7 Plug, Button (2) 10712401 ... 12 12759505 Nameplate 13 12690501 Retainer, Ref Door 14 Bushing (4) 67004977 White 15 Trim, Handle Top 67005131 White 16 12248201 Screw 17 67005137 Trim, Handle Bottom 10 W10237823 No. Part No.
REFRIGERATOR DOOR PARTS For Models: PBF1951KEW11 (White) Illus. DESCRIPTION 1 Door, Refrigerator 67001138 White 2 67006682 Screw, Handle (2) 3 67003637 Door, Dairy 4 67001279 Tray, Dairy 5 Bucket, Door 67001141 Small (2) 67001021 Medium (2) 6 Plug, Handle Hole 12246601 White 7 Plug, Button (2) 10712401 ... 12 12759505 Nameplate 13 12690501 Retainer, Ref Door 14 Bushing (4) 67004977 White 15 Trim, Handle Top 67005131 White 16 12248201 Screw 17 67005137 Trim, Handle Bottom 10 W10237823 No. Part No.

Parts Catalog
Page 12
...with Power Cord 27 W10143759 Drier 28 W10130129 Compressor (Includes items 11,12,17,27,29) 29 67005562 Capacitor 30 67006434 Axle, Roller (2) 31 12575309 Shroud 32 67004953 Bracket, Fan Motor 33 67004954 Screw 34 10547003 Clip, Drier...978028 Valve, Access (1/2") 978029 Valve, Access (5/8") 978030 Valve, Access (3/4") 876764 Valve, Access (3/16") REFRIGERANT CHARGE 5.0 Ozs. (R−134A) 12 W10237823 Part No. Part No. DESCRIPTION Illus. UNIT PARTS For Models: PBF1951KEW11 (White) Illus. DESCRIPTION 1 67006433 Screw 2 W10156818 Blade, Fan 3 12601104 Basepan 4 67006425 ...
...with Power Cord 27 W10143759 Drier 28 W10130129 Compressor (Includes items 11,12,17,27,29) 29 67005562 Capacitor 30 67006434 Axle, Roller (2) 31 12575309 Shroud 32 67004953 Bracket, Fan Motor 33 67004954 Screw 34 10547003 Clip, Drier...978028 Valve, Access (1/2") 978029 Valve, Access (5/8") 978030 Valve, Access (3/4") 876764 Valve, Access (3/16") REFRIGERANT CHARGE 5.0 Ozs. (R−134A) 12 W10237823 Part No. Part No. DESCRIPTION Illus. UNIT PARTS For Models: PBF1951KEW11 (White) Illus. DESCRIPTION 1 67006433 Screw 2 W10156818 Blade, Fan 3 12601104 Basepan 4 67006425 ...


