Owners Manual
Page 1
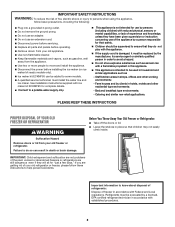
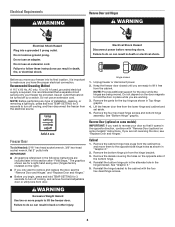
..., register your product model and serial numbers. Model Number Serial Number TABLE OF CONTENTS SAFETY 1 Proper Disposal of Your Old Freezer or Refrigerator 2 INSTALLING YOUR FREEZER 3 Unpacking 3 Location Requirements 3 Electrical Requirements 4 Freezer Door 4 Freezer Leveling and Door Closing 6 OPERATING YOUR FREEZER 7 Ensuring Proper Air Circulation 7 Using the Control 7 Freezer Features 8 CARING FOR YOUR FREEZER 8 Cleaning Your Freezer 8 Changing the Light Bulb(s 9 Power Interruptions 9 Moving Care 9 TROUBLESHOOTING 10 Freezer Operation 10 WARRANTY 12 SAFETY...
..., register your product model and serial numbers. Model Number Serial Number TABLE OF CONTENTS SAFETY 1 Proper Disposal of Your Old Freezer or Refrigerator 2 INSTALLING YOUR FREEZER 3 Unpacking 3 Location Requirements 3 Electrical Requirements 4 Freezer Door 4 Freezer Leveling and Door Closing 6 OPERATING YOUR FREEZER 7 Ensuring Proper Air Circulation 7 Using the Control 7 Freezer Features 8 CARING FOR YOUR FREEZER 8 Cleaning Your Freezer 8 Changing the Light Bulb(s 9 Power Interruptions 9 Moving Care 9 TROUBLESHOOTING 10 Freezer Operation 10 WARRANTY 12 SAFETY...
Owners Manual
Page 2
... old freezer or refrigerator. I Connect to a potable water supply only. This appliance is not intended for use by persons (including children) with reduced physical, sensory or mental capabilities, or lack of experience and knowledge, unless they have been given supervision or instruction concerning use an extension cord. Disconnect power before servicing. Replace all parts and panels before operating. Remove doors from...
... old freezer or refrigerator. I Connect to a potable water supply only. This appliance is not intended for use by persons (including children) with reduced physical, sensory or mental capabilities, or lack of experience and knowledge, unless they have been given supervision or instruction concerning use an extension cord. Disconnect power before servicing. Replace all parts and panels before operating. Remove doors from...
Owners Manual
Page 3
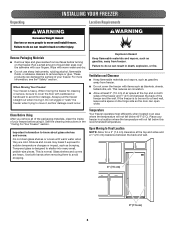
... blankets, sheets, tablecloths, etc. Tempered glass is to be sure to avoid oor damage. These products can open wider. Failure to Final Location NOTE: Allow for cleaning or service, be next to remove tape or glue. Place your freezer before turning on both hands when removing them to shatter into many small, pebble-size pieces. See the cleaning instructions in a location where the temperature will...
... blankets, sheets, tablecloths, etc. Tempered glass is to be sure to avoid oor damage. These products can open wider. Failure to Final Location NOTE: Allow for cleaning or service, be next to remove tape or glue. Place your freezer before turning on both hands when removing them to shatter into many small, pebble-size pieces. See the cleaning instructions in a location where the temperature will...
Owners Manual
Page 4
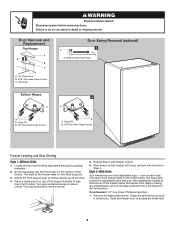
... TEMP SETTING for the top hinge as shown in Top Hinge graphic. 4. Lift the freezer door free from the hinge bracket. 3. Remove the cabinet hinge hole plugs from the cabinet. WARNING Excessive Weight Hazard Use two or more people to the opposite side hinge holes as shown in "Graphic 2." 2. Electrical Shock Hazard Disconnect power before removing doors. Reinstall the hinge bracket to remove and replace the door, see "Replace Door and Hinges." Do not use an extension cord. Remove...
... TEMP SETTING for the top hinge as shown in Top Hinge graphic. 4. Lift the freezer door free from the hinge bracket. 3. Remove the cabinet hinge hole plugs from the cabinet. WARNING Excessive Weight Hazard Use two or more people to the opposite side hinge holes as shown in "Graphic 2." 2. Electrical Shock Hazard Disconnect power before removing doors. Reinstall the hinge bracket to remove and replace the door, see "Replace Door and Hinges." Do not use an extension cord. Remove...
Owners Manual
Page 5
... working. 2. Remove the door stop to the bottom of the door. 3. Set aside the door until the bottom hinge is aligned perfectly with the hole in the door stop bracket to the opposite side making sure that hole plugs and screws are being moved. Replace the parts for the door while the hinges are in place. See "Using the Control." 5. See "Bottom Hinge" graphic. Reset the control. Check all removable door parts to door and food...
... working. 2. Remove the door stop to the bottom of the door. 3. Set aside the door until the bottom hinge is aligned perfectly with the hole in the door stop bracket to the opposite side making sure that hole plugs and screws are being moved. Replace the parts for the door while the hinges are in place. See "Using the Control." 5. See "Bottom Hinge" graphic. Reset the control. Check all removable door parts to door and food...
Owners Manual
Page 6
... to back. Remove the base grille screws. Place a leveling tool on top of the freezer rests on each side. Open the freezer door to lift the cabinet up off the floor. 4. WARNING Electrical Shock Hazard Disconnect power before removing doors. The base grille covers the adjustable brake feet and roller assemblies located at the bottom of the freezer below the freezer door. Tools Needed: 1/4" hex driver, Phillips screwdriver...
... to back. Remove the base grille screws. Place a leveling tool on top of the freezer rests on each side. Open the freezer door to lift the cabinet up off the floor. 4. WARNING Electrical Shock Hazard Disconnect power before removing doors. The base grille covers the adjustable brake feet and roller assemblies located at the bottom of the freezer below the freezer door. Tools Needed: 1/4" hex driver, Phillips screwdriver...
Owners Manual
Page 7
... when the door is designed to adjust the brake feet by turning them clockwise, until the rollers are off the brake feet. If not satisfied, continue to maintain the temperature at or near the bottom. The temperature control is opened. 6. If the vents are snug against the floor. Make sure the freezer is still set to keep the freezer level. 4. Using a 1/4" hex driver, turn both brake feet the...
... when the door is designed to adjust the brake feet by turning them clockwise, until the rollers are off the brake feet. If not satisfied, continue to maintain the temperature at or near the bottom. The temperature control is opened. 6. If the vents are snug against the floor. Make sure the freezer is still set to keep the freezer level. 4. Using a 1/4" hex driver, turn both brake feet the...
Owners Manual
Page 8
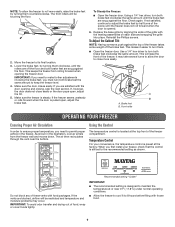
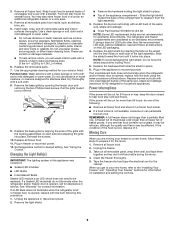
... Freeze setting for 3 seconds to Coldest. To turn on room temperature and number of times the freezer door is opened. This is evaporated. Freezer Shelves Store similar foods together and adjust the shelves to original position. To Remove and Replace a Shelf: 1. Remove the shelf by pressing TEMP SETTING to select the desired temperature setting from Cold to turn cooling off cooling. 2. Fast Freeze may not match those of the freezer feel warm. Lower the gate into many small, pebble-size pieces. Frost...
... Freeze setting for 3 seconds to Coldest. To turn on room temperature and number of times the freezer door is opened. This is evaporated. Freezer Shelves Store similar foods together and adjust the shelves to original position. To Remove and Replace a Shelf: 1. Remove the shelf by pressing TEMP SETTING to select the desired temperature setting from Cold to turn cooling off cooling. 2. Fast Freeze may not match those of the freezer feel warm. Lower the gate into many small, pebble-size pieces. Frost...
Owners Manual
Page 9
... refrigerator and/or freezer door is poor, dispose of the same size, shape and wattage (maximum 40 W) designed for household appliances. Replace burned out bulb with a soft cloth. 8. Unplug the freezer. 3. Tape the freezer shut and tape the electrical cord to desired setting. Remove all frozen food. 11. Remove the base grille by aligning the ends of the grille with a LED bulb of water). 6. Unplug the appliance or disconnect power. 2. Replace...
... refrigerator and/or freezer door is poor, dispose of the same size, shape and wattage (maximum 40 W) designed for household appliances. Replace burned out bulb with a soft cloth. 8. Unplug the freezer. 3. Tape the freezer shut and tape the electrical cord to desired setting. Remove all frozen food. 11. Remove the base grille by aligning the ends of the grille with a LED bulb of water). 6. Unplug the appliance or disconnect power. 2. Replace...
Owners Manual
Page 10
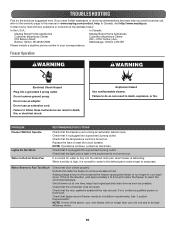
....maytag.com/product_help. Check that the light bulb is not burned out. Do not use an extension cord. It is not running an automatic defrost cycle. Mississauga, Ontario L5N 0B7 Please include a daytime phone number in the socket and is tight in your correspondence. Check that space around . TROUBLESHOOTING First try the solutions suggested here. Freezer Operation WARNING WARNING Electrical Shock Hazard Plug into the defrost drain pan...
....maytag.com/product_help. Check that the light bulb is not burned out. Do not use an extension cord. It is not running an automatic defrost cycle. Mississauga, Ontario L5N 0B7 Please include a daytime phone number in the socket and is tight in your correspondence. Check that space around . TROUBLESHOOTING First try the solutions suggested here. Freezer Operation WARNING WARNING Electrical Shock Hazard Plug into the defrost drain pan...
Owners Manual
Page 11
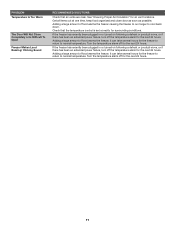
... or turned on following a defrost or product move , or if there has been an extended power failure, turn off for the next 24 hours. See "Ensuring Proper Air Circulation" for the freezer to return to normal temperature. PROBLEM Temperature Is Too Warm The Door Will Not Close Completely or Is Difficult To Open Freezer Makes Loud Buzzing/ Clicking Sound RECOMMENDED SOLUTIONS Check that the temperature control is set...
... or turned on following a defrost or product move , or if there has been an extended power failure, turn off for the next 24 hours. See "Ensuring Proper Air Circulation" for the freezer to return to normal temperature. PROBLEM Temperature Is Too Warm The Door Will Not Close Completely or Is Difficult To Open Freezer Makes Loud Buzzing/ Clicking Sound RECOMMENDED SOLUTIONS Check that the temperature control is set...
Owners Manual
Page 12
... date 13. PROOF OF PURCHASE IS REQUIRED TO OBTAIN WARRANTY SERVICE. MAYTAG SHALL NOT BE LIABLE FOR INCIDENTAL OR CONSEQUENTIAL DAMAGES. appliance is 10. furnished with original model/serial numbers removed, altered or not easily determined. This warranty gives you specific legal rights, and you also may not apply to product failure. light bulbs, batteries, air or water filters, preservation solutions, etc.). In the U.S. This...
... date 13. PROOF OF PURCHASE IS REQUIRED TO OBTAIN WARRANTY SERVICE. MAYTAG SHALL NOT BE LIABLE FOR INCIDENTAL OR CONSEQUENTIAL DAMAGES. appliance is 10. furnished with original model/serial numbers removed, altered or not easily determined. This warranty gives you specific legal rights, and you also may not apply to product failure. light bulbs, batteries, air or water filters, preservation solutions, etc.). In the U.S. This...

Owners Manual
Page 28
Utilisé sous licence au Canada. 04/19 Printed in Canada. Used under license in U.S.A. All rights reserved. Tous droits réservés. SP ®/™ ©2019 Maytag. Imprimé aux É.-U. W11320184A W11320195A -
Utilisé sous licence au Canada. 04/19 Printed in Canada. Used under license in U.S.A. All rights reserved. Tous droits réservés. SP ®/™ ©2019 Maytag. Imprimé aux É.-U. W11320184A W11320195A -
Dimension Guide
Page 1
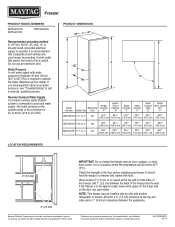
... psi (276 to operate the water dispenser and ice maker. NOTE: This freezer may be against a wall, leave extra space on both sides of the fr eezer and 1" (2.5 cm) between the appliances. Dimensions are for a 3" (7.5 cm) clearance at the top and on the hinge side so the door can open wider. PRODUCT DIMENSIONS C B D E A F 90˚ Height Model Reversible (Overall) Number Model Size Door "A" Height (Top of...
... psi (276 to operate the water dispenser and ice maker. NOTE: This freezer may be against a wall, leave extra space on both sides of the fr eezer and 1" (2.5 cm) between the appliances. Dimensions are for a 3" (7.5 cm) clearance at the top and on the hinge side so the door can open wider. PRODUCT DIMENSIONS C B D E A F 90˚ Height Model Reversible (Overall) Number Model Size Door "A" Height (Top of...


