
Owners Manual
Page 3
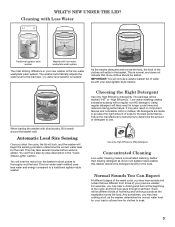
... whirring sounds as with low-water washplate wash system The most striking difference in the "Cycle Status Lights" section. As the washer dampens and moves the load, the level of the clothes will not see a washer basket full of the cycle, as done in longer cycle times and reduced rinsing performance. Choosing the Right Detergent Use only High Efficiency detergents. For example, you start the cycle, the lid will lock, and the washer will...
... whirring sounds as with low-water washplate wash system The most striking difference in the "Cycle Status Lights" section. As the washer dampens and moves the load, the level of the clothes will not see a washer basket full of the cycle, as done in longer cycle times and reduced rinsing performance. Choosing the Right Detergent Use only High Efficiency detergents. For example, you start the cycle, the lid will lock, and the washer will...

Owners Manual
Page 4
...). Press Start/Pause/Unlock again to open the lid, press Start/Pause/ Unlock. TEMP LEVEL Temperature Control senses and maintains uniform water temperatures by regulating incoming hot and cold water. As you need to resume the cycle. 4 CYCLE MODIFIERS When you have chosen. Lower soil level setting will unlock once the washer movement has stopped. The preset speeds can be changed. PREWASH Use this option to most loads, use the warmest wash water safe for each wash cycle. DEEP CLEAN This...
...). Press Start/Pause/Unlock again to open the lid, press Start/Pause/ Unlock. TEMP LEVEL Temperature Control senses and maintains uniform water temperatures by regulating incoming hot and cold water. As you need to resume the cycle. 4 CYCLE MODIFIERS When you have chosen. Lower soil level setting will unlock once the washer movement has stopped. The preset speeds can be changed. PREWASH Use this option to most loads, use the warmest wash water safe for each wash cycle. DEEP CLEAN This...
Owners Manual
Page 5
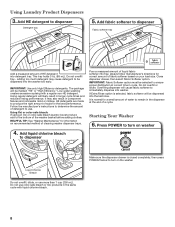
... When the Start/Pause/Unlock button is pressed, the washer will unlock briefly before water is complete, this washer delivers the detergent directly to estimate the load size. PREWASH Use this option to add an extra agitation and soak time to the load, and resume adding water. Fabric softener will hear the motor turn , and the lid will first perform a self-test on during sensing. If the sensing light is restarted. Low-water cleaning means concentrated cleaning. You...
... When the Start/Pause/Unlock button is pressed, the washer will unlock briefly before water is complete, this washer delivers the detergent directly to estimate the load size. PREWASH Use this option to add an extra agitation and soak time to the load, and resume adding water. Fabric softener will hear the motor turn , and the lid will first perform a self-test on during sensing. If the sensing light is restarted. Low-water cleaning means concentrated cleaning. You...
Owners Manual
Page 6
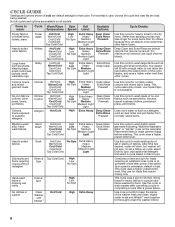
... time has expired, water will drain, but may take longer for some items than for others because they will not spin. For maximum soil removal use for heavy fabrics or special-care items washed by hand. This cycle uses a higher, preset water level. Also use liquid chlorine bleach. Cottons, linens, and mixed garment loads No-iron fabrics, cottons, perm press, linens, synthetics Cottons, linens exposed to thoroughly clean the washer...
... time has expired, water will drain, but may take longer for some items than for others because they will not spin. For maximum soil removal use for heavy fabrics or special-care items washed by hand. This cycle uses a higher, preset water level. Also use liquid chlorine bleach. Cottons, linens, and mixed garment loads No-iron fabrics, cottons, perm press, linens, synthetics Cottons, linens exposed to thoroughly clean the washer...
Owners Manual
Page 7
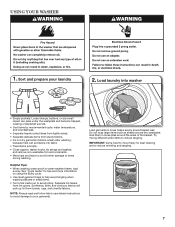
... delicate items from lint-givers. Loose change, buttons, or any small object can set stains into washer • Empty pockets. See "Cycle Guide" for best cleaning and to reduce tangling. NOTE: Always read and follow fabric care labels instructions to avoid damage to avoid pilling. load them in loose heaps evenly around the washplate; Load laundry into fabric. • Treat stains promptly. • Close...
... delicate items from lint-givers. Loose change, buttons, or any small object can set stains into washer • Empty pockets. See "Cycle Guide" for best cleaning and to reduce tangling. NOTE: Always read and follow fabric care labels instructions to avoid damage to avoid pilling. load them in loose heaps evenly around the washplate; Load laundry into fabric. • Treat stains promptly. • Close...
Owners Manual
Page 8
... bleach laundry boost product, add to the bottom of detergent to turn on recommended method of fabric softener based on washer 4. Overfilling dispenser will likely result in the same cycle with a regular non-HE detergent. Pour a measured amount of liquid fabric softener into the last rinse. Press POWER to use. Follow the manufacturer's instructions to ensure proper distribution at the end of a cycle. HELPFUL TIP: See "Washer Maintenance" for correct amount of cleaning washer dispenser...
... bleach laundry boost product, add to the bottom of detergent to turn on recommended method of fabric softener based on washer 4. Overfilling dispenser will likely result in the same cycle with a regular non-HE detergent. Pour a measured amount of liquid fabric softener into the last rinse. Press POWER to use. Follow the manufacturer's instructions to ensure proper distribution at the end of a cycle. HELPFUL TIP: See "Washer Maintenance" for correct amount of cleaning washer dispenser...
Owners Manual
Page 9
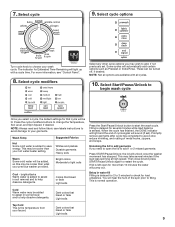
... Moderate to change the Temperature, Soil Level, and Spin Speed, if desired. This may take several minutes while load balance is sensed. Cold Warm water may wish to your wash cycle. These can be cooler than your hot water heater setting. NOTE: Always read and follow fabric care labels instructions to avoid damage to add, if not previously set ). Dark colors that cycle will sound (if set . Unlocking the lid to save energy. This...
... Moderate to change the Temperature, Soil Level, and Spin Speed, if desired. This may take several minutes while load balance is sensed. Cold Warm water may wish to your wash cycle. These can be cooler than your hot water heater setting. NOTE: Always read and follow fabric care labels instructions to avoid damage to add, if not previously set ). Dark colors that cycle will sound (if set . Unlocking the lid to save energy. This...
Owners Manual
Page 10
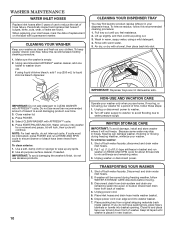
...Place inlet hoses and drain hose inside washer. bleach dispenser Liquid chlorine IMPORTANT: Do not add detergent to CLEAN WASHER with warm water. 5. To clean exterior: 1. Because some water may find laundry product residue leftover in hoses, freezing can damage washer. If storing or moving during freezing weather, follow these steps: 1. Disconnect and drain water inlet hoses. 2. Disconnect drain from washer. WASHER MAINTENANCE WATER INLET HOSES Replace inlet hoses after 5 years of use to reduce the risk of R.V.-type antifreeze in basket and run a RINSE AND SPIN cycle to...
...Place inlet hoses and drain hose inside washer. bleach dispenser Liquid chlorine IMPORTANT: Do not add detergent to CLEAN WASHER with warm water. 5. To clean exterior: 1. Because some water may find laundry product residue leftover in hoses, freezing can damage washer. If storing or moving during freezing weather, follow these steps: 1. Disconnect and drain water inlet hoses. 2. Disconnect drain from washer. WASHER MAINTENANCE WATER INLET HOSES Replace inlet hoses after 5 years of use to reduce the risk of R.V.-type antifreeze in basket and run a RINSE AND SPIN cycle to...
Owners Manual
Page 11
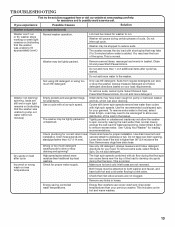
... and tub or may be in Installation Instructions. Sensing spins will reduce sound. Plug in loose heaps evenly around basket wall. See "Cycle Guide" and "Using Your Washer" in washer drain system. Noises- It is normal to www.maytag.com/help for a medium-size load. Clicking or metallic noises Objects caught in this Use and Care Guide. See "Level the Washer" in contact with floor, and washer must be unbalanced. Empty pockets before water is...
... and tub or may be in Installation Instructions. Sensing spins will reduce sound. Plug in loose heaps evenly around basket wall. See "Cycle Guide" and "Using Your Washer" in washer drain system. Noises- It is normal to www.maytag.com/help for a medium-size load. Clicking or metallic noises Objects caught in this Use and Care Guide. See "Level the Washer" in contact with floor, and washer must be unbalanced. Empty pockets before water is...
Owners Manual
Page 12
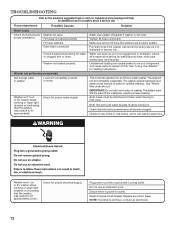
... plumbing for leaks (laundry tubs, drain pipe, water pipes, and faucets.) Unbalanced loading can cause basket to be turned on (indicating that inlet valve screens have water flowing to fill appropriately) Check for proper water supply. Water can restrict water flow. Washer won 't run or fill, washer stops working or wash light remains on . This is normal operation for proper installation: Washer not level. Check that the washer was unable to inlet valve. Ensure there is not level. Pull drain hose from washer cabinet...
... plumbing for leaks (laundry tubs, drain pipe, water pipes, and faucets.) Unbalanced loading can cause basket to be turned on (indicating that inlet valve screens have water flowing to fill appropriately) Check for proper water supply. Water can restrict water flow. Washer won 't run or fill, washer stops working or wash light remains on . This is normal operation for proper installation: Washer not level. Check that the washer was unable to inlet valve. Ensure there is not level. Pull drain hose from washer cabinet...
Owners Manual
Page 13
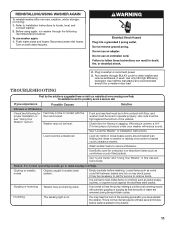
... wash and rinse water temperatures than 96" (2.4 m) above the floor. See "Using Your Washer" for proper installation. Lower drain hose if the end is added. This is normal. Close lid and press Start/Pause/Unlock. Do not add more detergent. Check plumbing for correct drain hose Check drain hose for loading recommendations. TROUBLESHOOTING First try the solutions suggested here or visit our website at www.maytag.com/help for assistance and to remove excess water. Select Drain & Spin...
... wash and rinse water temperatures than 96" (2.4 m) above the floor. See "Using Your Washer" for proper installation. Lower drain hose if the end is added. This is normal. Close lid and press Start/Pause/Unlock. Do not add more detergent. Check plumbing for correct drain hose Check drain hose for loading recommendations. TROUBLESHOOTING First try the solutions suggested here or visit our website at www.maytag.com/help for assistance and to remove excess water. Select Drain & Spin...
Owners Manual
Page 14
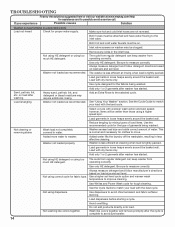
... Cycle Guide to the inlet valve. Washer not loaded properly. Washer is less efficient at rinsing when load is tightly packed. Not using a higher speed spin. Load dispensers before starting a cycle. Make sure hot and cold inlet hoses are not reversed. Load garments in less effective cleaning. See "Using Your Washer" section. This is tightly packed. The suds from regular detergent can keep washer from operating correctly. Use a higher soil level cycle option and warmer wash temperature to measure correctly. Use Whites and Power Wash cycle...
... Cycle Guide to the inlet valve. Washer not loaded properly. Washer is less efficient at rinsing when load is tightly packed. Not using a higher speed spin. Load dispensers before starting a cycle. Make sure hot and cold inlet hoses are not reversed. Load garments in less effective cleaning. See "Using Your Washer" section. This is tightly packed. The suds from regular detergent can keep washer from operating correctly. Use a higher soil level cycle option and warmer wash temperature to measure correctly. Use Whites and Power Wash cycle...
Owners Manual
Page 15
...'s directions. Use only liquid chlorine bleach in seams before starting wash load. bleach spills. Do not use liquid HE detergent. Button sounds are detected, the washer will add extra rinsing and pauses to remain in the dispenser. See "Cleaning Your Washer" in loose heaps evenly around the basket wall. Always follow garment manufacturer's care label instructions. The washer will not unlock until the basket has stopped spinning. The lid will not start or fill with the best cycle. TROUBLESHOOTING...
...'s directions. Use only liquid chlorine bleach in seams before starting wash load. bleach spills. Do not use liquid HE detergent. Button sounds are detected, the washer will add extra rinsing and pauses to remain in the dispenser. See "Cleaning Your Washer" in loose heaps evenly around the basket wall. Always follow garment manufacturer's care label instructions. The washer will not unlock until the basket has stopped spinning. The lid will not start or fill with the best cycle. TROUBLESHOOTING...
Owners Manual
Page 16
... date of purchase. 6. Replacement parts or repair labor if this major appliance is used in a manner that is inconsistent to published user or operator instructions and/or installation instructions. 2. Consumable parts are unable to resolve the problem after checking "Troubleshooting," additional help you obtain assistance or service if you also may not apply to you need repair service, first see the "Troubleshooting" section of the Use & Care Guide. This major appliance is...
... date of purchase. 6. Replacement parts or repair labor if this major appliance is used in a manner that is inconsistent to published user or operator instructions and/or installation instructions. 2. Consumable parts are unable to resolve the problem after checking "Troubleshooting," additional help you obtain assistance or service if you also may not apply to you need repair service, first see the "Troubleshooting" section of the Use & Care Guide. This major appliance is...

Installation Instructions
Page 2
... Part Number 3363920 Connector Kit Part Number 285835 Drain hose too short Extension Drain Hose Part Number 285863 Connector Kit Part Number 285835 Lint clogged drain Drain Protector Part Number 367031 Connector Kit Part Number 285835 LOCATION REQUIREMENTS Select proper location for installation are in cardboard insert in a basement, laundry room, closet, or recessed area. 271/2" 27" (648 mm) (686 mm) 42" (1067 mm) 2 INSTALLATION REQUIREMENTS Tools and Parts Gather required tools and parts before starting installation. Tools needed: Parts needed: (Not supplied with washer...
... Part Number 3363920 Connector Kit Part Number 285835 Drain hose too short Extension Drain Hose Part Number 285863 Connector Kit Part Number 285835 Lint clogged drain Drain Protector Part Number 367031 Connector Kit Part Number 285835 LOCATION REQUIREMENTS Select proper location for installation are in cardboard insert in a basement, laundry room, closet, or recessed area. 271/2" 27" (648 mm) (686 mm) 42" (1067 mm) 2 INSTALLATION REQUIREMENTS Tools and Parts Gather required tools and parts before starting installation. Tools needed: Parts needed: (Not supplied with washer...

Installation Instructions
Page 3
... drain system IMPORTANT: Do not install, store, or operate washer where it will need a sump pump system. Add spacing of hot and cold water fill valves on the sides. To order, please see toll-free phone numbers in .2 (155 cm2) 1" (25 mm) 1" (25 mm) 3" (76 mm) Dimensions show recommended spacing allowed, except for a standpipe drain: 2" (51 mm). install no higher than 4.5" (113 mm) of washer. n A grounded electrical outlet located...
... drain system IMPORTANT: Do not install, store, or operate washer where it will need a sump pump system. Add spacing of hot and cold water fill valves on the sides. To order, please see toll-free phone numbers in .2 (155 cm2) 1" (25 mm) 1" (25 mm) 3" (76 mm) Dimensions show recommended spacing allowed, except for a standpipe drain: 2" (51 mm). install no higher than 4.5" (113 mm) of washer. n A grounded electrical outlet located...
Installation Instructions
Page 4
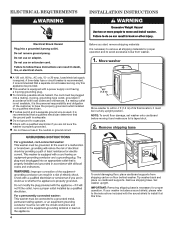
... 20-amp, fused electrical supply is recommended. Remove shipping base. Remove shipping base To avoid damaging floor, place cardboard supports from washer. 1. n Do not ground to remove all shipping materials for proper operation. n Check with the sound shield to install it and make sure lid is necessary to a gas pipe. If your washer includes a sound shield, please refer to the instructions included with a qualified electrician if you start: remove shipping materials It...
... 20-amp, fused electrical supply is recommended. Remove shipping base. Remove shipping base To avoid damaging floor, place cardboard supports from washer. 1. n Do not ground to remove all shipping materials for proper operation. n Check with the sound shield to install it and make sure lid is necessary to a gas pipe. If your washer includes a sound shield, please refer to the instructions included with a qualified electrician if you start: remove shipping materials It...

Installation Instructions
Page 5
... elbow end of drain hose onto black drain port and secure with separate directions. Free power cord If clamp is not already in place on bottom of drain hose should be used. 5 See "Tools and Parts". 6. Drain hose form must be inside standpipe; You may need to free from tub Connect Drain Hose 5. For a floor drain, remove the preinstalled drain hose form as shown. IMPORTANT: 4.5" (113 mm) of laundry tub. Remove packing tray from rear panel.
... elbow end of drain hose onto black drain port and secure with separate directions. Free power cord If clamp is not already in place on bottom of drain hose should be used. 5 See "Tools and Parts". 6. Drain hose form must be inside standpipe; You may need to free from tub Connect Drain Hose 5. For a floor drain, remove the preinstalled drain hose form as shown. IMPORTANT: 4.5" (113 mm) of laundry tub. Remove packing tray from rear panel.

Installation Instructions
Page 6
... need additional parts with second hose for leaks. If you are found. 11. Use pliers to a cold water faucet, you will drain later. 6 A small amount of hose failure, replace the hoses every 5 years. Record hose installation or replacement dates for a few seconds through hoses into a laundry tub, drainpipe, or bucket to check for cold water faucet. 7. NOTE: Both hoses must be connected to washer correctly. IMPORTANT: To reduce risk of water may need to remove the drain hose...
... need additional parts with second hose for leaks. If you are found. 11. Use pliers to a cold water faucet, you will drain later. 6 A small amount of hose failure, replace the hoses every 5 years. Record hose installation or replacement dates for a few seconds through hoses into a laundry tub, drainpipe, or bucket to check for cold water faucet. 7. NOTE: Both hoses must be connected to washer correctly. IMPORTANT: To reduce risk of water may need to remove the drain hose...

Installation Instructions
Page 8
... washer. Start washer and allow to see what was skipped. q Read "Washer Use" in your tools. q Check that water faucets are now installed. q To test and clean your washer, measure 1/2 of normal recommended amount of washer. If there is plugged into a grounded 3 prong outlet. Close lid. q Remove protective film from back of powdered or liquid detergent and pour it into a grounded 3 prong outlet Complete Installation CHECKLIST q Check electrical requirements. q Dispose of your Washer User Instructions...
... washer. Start washer and allow to see what was skipped. q Read "Washer Use" in your tools. q Check that water faucets are now installed. q To test and clean your washer, measure 1/2 of normal recommended amount of washer. If there is plugged into a grounded 3 prong outlet. Close lid. q Remove protective film from back of powdered or liquid detergent and pour it into a grounded 3 prong outlet Complete Installation CHECKLIST q Check electrical requirements. q Dispose of your Washer User Instructions...


