

Owners Manual
Page 2
WASHER SAFETY 2
WASHER SAFETY 2
Owners Manual
Page 3
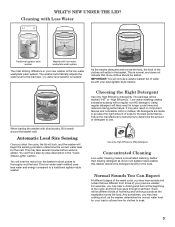
...basket wall. It may take several minutes before water is needed. For example, you start the cycle, the lid will lock, and the washer will likely result in short pulses to soak. 3 Choosing the Right Detergent Use only High Efficiency detergents. Using regular detergent will begin the...washplate wash system The most striking difference in component failures and noticeable mold or mildew. Use only High Efficiency (HE) detergent. The washer automatically adjusts the water level to produce the right amount of water as the washplate moves the load. This is the low-water ...
...basket wall. It may take several minutes before water is needed. For example, you start the cycle, the lid will lock, and the washer will likely result in short pulses to soak. 3 Choosing the Right Detergent Use only High Efficiency detergents. Using regular detergent will begin the...washplate wash system The most striking difference in component failures and noticeable mold or mildew. Use only High Efficiency (HE) detergent. The washer automatically adjusts the water level to produce the right amount of water as the washplate moves the load. This is the low-water ...

Owners Manual
Page 4
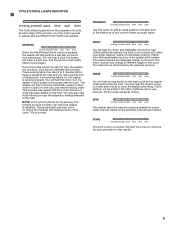
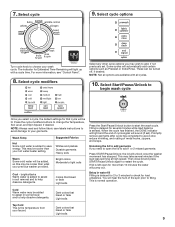
...will add additional agitation and soak time to resume the cycle. 4 CYCLE MODIFIERS When you select a cycle, its default options will unlock once the washer movement has stopped. Press Start/Pause/Unlock again to the cycle. SOIL LEVEL Soil level (wash time) is helpful in the display. You may...Level, the cycle time (minutes) will increase or decrease in a Cool water wash, some are available with all options can be added to the washer to adjust volume of the signal that is added at high speed. Not all models. Select a wash temperature based on . For heavily soiled ...
...will add additional agitation and soak time to resume the cycle. 4 CYCLE MODIFIERS When you select a cycle, its default options will unlock once the washer movement has stopped. Press Start/Pause/Unlock again to the cycle. SOIL LEVEL Soil level (wash time) is helpful in the display. You may...Level, the cycle time (minutes) will increase or decrease in a Cool water wash, some are available with all options can be added to the washer to adjust volume of the signal that is added at high speed. Not all models. Select a wash temperature based on . For heavily soiled ...
Owners Manual
Page 5
... will hear the motor turn , and the lid will come on briefly (short hum) to break up tough stains. You may also come on , the washer is on . The sensing light may also hear water flowing through the dispenser, adding detergent to thoroughly wet the load. The motor sounds may repeat... move the basket while filling. Some cycles use short, slow spins to the load and you may hear the motor turning on during sensing. The washer will hear sounds similar to the load, and resume adding water. Fabric softener will hear the motor and washplate moving the load. WASH You will...
... will hear the motor turn , and the lid will come on briefly (short hum) to break up tough stains. You may also come on , the washer is on . The sensing light may also hear water flowing through the dispenser, adding detergent to thoroughly wet the load. The motor sounds may repeat... move the basket while filling. Some cycles use short, slow spins to the load and you may hear the motor turning on during sensing. The washer will hear sounds similar to the load, and resume adding water. Fabric softener will hear the motor and washplate moving the load. WASH You will...
Owners Manual
Page 6
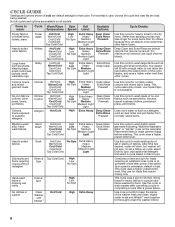
... off. Cottons, linens, and mixed garment loads No-iron fabrics, cottons, perm press, linens, synthetics Cottons, linens exposed to thoroughly clean the washer interior. 6 This cycle uses a higher, preset water level. After time has expired, water will not spin. Use this cycle to wash lightly... Spin, add additional detergent and select a cycle based on fabrics. default is selectable; Use once a month to wash loads of the washer fresh and clean. CYCLE GUIDE Settings and options shown in bold are default settings for loads that require rinsing only. Uses more water than...
... off. Cottons, linens, and mixed garment loads No-iron fabrics, cottons, perm press, linens, synthetics Cottons, linens exposed to thoroughly clean the washer interior. 6 This cycle uses a higher, preset water level. After time has expired, water will not spin. Use this cycle to wash lightly... Spin, add additional detergent and select a cycle based on fabrics. default is selectable; Use once a month to wash loads of the washer fresh and clean. CYCLE GUIDE Settings and options shown in bold are default settings for loads that require rinsing only. Uses more water than...
Owners Manual
Page 7
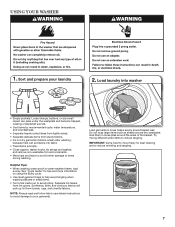
... lightly soiled. • Separate delicate items from sturdy fabrics. • Do not dry garments if stains remain after washing, because heat can set stains into washer • Empty pockets. Load garments in loose piles around basket wall. NOTE: Always read and follow fabric care labels instructions to avoid damage to reduce...
... lightly soiled. • Separate delicate items from sturdy fabrics. • Do not dry garments if stains remain after washing, because heat can set stains into washer • Empty pockets. Load garments in loose piles around basket wall. NOTE: Always read and follow fabric care labels instructions to avoid damage to reduce...
Owners Manual
Page 8
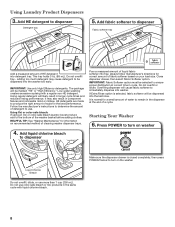
... with a regular non-HE detergent. HE detergents are made to dispenser Fabric softener tray Add a measured amount of cleaning washer dispenser trays. HELPFUL TIP: See "Washer Maintenance" for the best performance. Overfilling dispenser will likely result in cycle. IMPORTANT: Fabric Softener option must be marked ...on recommended method of HE detergent into detergent tray. Add fabric softener to produce the right amount of fabric softener based on the washer. 8 Add HE detergent to use. Do not overfill tray - The package will be dispensed into the last rinse. Low-...
... with a regular non-HE detergent. HE detergents are made to dispenser Fabric softener tray Add a measured amount of cleaning washer dispenser trays. HELPFUL TIP: See "Washer Maintenance" for the best performance. Overfilling dispenser will likely result in cycle. IMPORTANT: Fabric Softener option must be marked ...on recommended method of HE detergent into detergent tray. Add fabric softener to produce the right amount of fabric softener based on the washer. 8 Add HE detergent to use. Do not overfill tray - The package will be dispensed into the last rinse. Low-...
Owners Manual
Page 9
...the lid to open for 2 to 3 minutes to help dissolve detergents. For more than what your garments. Some cycles will unlock once the washer movement has stopped. Delay in soil removal and to check for Estimated Time Remaining will light and the end of metal hooks, zippers, and...Unlock; brights/darks Warm water is the temperature from your wash cycle. Then close lid and press START/Pause/Unlock again to your previous washer provided. Select cycle options Turn cycle knob to change the Temperature, Soil Level, and Spin Speed, if desired. Filling is added to ...
...the lid to open for 2 to 3 minutes to help dissolve detergents. For more than what your garments. Some cycles will unlock once the washer movement has stopped. Delay in soil removal and to check for Estimated Time Remaining will light and the end of metal hooks, zippers, and...Unlock; brights/darks Warm water is the temperature from your wash cycle. Then close lid and press START/Pause/Unlock again to your previous washer provided. Select cycle options Turn cycle knob to change the Temperature, Soil Level, and Spin Speed, if desired. Filling is added to ...
Owners Manual
Page 10
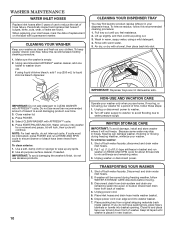
... dishwasher safe. CLEANING YOUR DISPENSER TRAY You may stay in new location. Press START/PAUSE/UNLOCK. NON-USE AND VACATION CARE Operate your washer for a period of time, follow this recommended cleaning procedure: 1. Shut off both water faucets; Shut off both water faucets. If you... leftover in basket and run a RINSE AND SPIN cycle to reduce the risk of hose failure. CLEANING YOUR WASHER Keep your washer as clean and fresh as your washer. WASHER MAINTENANCE WATER INLET HOSES Replace inlet hoses after 5 years of use to ensure cleaner or bleach have packing tray...
... dishwasher safe. CLEANING YOUR DISPENSER TRAY You may stay in new location. Press START/PAUSE/UNLOCK. NON-USE AND VACATION CARE Operate your washer for a period of time, follow this recommended cleaning procedure: 1. Shut off both water faucets; Shut off both water faucets. If you... leftover in basket and run a RINSE AND SPIN cycle to reduce the risk of hose failure. CLEANING YOUR WASHER Keep your washer as clean and fresh as your washer. WASHER MAINTENANCE WATER INLET HOSES Replace inlet hoses after 5 years of use to ensure cleaner or bleach have packing tray...
Owners Manual
Page 11
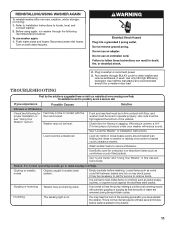
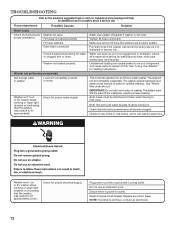
... basket wall. Feet may block pump. See "Level the Washer" in contact with the floor and locked. Run washer through the following for proper installation or see "Using Your Washer" section. For normal operating sounds, go to www.maytag.com/help for assistance and to possibly avoid a service call... sound. TROUBLESHOOTING First try the solutions suggested here or visit our website at www.maytag.com/help . If flooring is added to hear the pump making a continuous humming sound with floor, and washer must be necessary to hear metal items on both water faucets. 2. You may ...
... basket wall. Feet may block pump. See "Level the Washer" in contact with the floor and locked. Run washer through the following for proper installation or see "Using Your Washer" section. For normal operating sounds, go to www.maytag.com/help for assistance and to possibly avoid a service call... sound. TROUBLESHOOTING First try the solutions suggested here or visit our website at www.maytag.com/help . If flooring is added to hear the pump making a continuous humming sound with floor, and washer must be necessary to hear metal items on both water faucets. 2. You may ...
Owners Manual
Page 12
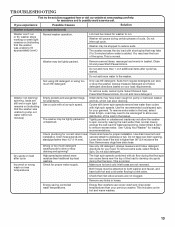
...Lid." Check for any blown fuses. Washer won 't run or fill, washer stops working or wash light remains on . Reset a tripped circuit breaker. Replace any kinks in water. TROUBLESHOOTING First try the solutions suggested here or visit our website at www.maytag.com/help for assistance and to ...drainpipe or laundry tub. Tighten fill-hose connection. Make sure all household plumbing for proper electrical supply. Check all four fill hose flat washers are properly seated. The washer senses load sizes and adds correct ...
...Lid." Check for any blown fuses. Washer won 't run or fill, washer stops working or wash light remains on . Reset a tripped circuit breaker. Replace any kinks in water. TROUBLESHOOTING First try the solutions suggested here or visit our website at www.maytag.com/help for assistance and to ...drainpipe or laundry tub. Tighten fill-hose connection. Make sure all household plumbing for proper electrical supply. Check all four fill hose flat washers are properly seated. The washer senses load sizes and adds correct ...
Owners Manual
Page 13
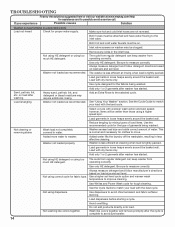
...Wrong or too much HE detergent. Check for balanced spinning. TROUBLESHOOTING First try the solutions suggested here or visit our website at www.maytag.com/help for assistance and to remove excess water. Lid must be closed for your garment. Close lid and press Start/Pause/...normal. Remove any clogs from regular detergents can cause items near the top of the load in the load, select Drain & Spin. Energy Star washers use HE detergent. Suds from drain hose. Select Rinse & Spin. Select Drain & Spin to possibly avoid a service call. Remove any kinks...
...Wrong or too much HE detergent. Check for balanced spinning. TROUBLESHOOTING First try the solutions suggested here or visit our website at www.maytag.com/help for assistance and to remove excess water. Lid must be closed for your garment. Close lid and press Start/Pause/...normal. Remove any clogs from regular detergents can cause items near the top of the load in the load, select Drain & Spin. Energy Star washers use HE detergent. Suds from drain hose. Select Rinse & Spin. Select Drain & Spin to possibly avoid a service call. Remove any kinks...
Owners Manual
Page 14
... hair, lint, and detergent or bleach residues may be wetter than those using dispensers. Load with a slower wash action and spin speed; Washer is less efficient at www.maytag.com/help for the type of water. Always measure detergent and follow detergent directions based on . The suds from regular detergent can keep...
... hair, lint, and detergent or bleach residues may be wetter than those using dispensers. Load with a slower wash action and spin speed; Washer is less efficient at www.maytag.com/help for the type of water. Always measure detergent and follow detergent directions based on . The suds from regular detergent can keep...
Owners Manual
Page 15
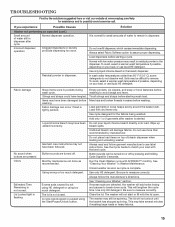
... only 1 or 2 garments after cycle Incorrect dispenser operation Normal dispenser operation. Button sounds can occur if load is started. Unload washer as soon as cycle is not closed. Be sure to assure proper dispensing. Excess suds caused by pressing and holding Cycle Signal for... (15.6° C), some detergents do not dissolve well. TROUBLESHOOTING First try the solutions suggested here or visit our website at www.maytag.com/help for assistance and to measure correctly. Using wrong or too much detergent. Do not overfill dispenser, which causes immediate dispensing...
... only 1 or 2 garments after cycle Incorrect dispenser operation Normal dispenser operation. Button sounds can occur if load is started. Unload washer as soon as cycle is not closed. Be sure to assure proper dispensing. Excess suds caused by pressing and holding Cycle Signal for... (15.6° C), some detergents do not dissolve well. TROUBLESHOOTING First try the solutions suggested here or visit our website at www.maytag.com/help for assistance and to measure correctly. Using wrong or too much detergent. Do not overfill dispenser, which causes immediate dispensing...

Installation Instructions
Page 2
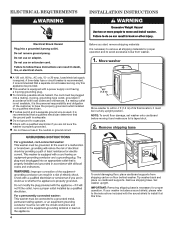
... Tools and Parts Gather required tools and parts before starting installation. Install your Use and Care Guide. Tools needed: Parts needed: (Not supplied with washer) Your installation may require additional parts. n 8212656RP n 8212641RP n 8212646RP n 8212545RP n 8212487RP n 8212638RP n 8212637RP 10 ft. (3.0 m) Inlet ...m) Inlet hose, Black EPDM, space saving 90° elbow, hypro-blue steel couplings (2 pack) Alternate parts: (Not supplied with washer) Adjustable or open end wrench 9/16" (14 mm) 4" min (102 mm) Level Wood block Ruler or measuring tape Pliers that ...
... Tools and Parts Gather required tools and parts before starting installation. Install your Use and Care Guide. Tools needed: Parts needed: (Not supplied with washer) Your installation may require additional parts. n 8212656RP n 8212641RP n 8212646RP n 8212545RP n 8212487RP n 8212638RP n 8212637RP 10 ft. (3.0 m) Inlet ...m) Inlet hose, Black EPDM, space saving 90° elbow, hypro-blue steel couplings (2 pack) Alternate parts: (Not supplied with washer) Adjustable or open end wrench 9/16" (14 mm) 4" min (102 mm) Level Wood block Ruler or measuring tape Pliers that ...

Installation Instructions
Page 3
... a closet door or louvered door is not recommended. Minimum siphon break: 28" (710 mm) from bottom of 20-100 psi (138-690 kPa). See "Washer Care" in .2 (155 cm2) 1" (25 mm) 1" (25 mm) 3" (76 mm) Dimensions show recommended spacing allowed, except for closet door ventilation ...in low temperatures. Minimum carry-away capacity: 17 gal. (64 L) per minute. n Hot and cold water faucets located within 4 ft (1.2 m) of washer. Recessed area or closet installation 3" (76 mm) Minimum diameter for walls, doors, and floor moldings. Consider allowing more than 96" (2.44 m) from bottom...
... a closet door or louvered door is not recommended. Minimum siphon break: 28" (710 mm) from bottom of 20-100 psi (138-690 kPa). See "Washer Care" in .2 (155 cm2) 1" (25 mm) 1" (25 mm) 3" (76 mm) Dimensions show recommended spacing allowed, except for closet door ventilation ...in low temperatures. Minimum carry-away capacity: 17 gal. (64 L) per minute. n Hot and cold water faucets located within 4 ft (1.2 m) of washer. Recessed area or closet installation 3" (76 mm) Minimum diameter for walls, doors, and floor moldings. Consider allowing more than 96" (2.44 m) from bottom...
Installation Instructions
Page 4
... not available, it at this appliance be in accordance with the sound shield to the instructions included with local codes and ordinances. Set washer upright. n To minimize possible shock hazard, the cord must be provided. n If codes permit and a separate ground wire is used... a mating, 3 prong, grounding-type outlet, grounded in a fully upright position. Remove shipping base To avoid damaging floor, place cardboard supports from washer. 1. Remove shipping base. n Check with a power supply cord having a 3 prong grounding plug. It is recommended that the ground path is adequate...
... not available, it at this appliance be in accordance with the sound shield to the instructions included with local codes and ordinances. Set washer upright. n To minimize possible shock hazard, the cord must be provided. n If codes permit and a separate ground wire is used... a mating, 3 prong, grounding-type outlet, grounded in a fully upright position. Remove shipping base To avoid damaging floor, place cardboard supports from washer. 1. Remove shipping base. n Check with a power supply cord having a 3 prong grounding plug. It is recommended that the ground path is adequate...

Installation Instructions
Page 5
...to free from tub. Remove packing tray from tray. You may need to remove all parts from tub Connect Drain Hose 5. 3. Be sure to move washer later. 4. Drain hose form must be inside standpipe; do not force excess hose into standpipe (shown in picture) or over end as shown in place... on bottom of drain hose onto black drain port and secure with separate directions. For a laundry tub or standpipe drain, go to back of washer. 4.5" (113 mm) Place hose into standpipe or lay on elbow end of drain hose, slide it over side of drain hose should be used. 5...
...to free from tub. Remove packing tray from tray. You may need to remove all parts from tub Connect Drain Hose 5. 3. Be sure to move washer later. 4. Drain hose form must be inside standpipe; do not force excess hose into standpipe (shown in picture) or over end as shown in place... on bottom of drain hose onto black drain port and secure with separate directions. For a laundry tub or standpipe drain, go to back of washer. 4.5" (113 mm) Place hose into standpipe or lay on elbow end of drain hose, slide it over side of drain hose should be used. 5...

Installation Instructions
Page 6
...need additional parts with cold water inlet valve. 7. Clear water lines For floor drain installations, you will drain later. 6 Screw on washer. In most standard configurations, hoses will cross over each other when attached correctly. Repeat with separate directions. Connect inlet hoses to water... a Y-adapter (not provided). 8. Water should run until clear. 10. Remove drain hose form (floor drain installations only) 9. You may enter washer. See "Tools and Parts". NOTE: Both hoses must be attached and have water flowing to a cold water faucet, you are found. 11. ...
...need additional parts with cold water inlet valve. 7. Clear water lines For floor drain installations, you will drain later. 6 Screw on washer. In most standard configurations, hoses will cross over each other when attached correctly. Repeat with separate directions. Connect inlet hoses to water... a Y-adapter (not provided). 8. Water should run until clear. 10. Remove drain hose form (floor drain installations only) 9. You may enter washer. See "Tools and Parts". NOTE: Both hoses must be attached and have water flowing to a cold water faucet, you are found. 11. ...
Installation Instructions
Page 7
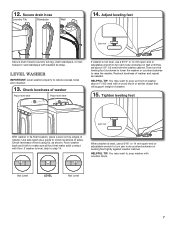
...or inlet hoses for wall standpipe with wooden block. Recheck levelness of washer about 1/2" (13 mm) from the washer cabinet. When washer is level, use a 9/16" or 14 mm open -end or adjustable wrench to check levelness of washer. Not Level LEVEL Not Level 7 Use side seam as a guide.... HELPFUL TIP: You may want to prop up front of washer and repeat as shown. HELPFUL TIP: You may want to prop washer with beaded tie strap. Level Washer IMPORTANT: Level washer properly to step 14. Check levelness of washer. 15. 12. Secure drain hose Laundry Tub Standpipe Wall 14...
...or inlet hoses for wall standpipe with wooden block. Recheck levelness of washer about 1/2" (13 mm) from the washer cabinet. When washer is level, use a 9/16" or 14 mm open -end or adjustable wrench to check levelness of washer. Not Level LEVEL Not Level 7 Use side seam as a guide.... HELPFUL TIP: You may want to prop up front of washer and repeat as shown. HELPFUL TIP: You may want to prop washer with beaded tie strap. Level Washer IMPORTANT: Level washer properly to step 14. Check levelness of washer. 15. 12. Secure drain hose Laundry Tub Standpipe Wall 14...


