Installation Instructions
Page 2
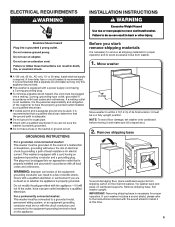
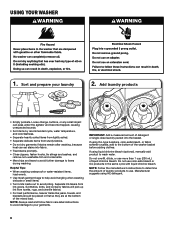
...injured if you don't immediately follow instructions. This is , tell you how to potential hazards that can be killed or seriously injured if you don't follow the safety alert symbol and either the word "DANGER" or "WARNING." WASHER SAFETY Your safety and the safety...These words mean: DANGER You can kill or hurt you what can happen if the instructions are very important. Always read and obey all safety messages. All safety messages will follow instructions. We have provided many important safety messages in this manual and on your appliance. All safety messages will ...
...injured if you don't immediately follow instructions. This is , tell you how to potential hazards that can be killed or seriously injured if you don't follow the safety alert symbol and either the word "DANGER" or "WARNING." WASHER SAFETY Your safety and the safety...These words mean: DANGER You can kill or hurt you what can happen if the instructions are very important. Always read and obey all safety messages. All safety messages will follow instructions. We have provided many important safety messages in this manual and on your appliance. All safety messages will ...
Installation Instructions
Page 3
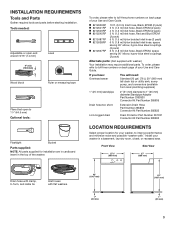
... Drain hose too short Extension Drain Hose Part Number 285863 Connector Kit Part Number 285835 Lint-clogged drain Drain Protector Part Number 367031 Connector Kit Part Number 285835 LOCATION REQUIREMENTS Select proper location for your Use and Care Guide. Tools needed: Adjustable or open-end wrench 9/16" (14 mm) 4" min (102 mm) Level Wood block Ruler or measuring tape Pliers that open to improve performance and minimize noise and possible "washer walk." To order, please refer to toll-free...
... Drain hose too short Extension Drain Hose Part Number 285863 Connector Kit Part Number 285835 Lint-clogged drain Drain Protector Part Number 367031 Connector Kit Part Number 285835 LOCATION REQUIREMENTS Select proper location for your Use and Care Guide. Tools needed: Adjustable or open-end wrench 9/16" (14 mm) 4" min (102 mm) Level Wood block Ruler or measuring tape Pliers that open to improve performance and minimize noise and possible "washer walk." To order, please refer to toll-free...
Installation Instructions
Page 4
... to reduce noise transfer. Minimum carry-away capacity: 17 gal. (64 L) per minute. Add spacing of 1" (25 mm) on back of wash tub. If a closet door or louvered door is installed, top and bottom air openings in your responsibility. n Hot and cold water faucets located within 4 ft (1.2 m) of power cord on all sides of washer to weather or in temperatures below the top of washer. Proper installation is not...
... to reduce noise transfer. Minimum carry-away capacity: 17 gal. (64 L) per minute. Add spacing of 1" (25 mm) on back of wash tub. If a closet door or louvered door is installed, top and bottom air openings in your responsibility. n Hot and cold water faucets located within 4 ft (1.2 m) of power cord on all sides of washer to weather or in temperatures below the top of washer. Proper installation is not...
Installation Instructions
Page 5
... a power supply cord having a 3 prong grounding plug. NOTE: To avoid floor damage, set washer onto cardboard before moving it at this appliance be in a fully upright position. IMPORTANT: Removing shipping base is taped shut. 2. A time-delay fuse or circuit breaker is necessary to remove all shipping materials for proper operation. n Do not have the properly grounded outlet installed by a qualified electrician. Remove shipping base. ELECTRICAL REQUIREMENTS INSTALLATION INSTRUCTIONS...
... a power supply cord having a 3 prong grounding plug. NOTE: To avoid floor damage, set washer onto cardboard before moving it at this appliance be in a fully upright position. IMPORTANT: Removing shipping base is taped shut. 2. A time-delay fuse or circuit breaker is necessary to remove all shipping materials for proper operation. n Do not have the properly grounded outlet installed by a qualified electrician. Remove shipping base. ELECTRICAL REQUIREMENTS INSTALLATION INSTRUCTIONS...
Installation Instructions
Page 6
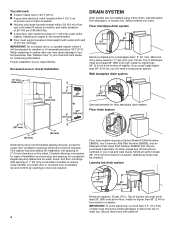
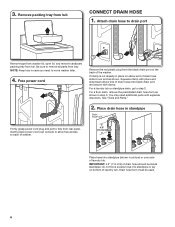
... in standpipe Drain hose form Firmly grasp power cord plug and pull to drain port Remove tape from washer lid, open lid, and remove cardboard packing tray from tub. Free power cord Remove the red plastic plug from tray. For a laundry tub or standpipe drain, go to remove all parts from the black drain port on bottom of laundry tub. Place drain hose in case you need additional parts with clamp. Attach drain hose to free from tub CONNECT DRAIN HOSE 1. For a floor drain, remove the preinstalled drain hose form...
... in standpipe Drain hose form Firmly grasp power cord plug and pull to drain port Remove tape from washer lid, open lid, and remove cardboard packing tray from tub. Free power cord Remove the red plastic plug from tray. For a laundry tub or standpipe drain, go to remove all parts from the black drain port on bottom of laundry tub. Place drain hose in case you need additional parts with clamp. Attach drain hose to free from tub CONNECT DRAIN HOSE 1. For a floor drain, remove the preinstalled drain hose form...
Installation Instructions
Page 7
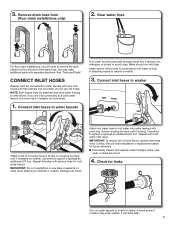
... inlet hoses to washer Attach hose to tighten couplings an additional 2/3 turn . IMPORTANT: To reduce risk of which hose is snug. Record hose installation or replacement dates for leaks. A small amount of water may need to faucets or washer. Make note of hose failure, replace the hoses every 5 years. NOTE: Both hoses must use old hoses. Water should run until it is connected to hot water to help in attaching hoses to a cold water faucet, you will drain...
... inlet hoses to washer Attach hose to tighten couplings an additional 2/3 turn . IMPORTANT: To reduce risk of which hose is snug. Record hose installation or replacement dates for leaks. A small amount of water may need to faucets or washer. Make note of hose failure, replace the hoses every 5 years. NOTE: Both hoses must use old hoses. Water should run until it is connected to hot water to help in attaching hoses to a cold water faucet, you will drain...
Installation Instructions
Page 8
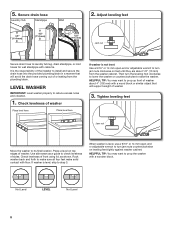
... will support weight of sides. Place a level on feet until they are about 4" (102 mm) with a wooden block. HELPFUL TIP: You may want to check levelness of washer. 3. Tighten leveling feet Jam nut Move the washer to reduce excess noise and vibration. 1. Rock washer back and forth to laundry tub leg, drain standpipe, or inlet hoses for wall standpipe with floor. Check levelness of or leaking from the washer cabinet. Adjust leveling feet...
... will support weight of sides. Place a level on feet until they are about 4" (102 mm) with a wooden block. HELPFUL TIP: You may want to check levelness of washer. 3. Tighten leveling feet Jam nut Move the washer to reduce excess noise and vibration. 1. Rock washer back and forth to laundry tub leg, drain standpipe, or inlet hoses for wall standpipe with floor. Check levelness of or leaking from the washer cabinet. Adjust leveling feet...
Installation Instructions
Page 9
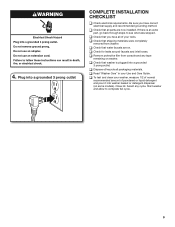
... all parts are on washer. Close lid. Select any tape remaining on . 4. q Remove protective film from washer. q Check that all packaging materials. q To test and clean your Use and Care Guide. q Check that water faucets are now installed. q Dispose of powdered or liquid detergent and pour it into a grounded 3 prong outlet COMPLETE INSTALLATION CHECKLIST q Check electrical requirements. Plug into washer basket or detergent dispenser (on some models). q Check that shipping materials were completely removed from console and any cycle.
... all parts are on washer. Close lid. Select any tape remaining on . 4. q Remove protective film from washer. q Check that all packaging materials. q To test and clean your Use and Care Guide. q Check that water faucets are now installed. q Dispose of powdered or liquid detergent and pour it into a grounded 3 prong outlet COMPLETE INSTALLATION CHECKLIST q Check electrical requirements. Plug into washer basket or detergent dispenser (on some models). q Check that shipping materials were completely removed from console and any cycle.
Owners Manual
Page 3
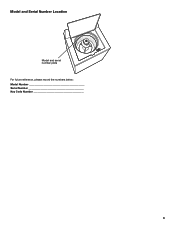
Model and Serial Number Location Model and serial number plate For future reference, please record the numbers below: Model Number _____ Serial Number _____ Key Code Number _____ 3
Model and Serial Number Location Model and serial number plate For future reference, please record the numbers below: Model Number _____ Serial Number _____ Key Code Number _____ 3
Owners Manual
Page 4
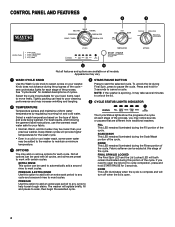
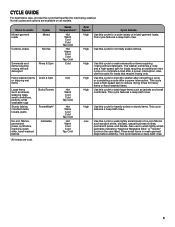
See "Cycle Guide" for detailed descriptions of fabric and soils being washed. Select a wash temperature based on the type of cycles. If you may add or remove options for your previous washer. Tightly packing can be used to automatically add a second rinse to start the selected cycle. NOTE: If the washer is spinning, it may increase wrinkling and tangling. 4 START/PAUSE BUTTON Press to most cycles. Deep Water cycles will agitate briefly, fill and pause...
See "Cycle Guide" for detailed descriptions of fabric and soils being washed. Select a wash temperature based on the type of cycles. If you may add or remove options for your previous washer. Tightly packing can be used to automatically add a second rinse to start the selected cycle. NOTE: If the washer is spinning, it may increase wrinkling and tangling. 4 START/PAUSE BUTTON Press to most cycles. Deep Water cycles will agitate briefly, fill and pause...
Owners Manual
Page 5
... drain the washer after cancelling a cycle or completing a cycle after a power interruption. This cycle features a deep bath rinse. 5 This cycle uses a high-speed spin to wash: Mixed-garment loads Cycle: Mixed Cottons, linens Normal Swimsuits and items requiring rinsing without detergent. Items to reduce drying times for loads that best fits the load being washed. Place small items in mesh garment bags before washing. Use this cycle to wash lightly soiled loads of mixed-garment loads. CYCLE GUIDE For best fabric care...
... drain the washer after cancelling a cycle or completing a cycle after a power interruption. This cycle features a deep bath rinse. 5 This cycle uses a high-speed spin to wash: Mixed-garment loads Cycle: Mixed Cottons, linens Normal Swimsuits and items requiring rinsing without detergent. Items to reduce drying times for loads that best fits the load being washed. Place small items in mesh garment bags before washing. Use this cycle to wash lightly soiled loads of mixed-garment loads. CYCLE GUIDE For best fabric care...
Owners Manual
Page 6
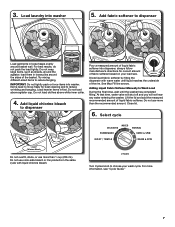
...; Do not dry garments if stains remain after washing, because heat can set stains into the basket. If using Oxi-type boosters, color-safe bleach, or fabric softener crystals, add to use. Do not use more than 1 cup (236 mL) of the mixed load. USING YOUR WASHER 1. Add laundry products • Empty pockets. NOTE: Always read and follow fabric care label instructions to avoid damage to avoid pilling. Sort...
...; Do not dry garments if stains remain after washing, because heat can set stains into the basket. If using Oxi-type boosters, color-safe bleach, or fabric softener crystals, add to use. Do not use more than 1 cup (236 mL) of the mixed load. USING YOUR WASHER 1. Add laundry products • Empty pockets. NOTE: Always read and follow fabric care label instructions to avoid damage to avoid pilling. Sort...
Owners Manual
Page 7
... the dispenser with liquid chlorine bleach. Do not use color-safe bleach or Oxi products in loose piles around the agitator; Do not wrap large items, such as sheets, around the sides of liquid fabric softener. Try mixing different-sized items to Wash Load During the final rinse, wait until liquid reaches the underside of liquid fabric softener into washer. IMPORTANT: Do not tightly pack or force items into dispenser; Load laundry into washer 5. Turn Cycles...
... the dispenser with liquid chlorine bleach. Do not use color-safe bleach or Oxi products in loose piles around the agitator; Do not wrap large items, such as sheets, around the sides of liquid fabric softener. Try mixing different-sized items to Wash Load During the final rinse, wait until liquid reaches the underside of liquid fabric softener into washer. IMPORTANT: Do not tightly pack or force items into dispenser; Load laundry into washer 5. Turn Cycles...
Owners Manual
Page 8
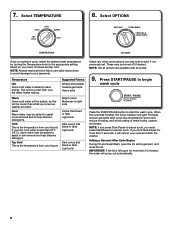
... energy. All rinses are available with all options are tap cold. 7. Promptly remove garments after cycle has completed to start the wash cycle. Cool Warm water may be added to assist in soil removal and help dissolve detergents. These may be turned off if desired. Tap Cold This is left open the lid, add a garment, and close the lid. If you select a cycle, select the desired wash temperature by turning the Temperature...
... energy. All rinses are available with all options are tap cold. 7. Promptly remove garments after cycle has completed to start the wash cycle. Cool Warm water may be added to assist in soil removal and help dissolve detergents. These may be turned off if desired. Tap Cold This is left open the lid, add a garment, and close the lid. If you select a cycle, select the desired wash temperature by turning the Temperature...
Owners Manual
Page 9
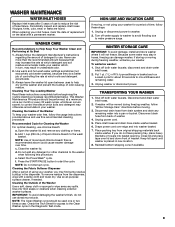
... the washer lid open between uses to the wash basket. Cleaning the Inside of liquid chlorine bleach to help dry out the washer and prevent the buildup of hose failure. Add 1 cup (236 mL) of the Washer To keep your washer which soils and detergent may otherwise accumulate in the Diagnostic Test mode. c. Press the START/PAUSE button to washer. 2. To winterize washer: 1. Place inlet hoses and drain hose inside your washer odor free, follow "Winter Storage Care" directions...
... the washer lid open between uses to the wash basket. Cleaning the Inside of liquid chlorine bleach to help dry out the washer and prevent the buildup of hose failure. Add 1 cup (236 mL) of the Washer To keep your washer which soils and detergent may otherwise accumulate in the Diagnostic Test mode. c. Press the START/PAUSE button to washer. 2. To winterize washer: 1. Place inlet hoses and drain hose inside your washer odor free, follow "Winter Storage Care" directions...

Owners Manual
Page 10
... of plywood under your washer will reduce sound. Refer to Installation Instructions to reduce imbalance. Plug in this Use and Care Guide. TROUBLESHOOTING First try the solutions suggested here or visit our website at www.maytag.com/product_help - Load could be draining water. Avoid washing single items. Use PowerWash® cycle for a medium-size load. Fill hoses not attached tightly. Empty pockets before washing. Before using again, run washer through Normal cycle to basket could...
... of plywood under your washer will reduce sound. Refer to Installation Instructions to reduce imbalance. Plug in this Use and Care Guide. TROUBLESHOOTING First try the solutions suggested here or visit our website at www.maytag.com/product_help - Load could be draining water. Avoid washing single items. Use PowerWash® cycle for a medium-size load. Fill hoses not attached tightly. Empty pockets before washing. Before using again, run washer through Normal cycle to basket could...
Owners Manual
Page 11
... for leaks Water can restrict water flow. Make sure all or clogged sink or drain. Improper loading can cause basket to unlock. Normal washer operation. NOTE: If problems continue, contact an electrician. Remove several items, rearrange load evenly in to splash off tub. Both hoses must be out of alignment and cause water to reset the control. Check for proper water supply. Do not interrupt cycle. Close lid and press START/PAUSE. Plug power cord into...
... for leaks Water can restrict water flow. Make sure all or clogged sink or drain. Improper loading can cause basket to unlock. Normal washer operation. NOTE: If problems continue, contact an electrician. Remove several items, rearrange load evenly in to splash off tub. Both hoses must be out of alignment and cause water to reset the control. Check for proper water supply. Do not interrupt cycle. Close lid and press START/PAUSE. Plug power cord into...
Owners Manual
Page 12
... model. Load not rinsed Check for balanced spinning on load after washer has started. Both hot and cold water faucets must be rearranged to slow or stop draining and spinning. Inlet valve screens on load size and soil level. Load is normal. however, items will be clogged. Always measure and follow detergent directions based on washer may have both hot and cold water flowing to spin correctly, leaving the load wetter than normal. Remove any clogs from operating correctly. Washer not loaded as expected (cont.) Washer not draining/ spinning, loads are...
... model. Load not rinsed Check for balanced spinning on load after washer has started. Both hot and cold water faucets must be rearranged to slow or stop draining and spinning. Inlet valve screens on load size and soil level. Load is normal. however, items will be clogged. Always measure and follow detergent directions based on washer may have both hot and cold water flowing to spin correctly, leaving the load wetter than normal. Remove any clogs from operating correctly. Washer not loaded as expected (cont.) Washer not draining/ spinning, loads are...
Owners Manual
Page 13
... of bleach dispenser when loading and unloading washer. See the "Cycle Guide" to avoid dye transfer. Wash like colors together. Add detergent, Oxi products, and color-safe bleach to improve cleaning. Fabric damage Sharp items were in "Washer Maintenance." See "Washer Care" section. This may still be spinning. Adding detergent on top of the basket before starting a cycle. Load dispensers before wash cycle. Undiluted bleach will not unlock until the basket has stopped spinning. Use only liquid chlorine bleach in the fabric softener dispenser. Strings...
... of bleach dispenser when loading and unloading washer. See the "Cycle Guide" to avoid dye transfer. Wash like colors together. Add detergent, Oxi products, and color-safe bleach to improve cleaning. Fabric damage Sharp items were in "Washer Maintenance." See "Washer Care" section. This may still be spinning. Adding detergent on top of the basket before starting a cycle. Load dispensers before wash cycle. Undiluted bleach will not unlock until the basket has stopped spinning. Use only liquid chlorine bleach in the fabric softener dispenser. Strings...
Specification Sheet
Page 1
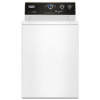
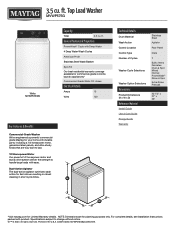
...Properties PowerWash® Cycle with product. Printed in short cycle times. Dual-Action Agitator The dual-action agitator optimizes wash action for Limited Warranty details. Technical Details Drum Material Wash Action Control Location Control Type Number of Cycles Washer Cycle Selections Washer Option Selections Dimensions Product Dimensions (H x W x D) Reference Material Install Guide Use & Care Guide Energy Guide Warranty Stainless Steel Agitator Rear Panel Dials 7 Bulky Items Delicates Drain & Spin Mixed Normal PowerWash® Rinse & Spin Extra Rinse Presoak 42-1/2" x 27...
...Properties PowerWash® Cycle with product. Printed in short cycle times. Dual-Action Agitator The dual-action agitator optimizes wash action for Limited Warranty details. Technical Details Drum Material Wash Action Control Location Control Type Number of Cycles Washer Cycle Selections Washer Option Selections Dimensions Product Dimensions (H x W x D) Reference Material Install Guide Use & Care Guide Energy Guide Warranty Stainless Steel Agitator Rear Panel Dials 7 Bulky Items Delicates Drain & Spin Mixed Normal PowerWash® Rinse & Spin Extra Rinse Presoak 42-1/2" x 27...


