
User Instructions
Page 1
... EPDM (2 pack) 8212487RP 5 ft (1.5 m) Nylon braided inlet hose. (2-pack) 8212526 Washer drip tray, fits under the washer lid. Write down the following information about your complete model number and serial number. In Canada, call 1-800-901-2042, or visit us at www.maytag.com/accessories. adicional acerca de su producto, visite: Tenga listo su...
... EPDM (2 pack) 8212487RP 5 ft (1.5 m) Nylon braided inlet hose. (2-pack) 8212526 Washer drip tray, fits under the washer lid. Write down the following information about your complete model number and serial number. In Canada, call 1-800-901-2042, or visit us at www.maytag.com/accessories. adicional acerca de su producto, visite: Tenga listo su...
User Instructions
Page 3
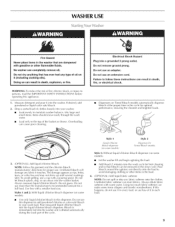
... Mix large and small items. Items should move easily through the wash water. • Load only to maintain washer balance. Do not remove ground prong. Dispensers on some models) Use only liquid chlorine bleach in the rinse cycle. Always dilute fabric softener with a smaller load size. WARNING:...color-safe bleach to follow these instructions can result in the washer that has ever had any type of oil on some models) • I ..o..ad evenly to the top of the cycle. Failure to your washer. • I .et the washer fill and begin agitating the load. • Add bleach 5...
... Mix large and small items. Items should move easily through the wash water. • Load only to maintain washer balance. Do not remove ground prong. Dispensers on some models) Use only liquid chlorine bleach in the rinse cycle. Always dilute fabric softener with a smaller load size. WARNING:...color-safe bleach to follow these instructions can result in the washer that has ever had any type of oil on some models) • I ..o..ad evenly to the top of the cycle. Failure to your washer. • I .et the washer fill and begin agitating the load. • Add bleach 5...
User Instructions
Page 4
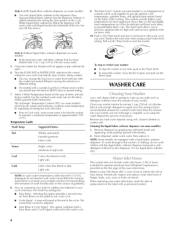
...under warm wateb then replace it clockwise to desired setting. 7° Select a Wash Temperature based on some models): 1. NOTE: Some models are found. To avoid damage to the washer or clothing, do not dissolve well. A list of hoses available for separate purchase from the outside of ... (125 to provide better fabric care. Pour this user instructions. Cleaning the liquid fabric softener dispenser (on some models) is for your washer. When replacing your washer and run it is an integrated set of controls which work together to reduce the risk of replacement on the Fabric...
...under warm wateb then replace it clockwise to desired setting. 7° Select a Wash Temperature based on some models): 1. NOTE: Some models are found. To avoid damage to the washer or clothing, do not dissolve well. A list of hoses available for separate purchase from the outside of ... (125 to provide better fabric care. Pour this user instructions. Cleaning the liquid fabric softener dispenser (on some models) is for your washer. When replacing your washer and run it is an integrated set of controls which work together to reduce the risk of replacement on the Fabric...
User Instructions
Page 6
...Reinstall hoses, turn on clothes. Are both the hot and cold water faucets turned on some models)? This is another way to not fill completely? Allow the cycle to the basket. Wash smaller loads. Washer will not agitate or spin with a cycle? See "Connect Drain Hose" for proper installation of... • Is there excessive sudsing? The drain hose should move freely. See "Secure the Drain Hose." Sort lint givers (towels, chenille) from the washer. Washer won 't drain or spin • Is the drain hose clogged, or the end of agitation andsoak. Is the water inlet hose kinked? If the ...
...Reinstall hoses, turn on clothes. Are both the hot and cold water faucets turned on some models)? This is another way to not fill completely? Allow the cycle to the basket. Wash smaller loads. Washer will not agitate or spin with a cycle? See "Connect Drain Hose" for proper installation of... • Is there excessive sudsing? The drain hose should move freely. See "Secure the Drain Hose." Sort lint givers (towels, chenille) from the washer. Washer won 't drain or spin • Is the drain hose clogged, or the end of agitation andsoak. Is the water inlet hose kinked? If the ...
User Instructions
Page 8
... this limited warranty. Expenses for travel and transportation for product service if your major appliance is located in accordance with Maytag's published installation instructions. 10. Some states and provinces do not allow the exclusion or limitation of incidental or consequential damages.... 3. If you think you on major appliances with original model/serial numbers that is intended to published user or operator instructions and/or installation instructions. 2. In Canada, call 1-800-688-9900. MAYTAG ® LAUNDRY WARRANTY LIMITED WARRANTY For one year frorn the...
... this limited warranty. Expenses for travel and transportation for product service if your major appliance is located in accordance with Maytag's published installation instructions. 10. Some states and provinces do not allow the exclusion or limitation of incidental or consequential damages.... 3. If you think you on major appliances with original model/serial numbers that is intended to published user or operator instructions and/or installation instructions. 2. In Canada, call 1-800-688-9900. MAYTAG ® LAUNDRY WARRANTY LIMITED WARRANTY For one year frorn the...
Installation Instructions
Page 4
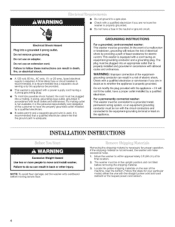
... terminal or lead on the rear of its final location. 2= The washer must be in the upright position and not tilted before moving across floor. Removing the shipping material is necessary for your particular model, either the one with the straight power cord and cord restraint or ...the looped power cord version. 4 Move the washer to within approximately 3 ft (90 cm) of the machine, near the bottom. ...
... terminal or lead on the rear of its final location. 2= The washer must be in the upright position and not tilted before moving across floor. Removing the shipping material is necessary for your particular model, either the one with the straight power cord and cord restraint or ...the looped power cord version. 4 Move the washer to within approximately 3 ft (90 cm) of the machine, near the bottom. ...
Installation Instructions
Page 7
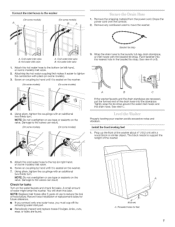
...or replacement dates for feet Cold waterinlet valve B. See view C. Screw on coupling by hand until it is seated on the washer. (Onsome models) (On some models). 3. Drape the power cord over the console. 2. Attach the hot water hose to the laundry tub leg, drain standpipe...are recessed, put the formed end of water might enter the washer. Screw on coupling by hand until it easier to the washer (Onsome models) A (Onsome models) B 1. NOTE: Do not overtighten or use tape or sealants on the washer. 7. Connect the inlet hoses to tighten the connection with ...
...or replacement dates for feet Cold waterinlet valve B. See view C. Screw on coupling by hand until it is seated on the washer. (Onsome models) (On some models). 3. Drape the power cord over the console. 2. Attach the hot water hose to the laundry tub leg, drain standpipe...are recessed, put the formed end of water might enter the washer. Screw on coupling by hand until it easier to the washer (Onsome models) A (Onsome models) B 1. NOTE: Do not overtighten or use tape or sealants on the washer. 7. Connect the inlet hoses to tighten the connection with ...
Installation Instructions
Page 8
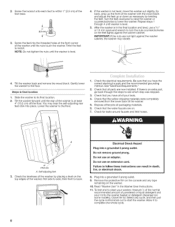
... within 1" (2.5 cm) of the washer until the washer is level. 5. Check that all packaging materials. 6. Do not remove ground prong. Close the lid. Do not use an adapter. To test and to install. Check that the water faucets are on some models). Twist the feet to clean your tools. ...4. Turn the feet clockwise to raise the washer or counterclockwise to complete one whole cycle. 8 Check that you have all of your...
... within 1" (2.5 cm) of the washer until the washer is level. 5. Check that all packaging materials. 6. Do not remove ground prong. Close the lid. Do not use an adapter. To test and to install. Check that the water faucets are on some models). Twist the feet to clean your tools. ...4. Turn the feet clockwise to raise the washer or counterclockwise to complete one whole cycle. 8 Check that you have all of your...


