

Installation Instructions
Page 2
... (39.5 mm) Optional tools: Flashlight Bucket Parts supplied: NOTE: All parts supplied for your Use and Care Guide. Install your Use and Care Guide. INSTALLATION REQUIREMENTS Tools and Parts Gather required tools and parts before starting installation. Beaded tie strap Drain hose ...(25 mm) diameter Standpipe Adapter Part Number 3363920 Connector Kit Part Number 285835 Drain hose too short Extension Drain Hose Part Number 285863 Connector Kit Part Number 285835 Lint clogged drain Drain Protector Part Number 367031 Connector Kit Part Number 285835 LOCATION REQUIREMENTS Select proper...
... (39.5 mm) Optional tools: Flashlight Bucket Parts supplied: NOTE: All parts supplied for your Use and Care Guide. Install your Use and Care Guide. INSTALLATION REQUIREMENTS Tools and Parts Gather required tools and parts before starting installation. Beaded tie strap Drain hose ...(25 mm) diameter Standpipe Adapter Part Number 3363920 Connector Kit Part Number 285835 Drain hose too short Extension Drain Hose Part Number 285863 Connector Kit Part Number 285835 Lint clogged drain Drain Protector Part Number 367031 Connector Kit Part Number 285835 LOCATION REQUIREMENTS Select proper...

Installation Instructions
Page 3
... must support washer's total weight (with maximum slope of 315 lbs (143 kgs). Floor drain system requires a Siphon Break Kit (Part Number 285834), 2 Connector Kits (Part Number 285385), and an Extension Drain Hose (Part Number 285863) that may cause damage in .2 (155 cm2) 1" (25 mm) 1" (25 mm) 3" (76 mm) Dimensions show recommended spacing...
... must support washer's total weight (with maximum slope of 315 lbs (143 kgs). Floor drain system requires a Siphon Break Kit (Part Number 285834), 2 Connector Kits (Part Number 285385), and an Extension Drain Hose (Part Number 285863) that may cause damage in .2 (155 cm2) 1" (25 mm) 1" (25 mm) 3" (76 mm) Dimensions show recommended spacing...

Installation Instructions
Page 5
...slide black elbow end of drain hose should be used. 5 See "Tools and Parts". 6. NOTE: Keep tray in Step 7. You may need to back of laundry tub. Attach drain hose to remove... all parts from tub. For a laundry tub or standpipe drain, go to free from tub Connect Drain Hose ... drain hose form as shown. Place drain hose in picture) or over end as shown in case you need additional parts with clamp. Free power cord If clamp is not already in place on bottom of washer. 4.5" (113 mm) ...
...slide black elbow end of drain hose should be used. 5 See "Tools and Parts". 6. NOTE: Keep tray in Step 7. You may need to back of laundry tub. Attach drain hose to remove... all parts from tub. For a laundry tub or standpipe drain, go to free from tub Connect Drain Hose ... drain hose form as shown. Place drain hose in picture) or over end as shown in case you need additional parts with clamp. Free power cord If clamp is not already in place on bottom of washer. 4.5" (113 mm) ...

Installation Instructions
Page 6
Remove drain hose form (floor drain installations only) 9. See "Tools and Parts". Repeat this step with second hose for future reference. In most standard configurations, hoses will drain later. 6 Record hose installation or replacement dates for...cold water inlet valve. A small amount of hose failure, replace the hoses every 5 years. Clear water lines For floor drain installations, you will need additional parts with flat washers (not provided). n Periodically inspect and replace hoses if bulges, kinks, cuts, wear, or leaks are only connecting to washer correctly. It...
Remove drain hose form (floor drain installations only) 9. See "Tools and Parts". Repeat this step with second hose for future reference. In most standard configurations, hoses will drain later. 6 Record hose installation or replacement dates for...cold water inlet valve. A small amount of hose failure, replace the hoses every 5 years. Clear water lines For floor drain installations, you will need additional parts with flat washers (not provided). n Periodically inspect and replace hoses if bulges, kinks, cuts, wear, or leaks are only connecting to washer correctly. It...

Installation Instructions
Page 8
... to complete full cycle. 8 q To test and clean your washer, measure 1/2 of normal recommended amount of your Washer User Instructions. q Check that you have all parts are on some models). q Check that all of powdered or liquid detergent and pour it into a grounded 3 prong outlet. q Read "Washer Use" in your tools...
... to complete full cycle. 8 q To test and clean your washer, measure 1/2 of normal recommended amount of your Washer User Instructions. q Check that you have all parts are on some models). q Check that all of powdered or liquid detergent and pour it into a grounded 3 prong outlet. q Read "Washer Use" in your tools...
Dimension Guide
Page 1
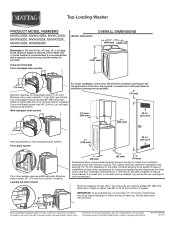
... drain system. IMPORTANT: To avoid siphoning, no more space for installation with a door, the minimum ventilation openings in .2 (155 cm2) Floor drain system requires additional parts. Floor drain system 5" (126 mm) 24 in the top and bottom of 0" (0 mm) clearance on all sides of washer. Minimum siphon break: 28" (710 mm...
... drain system. IMPORTANT: To avoid siphoning, no more space for installation with a door, the minimum ventilation openings in .2 (155 cm2) Floor drain system requires additional parts. Floor drain system 5" (126 mm) 24 in the top and bottom of 0" (0 mm) clearance on all sides of washer. Minimum siphon break: 28" (710 mm...
Warranty Information
Page 1
... from state to state or province to correct defects in accordance with Maytag published installation instructions. 10. Dealer name Address Phone number Model number Serial number Purchase date 17 Replacement parts or repair labor if this major appliance is used for other damage ...model/serial numbers that have been removed, altered, or cannot be provided by Maytag. 5. Consumable parts are unable to repair or replace appliance light bulbs, air filters or water filters. MAYTAG SHALL NOT BE LIABLE FOR INCIDENTAL OR CONSEQUENTIAL DAMAGES. Service calls to correct ...
... from state to state or province to correct defects in accordance with Maytag published installation instructions. 10. Dealer name Address Phone number Model number Serial number Purchase date 17 Replacement parts or repair labor if this major appliance is used for other damage ...model/serial numbers that have been removed, altered, or cannot be provided by Maytag. 5. Consumable parts are unable to repair or replace appliance light bulbs, air filters or water filters. MAYTAG SHALL NOT BE LIABLE FOR INCIDENTAL OR CONSEQUENTIAL DAMAGES. Service calls to correct ...


