

Installation Instructions
Page 2
...steel couplings (2 pack) 6 ft. (1.8 m) Inlet hose, Black EPDM, space saving 90° elbow, hypro-blue steel couplings (2 pack) Alternate parts: (Not supplied with washer) Adjustable or open end wrench 9/16" (14 mm) 4" min (102 mm) Level Wood block Ruler or measuring ... 1" (25 mm) diameter Standpipe Adapter Part Number 3363920 Connector Kit Part Number 285835 Drain hose too short Extension Drain Hose Part Number 285863 Connector Kit Part Number 285835 Lint clogged drain Drain Protector Part Number 367031 Connector Kit Part Number 285835 LOCATION REQUIREMENTS Select proper location for...
...steel couplings (2 pack) 6 ft. (1.8 m) Inlet hose, Black EPDM, space saving 90° elbow, hypro-blue steel couplings (2 pack) Alternate parts: (Not supplied with washer) Adjustable or open end wrench 9/16" (14 mm) 4" min (102 mm) Level Wood block Ruler or measuring ... 1" (25 mm) diameter Standpipe Adapter Part Number 3363920 Connector Kit Part Number 285835 Drain hose too short Extension Drain Hose Part Number 285863 Connector Kit Part Number 285835 Lint clogged drain Drain Protector Part Number 367031 Connector Kit Part Number 285835 LOCATION REQUIREMENTS Select proper location for...

Installation Instructions
Page 3
... for companion appliances and clearances for closet door ventilation openings which are required. Floor drain system requires a Siphon Break Kit (Part Number 285834), 2 Connector Kits (Part Number 285385), and an Extension Drain Hose (Part Number 285863) that may be installed using a floor drain, wall standpipe, floor standpipe, or laundry tub. To order, please...
... for companion appliances and clearances for closet door ventilation openings which are required. Floor drain system requires a Siphon Break Kit (Part Number 285834), 2 Connector Kits (Part Number 285385), and an Extension Drain Hose (Part Number 285863) that may be installed using a floor drain, wall standpipe, floor standpipe, or laundry tub. To order, please...

Installation Instructions
Page 5
..., open lid and remove cardboard packing tray from rear panel. Drain hose form must be inside standpipe; Remove packing tray from tray. See "Tools and Parts". 6. Be sure to free from tub. Place drain hose in picture) or over side of drain hose should be used. 5 do not force excess... tub. For a floor drain, remove the preinstalled drain hose form as shown. Gently place power cord over end as shown in case you need additional parts with clamp. You may need to back of washer. 4.5" (113 mm) Place hose into standpipe or lay on elbow end of laundry tub. Squeeze...
..., open lid and remove cardboard packing tray from rear panel. Drain hose form must be inside standpipe; Remove packing tray from tray. See "Tools and Parts". 6. Be sure to free from tub. Place drain hose in picture) or over side of drain hose should be used. 5 do not force excess... tub. For a floor drain, remove the preinstalled drain hose form as shown. Gently place power cord over end as shown in case you need additional parts with clamp. You may need to back of washer. 4.5" (113 mm) Place hose into standpipe or lay on elbow end of laundry tub. Squeeze...

Installation Instructions
Page 6
.... n Periodically inspect and replace hoses if bulges, kinks, cuts, wear, or leaks are only connecting to a cold water faucet, you will need additional parts with second hose for cold water faucet. If you are found. 11. Water should run until it is snug. HELPFUL TIP: Make note of water... To reduce risk of the drain hose. Attach hot water hose to water faucets with new inlet hoses with a red ring. See "Tools and Parts". A small amount of which hose is connected to hot water to help in attaching hoses to tighten couplings an additional two-thirds turn . Clear water...
.... n Periodically inspect and replace hoses if bulges, kinks, cuts, wear, or leaks are only connecting to a cold water faucet, you will need additional parts with second hose for cold water faucet. If you are found. 11. Water should run until it is snug. HELPFUL TIP: Make note of water... To reduce risk of the drain hose. Attach hot water hose to water faucets with new inlet hoses with a red ring. See "Tools and Parts". A small amount of which hose is connected to hot water to help in attaching hoses to tighten couplings an additional two-thirds turn . Clear water...

Installation Instructions
Page 8
Be sure you have correct electrical supply and recommended grounding method. q Check that all parts are on some models). q Check for leaks around faucets and inlet hoses. q Read "Washer Use" in your tools. Start washer and allow to see what... yellow shipping materials were completely removed from console and any cycle. If there is plugged into a grounded 3 prong outlet. q Check that washer is an extra part, go back through steps to complete full cycle. 8 Select any tape remaining on washer. q To test and clean your washer, measure 1/2 of normal recommended ...
Be sure you have correct electrical supply and recommended grounding method. q Check that all parts are on some models). q Check for leaks around faucets and inlet hoses. q Read "Washer Use" in your tools. Start washer and allow to see what... yellow shipping materials were completely removed from console and any cycle. If there is plugged into a grounded 3 prong outlet. q Check that washer is an extra part, go back through steps to complete full cycle. 8 Select any tape remaining on washer. q To test and clean your washer, measure 1/2 of normal recommended ...
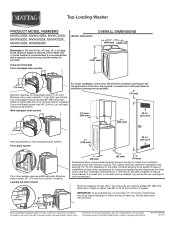
Dimension Guide
Page 1
... Hz., AC only, 15- or 20-amp, fused electrical supply is installed, top and bottom air openings in .2 (155 cm2) Floor drain system requires additional parts. Minimum carry-away capacity: 17 gal. (64 L) per minute. Floor drain system 5" (126 mm) 24 in door are required. Dimensions are minimum required. Specifications subject...
... Hz., AC only, 15- or 20-amp, fused electrical supply is installed, top and bottom air openings in .2 (155 cm2) Floor drain system requires additional parts. Minimum carry-away capacity: 17 gal. (64 L) per minute. Floor drain system 5" (126 mm) 24 in door are required. Dimensions are minimum required. Specifications subject...
Warranty Information
Page 1
...: 1. This major appliance is intended to be found by checking the "Assistance or Service" section or by Maytag. 5. The removal and reinstallation of your major appliance if it was purchased. Replacement parts or repair labor on the product. If you . You will pay for factory specified.... In Canada, call 18006889900. Dealer name Address Phone number Model number Serial number Purchase date 17 MAYTAG® LAUNDRY WARRANTY LIMITED WARRANTY For one year from the date of purchase, when this major appliance is operated and maintained according ...
...: 1. This major appliance is intended to be found by checking the "Assistance or Service" section or by Maytag. 5. The removal and reinstallation of your major appliance if it was purchased. Replacement parts or repair labor on the product. If you . You will pay for factory specified.... In Canada, call 18006889900. Dealer name Address Phone number Model number Serial number Purchase date 17 MAYTAG® LAUNDRY WARRANTY LIMITED WARRANTY For one year from the date of purchase, when this major appliance is operated and maintained according ...


