

Installation Guide
Page 2
... m) Inlet hose, Black EPDM, space saving 90° elbow, hypro-blue steel couplings (2 pack) Alternate parts: (Not supplied with flat washers To order, please refer to 1" (25 mm) diameter Standpipe Adapter Part Number 3363920 Connector Kit Part Number 285835 Drain hose too short Extension Drain...Care Guide. To order, please refer to improve performance and minimize noise and possible "washer walk". Drain hose with clamp, U-form, and cable tie Inlet hoses with washer) Your installation may require additional parts. INSTALLATION REQUIREMENTS Tools and Parts Gather required tools and...
... m) Inlet hose, Black EPDM, space saving 90° elbow, hypro-blue steel couplings (2 pack) Alternate parts: (Not supplied with flat washers To order, please refer to 1" (25 mm) diameter Standpipe Adapter Part Number 3363920 Connector Kit Part Number 285835 Drain hose too short Extension Drain...Care Guide. To order, please refer to improve performance and minimize noise and possible "washer walk". Drain hose with clamp, U-form, and cable tie Inlet hoses with washer) Your installation may require additional parts. INSTALLATION REQUIREMENTS Tools and Parts Gather required tools and...
Installation Guide
Page 3
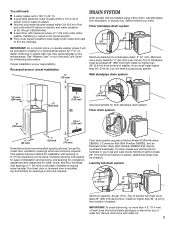
..., except for a standpipe drain: 2" (51 mm). Add spacing of 1" (25 mm) on all sides of 0" (0 mm) clearance on back of washer. Top of 315 lbs (143 kgs). n Floor must be purchased separately. install no higher than 96" (2.44 m) from bottom of drain hose should be...mm) 39" (990 mm) Minimum diameter for closet door ventilation openings which are required. install no higher than 96" (2.44 m) from bottom of washer. If a closet door or louvered door is not recommended. To order, please see toll-free phone numbers in door are minimum required. n A grounded...
..., except for a standpipe drain: 2" (51 mm). Add spacing of 1" (25 mm) on all sides of 0" (0 mm) clearance on back of washer. Top of 315 lbs (143 kgs). n Floor must be purchased separately. install no higher than 96" (2.44 m) from bottom of drain hose should be...mm) 39" (990 mm) Minimum diameter for closet door ventilation openings which are required. install no higher than 96" (2.44 m) from bottom of washer. If a closet door or louvered door is not recommended. To order, please see toll-free phone numbers in door are minimum required. n A grounded...
Installation Guide
Page 4
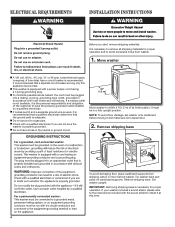
...this time. 4 Remove shipping base. it at this appliance be in accordance with a power supply cord having a 3 prong grounding plug. If your washer includes a sound shield, please refer to install it must be plugged into a mating, 3 prong, grounding-type outlet, grounded in a fully upright position.... If a mating outlet is not available, it is necessary for proper operation and to a gas pipe. Move washer n A 120 volt, 60 Hz., AC only, 15- or 20-amp, fused electrical supply is recommended. Remove shipping base To avoid damaging ...
...this time. 4 Remove shipping base. it at this appliance be in accordance with a power supply cord having a 3 prong grounding plug. If your washer includes a sound shield, please refer to install it must be plugged into a mating, 3 prong, grounding-type outlet, grounded in a fully upright position.... If a mating outlet is not available, it is necessary for proper operation and to a gas pipe. Move washer n A 120 volt, 60 Hz., AC only, 15- or 20-amp, fused electrical supply is recommended. Remove shipping base To avoid damaging ...

Installation Guide
Page 5
..., remove the preinstalled drain hose form as shown. Be sure to free from tray. Squeeze clamp with pliers and slide black elbow end of the washer. See "Tools and Parts". 6. NOTE: Keep tray in standpipe Drain hose form Firmly grasp power cord plug and pull to remove all parts from rear...; Free power cord Remove the red plastic plug from tub CONNECT DRAIN HOSE 5. Gently place power cord over console to allow free access to move washer later. 4. do not force excess hose into standpipe (shown in picture) or over end as shown in place on elbow end of laundry tub. ...
..., remove the preinstalled drain hose form as shown. Be sure to free from tray. Squeeze clamp with pliers and slide black elbow end of the washer. See "Tools and Parts". 6. NOTE: Keep tray in standpipe Drain hose form Firmly grasp power cord plug and pull to remove all parts from rear...; Free power cord Remove the red plastic plug from tub CONNECT DRAIN HOSE 5. Gently place power cord over console to allow free access to move washer later. 4. do not force excess hose into standpipe (shown in picture) or over end as shown in place on elbow end of laundry tub. ...

Installation Guide
Page 6
... drain installations, you will drain later. 6 NOTE: Both hoses must be connected to check for leaks. Connect inlet hoses to washer Attach hose to inlet valves. Repeat this step with cold water inlet valve. Damage can result. It will need additional parts with flat...with new inlet hoses with separate directions. Remove drain hose form (floor drain installations only) 9. You may enter washer. Water should run until it is snug. CONNECT INLET HOSES Washer must use old hoses. Repeat with second hose for a few seconds through hoses into a laundry tub, drainpipe,...
... drain installations, you will drain later. 6 NOTE: Both hoses must be connected to check for leaks. Connect inlet hoses to washer Attach hose to inlet valves. Repeat this step with cold water inlet valve. Damage can result. It will need additional parts with flat...with new inlet hoses with separate directions. Remove drain hose form (floor drain installations only) 9. You may enter washer. Water should run until it is snug. CONNECT INLET HOSES Washer must use old hoses. Repeat with second hose for a few seconds through hoses into a laundry tub, drainpipe,...
Installation Guide
Page 7
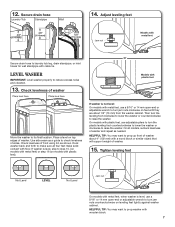
...wall standpipe with plastic feet, use a 9/16" or 14 mm open -end or adjustable wrench to turn the leveling foot clockwise to lower the washer or counterclockwise to its final location. HELPFUL TIP: You may want to turn jam nuts counterclockwise on feet until they are about 4" (102 mm)... with a wood block or similar object that will support weight of washer. If washer is level, use adjustable pliers to prop washer with floor. On models with cable tie. Check levelness of sides. On all four feet make sure all models, recheck ...
...wall standpipe with plastic feet, use a 9/16" or 14 mm open -end or adjustable wrench to turn the leveling foot clockwise to lower the washer or counterclockwise to its final location. HELPFUL TIP: You may want to turn jam nuts counterclockwise on feet until they are about 4" (102 mm)... with a wood block or similar object that will support weight of washer. If washer is level, use adjustable pliers to prop washer with floor. On models with cable tie. Check levelness of sides. On all four feet make sure all models, recheck ...
Installation Guide
Page 8
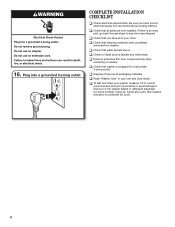
... were completely removed from console and any cycle. q Check that you have all of /recycle all parts are on. q Remove protective film from washer. q To test and clean your washer, measure 1/2 of normal recommended amount of powdered or liquid detergent and pour it into a grounded 3 prong outlet. Select any tape remaining on...
... were completely removed from console and any cycle. q Check that you have all of /recycle all parts are on. q Remove protective film from washer. q To test and clean your washer, measure 1/2 of normal recommended amount of powdered or liquid detergent and pour it into a grounded 3 prong outlet. Select any tape remaining on...
Dimension Guide
Page 1
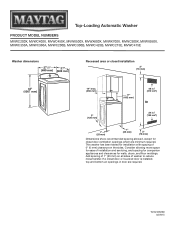
...companion appliances and clearances for installation with spacing of 0" (0 mm) clearance on all sides of washer to reduce noise transfer. Consider allowing more space for closet door ventilation openings which are required. Top-Loading Automatic... Washer PRODUCT MODEL NUMBERS MVWC200X, MVWC400X, MVWC450X, MVWX500X, MVWX600X, MVWX700X, MVWC300X, MVWX550X, MVWC350A, MVWC360A, MVWC200B, MVWC300B, MVWC425B, MVWC215E, MVWC415E Washer dimensions 271/2" 27" (699 mm) (686 mm) Recessed area or closet...
...companion appliances and clearances for installation with spacing of 0" (0 mm) clearance on all sides of washer to reduce noise transfer. Consider allowing more space for closet door ventilation openings which are required. Top-Loading Automatic... Washer PRODUCT MODEL NUMBERS MVWC200X, MVWC400X, MVWC450X, MVWX500X, MVWX600X, MVWX700X, MVWC300X, MVWX550X, MVWC350A, MVWC360A, MVWC200B, MVWC300B, MVWC425B, MVWC215E, MVWC415E Washer dimensions 271/2" 27" (699 mm) (686 mm) Recessed area or closet...
Dimension Guide
Page 2
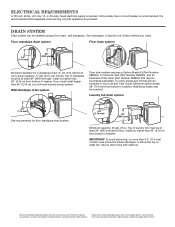
...or circuit breaker is required. Select method you will need . Top of laundry tub must install higher than 96" (2.44 m) from bottom of washer. If you must be at least 39" (990 mm) above floor; To order, please see Installation Instructions packed with cable tie. Floor ...install no higher than 4.5" (114 mm) of wash tub. IMPORTANT: To avoid siphoning, no more than 96" (2.44 m) from bottom of washer. (Additional hoses may be inside standpipe or below the top of drain hose should be purchased separately. Secure drain hose with product. Dimensions are for...
...or circuit breaker is required. Select method you will need . Top of laundry tub must install higher than 96" (2.44 m) from bottom of washer. If you must be at least 39" (990 mm) above floor; To order, please see Installation Instructions packed with cable tie. Floor ...install no higher than 4.5" (114 mm) of wash tub. IMPORTANT: To avoid siphoning, no more than 96" (2.44 m) from bottom of washer. (Additional hoses may be inside standpipe or below the top of drain hose should be purchased separately. Secure drain hose with product. Dimensions are for...

Energy Guide
Page 1
... (P/N W10063028) Labels with yellow numbers are based on six wash loads a week and a national average electricity cost of 12 cents per therm. Clothes Washer Capacity Class: Standard Maytag Model MVWC415E* Cat. Estimated Yearly Energy Cost (when used with an electric water heater) $25 Cost range not available 160 kWh Estimated Yearly Electricity...
... (P/N W10063028) Labels with yellow numbers are based on six wash loads a week and a national average electricity cost of 12 cents per therm. Clothes Washer Capacity Class: Standard Maytag Model MVWC415E* Cat. Estimated Yearly Energy Cost (when used with an electric water heater) $25 Cost range not available 160 kWh Estimated Yearly Electricity...
Use & Care Guide
Page 2
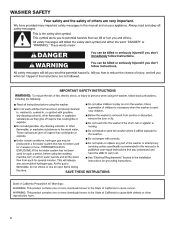
WASHER SAFETY 2
WASHER SAFETY 2

Use & Care Guide
Page 3
... seconds to several minutes for the lid to check for load size and determine the correct water level for load balance or moves the load. Washer lid lock will turn on when in the cycle you may hear nothing at the beginning of humming and whirring sounds as the lid lock..., you may hear sounds and pauses that sensing technology is determining if there is an off , the lid can start. IMPORTANT: ■■ After the washer basket fills to resume the cycle. When this time, a series of clicks and a whirring noise signal that are different from those of spins to unlock...
... seconds to several minutes for the lid to check for load size and determine the correct water level for load balance or moves the load. Washer lid lock will turn on when in the cycle you may hear nothing at the beginning of humming and whirring sounds as the lid lock..., you may hear sounds and pauses that sensing technology is determining if there is an off , the lid can start. IMPORTANT: ■■ After the washer basket fills to resume the cycle. When this time, a series of clicks and a whirring noise signal that are different from those of spins to unlock...
Use & Care Guide
Page 4
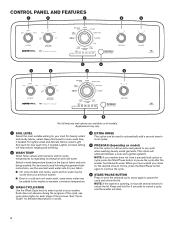
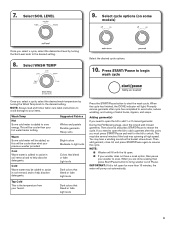
...cycle. 6 START/PAUSE BUTTON Press to select cycles on model) Use this option to add an extra soak period to cancel a cycle and the washer will help reduce tangling and wrinkling. 2 WASH TEMP Wash Temp senses and maintains uniform water temperatures by regulating incoming hot and cold water. NOTE:... For lightly soiled and delicate fabrics, select Light Soil Level for each stage of cycles. 4 EXTRA RINSE This option can be added to the washer to maintain a minimum temperature. 3 WASH CYCLE KNOB Use the Wash Cycle knob to start the selected cycle; Knob does not advance during the progress...
...cycle. 6 START/PAUSE BUTTON Press to select cycles on model) Use this option to add an extra soak period to cancel a cycle and the washer will help reduce tangling and wrinkling. 2 WASH TEMP Wash Temp senses and maintains uniform water temperatures by regulating incoming hot and cold water. NOTE:... For lightly soiled and delicate fabrics, select Light Soil Level for each stage of cycles. 4 EXTRA RINSE This option can be added to the washer to maintain a minimum temperature. 3 WASH CYCLE KNOB Use the Wash Cycle knob to start the selected cycle; Knob does not advance during the progress...

Use & Care Guide
Page 5
... lid will hear the motor and agitator moving the load. If the cycle has not been continued within 10 minutes of the second stage, the washer will repeat for the load to become saturated. During the first stage of a cycle. DONE Once the cycle is normal for several second pause. Then... the lid must be unlocked at this light is blinking, the washer is paused. The motor sounds may take approximately 2-3 minutes and the lid will be opened . SENSING/FILL Once you need to open when the water...
... lid will hear the motor and agitator moving the load. If the cycle has not been continued within 10 minutes of the second stage, the washer will repeat for the load to become saturated. During the first stage of a cycle. DONE Once the cycle is normal for several second pause. Then... the lid must be unlocked at this light is blinking, the washer is paused. The motor sounds may take approximately 2-3 minutes and the lid will be opened . SENSING/FILL Once you need to open when the water...

Use & Care Guide
Page 6
... level. This cycle should not be adjusted as jackets and small comforters. Recommended settings for some items than other fabric types. The washer will absorb more water than for normally soiled cottons and mixed fabric loads. Water-level sensing process may be interrupted. This cycle uses...indicating "Machine Washable Silks" or "Gentle" cycle on the care label. Settings may take longer for some items than other items in washer Clean Hot Washer with affresh® cycle. Not all models. This cycle uses a higher, preset water level. Use with an empty wash tub....
... level. This cycle should not be adjusted as jackets and small comforters. Recommended settings for some items than other fabric types. The washer will absorb more water than for normally soiled cottons and mixed fabric loads. Water-level sensing process may be interrupted. This cycle uses...indicating "Machine Washable Silks" or "Gentle" cycle on the care label. Settings may take longer for some items than other items in washer Clean Hot Washer with affresh® cycle. Not all models. This cycle uses a higher, preset water level. Use with an empty wash tub....
Use & Care Guide
Page 7
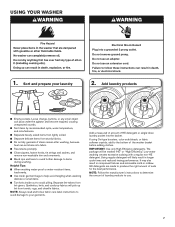
... and follow these instructions can set stains into the basket. Add a measured of amount of the washer basket before adding clothes. Using regular detergent will likely result in death, re, or electrical shock. 2. USING YOUR WASHER WARNING 1. Do not remove ground prong. Failure to use. 7 Helpful Tips: ■■ When washing water...
... and follow these instructions can set stains into the basket. Add a measured of amount of the washer basket before adding clothes. Using regular detergent will likely result in death, re, or electrical shock. 2. USING YOUR WASHER WARNING 1. Do not remove ground prong. Failure to use. 7 Helpful Tips: ■■ When washing water...
Use & Care Guide
Page 8
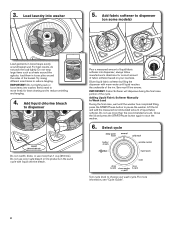
...to reduce tangling. IMPORTANT: Fabric Softener will dispense during the final rinse portion of the basket. IMPORTANT: Do not tightly pack or force items into washer 5. Close the lid and press the START/Pause button again to dispenser (on your wash cycle. For more than 1 cup (250 mL). ...Load laundry into washer. load them in the same cycle with warm water until the washer has completed filling, press the START/Pause button to Wash Load During the final rinse, wait until liquid reaches...
...to reduce tangling. IMPORTANT: Fabric Softener will dispense during the final rinse portion of the basket. IMPORTANT: Do not tightly pack or force items into washer 5. Close the lid and press the START/Pause button again to dispenser (on your wash cycle. For more than 1 cup (250 mL). ...Load laundry into washer. load them in the same cycle with warm water until the washer has completed filling, press the START/Pause button to Wash Load During the final rinse, wait until liquid reaches...
Use & Care Guide
Page 9
... add 1 or 2 missed garments: During the Fill/Sensing stage, open . ■■ If your washer does not have a soak option, then pause your previous washer provided. NOTE: ■■ Washer will light. When the cycle has finished, the DONE indicator will fill with the lid open the lid and add missed ... Warm water may be added, so this point, you select a cycle, select the desired soil level by turning the Wash Temp knob to bring washer out of metal hooks, zippers, and snaps. Adding garment(s) If you are done soaking then press Start/Pause button to the desired setting. This ...
... add 1 or 2 missed garments: During the Fill/Sensing stage, open . ■■ If your washer does not have a soak option, then pause your previous washer provided. NOTE: ■■ Washer will light. When the cycle has finished, the DONE indicator will fill with the lid open the lid and add missed ... Warm water may be added, so this point, you select a cycle, select the desired soil level by turning the Wash Temp knob to bring washer out of metal hooks, zippers, and snaps. Adding garment(s) If you are done soaking then press Start/Pause button to the desired setting. This ...

Use & Care Guide
Page 10
...Best 1. Unplug or disconnect power to remove the dispensers or trim for cleaning the inside of the washer. If storing or moving , or not using your washer. This Washer Maintenance Procedure should be performed, at a minimum, once per month or every 30 wash cycles, ...the cycle has stopped, run a RINSE & SPIN cycle to rinse cleaner from washer. Open the washer lid and remove any clothing or items. b. d. Select the cycle recommended for cleaning. To winterize washer: 1. WASHER MAINTENANCE WATER INLET HOSES Replace inlet hoses after you may find some water may ...
...Best 1. Unplug or disconnect power to remove the dispensers or trim for cleaning the inside of the washer. If storing or moving , or not using your washer. This Washer Maintenance Procedure should be performed, at a minimum, once per month or every 30 wash cycles, ...the cycle has stopped, run a RINSE & SPIN cycle to rinse cleaner from washer. Open the washer lid and remove any clothing or items. b. d. Select the cycle recommended for cleaning. To winterize washer: 1. WASHER MAINTENANCE WATER INLET HOSES Replace inlet hoses after you may find some water may ...
Use & Care Guide
Page 11
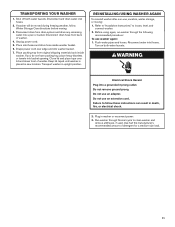
.... WARNING Electrical Shock Hazard Plug into basket opening. Failure to locate, level, and connect washer. 2. TRANSPORTING YOUR WASHER 1. Disconnect drain from back of washer. 4. Place packing tray from original shipping materials back inside washer basket. 6. Flush water pipes and hoses. Disconnect drain hose from drain system and drain ... Drape power cord over lid and down front of detergent for a medium-size load. 11 Place inlet hoses and drain hose inside washer. If you do not have packing tray, place heavy blankets or towels into a grounded 3 prong outlet. Do not use an ...
.... WARNING Electrical Shock Hazard Plug into basket opening. Failure to locate, level, and connect washer. 2. TRANSPORTING YOUR WASHER 1. Disconnect drain from back of washer. 4. Place packing tray from original shipping materials back inside washer basket. 6. Flush water pipes and hoses. Disconnect drain hose from drain system and drain ... Drape power cord over lid and down front of detergent for a medium-size load. 11 Place inlet hoses and drain hose inside washer. If you do not have packing tray, place heavy blankets or towels into a grounded 3 prong outlet. Do not use an ...


