

Installation Instructions
Page 2
... Optional tools: Flashlight Bucket Parts supplied: NOTE: All parts supplied for your Use and Care Guide. Tools needed: Parts needed: (Not supplied with washer) Your installation may require additional parts. Install your Use and Care Guide. n 8212656RP n 8212641RP n 8212646RP n 8212545RP n 8212487RP n 8212638RP n...(1.8 m) Inlet hose, Black EPDM, space saving 90° elbow, hypro-blue steel couplings (2 pack) Alternate parts: (Not supplied with washer) Adjustable or open end wrench 9/16" (14 mm) 4" min (102 mm) Level Wood block Ruler or measuring tape Pliers that open...
... Optional tools: Flashlight Bucket Parts supplied: NOTE: All parts supplied for your Use and Care Guide. Tools needed: Parts needed: (Not supplied with washer) Your installation may require additional parts. Install your Use and Care Guide. n 8212656RP n 8212641RP n 8212646RP n 8212545RP n 8212487RP n 8212638RP n...(1.8 m) Inlet hose, Black EPDM, space saving 90° elbow, hypro-blue steel couplings (2 pack) Alternate parts: (Not supplied with washer) Adjustable or open end wrench 9/16" (14 mm) 4" min (102 mm) Level Wood block Ruler or measuring tape Pliers that open...

Installation Instructions
Page 3
... n A grounded electrical outlet located within 3 ft (0.9 m) of hot and cold water fill valves on carpet is not recommended. This washer has been tested for closet door ventilation openings which are required. Consider allowing more than 96" (2.44 m), you need a sump pump ...) 1" (25 mm) 3" (76 mm) Dimensions show recommended spacing allowed, except for installation with water and load) of standpipe must support washer's total weight (with spacing of installation and servicing, and spacing for companion appliances and clearances for ease of 0" (0 mm) clearance on back...
... n A grounded electrical outlet located within 3 ft (0.9 m) of hot and cold water fill valves on carpet is not recommended. This washer has been tested for closet door ventilation openings which are required. Consider allowing more than 96" (2.44 m), you need a sump pump ...) 1" (25 mm) 3" (76 mm) Dimensions show recommended spacing allowed, except for installation with water and load) of standpipe must support washer's total weight (with spacing of installation and servicing, and spacing for companion appliances and clearances for ease of 0" (0 mm) clearance on back...
Installation Instructions
Page 4
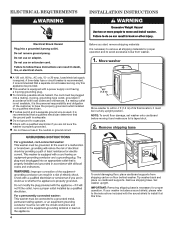
... and to avoid excessive noise from shipping carton on cardboard supports. Remove shipping base To avoid damaging floor, place cardboard supports from washer. 1. Move washer n A 120 volt, 60 Hz., AC only, 15- or 20-amp, fused electrical supply is recommended that the ground path... hazard, the cord must be plugged into a mating, 3 prong, grounding-type outlet, grounded in a fully upright position. Set washer upright. n Do not ground to the instructions included with local codes and ordinances. ELECTRICAL REQUIREMENTS INSTALLATION INSTRUCTIONS Before you are not sure the...
... and to avoid excessive noise from shipping carton on cardboard supports. Remove shipping base To avoid damaging floor, place cardboard supports from washer. 1. Move washer n A 120 volt, 60 Hz., AC only, 15- or 20-amp, fused electrical supply is recommended that the ground path... hazard, the cord must be plugged into a mating, 3 prong, grounding-type outlet, grounded in a fully upright position. Set washer upright. n Do not ground to the instructions included with local codes and ordinances. ELECTRICAL REQUIREMENTS INSTALLATION INSTRUCTIONS Before you are not sure the...

Installation Instructions
Page 5
.... 3. Attach drain hose to step 6. do not force excess hose into standpipe or lay on elbow end of drain hose, slide it over side of washer. 4.5" (113 mm) Place hose into standpipe (shown in standpipe Drain hose form Firmly grasp power cord plug and pull to remove all parts from tub.... See "Tools and Parts". 6. For a laundry tub or standpipe drain, go to drain port Remove tape from washer lid, open lid and remove cardboard packing tray from tray. Be sure to free from tub Connect Drain Hose 5. Remove packing tray from rear panel...
.... 3. Attach drain hose to step 6. do not force excess hose into standpipe or lay on elbow end of drain hose, slide it over side of washer. 4.5" (113 mm) Place hose into standpipe (shown in standpipe Drain hose form Firmly grasp power cord plug and pull to remove all parts from tub.... See "Tools and Parts". 6. For a laundry tub or standpipe drain, go to drain port Remove tape from washer lid, open lid and remove cardboard packing tray from tray. Be sure to free from tub Connect Drain Hose 5. Remove packing tray from rear panel...

Installation Instructions
Page 6
... cross over each other when attached correctly. Clear water lines For floor drain installations, you are found. 11. You may enter washer. Use pliers to prevent clogs. Screw coupling by hand until it is connected to hot water to help in attaching hoses to hot...should run until clear. 10. 7. Remove drain hose form (floor drain installations only) 9. Connect inlet hoses to faucets or washer. Connect inlet hoses to washer Attach hose to washer correctly. HELPFUL TIP: Make note of the drain hose. In most standard configurations, hoses will drain later. 6 Use pliers ...
... cross over each other when attached correctly. Clear water lines For floor drain installations, you are found. 11. You may enter washer. Use pliers to prevent clogs. Screw coupling by hand until it is connected to hot water to help in attaching hoses to hot...should run until clear. 10. 7. Remove drain hose form (floor drain installations only) 9. Connect inlet hoses to faucets or washer. Connect inlet hoses to washer Attach hose to washer correctly. HELPFUL TIP: Make note of the drain hose. In most standard configurations, hoses will drain later. 6 Use pliers ...
Installation Instructions
Page 7
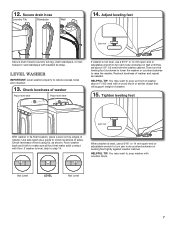
... a guide to turn jam nuts counterclockwise on feet until they are about 4" (102 mm) with wooden block. Check levelness of washer Place level here Place level here If washer is not level, use a 9/16" or 14 mm open -end or adjustable wrench to turn the leveling foot clockwise to lower...floor. Check levelness of front using lid, as needed. HELPFUL TIP: You may want to step 14. When washer is level, skip to prop up front of washer about 1/2" (13 mm) from the washer cabinet. Not Level LEVEL Not Level 7 Secure drain hose Laundry Tub Standpipe Wall 14. HELPFUL TIP: You ...
... a guide to turn jam nuts counterclockwise on feet until they are about 4" (102 mm) with wooden block. Check levelness of washer Place level here Place level here If washer is not level, use a 9/16" or 14 mm open -end or adjustable wrench to turn the leveling foot clockwise to lower...floor. Check levelness of front using lid, as needed. HELPFUL TIP: You may want to step 14. When washer is level, skip to prop up front of washer about 1/2" (13 mm) from the washer cabinet. Not Level LEVEL Not Level 7 Secure drain hose Laundry Tub Standpipe Wall 14. HELPFUL TIP: You ...

Installation Instructions
Page 8
...removed from console and any cycle. Select any tape remaining on washer. q Remove protective film from back of powdered or liquid detergent and pour it into washer basket or detergent dispenser (on . q Check that washer is an extra part, go back through steps to complete full ...cycle. 8 q Check for leaks around faucets and inlet hoses. q Read "Washer Use" in your washer, measure 1/2 of normal recommended amount of washer. Plug into a grounded 3 prong outlet. Start washer and allow to see what was skipped. Close lid. 16. If there is plugged into ...
...removed from console and any cycle. Select any tape remaining on washer. q Remove protective film from back of powdered or liquid detergent and pour it into washer basket or detergent dispenser (on . q Check that washer is an extra part, go back through steps to complete full ...cycle. 8 q Check for leaks around faucets and inlet hoses. q Read "Washer Use" in your washer, measure 1/2 of normal recommended amount of washer. Plug into a grounded 3 prong outlet. Start washer and allow to see what was skipped. Close lid. 16. If there is plugged into ...

Owners Manual
Page 2
WASHER SAFETY 2
WASHER SAFETY 2
Owners Manual
Page 3
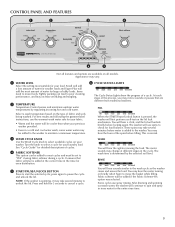
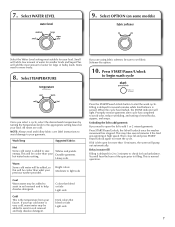
... lock mechanism. You may take several minutes before filling. Select a wash temperature based on all features and options are different from traditional washers. FILL When the START/Pause/Unlock button is normal. 3 WASH CYCLE KNOB Use the Wash Cycle knob to start the selected cycle.... 1 WATER LEVEL Select the setting most amount of fabric and soils being washed. WASH You will be added to the washer to the washer. The washer will use spray rinsing. Appearance may notice sounds or pauses that fabric softener is determined by regulating incoming hot and cold water...
... lock mechanism. You may take several minutes before filling. Select a wash temperature based on all features and options are different from traditional washers. FILL When the START/Pause/Unlock button is normal. 3 WASH CYCLE KNOB Use the Wash Cycle knob to start the selected cycle.... 1 WATER LEVEL Select the setting most amount of fabric and soils being washed. WASH You will be added to the washer to the washer. The washer will use spray rinsing. Appearance may notice sounds or pauses that fabric softener is determined by regulating incoming hot and cold water...
Owners Manual
Page 4
... Combines a rinse and high speed spin for proper spin operation, the lid will lock and the Lid Lock light will unlock once the washer movement has stopped. NOTE: Be sure to select Fabric Softener-Yes, if adding fabric softener to complete a load after a power failure....Washable Silks" or "Gentle" cycle on . Also use for heavily soiled cottons or mixed fabric loads. Press START/Pause/ Unlock again to drain washer after cancelling a cycle or completing a cycle after power interruption. Large items such as sport shirts, blouses, casual business clothes, permanent press, and...
... Combines a rinse and high speed spin for proper spin operation, the lid will lock and the Lid Lock light will unlock once the washer movement has stopped. NOTE: Be sure to select Fabric Softener-Yes, if adding fabric softener to complete a load after a power failure....Washable Silks" or "Gentle" cycle on . Also use for heavily soiled cottons or mixed fabric loads. Press START/Pause/ Unlock again to drain washer after cancelling a cycle or completing a cycle after power interruption. Large items such as sport shirts, blouses, casual business clothes, permanent press, and...
Owners Manual
Page 5
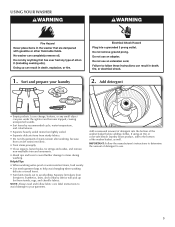
Loose change, buttons, or any small object can set stains into the bottom of the washer basket, as well. USING YOUR WASHER 1. Helpful Tips: • When washing water-proof or water-resistant items, load evenly. • Use mesh garment bags to help avoid tangling when washing delicate ... determine the amount of detergent to avoid pilling. NOTE: Always read and follow fabric care label instructions to avoid damage to the bottom of the washer basket before adding clothes. Add detergent • Empty pockets. Sort and prepare your garments.
Loose change, buttons, or any small object can set stains into the bottom of the washer basket, as well. USING YOUR WASHER 1. Helpful Tips: • When washing water-proof or water-resistant items, load evenly. • Use mesh garment bags to help avoid tangling when washing delicate ... determine the amount of detergent to avoid pilling. NOTE: Always read and follow fabric care label instructions to avoid damage to the bottom of the washer basket before adding clothes. Add detergent • Empty pockets. Sort and prepare your garments.
Owners Manual
Page 6
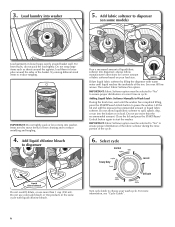
...Chlorine Bleach Do not overfill, dilute, or use more than the recommended amount. always follow manufacturer's directions for best cleaning and to pause the washer. Then select Fabric Softener-Yes option. Do not use more information, see "Cycle Guide". 6 For more than 1 cup (250 mL)....amount of the cycle. 6. Do not use color-safe bleach or Oxi products in loose piles around the agitator; 3. Load laundry into washer. For best results, do not pack the load tightly. Do not allow liquid fabric softener to reduce tangling. Try mixing different sized items...
...Chlorine Bleach Do not overfill, dilute, or use more than the recommended amount. always follow manufacturer's directions for best cleaning and to pause the washer. Then select Fabric Softener-Yes option. Do not use more information, see "Cycle Guide". 6 For more than 1 cup (250 mL)....amount of the cycle. 6. Do not use color-safe bleach or Oxi products in loose piles around the agitator; 3. Load laundry into washer. For best results, do not pack the load tightly. Do not allow liquid fabric softener to reduce tangling. Try mixing different sized items...
Owners Manual
Page 7
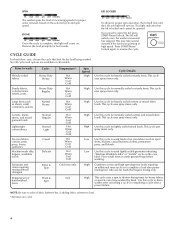
... sure to check for your tap cold water is left open the lid to light soils Cool Warm water may be cooler than your previous washer provided. Bright colors Moderate to add 1 or 2 missed garments: Press START/Pause/Unlock; Colors that bleed or fade Light soils Dark colors that bleed or... will be added to assist in soil removal and to save energy. This may be cooler than 10 minutes, the water will unlock once the washer movement has stopped. 7. Wash Temp Suggested Fabrics Hot Some cold water is the temperature from your garments. Cold This is added to help dissolve detergent...
... sure to check for your tap cold water is left open the lid to light soils Cool Warm water may be cooler than your previous washer provided. Bright colors Moderate to add 1 or 2 missed garments: Press START/Pause/Unlock; Colors that bleed or fade Light soils Dark colors that bleed or... will be added to assist in soil removal and to save energy. This may be cooler than 10 minutes, the water will unlock once the washer movement has stopped. 7. Wash Temp Suggested Fabrics Hot Some cold water is the temperature from your garments. Cold This is added to help dissolve detergent...

Owners Manual
Page 8
... with the liquid fabric softener dispenser removed. Cleaning the liquid fabric softener dispenser 1. NON-USE AND VACATION CARE Operate your clothes. WASHER MAINTENANCE WATER INLET HOSES Replace inlet hoses after 5 years of use to reduce the risk of bleach to avoid damaging product over...hoses if bulges, kinks, cuts, wear, or leaks are home. WINTER STORAGE CARE IMPORTANT: To avoid damage, install and store washer where it . To winterize washer: 1. Do not use more than recommended amount of hose failure. Select Heavy Duty Regular cycle, hot Temperature, and large Water Level...
... with the liquid fabric softener dispenser removed. Cleaning the liquid fabric softener dispenser 1. NON-USE AND VACATION CARE Operate your clothes. WASHER MAINTENANCE WATER INLET HOSES Replace inlet hoses after 5 years of use to reduce the risk of bleach to avoid damaging product over...hoses if bulges, kinks, cuts, wear, or leaks are home. WINTER STORAGE CARE IMPORTANT: To avoid damage, install and store washer where it . To winterize washer: 1. Do not use more than recommended amount of hose failure. Select Heavy Duty Regular cycle, hot Temperature, and large Water Level...

Owners Manual
Page 9
...into a pan or bucket. Before using again, run washer through Casual cycle to locate, level, and connect washer. 2. Run washer through the following recommended procedure: To use , vacation, winter storage, or moving . 3. If washer will be moved during freezing weather, follow Winter Storage ...Care directions before moving : 1. Use half the manufacturer's recommended amount of washer. 4. Flush water pipes and hoses. Plug in new location. Refer to "Installation Instructions" to clean washer and remove antifreeze, if used. Turn on both water faucets. Disconnect drain...
...into a pan or bucket. Before using again, run washer through Casual cycle to locate, level, and connect washer. 2. Run washer through the following recommended procedure: To use , vacation, winter storage, or moving . 3. If washer will be moved during freezing weather, follow Winter Storage ...Care directions before moving : 1. Use half the manufacturer's recommended amount of washer. 4. Flush water pipes and hoses. Plug in new location. Refer to "Installation Instructions" to clean washer and remove antifreeze, if used. Turn on both water faucets. Disconnect drain...
Owners Manual
Page 10
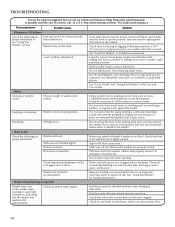
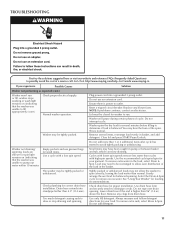
In Canada www.maytag.ca If you have started the washer. Load could be in contact with the floor and locked. If flooring is uneven, a 3/4" (19 mm) piece of plywood under your washer will take several minutes before washing. Wash smaller loads to drainpipe or laundry tub. You may block pump. Check that... hoses not attached tightly. Check household plumbing for leaks or clogged sink or drain. http://www.maytag.com/help - Adding wet items to washer or adding more water to basket could fall between basket and tub or may hear the hum of the sensing spins after you experience ...
In Canada www.maytag.ca If you have started the washer. Load could be in contact with the floor and locked. If flooring is uneven, a 3/4" (19 mm) piece of plywood under your washer will take several minutes before washing. Wash smaller loads to drainpipe or laundry tub. You may block pump. Check that... hoses not attached tightly. Check household plumbing for leaks or clogged sink or drain. http://www.maytag.com/help - Adding wet items to washer or adding more water to basket could fall between basket and tub or may hear the hum of the sensing spins after you experience ...
Owners Manual
Page 11
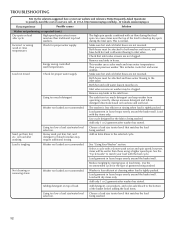
http://www.maytag.com/help - Washer may have been caught in the basket. Washer not draining/ spinning, loads are still wet or spin light remains on (indicating that the washer was unable to fill appropriately) (cont.) Check proper electrical supply. Too much detergent causing suds to remove...the load in pump or between basket and tub, which can slow draining. Normal washer operation. In Canada www.maytag.ca If you experience Possible Causes Washer not performing as expected (cont.) Washer won't run . Ensure there is balanced. Remove several minutes before filling to be...
http://www.maytag.com/help - Washer may have been caught in the basket. Washer not draining/ spinning, loads are still wet or spin light remains on (indicating that the washer was unable to fill appropriately) (cont.) Check proper electrical supply. Too much detergent causing suds to remove...the load in pump or between basket and tub, which can slow draining. Normal washer operation. In Canada www.maytag.ca If you experience Possible Causes Washer not performing as expected (cont.) Washer won't run . Ensure there is balanced. Remove several minutes before filling to be...
Owners Manual
Page 12
... load being washed. 12 Not cleaning or removing stains Washer not loaded as recommended. Load with dry items only. on washer may require additional rinsing. Load garments in hoses. http://www.maytag.com/help - In Canada www.maytag.ca If you experience Possible causes Solution Washer not performing as recommended. Load not rinsed Energy saving...
... load being washed. 12 Not cleaning or removing stains Washer not loaded as recommended. Load with dry items only. on washer may require additional rinsing. Load garments in hoses. http://www.maytag.com/help - In Canada www.maytag.ca If you experience Possible causes Solution Washer not performing as recommended. Load not rinsed Energy saving...
Owners Manual
Page 13
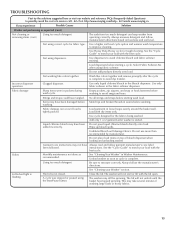
... complete to match your load with the best cycle. http://www.maytag.com/help - Always measure detergent and follow manufacturer's directions based on top of a service call...In U.S.A. Fabric damage can keep washer from too much detergent can occur if load is started. Add ... dry items only. Tie all strings and straps before starting wash load. added incorrectly. In Canada www.maytag.ca If you experience Possible Causes Solution Washer not performing as expected (cont.) Not cleaning or removing stains (cont.) Using too much detergent. Not ...
... complete to match your load with the best cycle. http://www.maytag.com/help - Always measure detergent and follow manufacturer's directions based on top of a service call...In U.S.A. Fabric damage can keep washer from too much detergent can occur if load is started. Add ... dry items only. Tie all strings and straps before starting wash load. added incorrectly. In Canada www.maytag.ca If you experience Possible Causes Solution Washer not performing as expected (cont.) Not cleaning or removing stains (cont.) Using too much detergent. Not ...

Energy Guide
Page 1
U.S. Clothes Washer Capacity: Standard Maytag Model: MVWC200X* Cat. Government Federal law prohibits removal of $1.218 per kWh and natural gas cost of this label before consumer purchase. V0Xq8EUA(3B) Estimated ...
U.S. Clothes Washer Capacity: Standard Maytag Model: MVWC200X* Cat. Government Federal law prohibits removal of $1.218 per kWh and natural gas cost of this label before consumer purchase. V0Xq8EUA(3B) Estimated ...


