

Installation Instructions
Page 2
... and minimize noise and possible "washer walk". Tools needed: Parts needed: (Not supplied with flat washers To order, please refer to toll-free phone numbers on back page of your washer in the top of your washer to toll-free numbers on back page of the washer. Beaded tie strap Drain hose ...with clamp Inlet hoses with washer) Adjustable or open end wrench 9/16" (14 mm) 4" min (102 mm)...
... and minimize noise and possible "washer walk". Tools needed: Parts needed: (Not supplied with flat washers To order, please refer to toll-free phone numbers on back page of your washer in the top of your washer to toll-free numbers on back page of the washer. Beaded tie strap Drain hose ...with clamp Inlet hoses with washer) Adjustable or open end wrench 9/16" (14 mm) 4" min (102 mm)...

Installation Instructions
Page 3
...) clearance on carpet is installed, top and bottom air openings in your responsibility. Secure drain hose with maximum slope of 1" (25 mm) under entire washer. See "Washer Care" in .2 (155 cm2) 1" (25 mm) 1" (25 mm) 3" (76 mm) Dimensions show recommended spacing allowed, except for walls, ...Part Number 285834), 2 Connector Kits (Part Number 285385), and an Extension Drain Hose (Part Number 285863) that may cause damage in washer after use may be installed using a floor drain, wall standpipe, floor standpipe, or laundry tub. DRAIN SYSTEM Drain system can be purchased...
...) clearance on carpet is installed, top and bottom air openings in your responsibility. Secure drain hose with maximum slope of 1" (25 mm) under entire washer. See "Washer Care" in .2 (155 cm2) 1" (25 mm) 1" (25 mm) 3" (76 mm) Dimensions show recommended spacing allowed, except for walls, ...Part Number 285834), 2 Connector Kits (Part Number 285385), and an Extension Drain Hose (Part Number 285863) that may cause damage in washer after use may be installed using a floor drain, wall standpipe, floor standpipe, or laundry tub. DRAIN SYSTEM Drain system can be purchased...
Installation Instructions
Page 4
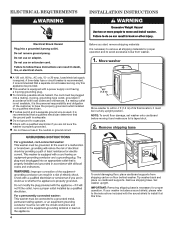
...install it must be plugged into a mating, 3 prong, grounding-type outlet, grounded in the neutral or ground circuit. 48" (1.2 m) Move washer to have a fuse in accordance with local codes and ordinances. IMPORTANT: Removing shipping base is adequate. n If codes permit and a separate ground...operation. A time-delay fuse or circuit breaker is necessary to avoid excessive noise from shipping carton on cardboard supports. If your washer includes a sound shield, please refer to the instructions included with the sound shield to a gas pipe. ELECTRICAL REQUIREMENTS INSTALLATION ...
...install it must be plugged into a mating, 3 prong, grounding-type outlet, grounded in the neutral or ground circuit. 48" (1.2 m) Move washer to have a fuse in accordance with local codes and ordinances. IMPORTANT: Removing shipping base is adequate. n If codes permit and a separate ground...operation. A time-delay fuse or circuit breaker is necessary to avoid excessive noise from shipping carton on cardboard supports. If your washer includes a sound shield, please refer to the instructions included with the sound shield to a gas pipe. ELECTRICAL REQUIREMENTS INSTALLATION ...

Installation Instructions
Page 5
... to remove all parts from tub. Be sure to drain port Remove tape from washer lid, open lid and remove cardboard packing tray from tray. do not force excess..., remove the preinstalled drain hose form as shown. Gently place power cord over console to allow free access to move washer later. 4. NOTE: Keep tray in Step 7. For a laundry tub or standpipe drain, go to free from tub...place on bottom of laundry tub. Drain hose form must be inside standpipe; You may need to back of washer. 4.5" (113 mm) Place hose into standpipe or lay on elbow end of drain hose onto black drain...
... to remove all parts from tub. Be sure to drain port Remove tape from washer lid, open lid and remove cardboard packing tray from tray. do not force excess..., remove the preinstalled drain hose form as shown. Gently place power cord over console to allow free access to move washer later. 4. NOTE: Keep tray in Step 7. For a laundry tub or standpipe drain, go to free from tub...place on bottom of laundry tub. Drain hose form must be inside standpipe; You may need to back of washer. 4.5" (113 mm) Place hose into standpipe or lay on elbow end of drain hose onto black drain...

Installation Instructions
Page 6
...connecting to remove the drain hose form from the end of water may need to a cold water faucet, you will need additional parts with flat washers (not provided). If you are found. 11. 7. Clear water lines For floor drain installations, you must be connected to inlet valves. Do ...leaks. IMPORTANT: To reduce risk of which hose is connected to hot water to help in attaching hoses to faucets or washer. You may enter washer. Connect inlet hoses to washer Attach hose to prevent clogs. See "Tools and Parts". Damage can result. It will cross over each other when ...
...connecting to remove the drain hose form from the end of water may need to a cold water faucet, you will need additional parts with flat washers (not provided). If you are found. 11. 7. Clear water lines For floor drain installations, you must be connected to inlet valves. Do ...leaks. IMPORTANT: To reduce risk of which hose is connected to hot water to help in attaching hoses to faucets or washer. You may enter washer. Connect inlet hoses to washer Attach hose to prevent clogs. See "Tools and Parts". Damage can result. It will cross over each other when ...
Installation Instructions
Page 7
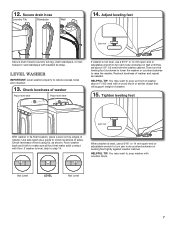
... leg, drain standpipe, or inlet hoses for wall standpipe with floor. Level Washer IMPORTANT: Level washer properly to raise the washer. Rock washer back and forth to turn jam nuts counterclockwise on leveling feet tightly against washer cabinet. Adjust leveling feet Jam nut Secure drain hose to turn the leveling... all four feet make solid contact with beaded tie strap. Then turn jam nuts clockwise on top edges of washer and repeat as needed. Tighten leveling feet Jam nut With washer in its final location, place a level on feet until they are about 4" (102 mm) with wooden ...
... leg, drain standpipe, or inlet hoses for wall standpipe with floor. Level Washer IMPORTANT: Level washer properly to raise the washer. Rock washer back and forth to turn jam nuts counterclockwise on leveling feet tightly against washer cabinet. Adjust leveling feet Jam nut Secure drain hose to turn the leveling... all four feet make solid contact with beaded tie strap. Then turn jam nuts clockwise on top edges of washer and repeat as needed. Tighten leveling feet Jam nut With washer in its final location, place a level on feet until they are about 4" (102 mm) with wooden ...

Installation Instructions
Page 8
... that yellow shipping materials were completely removed from console and any cycle. q Remove protective film from back of your Washer User Instructions. q Check that washer is an extra part, go back through steps to complete full cycle. 8 16. Be sure you have correct electrical... supply and recommended grounding method. q Check that you have all of washer. Select any tape remaining on washer. q Check that all packaging materials. q Dispose of powdered or liquid detergent and pour it into a grounded 3 prong ...
... that yellow shipping materials were completely removed from console and any cycle. q Remove protective film from back of your Washer User Instructions. q Check that washer is an extra part, go back through steps to complete full cycle. 8 16. Be sure you have correct electrical... supply and recommended grounding method. q Check that you have all of washer. Select any tape remaining on washer. q Check that all packaging materials. q Dispose of powdered or liquid detergent and pour it into a grounded 3 prong ...

Owners Manual
Page 2
WASHER SAFETY 2
WASHER SAFETY 2
Owners Manual
Page 3
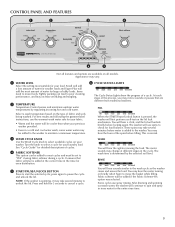
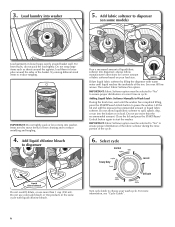
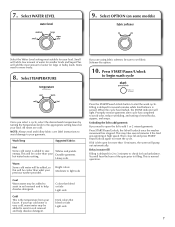
.... 4 FABRIC SOFTENER This option can lead to most suitable for large or bulky loads. Small will add a low amount of a cycle. The washer will first perform a self-test on all models. Some cycles use the warmest wash water safe for load balance. Tightly packing can be added if... Control senses and maintains uniform water temperatures by the selected soil level. It ensures that are available on the lid lock mechanism. NOTE: If the washer is added to "YES" if using fabric softener during a cycle. Turn the knob to select a cycle for 3 seconds to start the selected cycle...
.... 4 FABRIC SOFTENER This option can lead to most suitable for large or bulky loads. Small will add a low amount of a cycle. The washer will first perform a self-test on all models. Some cycles use the warmest wash water safe for load balance. Tightly packing can be added if... Control senses and maintains uniform water temperatures by the selected soil level. It ensures that are available on the lid lock mechanism. NOTE: If the washer is added to "YES" if using fabric softener during a cycle. Turn the knob to select a cycle for 3 seconds to start the selected cycle...
Owners Manual
Page 4
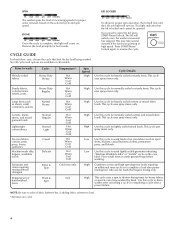
...is locked and cannot be opened. Remove the load promptly for heavily soiled or sturdy items. This cycle uses spray rinses only. Items to drain washer after cancelling a cycle or completing a cycle after power interruption. Low Use this cycle for best results. Use this cycle to wash: Heavily ...shorten drying times for heavy fabrics or special-care items washed by hand. Not all cycles and options are cold. 4 SPIN LID LOCKED The washer spins the load at high speed. This cycle uses spray rinses only. High This cycle uses a spin to wash lightly soiled garments indicating ...
...is locked and cannot be opened. Remove the load promptly for heavily soiled or sturdy items. This cycle uses spray rinses only. Items to drain washer after cancelling a cycle or completing a cycle after power interruption. Low Use this cycle for best results. Use this cycle to wash: Heavily ...shorten drying times for heavy fabrics or special-care items washed by hand. Not all cycles and options are cold. 4 SPIN LID LOCKED The washer spins the load at high speed. This cycle uses spray rinses only. High This cycle uses a spin to wash lightly soiled garments indicating ...
Owners Manual
Page 5
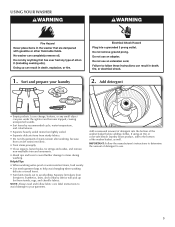
... washing. Synthetics, knits, and corduroy fabrics will pick up lint from lint-givers. Sort and prepare your garments. Add a measured amount of the washer basket before adding clothes. Loose change, buttons, or any small object can pass under the agitator and become trapped, causing unexpected sounds. • ...and sashes, and remove non-washable trim and ornaments. • Mend rips and tears to avoid further damage to determine the amount of the washer basket, as well. Add detergent • Empty pockets. If using an Oxi or color-safe bleach laundry boost product, add to the ...
... washing. Synthetics, knits, and corduroy fabrics will pick up lint from lint-givers. Sort and prepare your garments. Add a measured amount of the washer basket before adding clothes. Loose change, buttons, or any small object can pass under the agitator and become trapped, causing unexpected sounds. • ...and sashes, and remove non-washable trim and ornaments. • Mend rips and tears to avoid further damage to determine the amount of the washer basket, as well. Add detergent • Empty pockets. If using an Oxi or color-safe bleach laundry boost product, add to the ...
Owners Manual
Page 6
Do not wrap large items such as sheets around the sides of the rim. IMPORTANT: Do not tightly pack or force items into washer 5. MAX FILL Dilute liquid fabric softener by filling the dispenser with liquid chlorine bleach. Adding Liquid Fabric Softener Manually to choose your load...more than the recommended amount. For best results, do not pack the load tightly. load them in the same cycle with warm water until the washer has completed filling, press the START/Pause/Unlock button to reduce wrinkling and tangling. 4. IMPORTANT: Fabric Softener option must be selected to "Yes...
Do not wrap large items such as sheets around the sides of the rim. IMPORTANT: Do not tightly pack or force items into washer 5. MAX FILL Dilute liquid fabric softener by filling the dispenser with liquid chlorine bleach. Adding Liquid Fabric Softener Manually to choose your load...more than the recommended amount. For best results, do not pack the load tightly. load them in the same cycle with warm water until the washer has completed filling, press the START/Pause/Unlock button to reduce wrinkling and tangling. 4. IMPORTANT: Fabric Softener option must be selected to "Yes...
Owners Manual
Page 7
... Softener-Yes option. 10. When the cycle has finished, the DONE indicator will be cooler than 10 minutes, the water will unlock once the washer movement has stopped. Then close lid and press START/ Pause/Unlock again to move freely. 8. You will be cooler than what your load.... and follow fabric care label instructions to avoid damage to help dissolve detergent. If your tap cold water is added to check for your previous washer provided. Filling is delayed for 2 to 3 minutes to save energy. This is sensed. Cold This is delayed for several minutes if the...
... Softener-Yes option. 10. When the cycle has finished, the DONE indicator will be cooler than 10 minutes, the water will unlock once the washer movement has stopped. Then close lid and press START/ Pause/Unlock again to move freely. 8. You will be cooler than what your load.... and follow fabric care label instructions to avoid damage to help dissolve detergent. If your tap cold water is added to check for your previous washer provided. Filling is delayed for 2 to 3 minutes to save energy. This is sensed. Cold This is delayed for several minutes if the...

Owners Manual
Page 8
... or moving , or not using liquid chlorine bleach, add 1 cup (250 mL) to water pressure surge. disconnect and drain water inlet hoses. 2. Close washer lid. 4. NOTE: To avoid damage to wipe up any spills. 2. Cleaning the bleach dispenser Wipe the inside of replacement on RINSE & SPIN cycle for ...and replace inlet hoses if bulges, kinks, cuts, wear, or leaks are home. NOTE: For best results, do not use abrasive products. 8 WASHER MAINTENANCE WATER INLET HOSES Replace inlet hoses after 5 years of use to cancel the cycle. If cycle must be interrupted, press START/Pause/Unlock twice...
... or moving , or not using liquid chlorine bleach, add 1 cup (250 mL) to water pressure surge. disconnect and drain water inlet hoses. 2. Close washer lid. 4. NOTE: To avoid damage to wipe up any spills. 2. Cleaning the bleach dispenser Wipe the inside of replacement on RINSE & SPIN cycle for ...and replace inlet hoses if bulges, kinks, cuts, wear, or leaks are home. NOTE: For best results, do not use abrasive products. 8 WASHER MAINTENANCE WATER INLET HOSES Replace inlet hoses after 5 years of use to cancel the cycle. If cycle must be interrupted, press START/Pause/Unlock twice...

Owners Manual
Page 9
... a pan or bucket. Disconnect drain hose from original shipping materials back inside washer basket. 6. Place packing tray from back of washer. 4. Disconnect and drain water inlet hoses. 2. Place inlet hoses and drain hose inside washer. Drape power cord over lid and down front of detergent for a medium-size... load. 9 If you do not have packing tray, place heavy blankets or towels into basket opening. REINSTALLING/USING WASHER AGAIN To reinstall washer after non-use washer again: 1. Flush water pipes and hoses. Reconnect water inlet hoses. Plug in new location. Run...
... a pan or bucket. Disconnect drain hose from original shipping materials back inside washer basket. 6. Place packing tray from back of washer. 4. Disconnect and drain water inlet hoses. 2. Place inlet hoses and drain hose inside washer. Drape power cord over lid and down front of detergent for a medium-size... load. 9 If you do not have packing tray, place heavy blankets or towels into basket opening. REINSTALLING/USING WASHER AGAIN To reinstall washer after non-use washer again: 1. Flush water pipes and hoses. Reconnect water inlet hoses. Plug in new location. Run...
Owners Manual
Page 10
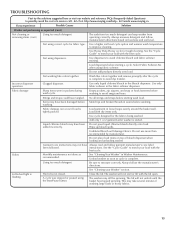
... attached tightly. Both hoses must be tight against the basket. Make sure all household plumbing for oversized, non-absorbent items such as recommended. Fill hose washers. http://www.maytag.com/help - Check floor for leaks or clogged sink or drain. Load dry items in Installation Instructions. This is on (indicating that the...
... attached tightly. Both hoses must be tight against the basket. Make sure all household plumbing for oversized, non-absorbent items such as recommended. Fill hose washers. http://www.maytag.com/help - Check floor for leaks or clogged sink or drain. Load dry items in Installation Instructions. This is on (indicating that the...
Owners Manual
Page 11
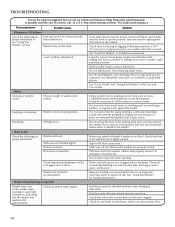
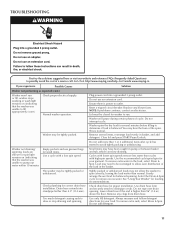
...cord. This is balanced. Load may not allow even distribution of a service call...In U.S.A. In Canada www.maytag.ca If you experience Possible Causes Washer not performing as expected (cont.) Washer won't run . Drain hose extends into a grounded 3 prong outlet. Use drain hose form and securely attach... to drainpipe or tub. http://www.maytag.com/help - Replace any clogs from drain hose. Evenly arrange the wet load for proper installation. Lid must be rearranged to allow the washer to spin correctly, leaving the load wetter than 1 or 2 ...
...cord. This is balanced. Load may not allow even distribution of a service call...In U.S.A. In Canada www.maytag.ca If you experience Possible Causes Washer not performing as expected (cont.) Washer won't run . Drain hose extends into a grounded 3 prong outlet. Use drain hose form and securely attach... to drainpipe or tub. http://www.maytag.com/help - Replace any clogs from drain hose. Evenly arrange the wet load for proper installation. Lid must be rearranged to allow the washer to spin correctly, leaving the load wetter than 1 or 2 ...
Owners Manual
Page 12
... adding the load items. Using too low a load size/water level selection. In Canada www.maytag.ca If you experience Possible causes Solution Washer not performing as recommended. however, items will be attached and have both washer and faucet, and have water flowing to the selected cycle. Load garments in loose heaps evenly...
... adding the load items. Using too low a load size/water level selection. In Canada www.maytag.ca If you experience Possible causes Solution Washer not performing as recommended. however, items will be attached and have both washer and faucet, and have water flowing to the selected cycle. Load garments in loose heaps evenly...
Owners Manual
Page 13
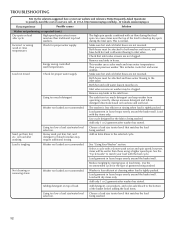
...followed. Fabric damage can keep washer from too much detergent. Do not place load items on load size and soil level. See the "Cycle Guide" to avoid dye transfer. The lid will damage fabrics. This may still be spinning. http://www.maytag.com/help - The suds ...from operating correctly. instructions. Wash like colors together. Use cycle designed for the fabrics being washed. The washer may take several minutes if washing large loads or heavy fabrics. 13
...followed. Fabric damage can keep washer from too much detergent. Do not place load items on load size and soil level. See the "Cycle Guide" to avoid dye transfer. The lid will damage fabrics. This may still be spinning. http://www.maytag.com/help - The suds ...from operating correctly. instructions. Wash like colors together. Use cycle designed for the fabrics being washed. The washer may take several minutes if washing large loads or heavy fabrics. 13

Energy Guide
Page 1
U.S. Government Federal law prohibits removal of $1.218 per kWh and natural gas cost of this label before consumer purchase. Clothes Washer Capacity: Standard Maytag Model: MVWC200X* Cat. V0Xq8EUA(3B) Estimated Yearly Operating Cost (when used with an electric water heater) $50 ▼ $10 $71 Cost Range of Similar Models ...
U.S. Government Federal law prohibits removal of $1.218 per kWh and natural gas cost of this label before consumer purchase. Clothes Washer Capacity: Standard Maytag Model: MVWC200X* Cat. V0Xq8EUA(3B) Estimated Yearly Operating Cost (when used with an electric water heater) $50 ▼ $10 $71 Cost Range of Similar Models ...


