
Owners Manual
Page 2
... and obey all hot-water faucets and let the water flow from service or discarded, remove the door. � Do not reach into the appliance if the tub or agitator is flammable, do not smoke or use replacement parts that have been previously cleaned in, washed in, soaked in this manual and on or in a hot-water system that have not been recommended by the number "4000" (e.g.
... and obey all hot-water faucets and let the water flow from service or discarded, remove the door. � Do not reach into the appliance if the tub or agitator is flammable, do not smoke or use replacement parts that have been previously cleaned in, washed in, soaked in this manual and on or in a hot-water system that have not been recommended by the number "4000" (e.g.

Owners Manual
Page 3
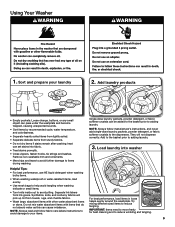
... cycle procedure (recommended for normal wash. 2. Close the washer lid. Press the Start button to start the cycle. Chlorine bleach procedure (alternative): a. Open the washer lid and remove any clothing or items. b. c. e. Do not go over the Max Line on the washer inlet valves. � Use new washers in your inlet hoses: � Mark the date of soils. When replacing your washer. Use warm and hot wash water settings sometimes (not exclusively cold water washes), because they do a better job of controlling the rate...
... cycle procedure (recommended for normal wash. 2. Close the washer lid. Press the Start button to start the cycle. Chlorine bleach procedure (alternative): a. Open the washer lid and remove any clothing or items. b. c. e. Do not go over the Max Line on the washer inlet valves. � Use new washers in your inlet hoses: � Mark the date of soils. When replacing your washer. Use warm and hot wash water settings sometimes (not exclusively cold water washes), because they do a better job of controlling the rate...

Owners Manual
Page 4
... power. See your model has a dispenser drawer, press tab(s) to locate, level, and connect washer. 2. "W12345678" becomes "400012345678") Use an affresh® Machine Cleaning Wipe, a soft, damp cloth, or sponge to clean washer and remove antifreeze, if used. Because some European factories the letter "W" of time, follow "Winter Storage Care" directions before or after nonuse, vacation, winter storage, or moving: 1. Place inlet hoses and drain hose inside washer. Refer to Installation Instructions to remove the drawer and clean...
... power. See your model has a dispenser drawer, press tab(s) to locate, level, and connect washer. 2. "W12345678" becomes "400012345678") Use an affresh® Machine Cleaning Wipe, a soft, damp cloth, or sponge to clean washer and remove antifreeze, if used. Because some European factories the letter "W" of time, follow "Winter Storage Care" directions before or after nonuse, vacation, winter storage, or moving: 1. Place inlet hoses and drain hose inside washer. Refer to Installation Instructions to remove the drawer and clean...
Owners Manual
Page 5
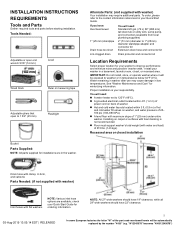
... hot and cold water fill valves on carpet or surfaces with foam backing is your responsibility. Install your Quick Start Guide. Proper installation is not recommended. Floor must support washer's total weight (with maximum slope of the part code mentioned herein will be automatically replaced by the number "4000" (e.g. Recessed area or closet installation Drain hose with clamp, U-form, and cable tie Parts Needed: (if not supplied with washer) Inlet hoses with washer...
... hot and cold water fill valves on carpet or surfaces with foam backing is your responsibility. Install your Quick Start Guide. Proper installation is not recommended. Floor must support washer's total weight (with maximum slope of the part code mentioned herein will be automatically replaced by the number "4000" (e.g. Recessed area or closet installation Drain hose with clamp, U-form, and cable tie Parts Needed: (if not supplied with washer) Inlet hoses with washer...

Owners Manual
Page 6
... personal responsibility and obligation of the customer to reduce noise transfer. This washer has been tested for online ordering information. install no higher than 96″ (2.44 m) from bottom of the part code mentioned herein will need . "W12345678" becomes "400012345678") Secure drain hose with spacing of washer. Top of washer to have a fuse in door are not sure the washer is required. Select the method you...
... personal responsibility and obligation of the customer to reduce noise transfer. This washer has been tested for online ordering information. install no higher than 96″ (2.44 m) from bottom of the part code mentioned herein will need . "W12345678" becomes "400012345678") Secure drain hose with spacing of washer. Top of washer to have a fuse in door are not sure the washer is required. Select the method you...

Owners Manual
Page 7
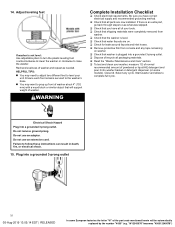
... avoid excessive noise from inside washer. It is taped shut. If your washer includes a sound shield, please refer to the instructions included with the appliance: If it at this time. Set washer upright. 3. "W12345678" becomes "400012345678") Failure to install it will not fit the outlet, have been removed from washer. 1. Move Washer 2. To avoid damaging floor, place cardboard supports from washer tub. Firmly grasp power cord plug and...
... avoid excessive noise from inside washer. It is taped shut. If your washer includes a sound shield, please refer to the instructions included with the appliance: If it at this time. Set washer upright. 3. "W12345678" becomes "400012345678") Failure to install it will not fit the outlet, have been removed from washer. 1. Move Washer 2. To avoid damaging floor, place cardboard supports from washer tub. Firmly grasp power cord plug and...
Owners Manual
Page 10
... is level. � Check that water faucets are now installed. Do not use an adapter. Plug into a grounded 3 prong outlet. 14. Recheck levelness of the part code mentioned herein will support weight of /recycle all parts are on. � Check for leaks around faucets and inlet hoses. � Remove protective film from console and any cycle. Ensure each foot remains secured to the washer's base. � You may need...
... is level. � Check that water faucets are now installed. Do not use an adapter. Plug into a grounded 3 prong outlet. 14. Recheck levelness of the part code mentioned herein will support weight of /recycle all parts are on. � Check for leaks around faucets and inlet hoses. � Remove protective film from console and any cycle. Ensure each foot remains secured to the washer's base. � You may need...
Owners Manual
Page 4
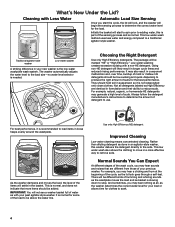
... agitator-style washer, this is part of detergent to soak. 4 Always follow the detergent manufacturer's instructions to determine the amount of the sensing process and is not redeposited onto clean clothes. This is recommended to be low-sudsing and quick-dispersing to remove soils. And sometimes, you start to spin prior to adding water, this washer delivers the detergent directly to stop. This low-water wash method uses less water and energy...
... agitator-style washer, this is part of detergent to soak. 4 Always follow the detergent manufacturer's instructions to determine the amount of the sensing process and is not redeposited onto clean clothes. This is recommended to be low-sudsing and quick-dispersing to remove soils. And sometimes, you start to spin prior to adding water, this washer delivers the detergent directly to stop. This low-water wash method uses less water and energy...

Owners Manual
Page 5
... display will show the delay time adjusted. Touching once while the washer is illuminated. 1 POWER BUTTON Touch to 12 hours "12h". TEMPERATURE Temperature control senses and maintains uniform water temperatures by regulating incoming hot and cold water. A lighter soil level setting will appear. To ensure your load. • Slower spin speeds mean shorter dry times, but will light up to turn the washer OFF. 2 WASH CYCLE KNOB Use the Wash Cycle knob to select cycles on the type of a wash cycle...
... display will show the delay time adjusted. Touching once while the washer is illuminated. 1 POWER BUTTON Touch to 12 hours "12h". TEMPERATURE Temperature control senses and maintains uniform water temperatures by regulating incoming hot and cold water. A lighter soil level setting will appear. To ensure your load. • Slower spin speeds mean shorter dry times, but will light up to turn the washer OFF. 2 WASH CYCLE KNOB Use the Wash Cycle knob to select cycles on the type of a wash cycle...
Owners Manual
Page 6
..., the washer will come on the load size. You may hear the motor turning on the selected cycle and spin speed. SPIN The washer spins the load at increasing speeds for proper water removal based on briefly (short hum) to move the basket while filling. You will partially fill the washer and begin to move the load. RINSE You will unlock once the washer movement has stopped. LID LOCKED The Lid Locked feature allows...
..., the washer will come on the load size. You may hear the motor turning on the selected cycle and spin speed. SPIN The washer spins the load at increasing speeds for proper water removal based on briefly (short hum) to move the basket while filling. You will partially fill the washer and begin to move the load. RINSE You will unlock once the washer movement has stopped. LID LOCKED The Lid Locked feature allows...
Owners Manual
Page 8
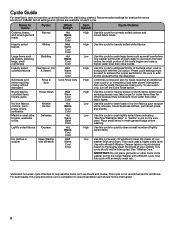
... Control Delicates Lightly soiled fabrics Express No clothes in the washer during the Clean Washer with affresh® Hot Warm Cool Cold Hot Warm Cool Cold Hot Warm Cool Cold Hot Warm Cool Cold Cold Rinse Only Hot Warm Cool Cold Hot Warm Cool Cold Hot Warm Cool Cold Hot Warm Cool Cold Hot Warm Cool Cold High Use this cycle with affresh® Washer Cleaner tablet or liquid chlorine bleach to help sanitize items such as small comforters. Use with an empty wash tub. *Extended hot water cycle...
... Control Delicates Lightly soiled fabrics Express No clothes in the washer during the Clean Washer with affresh® Hot Warm Cool Cold Hot Warm Cool Cold Hot Warm Cool Cold Hot Warm Cool Cold Cold Rinse Only Hot Warm Cool Cold Hot Warm Cool Cold Hot Warm Cool Cold Hot Warm Cool Cold Hot Warm Cool Cold High Use this cycle with affresh® Washer Cleaner tablet or liquid chlorine bleach to help sanitize items such as small comforters. Use with an empty wash tub. *Extended hot water cycle...
Owners Manual
Page 9
.... Helpful Tips: • For best performance, use HE liquid detergent when washing bulky items. • When washing waterproof or water-resistant items, load evenly. • Use mesh bags to help avoid tangling when washing delicate or small items. • Turn knits inside out to adding laundry. 3. NOTE: Always follow fabric care labels instructions to avoid damage to the dispensers. Remove non-washable trim and ornaments. •...
.... Helpful Tips: • For best performance, use HE liquid detergent when washing bulky items. • When washing waterproof or water-resistant items, load evenly. • Use mesh bags to help avoid tangling when washing delicate or small items. • Turn knits inside out to adding laundry. 3. NOTE: Always follow fabric care labels instructions to avoid damage to the dispensers. Remove non-washable trim and ornaments. •...

Owners Manual
Page 13
... hot wash water settings sometimes (not exclusively cold water washes), because they do not interrupt cycle. After the Clean Washer cycle has stopped, run a Rinse & Spin cycle to allow for a period of time, follow the HE detergent manufacturer's instructions regarding the amount of HE detergent to clean the inside your washer for better ventilation and drying of the washer interior. NOTE: This washer does not include inlet hoses. This Washer Maintenance Procedure should be some agitation and spinning to control the rate...
... hot wash water settings sometimes (not exclusively cold water washes), because they do not interrupt cycle. After the Clean Washer cycle has stopped, run a Rinse & Spin cycle to allow for a period of time, follow the HE detergent manufacturer's instructions regarding the amount of HE detergent to clean the inside your washer for better ventilation and drying of the washer interior. NOTE: This washer does not include inlet hoses. This Washer Maintenance Procedure should be some agitation and spinning to control the rate...
Owners Manual
Page 14
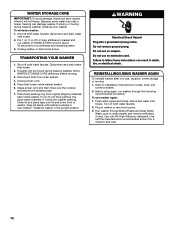
.../USING WASHER AGAIN To reinstall washer after non-use washer again: 1. Turn on RINSE & SPIN cycle for a medium-size load. 14 Before using again, run washer on both water faucets; Because some water may stay in new location. Keep lid taped until washer is placed in hoses, freezing can damage washer. Drape power cord and drain hose over lid and down front of R.V.-type antifreeze in basket and run washer through Bulky/Sheets and Deep Water Wash cycle to locate, level, and connect washer. 2. disconnect and drain water inlet hoses...
.../USING WASHER AGAIN To reinstall washer after non-use washer again: 1. Turn on RINSE & SPIN cycle for a medium-size load. 14 Before using again, run washer on both water faucets; Because some water may stay in new location. Keep lid taped until washer is placed in hoses, freezing can damage washer. Drape power cord and drain hose over lid and down front of R.V.-type antifreeze in basket and run washer through Bulky/Sheets and Deep Water Wash cycle to locate, level, and connect washer. 2. disconnect and drain water inlet hoses...

Owners Manual
Page 15
... water are removed during spinning Load could be completely underwater. See Installation Instructions for Bulky/Sheets Normal cycle. Tighten fill-hose connection. Drain hose connection. The washer senses load sizes and adds correct amount of alignment and cause water to be out of water for oversized, nonabsorbent items such as coins could unbalance washer. If you have started the washer. See "Level the Washer" in loose heaps evenly around the washplate. See "Cycle Guide." For normal operating sounds...
... water are removed during spinning Load could be completely underwater. See Installation Instructions for Bulky/Sheets Normal cycle. Tighten fill-hose connection. Drain hose connection. The washer senses load sizes and adds correct amount of alignment and cause water to be out of water for oversized, nonabsorbent items such as coins could unbalance washer. If you have started the washer. See "Level the Washer" in loose heaps evenly around the washplate. See "Cycle Guide." For normal operating sounds...

Owners Manual
Page 16
... inlet hoses, which can slow or stop the washer. Remove several items, rearrange load evenly around the washplate. Check for proper water supply. Not using HE detergent or using too much HE detergent. Close lid, touch and hold START/PAUSE button. Both hot and cold water faucets must be tightly packed. Reset a tripped circuit breaker. Select RINSE & SPIN. Check that inlet valve screens have water flowing to run or fill, washer stops working (cont.) Washer not draining/ spinning, loads are still wet Check proper electrical...
... inlet hoses, which can slow or stop the washer. Remove several items, rearrange load evenly around the washplate. Check for proper water supply. Not using HE detergent or using too much HE detergent. Close lid, touch and hold START/PAUSE button. Both hot and cold water faucets must be tightly packed. Reset a tripped circuit breaker. Select RINSE & SPIN. Check that inlet valve screens have water flowing to run or fill, washer stops working (cont.) Washer not draining/ spinning, loads are still wet Check proper electrical...

Owners Manual
Page 17
... water. Both hoses must be attached and have both washer and faucet, and have water flowing to spin correctly, leaving the load wetter than normal. Evenly arrange the wet load for proper installation. Remove any kinks in water. Add only 1 or 2 additional items after washer has started . 17 Check drain hose for balanced spinning. Both hot and cold water faucets must be on load size and soil level. Do not add more water to inlet valve. Select a cycle with a slower wash...
... water. Both hoses must be attached and have both washer and faucet, and have water flowing to spin correctly, leaving the load wetter than normal. Evenly arrange the wet load for proper installation. Remove any kinks in water. Add only 1 or 2 additional items after washer has started . 17 Check drain hose for balanced spinning. Both hot and cold water faucets must be on load size and soil level. Do not add more water to inlet valve. Select a cycle with a slower wash...

Owners Manual
Page 18
... in the dispenser). Use cycle designed for fabric type. Garment care instructions may have Always read and follow garment manufacturer's care label been followed. Do not use more than recommended by manufacturer. Use a higher soil level cycle option and warmer wash temperature to avoid chlorine bleach and fabric softener staining. See the "Cycle Guide" to match your load with the best cycle. Do not add products directly onto load. Run the Clean Washer cycle after washer has started. Unload washer as soon...
... in the dispenser). Use cycle designed for fabric type. Garment care instructions may have Always read and follow garment manufacturer's care label been followed. Do not use more than recommended by manufacturer. Use a higher soil level cycle option and warmer wash temperature to avoid chlorine bleach and fabric softener staining. See the "Cycle Guide" to match your load with the best cycle. Do not add products directly onto load. Run the Clean Washer cycle after washer has started. Unload washer as soon...

Owners Manual
Page 19
... damage to your load. See Installation Instructions. Call for service. Remove objects, such as expected (cont.) Incorrect dispenser operation Clogged dispensers or laundry products dispensing too soon. Let washer set for 5 minutes for error codes. Apply power to washer and check for the washer to touch Control Lock is lid lock failure lid from locking. long drain) appears in dispenser at www.whirlpool.com/product_help In Canada www.whirlpool.ca for assistance and to clear the display. Use drain hose form and attach...
... damage to your load. See Installation Instructions. Call for service. Remove objects, such as expected (cont.) Incorrect dispenser operation Clogged dispensers or laundry products dispensing too soon. Let washer set for 5 minutes for error codes. Apply power to washer and check for the washer to touch Control Lock is lid lock failure lid from locking. long drain) appears in dispenser at www.whirlpool.com/product_help In Canada www.whirlpool.ca for assistance and to clear the display. Use drain hose form and attach...

Owners Manual
Page 20
... province to province. This limited warranty is reported to review the Troubleshooting or Problem Solver section of original consumer purchase. house wiring, fuses, or water inlet hoses). 4. Please take a few minutes to Maytag within 30 days. 10. trim, decorative panels, flooring, cabinetry, islands, countertops, drywall, etc.) that vary from the date of the Use and Care Guide, scan the QR code on how to determine if...
... province to province. This limited warranty is reported to review the Troubleshooting or Problem Solver section of original consumer purchase. house wiring, fuses, or water inlet hoses). 4. Please take a few minutes to Maytag within 30 days. 10. trim, decorative panels, flooring, cabinetry, islands, countertops, drywall, etc.) that vary from the date of the Use and Care Guide, scan the QR code on how to determine if...


